医学图像处理
一、DICOM介绍
DICOM(Digital Imaging and Communications in Medicine)即医学数字成像和通信,是医学图像和相关信息的国际标准(ISO 12052)。DICOM被广泛应用于放射医疗、心血管成像以及放射诊疗诊断设备(X射线,CT,核磁共振,超声等),并且在眼科和牙科等其它医学领域得到越来越深入广泛的应用。
二、医学影像的分类
经常处理的图像:X射线、CT。
三、Python下面支持处理DICOM图像的库
1、Pydicom
处理DICOM文件的纯Python软件包,可以用来提取和修改DICOM数据,修改后的数据还会生成新的DICOM文件。要求:预先安装Numpy模块,缺陷:1、无法处理压缩像素图像(JPEG),2、无法处理分帧动画图像。
import dicom
path_file = '*.dcm'
img = dicom.read_file(path_file)
print(img)
输出:对应于*.dcm图像的详细信息,即在*.dcm图像下面点击"A"---Show DICOM tags里面的所有信息。注意:img对应的是图像的矩阵信息
import dicom
filename = 'C:/Users/Administrator/Desktop/1/1.2.392.200036.9125.9.0.420414308.2512671076.1090921210.dcm'
information = {}
ds = dicom.read_file(filename)
information['PatientID'] = ds.PatientID
information['PatientName'] = ds.PatientName
information['PatientBirthDate'] = ds.PatientBirthDate
information['PatientSex'] = ds.PatientSex
information['StudyID'] = ds.StudyID
information['StudyDate'] = ds.StudyDate
information['StudyTime'] = ds.StudyTime
information['BitsStored'] = ds.BitsStored
information['RescaleSlope'] = ds.RescaleSlope
information['RescaleIntercept'] = ds.RescaleIntercept
information['BitsAllocated'] = ds.BitsAllocated
information['PixelRepresentation'] = ds.PixelRepresentation
# information['PixelData'] = ds.PixelData
print(information)
输出:
{'StudyTime': '101311.389', 'StudyDate': '20170913', 'RescaleSlope': '1', 'BitsAllocated': 16, 'PatientBirthDate': '19680304', 'PixelRepresentation': 0, 'StudyID': '1709130241', 'PatientName': '', 'BitsStored': 10, 'PatientID': 'p1709130235', 'PatientSex': 'M', 'RescaleIntercept': '0'}
数据位存储(BitsStored)、数据位分配(BitsAllocated)、数据符号类型(PixelRepresentation)、灰度偏移(RescaleIntercept) 和数据值(PixelData)本身的关系:
(1)、BitsAllocated:是给每个像素分配的字节数对应的位数,如单字节就是8,两字节就是16.......,把dicom数据读出来存到计算机内存最好就用相应的BitsAllocated数据类型,如BitsAllocated=16的时候,用short或者unsigned short类型
(2)、PixelRepresentation是数据的存储类型,0代表无符号存储,1代表有符号存储;
(3)、在dicom文件里,BitsStored是BitsAllocated中的有效存储位。如果PixelRepresentation=1(有符号存储),那么BitsStored的HighBit位为符号位,比如BitsStored=12并且HighBit=11的时候,表示有效存储位(BitsStored)中的最高位为符号位,此时数据表示范围为-2048(即2^11) ~ 2043(即2^11-1);
(4)、RescaleIntercept用于得到输出灰度值,也就是每个像素的PixelData值加上RescaleIntercept得到的结果。如一张图像上一个像素点灰度为1024,偏移RescaleIntercept=-1024,那么该像素对应输出1024+(-1024)=0;
(5)、由(3)和(4)可知,图像存储的有符号或者无符号不能决定图像的输出灰度的正负,而是由RescaleIntercept与PixelData的相加的结果决定。比如无符号存储的图像,某一像素灰度为255,但是偏移RescaleIntercept=-1024,那么输出灰度=255-1024=-769;
(6)、由(3)和(4)可知图像的输出灰度的数据类型与分配的位宽不一定一致,比如BitsAllocated=8,最大表示灰度255, 如果偏移为-2048,那么输出灰度为1793,必须要用short类型才能保存。
方法一、根据dicom读取图像矩阵信息,并进行处理,显示处理后的结果:
import dicom

# 读取单张Dicom图像
dicom.read_file("*.dcm")
dcm.image = dcm.pixel_array * dcm.RescaleSlope + dcm.RescaleIntercept

# 获取图像中的像素数据
slices = []
slices.append(dcm)

# 复制Dicom图像中的像素数据
img = slices[int(len(slices)/2)].image.copy()
print(img.dtype)
输出:(注意图像的位数发生了变化)
float64方法二、例如:使用SimpleITK读取.dicom图像查看图像位数
import SimpleITK as sitk
filename = '*.dcm'
itk_img = sitk.ReadImage(filename)
img_array = sitk.GetArrayFromImage(itk_img)[0]
print(img_array.dtype)
输出:
uint16注意:此时的方法一与方法二处理之后的图像位数不一致。
2、SimpleITK
ITK是一个开源、跨平台的框架,提供给开发者增强功能的图像分析和处理套件(推荐使用)。
Note:注意SimpleITK不支持中文,即路径中不能有中文
X射线图像对应的读取
import SimpleITK as sitk
filename = '*.dcm'
itk_img = sitk.ReadImage(filename)
img_array = sitk.GetArrayFromImage(itk_img)
print(img_array.shape)输出:(对应信息:frame_num, width, height)注意:img_array对应的是图像的矩阵信息
(1, 3328, 2560)推荐用法:
import SimpleITK as sitk
filename = '*.dcm'
itk_img = sitk.ReadImage(filename)
img_array = sitk.GetArrayFromImage(itk_img)[0]
print(img_array.shape)
输出:
(3328, 2560)CT图像的读取
import SimpleITK as sitk
filename = '*.mhd'
itk_img = sitk.ReadImage(filename)
img_array = sitk.GetArrayFromImage(itk_img)
print(img_array.shape)输出:(对应信息:frame_num, width, height)帧参数:frame_num,代表CT扫描层数注意:img_array对应的是图像的矩阵信息
(133, 512, 512)将CT影像拆分成多个单幅图像
方法一:
import SimpleITK as sitk
import cv2
filename = '*.mhd'
itk_img = sitk.ReadImage(filename)
img_array = sitk.GetArrayFromImage(itk_img)
frame_num, width, height = img_array.shape
outpath = 'F:/data/LUNA16'#存放拆分得到的图像路径
index = -1
for img_item in img_array:
    index = index + 1
    cv2.imwrite("%s/%d.png" % (outpath, index), img_item)
print("done!")
方法二:
import SimpleITK as sitk
import os
import cv2
filename = '*.mhd'
path = 'F:/data/LUNA16'   #存放拆分得到图像的路径
itk_img = sitk.ReadImage(filename)
img_array = sitk.GetArrayFromImage(itk_img)
for i, im in enumerate(img_array):
  cv2.imwrite(os.path.join(path, '{}.png'.format(i)), im)
如下图所示是CT影像拆分出来的部分图像。拆分得到的图像大小均为512*512,总数是:frame_num张。
3、PIL
支持多种格式(注意:不支持上面的.dcm和.mhd文件),并提供强大的图形与图像处理功能,而且API却非常简单易用。
from PIL import Image
filename = '*.jpg'
im = Image.open(filename)
print(im)
print(im.size)
输出:
(512, 512)
注意:这里输出的im是字符串,不同于上面的矩阵,查看图像的大小时,使用的是.size。
4、OpenCV一个图像处理很强大的库,同时提供了Python、Ruby、MATLAB等语言的接口,实现了图像处理和计算机视觉方面的很多通用算法。
范例:
im = cv2.imread('F:/data/chest.jpg', 0)
blur = cv2.GaussianBlur(im, (5, 5), 0)
ret, th = cv2.threshold(blur, 0, 255 , cv2.THRESH_BINARY+cv2.THRESH_OTSU)
plt.figure(num = 8, figsize=(20, 20))

'''
Step 1: 二值化
'''
binary = im < ret  #还可以直接打印矩阵th,对应的就是二值化后的图像,注意这里面使用的binary是布尔逻辑值。
ax = plt.subplot(331)
ax.axis('off')
ax.set_title('Step 1')
ax.imshow(binary, cmap=plt.cm.bone)

'''
Step 2: 清除边界(from skimage.segmentation import clear_border)
'''
cleared = clear_border(binary)
ax = plt.subplot(332)
ax.axis('off')
ax.set_title('Step 2')
ax.imshow(cleared, cmap=plt.cm.bone)

'''
Step 3: 膨胀操作.
'''
selem = disk(2)
cleared = dilation(cleared, selem)
ax = plt.subplot(333)
ax.axis('off')
ax.set_title('Step 3')
ax.imshow(cleared, cmap=plt.cm.bone)


'''
Step 4: 连通区域标记(from skimage.measure import label很好使用).
'''
label_image = label(cleared)
ax = plt.subplot(334)
ax.axis('off')
ax.set_title('Step 4')
ax.imshow(label_image, cmap=plt.cm.bone)

'''
Step 5: 寻找最大的两个连通区域:肺区.
'''
areas = [r.area for r in regionprops(label_image)]
areas.sort()
if len(areas) > 2:
    for region in regionprops(label_image):
        if region.area < areas[-2]:
            for coordinates in region.coords:
                label_image[coordinates[0], coordinates[1]] = 0
binary = label_image > 0
ax = plt.subplot(335)
ax.axis('off')
ax.set_title('Step 5')
ax.imshow(binary, cmap=plt.cm.bone)

'''
Step 6: 腐蚀操作.
'''
selem = disk(2)
binary = binary_erosion(binary, selem)
ax = plt.subplot(336)
ax.axis('off')
ax.set_title('Step 6')
ax.imshow(binary, cmap=plt.cm.bone)

'''
Step 7: 闭合操作.
'''
selem = disk(10)
binary = binary_closing(binary, selem)
ax = plt.subplot(337)
ax.axis('off')
ax.set_title('Step 7')
ax.imshow(binary, cmap=plt.cm.bone)

'''
Step 8: 孔洞填充.
'''
edges = roberts(binary)
binary = ndi.binary_fill_holes(edges)
ax = plt.subplot(338)
ax.axis('off')
ax.set_title('Step 8')
ax.imshow(binary, cmap=plt.cm.bone)

'''
Step 9: 生成ROI区域.
'''
get_high_vals = binary == 0
im[get_high_vals] = 0
ax = plt.subplot(339)
ax.axis('off')
ax.set_title('Step 9')
ax.imshow(im, cmap=plt.cm.bone)
plt.show()
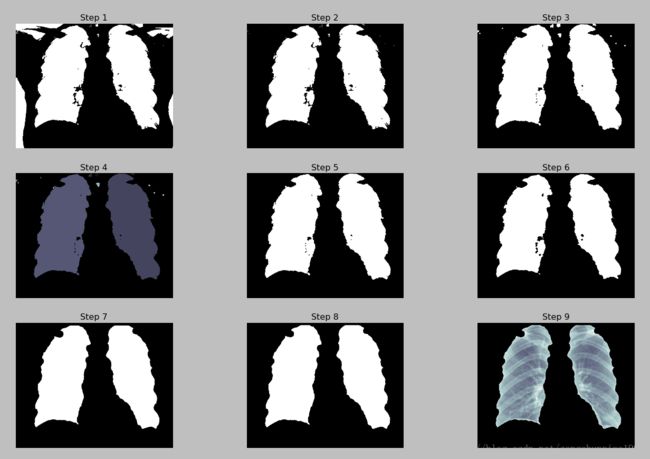
一个医学图像寻找ROI区域的流程依次是:二值化、清除边界、连通区域标记、腐蚀操作、闭合运算、孔洞填充,网上下载一个X光胸片图如图1所示
图1 X胸片的原图
进行肺分割的效果图2所示:
图2 肺分割单步效果图
这个函数有一点不好,就是当肺区与外边界来链接较紧的时候,容易被clear_border掉,这样肺区就提取不出来了。

