tensorflow 按区域提取实例
tensorflow 按区域提取实例
需求
- 输入一张图片,按照规定正方形尺寸(如30*30 像素) 对输入图片进行提取,类似于口 ,田两个文字 一张图变成四张,四张图能够变成一张图。
数据与思路
数据资源
思路
-
根据输入情况来看 534 不能够被30 整除,需要对534这个宽度进行调整 。300则被30整除不需要进行特殊处理。
- 遇到除不尽的处理方式 : (被提取图片的宽度或高度 // 提取尺寸 +1 )* 提取尺寸
-
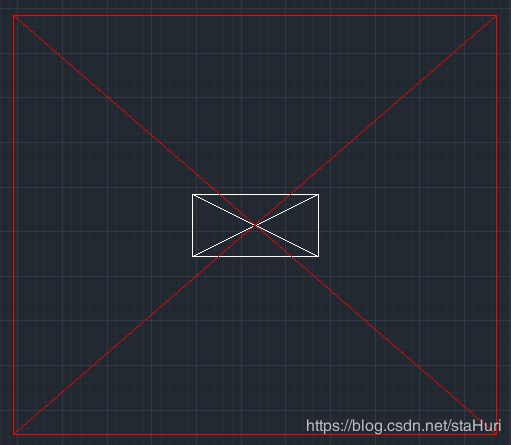
经过第一步操作得到一个新的尺寸 , (540,300) 我们需要将原尺寸填充到这个尺寸中。tensorflow 内置了这个功能 , **tf.image.resize_image_with_crop_or_pad ** 这个函数的作用是将一个图片填充到一个新的尺寸中,且两个图的中心不变。
- 上图中红色部分为经过 **tf.image.resize_image_with_crop_or_pad **处理后的图形尺寸,白色部分为原始尺寸。
-
经过第二部获得一张新的图片,我们最终操作的也就是这个图片 , 所使用的函数 tf.image.crop_to_bounding_box
def crop_to_bounding_box(image, offset_height, offset_width, target_height,target_width):
                         """
                         image =  图片内容
                         offset_height = 开始的h
                         offset_width =  开始的w
                        target_height 纵向位移长度
                        target_width 横向位移长度

                         """
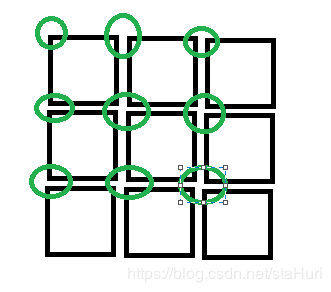
最终需要计算下图中绿色的角点位置作为 offset_height , offset_width 的参数,target_height , target_width 则是提取尺寸
-
保存数据
- 使用 imageio 库进行保存,**imageio.imwrite(“保存地址”, tf.eval()) 这就保存完成 **
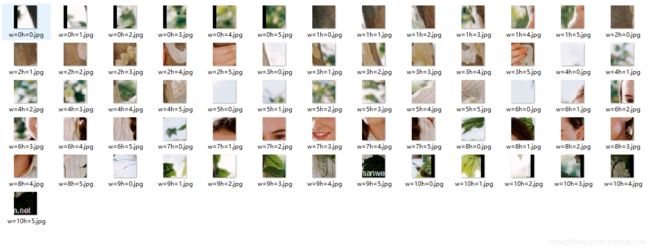
代码以及结果
#! /usr/bin/env python
# -*- coding: utf-8 -*-
# __file__: huifer

import tensorflow as tf
import imageio
from PIL import Image
import os


BASE_PATH = os.path.join(os.path.abspath(os.curdir), 'data')
BASE_PATH_res = os.path.join(os.path.abspath(os.curdir), 'result')


def get_pic_size(path):
    """
    获取图片尺寸
    :param path: 图片路径
    :return: (高度,宽度)
    """

    decode_jpeg_data = tf.placeholder(dtype=tf.string)
    decode_jpeg = tf.image.decode_jpeg(decode_jpeg_data, channels=3)

    image_data = tf.gfile.FastGFile(path, 'rb').read()
    with tf.Session() as sess:
        image = sess.run(decode_jpeg, feed_dict={decode_jpeg_data: image_data})
        return (image.shape[0], image.shape[1])


def _size(pic, split):
    """
    处理图片尺寸 , 不能整除向上取一位
    :param pic: 图片的尺寸 ,宽度或者高度
    :param split: 切割尺寸,宽度或者高度
    :return: 图片尺寸 ,宽度或者高度
    """
    if pic % split == 0:
        return pic
    else:
        return (pic // split + 1) * split


def get_new_size(pic_size, split_size):
    """
    计算新的图片尺寸
    :param pic_size: 原始图片尺寸(高,宽)
    :param split_size: 切割图片尺寸(高,宽)
    :return:
    """
    return (_size(pic_size[0], split_size[0]), _size(pic_size[1], split_size[1]))


def fill_pic(path, new_size, new_path):
    """
    填充图片到指定的新尺寸
    :return:
    """
    # tf.train.string_input_producer 接收参数是一个文件列表['1.jpg','2.jpg'] , 由于实际操作中可能多个每个图片最后填充结果不一致,
    # 所以在这个测试用例中直接将一个地址放在列表中
    filename_queue = tf.train.string_input_producer([path])
    reader = tf.WholeFileReader()
    key, value = reader.read(filename_queue)
    images = tf.image.decode_jpeg(value)
    with tf.Session() as sess:
        coord = tf.train.Coordinator()
        threads = tf.train.start_queue_runners(coord=coord)
        # 填充图片底色黑色
        reshapeimg = tf.image.resize_image_with_crop_or_pad(images, new_size[0], new_size[1])
        reimg1 = reshapeimg.eval()
        imageio.imwrite(new_path, reimg1)
        coord.request_stop()
        coord.join(threads)
        print('填充完成')


def split_pic(split_path, new_size, split_size):
    """
    切图
    :param split_path:被切割图片地址
    :param new_size:  新的图片尺寸(被切割图片的尺寸)
    :param split_size:  切割尺寸
    :return:
    """
    image_raw_data = tf.gfile.FastGFile(split_path, 'rb').read()
    with tf.Session() as sess:
        img_data = tf.image.decode_jpeg(image_raw_data)

        for h in range(new_size[0] // split_size[0]):
            for w in range(new_size[1] // split_size[1]):
                # print(h * split_size[0], w * split_size[1])

                s = tf.image.crop_to_bounding_box(image=img_data, offset_height=h * split_size[0],
                                                  offset_width=w * split_size[1],
                                                  target_height=split_size[0],
                                                  target_width=split_size[1])
                reimage1 = s.eval()
                imageio.imwrite("data/w={}h={}.jpg".format(w, h), reimage1)
        print("切图ok")


def merge_pic(x, y, picSize):
    """
    合并下载地图
    :param x: x 范围
    :param y: y 范围
    :return:
    """
    try:
        # 构造平图矩阵
        li = []

        for xi in x:
            lis = []
            for yi in y:
                fileName = os.path.join(BASE_PATH, "w={}h={}.jpg".format(xi, yi))
                lis.append(fileName)

            li.append(lis)

        oca = len(x)
        ocb = len(y)

        toImage = Image.new('RGBA', (oca * picSize[0], ocb * picSize[1]))

        for i in range(oca):
            for j in range(ocb):
                fromImge = Image.open(li[i][j])
                picx = picSize[0] * i
                picy = picSize[1] * j
                loc = (picx, picy)
                toImage.paste(fromImge, loc)

        toImage.save(os.path.join(BASE_PATH_res, "rs.png"))
        print("构造完成输出图片")

    except Exception as e:
        print(e)
        pass


def run():
    """
    规则尺寸100*100 20*20 这类
    :return:
    """
    # 最原始的图片(尺寸可能存在问题)
    path = '1.jpg'
    # 1. 获取旧图片的尺寸
    old_pic_size = get_pic_size(path)
    # 定义切割尺寸
    split_size = (50, 50)
    # 2. 将旧的图片填充到能够被自定义的切割尺寸整除的大小
    # 新图片的地址
    new_path = "233.jpg"
    # 计算新的图片尺寸大小
    new_size = get_new_size(old_pic_size, split_size)
    # 填充开始
    fill_pic(path, new_size, new_path)
    # 切割图片
    split_pic(new_path, new_size, split_size)
    # 合并图片
    merge_pic(x=range(new_size[1] // split_size[1]), y=range(new_size[0] // split_size[0]), picSize=split_size)
    print("流程结束")


if __name__ == '__main__':
    run()

    pass
注
本文代码不支持 宽度高度不一样的提取框


