AUTOMATE THE BORING STUFF WITH PYTHON读书笔记 - 第12章:WEB SCRAPING
Web Scraping是指用程序来下载和处理网络上的内容。Scrap是铲,刮和削的意思。
本章介绍的模块包括webbrowser,requests,bs4和selenium。
项目: 使用WEBBROWSER模块的MAPIT.PY
以下代码启动浏览器并打开页面:
>>> import webbrowser
>>> webbrowser.open('https://inventwithpython.com/')
True
这个项目需要用到Google Maps,要点是:
- 从命令行或者剪贴板获取地址
- 拼接网址’https://www.google.com/maps/place/’ + address
- webbrowser.open打开网页
效果如下:
使用REQUESTS模块从WEB下载文件
此模块非Python自带,需额外安装:
$ pip3 install --user requests
此模块的出现是因为自带的urllib2模块不好用。
示例如下:
>>> import requests
>>> res = requests.get('https://www.oracle.com/webfolder/technetwork/tutorials/FAQs/oci/Events-FAQ.pdf')
>>> type(res)
<class 'requests.models.Response'>
>>> res.status_code == requests.codes.ok
True
>>> len(res.text)
168411
>>> res.
res.apparent_encoding      res.cookies                res.history                res.iter_lines(            res.ok                     res.request
res.close(                 res.elapsed                res.is_permanent_redirect  res.json(                  res.raise_for_status(      res.status_code
res.connection             res.encoding               res.is_redirect            res.links                  res.raw                    res.text
res.content                res.headers                res.iter_content(          res.next                   res.reason                 res.url
如果出现错误,可以使用requests.raise_for_status()
将下载软件存盘
>>> import requests
>>> res = requests.get('https://www.oracle.com/webfolder/technetwork/tutorials/FAQs/oci/Events-FAQ.pdf')
>>> res.raise_for_status()
>>> playFile = open('test.pdf', 'wb') # binary模式打开
>>> for chunk in res.iter_content(100000):
...     playFile.write(chunk)
...
100000
76206
>>> playFile.close()
关于Unicode,作者推荐了两篇文章:
- Pragmatic Unicode
- Joel on Software: The Absolute Minimum Every Software Developer Absolutely, Positively Must Know About Unicode and Character Sets (No Excuses!)
这两篇文章都值得花时间仔细阅读以下,第一篇注重实践,第二篇注重理论。
概念:
- bytes 解码为unicode,unicode 编码为bytes
- Unicode编码虽然是两个字节,但存储是变长的
- ASCII是一种编码
- Unicode是编码,和内存中占用的字节没有关系
#\xf8相当于\u00f8
>>> u_string = 'Hi \u2119\u01b4\u2602\u210c\xf8\u1f24'
>>> b_string = b'Hi Python'
>>> type(b_string)
<class 'bytes'>
# python3中字符串有两种类型,一种是str,一种是bytes。
>>> type(u_string)
<class 'str'>
>>> print(u_string)
Hi ℙƴ☂ℌøἤ
>>> u_string.encode()
b'Hi \xe2\x84\x99\xc6\xb4\xe2\x98\x82\xe2\x84\x8c\xc3\xb8\xe1\xbc\xa4'
>>> len(u_string.encode())
19
>>> u_string.encode().decode()
'Hi ℙƴ☂ℌøἤ'
>>> len(b_string)	# 11个bytes
11
>>> len(u_string)	# 8个character
9
>>> f=open('hello.txt', 'w')
>>> f.write(u_string)
9
>>> f.close()
# 以下用单个字符生成文件
>>> u_string='\u2119'
>>> type(u_string)
<class 'str'>
>>> len(u_string)
1
>>> f=open('p.txt', 'w')
>>> f.write(u_string)
1
>>> f.close()
从操作系统看这个文件:
$ ls -l hello.txt
-rw-rw-r--. 1 xiaoyu xiaoyu 19 Feb  1 09:23 hello.txt
# 由于字节序的关系,实际的存储为486920e28499
$ od -x hello.txt
0000000 6948 e220 9984 b4c6 98e2 e282 8c84 b8c3
0000020 bce1 00a4
0000023
# 0xe28499是实际存放在文件中的字节流
$ od -x p.txt
0000000 84e2 0099
0000003
# 这个字符占用了3字节
$ ls -l p.txt
-rw-rw-r--. 1 xiaoyu xiaoyu 3 Feb  1 17:53 p.txt
# OS知道其编码为UTF-8 Unicode
$ file p.txt
p.txt: UTF-8 Unicode text, with no line terminators
$ ls > 1
$ file 1
1: ASCII text
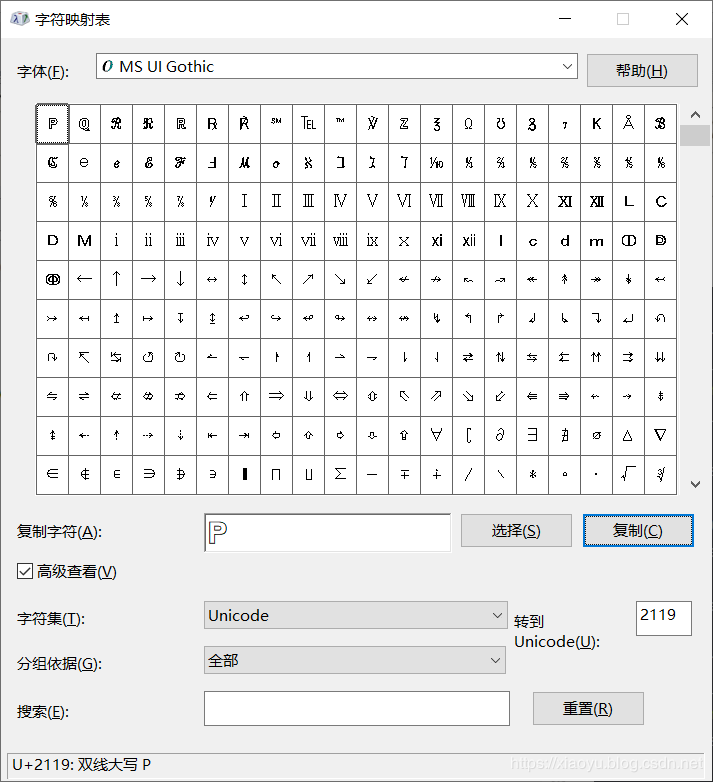
在本实验中,通过http://www.unicode.org/charts/可查询unicode。用Windows下的charmap查更方便。

HTML
为初学者推荐的网站:
- https://developer.mozilla.org/en-US/learn/html/
- https://htmldog.com/guides/html/beginner/
- https://www.codecademy.com/learn/learn-html
后续好好看看。
HTML文件后缀为html,是文本文件,其中包含尖括号包围的tag,tag包围的是element。
<strong>Hellostrong>, world!
一些element通常包括id已便于定位。
可以在浏览器中查看页面的源HTML代码
浏览器开发工具(Developer Tools),例如在Chrome中,可用F12打开(菜单是More Tools - Developer Tools)。其作用在于搜索和拷贝element
例如在https://weather.gov/中搜索ZIP code为94105的地区。
使用BS4模块解析HTML
BS是Beautiful Soup的简称,4是版本。BS4用于从HTML页面中抽取信息。安装如下
pip3 install --user beautifulsoup4
以下为访问网站页面的示例:
>>> import requests, bs4
>>> res = requests.get('https://www.zdic.net/')
>>> res.raise_for_status()
>>> zdic_soup = bs4.BeautifulSoup(res.text, 'html.parser')
>>> type(zdic_soup)
<class 'bs4.BeautifulSoup'>
>>> zdic_soup.se
zdic_soup.select(      zdic_soup.select_one(  zdic_soup.setup(
>>> zdic_soup.select('button')	# 注意其返回的是list
[<button class="search-submit" type="submit"><i class="i_search i_fw" title="搜索"></i></button>, <button class="search-keyboard res_hos res_hot"><i class="i_keyboard i_fw"></i></button>]
源代码中包含button的部分:
<button type="submit" class='search-submit'><i class='i_search i_fw' title="搜索">i>button>
        <button class='search-keyboard res_hos res_hot'><i class='i_keyboard i_fw'>i>button>
也可以访问离线的页面,如本书附带的example.html:
$ cat example.html


<html><head><title>The Website Titletitle>head>
<body>
<p>Download my <strong>Pythonstrong> book from <a href="http://inventwithpython.com">my websitea>.p>
<p class="slogan">Learn Python the easy way!p>
<p>By <span id="author">Al Sweigartspan>p>
body>html>
>>> import bs4
>>> exampleFile = open('example.html')
>>> exampleSoup = bs4.BeautifulSoup(exampleFile, 'html.parser')
>>> type(exampleSoup)
<class 'bs4.BeautifulSoup'>
>>> elems = exampleSoup.select('#author')
>>> type(elems)
<class 'bs4.element.ResultSet'>
>>> len(elems)
1
>>> elems
[<span id="author">Al Sweigart</span>]
>>> type(elems[0])
<class 'bs4.element.Tag'>
>>> str(elems[0])
''
>>> elems[0].getText()
'Al Sweigart'
>>> elems[0].attrs
{'id': 'author'}
>>> pElems = exampleSoup.select('p')
>>> len(pElems)
3
>>> str(pElems[0])
'Download my Python book from my website.
'
>>> str(pElems[0].getText())
'Download my Python book from my website.'
以下示例为从element中获取属性:
>>> import bs4
>>> soup = bs4.BeautifulSoup(open('example.html'), 'html.parser')
>>> spanElem = soup.select('span')
>>> len(spanElem)
1
>>> str(spanElem[0])
''
>>> spanElem[0].get('id')
'author'
>>> spanElem[0].attrs
{'id': 'author'}
项目: 打开所有搜索结果
自动打开排名前几位的搜索结果。网站为Python Package Index(Python软件仓库)
搜索格式为https://pypi.org/search/?q=搜索关键字
为得到URL,在页面中搜索的是’.package-snippet’。其中的.表示( find all elements that are within an element that has the package-snippet CSS class)
打开网页使用的是webbrowser.open()
项目: 下载所有 XKCD漫画
一些网站,我们需要手工不断翻到上一篇,直到第一篇。我们以https://xkcd.com/为例,用程序自动完成。
定位网页中的图片:
<div id="comic">
<img src="//imgs.xkcd.com/comics/worst_thing_that_could_happen.png" title="Before I install any patch, I always open the patch notes and Ctrl-F for 'supervolcano', 'seagull', and 'garbage disposal', just to be safe." alt="Worst Thing That Could Happen" srcset="//imgs.xkcd.com/comics/worst_thing_that_could_happen_2x.png 2x"/>
div>
相应的代码为:
comicElem = soup.select('#comic img')
# 获取图片下载链接
comicUrl = 'https:' + comicElem[0].get('src')
res = requests.get(comicUrl)
# 图片另存为文件
...
for chunk in res.iter_content(100000):
            imageFile.write(chunk)
...
上一个链接在HTML中的描述为,如果已经到头了,则href="#":
<li><a rel="prev" href="/2260/" accesskey="p">< Preva>li>
因此寻找上一个链接的代码为:
prevLink = soup.select('a[rel="prev"]')[0]
url = 'https://xkcd.com' + prevLink.get('href')
bs的文档参见这里
类似的程序包括下载页面中所有的链接。验证网页的有效性。
拷贝博客中所有的信息。
通过SELENIUM模块控制浏览器
如果需要与网站交互,例如输入用户名,口令,这时应用selenium而非requests。
安装如下:
$ pip3 install --user selenium
网站通过user-agent知道客户端的信息,例如requests模块的user-agent类似于python-requests/2.21.0。
你可以访问https://www.whatsmyua.info/获取user agent的信息。
selenium模拟浏览器的行为,因此被网站拒绝的可能性小,但同时也会慢。
运行时报错FileNotFoundError: [Errno 2] No such file or directory: 'geckodriver',是因为firefox对应webdriver没有安装,因此又从Github上下载并安装了geckodriver. 加压后放到$PATH中即可,例如/usr/local/bin。
如果是chrome,驱动从这里下载。
帮助文档参见这里。
# 固定写法,不能写成import webdriver
>>> from selenium import webdriver
# 打开浏览器
>>> browser = webdriver.Firefox()
>>> type(browser)
<class 'selenium.webdriver.firefox.webdriver.WebDriver'>
>>> browser.get('https://inventwithpython.com')
从网页中提取元素:
>>> from selenium import webdriver
>>> browser = webdriver.Firefox()
>>> browser.get('https://inventwithpython.com')
>>> try:
...     elem = browser.find_element_by_class_name('cover-thumb') # 这里和书中不一致
...     print('Found <%s> element with that class name!' % (elem.tag_name))
... except:
...     print('Was not able to find an element with that name.')
...
Found <img> element with that class name!
以下代码自动点击网页中的链接:
>>> from selenium import webdriver
>>> browser = webdriver.Firefox()
>>> browser.get('https://inventwithpython.com')
>>> linkElem = browser.find_element_by_link_text('Read Online for Free')
>>> type(linkElem)
<class 'selenium.webdriver.firefox.webelement.FirefoxWebElement'>
>>> linkElem.click()
以下示例自动填充Oracle云账户名:
>>> from selenium import webdriver
>>> browser = webdriver.Firefox()
>>> browser.get('https://www.oracle.com/cloud/sign-in.html')
>>> userElem = browser.find_element_by_id('cloudAccountName') # 从input id中寻找
>>> userElem.send_keys('myCloudAccount')
 ...
以下示例向页面发生特殊按键:
>>> from selenium import webdriver
>>> from selenium.webdriver.common.keys import Keys
>>> browser = webdriver.Firefox()
>>> browser.get('https://inventwithpython.com')
>>> htmlElem = browser.find_element_by_tag_name('html') # 获取整个页面
>>> htmlElem.send_keys(Keys.END)  # 到页尾
>>> htmlElem.send_keys(Keys.HOME) # 到页首
以下示例控制浏览器:
>>> from selenium import webdriver
>>> from selenium.webdriver.common.keys import Keys
>>> browser = webdriver.Firefox()
>>> browser.get('https://inventwithpython.com')
>>> browser.forward()
>>> browser.back()
>>> browser.refresh()
>>> browser.quit()
单词
exotic - 异国情调的,异域风情的

