werkzeug实现WSGI Application
WSGI 为 Web Server Gateway Inferface 的缩写,是 Python Web 框架(或应用程序)与 Web 服务器 (Web Server) 之间通讯的规范,本质上是定义了一种 Web server 与 Web application 解耦的规范。比如 Flask 就是运行在 WSGI 协议之上的 web 框架。
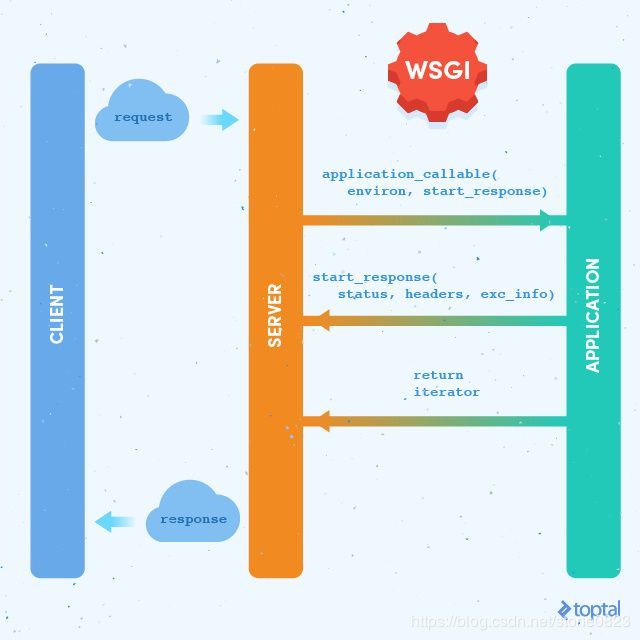
来看一幅图:
左边,Client 和 Server 之间,Client 发送请求,Server 返回响应,遵守 HTTP 协议; 右边:Python 语言编写的 Web Application 和 Web Server 之间通讯,建议遵守 WSGI 规范。该规范被定义在 PEP 333。
WSGI 规定:每个使用 Python 语言编写的 Web Application 必须是一个可调用对象(实现了__call__ 函数的方法或者类),接受两个参数 :
environ:WSGI 的环境信息start_response:回调函数,在发送 response body 之前被调用,也是一个可调用对象。
如果使用 werkzeug 来实现 Web Application 和 Web Server,只需要下面的代码:
from werkzeug.serving import run_simple

def application(environ, start_response):
    headers = [('Content-Type', 'text/plain')]
    start_response('200 OK', headers)
    return [b'Hello World']

if __name__ == "__main__":
    run_simple('localhost', 5000, application)
start_response 函数必须接受两个参数: status(HTTP状态)和 response_headers(响应消息的头)。
Request 和 Response
werkzeug 的 Request 对象对 environ 对象进行了封装 (The Request class wraps the environ for easier access to request variables),Response 对象则封装了 WSGI Application。经过 Request 和 Response 的封装,编写 web application 变得更加简单。比如,下面的代码实现了与刚才程序代码相同的功能。
from werkzeug.serving import run_simple
from werkzeug.wrappers import Request, Response

def application(environ, start_response):
    req = Request(environ)
    body = 'Hello World'

    resp = Response(body, mimetype='text/plain')
    return resp(environ, start_response)

if __name__ == "__main__":
    run_simple('localhost', 5000, application)
理解了 WSGI 规范和 werkzeug 封装的 Request 和 Response,接下来我们要实现 web application 的几个主要功能:路由、模板渲染 (render template)、请求和响应循环。通过代码的逐步演变,有助于理解 Flask 的思路和源码。
基本框架
下面的代码基于 werkzeug ,实现了 Web Application 和 Web Server 的功能。无论 url 的 path 是什么,都返回 Hello World!
from werkzeug.serving import run_simple
from werkzeug.wrappers import Request, Response

class WebApp(object):
    def __init__(self):
        pass

    def dispatch_request(self, request):
        return Response('Hello World')

    def wsgi_app(self, environ, start_response):
        request = Request(environ)
        response = self.dispatch_request(request)

        return response(environ, start_response)

    def __call__(self, environ, start_response):
        return self.wsgi_app(environ, start_response)

def create_app(host='localhost', port=5000):
    app = WebApp()
    return app

if __name__ == "__main__":
    app = create_app()
    run_simple('localhost', 5000, app)
实现路由
上面的代码中,无论客户端请求的 url path 是什么,都返回固定的字符串。前面我们在深入理解Flask路由(2)- werkzeug 路由系统 博文中,介绍了 werkzeug 的路由系统,我们基于上面的代码,实现可以处理下面两个路径的路由:
- root path
- /users/userid
如果客户端请求其它的 url,将得到 Not Found 错误。
from werkzeug.serving import run_simple
from werkzeug.wrappers import Request, Response
from werkzeug.routing import Map, Rule
from werkzeug.exceptions import HTTPException
class WebApp(object):
def __init__(self):
self.url_map = Map([
Rule('/', endpoint='index'),
Rule('/users/' , endpoint='userinfo')
])
def dispatch_request(self, request):
adapter = self.url_map.bind_to_environ(request.environ)
try:
endpoint, args = adapter.match()
# 根据endpoint,找到视图函数 on_endpointname,并且执行
return getattr(self, 'on_'+endpoint)(request, **args)
except HTTPException as ex:
return ex
def wsgi_app(self, environ, start_response):
req = Request(environ)
resp = self.dispatch_request(req)
return resp(environ, start_response)
def __call__(self, environ, start_response):
return self.wsgi_app(environ, start_response)
def on_index(self, request):
return Response('index page')
def on_userinfo(self, request, userid):
return Response('Hello, {}'.format(userid))
def create_app(host='localhost', port=5000):
app = WebApp()
return app
if __name__ == "__main__":
app = create_app()
run_simple('localhost', 5000, app)
代码的主要变化在 __init__() 方法和 dispatch_request() 方法中:
实现视图和模板渲染
对客户端的请求,不能只是返回简单的字符串。接下来,我们对程序的功能加上视图函数,返回真正的页面,并且借助 jinjia2 的模板功能,允许向页面传递参数。
首先编写两个 html 页面,放在工程文件 templates 文件夹下面:
templates/index.html:
<html lang="en">
<link rel=stylesheet href=/static/style.css type=text/css>
<head>
    <meta charset="UTF-8">
    <meta name="viewport" content="width=device-width, initial-scale=1.0">
    <title>Documenttitle>
head>
<body>
    <h1>This is index pageh1>
body>
html>
templates/user.html
<html lang="en">
<link rel=stylesheet href=/static/style.css type=text/css>
<head>
    <meta charset="UTF-8">
    <meta name="viewport" content="width=device-width, initial-scale=1.0">
    <title>Documenttitle>
head>
<body>
    <h1>Hello, {{ userid }} h1>
body>
html>
然后在 WebApp 类中实现 render_template() 方法:
def __init__(self):
        template_path = os.path.join(os.path.dirname(__file__), 'templates')
        self.jinja_env = Environment(loader=FileSystemLoader(template_path),
                                     autoescape=True)
        # 其它代码略

def render_template(self, template_name, **context):
    t = self.jinja_env.get_template(template_name)
    return Response(t.render(context), mimetype='text/html')
这样,视图函数 on_index() 和 on_userinfo() 就可以返回 html 文件了。完整代码如下:
from werkzeug.serving import run_simple
from werkzeug.wrappers import Request, Response
from werkzeug.routing import Map, Rule
from werkzeug.wsgi import SharedDataMiddleware
from werkzeug.exceptions import HTTPException, NotFound
from jinja2 import Environment, FileSystemLoader
import os
class WebApp(object):
def __init__(self):
template_path = os.path.join(os.path.dirname(__file__), 'templates')
self.jinja_env = Environment(loader=FileSystemLoader(template_path),
autoescape=True)
self.url_map = Map([
Rule('/', endpoint='index'),
Rule('/users/' , endpoint='userinfo')
])
self.view_functions = {
'index': self.on_index,
'userinfo': self.on_userinfo
}
def dispatch_request(self, request):
adapter = self.url_map.bind_to_environ(request.environ)
try:
endpoint, args = adapter.match()
return self.view_functions[endpoint](endpoint, **args)
except HTTPException as e:
return e
def render_template(self, template_name, **context):
t = self.jinja_env.get_template(template_name)
return Response(t.render(context), mimetype='text/html')
def wsgi_app(self, environ, start_response):
req = Request(environ)
resp = self.dispatch_request(req)
return resp(environ, start_response)
def __call__(self, environ, start_response):
return self.wsgi_app(environ, start_response)
def on_index(self, request):
return self.render_template('index.html')
def on_userinfo(self, request, userid):
return self.render_template('user.html', userid=userid)
def create_app(host='localhost', port=5000, with_static=True):
app = WebApp()
if with_static:
app.wsgi_app = SharedDataMiddleware(app.wsgi_app, {
'/static': os.path.join(os.path.dirname(__file__), 'static')
})
return app
if __name__ == "__main__":
app = create_app()
run_simple('localhost', 5000, app)
代码
完整代码:github: werkzeug-web-app-evolve
参考
- Request / Response Objects
- Werkzeug 教程


