SpringBoot2.x系列教程25--整合SpringMVC之欢迎页面与自定义Favicon
SpringBoot2.x系列教程25--整合SpringMVC之欢迎页面与自定义Favicon
作者:一一哥
一.Spring Boot设置欢迎页面
1.默认欢迎页的源码
在Spring Boot中,默认的欢迎界面是index.html,那为什么这样呢?我们可以看看源码是怎么定义的。
public class WebMvcAutoConfiguration {
   private Optional getWelcomePage() {
       String[] locations = getResourceLocations(this.resourceProperties.getStaticLocations());
       return Arrays.stream(locations).map(this::getIndexHtml).filter(this::isReadable).findFirst();
   }

    private Resource getIndexHtml(String location) {
        return this.resourceLoader.getResource(location + "index.html");
    }
}
从源码中我们可以看到,欢迎页的静态资源文件默认就是index.html页面,并且只要该页面存放在resources目录下的默认路径中,就会被"/**"映射。
classpath:/META-INF/resources/
classpath:/resources/
classpath:/static/
classpath:/public/
/:当前项目的根路径
也就是只要index.html页面在以上几个目录内,就会自动被Spring Boot探测到。
2.实验验证
2.1 创建web项目(略)
目录结构如下,在该项目中,我们在resources目录下,创建4个子文件夹,具体参考上一章节。
然后在每个子文件夹中,都存放一个index.html文件,但是文件内容略有不同,每个文件都有自己的编号。

每个index.html文件内容的编号不同,以此类推!

2.2 启动项目测试
我们启动web项目,输入地址
http://localhost:8080
会发现,默认加载的是META-INF/resources目录下的index.html文件,为什么呢?这与静态资源文件夹的优先级有关系哦,我们上一章节已经讲过了

二.自定义欢迎页面
但在实际开发中,我们有时候就希望先访问登录界面,然后登录成功后再跳到主页面,那此时如何将登录页面作为欢迎页面呢?
这个可以有两种实现方式。
- 视图控制器配置方式;
- Controller直接实现方式;
1.视图控制器配置方式
1.1 创建配置类
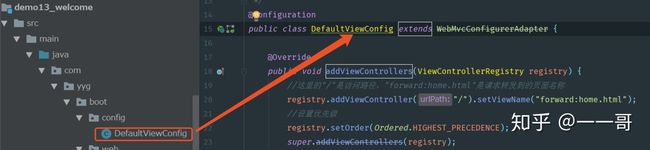
我们可以在上面的web项目中,创建一个WebMvcConfigurerAdapter类。
package com.yyg.boot.config;

import org.springframework.context.annotation.Configuration;
import org.springframework.core.Ordered;
import org.springframework.web.servlet.config.annotation.ViewControllerRegistry;
import org.springframework.web.servlet.config.annotation.WebMvcConfigurationSupport;
import org.springframework.web.servlet.config.annotation.WebMvcConfigurerAdapter;

/**
 * @Description Description
 * @Author 一一哥Sun
 * @Date Created in 2020/3/21
 */
@Configuration
public class DefaultViewConfig extends WebMvcConfigurerAdapter {

    @Override
    public void addViewControllers(ViewControllerRegistry registry) {
        //这里的"/"是访问路径,"forward:home.html"是请求转发到的页面名称
        registry.addViewController("/").setViewName("forward:home.html");
        //设置优先级
        registry.setOrder(Ordered.HIGHEST_PRECEDENCE);
        super.addViewControllers(registry);
    }

}
1.2 创建home.html页面

我们在static目录下创建一个home.html页面。
    Home


    一一哥的Home页面...
1.3 运行测试
接着我们运行程序,输入地址:
http://localhost:8080
就可以看到如下欢迎界面。

2. Controller直接实现方式
我们在上一个例子的基础之上,创建一个Controller类。
注意:
把上一个案例中DefaultViewConfig配置类的@Configure注解去掉,避免影响到本次实验。
2.1 项目结构:

2.2 创建Controller
package com.yyg.boot.web;

import org.springframework.stereotype.Controller;
import org.springframework.web.bind.annotation.RequestMapping;

/**
 * @Description Description
 * @Author 一一哥Sun
 * @Date Created in 2020/3/21
 */
@Controller
public class WelcomeController {

    @RequestMapping("/")
    public String view() {
        return "forward:home.html";
    }

}
2.3 运行测试
接着我们运行程序,输入地址:
http://localhost:8080
就可以看到如下欢迎界面。

三.结合Thymeleaf模板实现欢迎页面
我们可以结合Thymeleaf模板,来实现欢迎页面。
1.添加依赖包
在该web项目的pom.xml文件中添加依赖包。
        org.springframework.boot
        spring-boot-starter-thymeleaf
2.配置模板路径
创建application.properties文件,添加如下配置,其实默认也是这个配置。
spring.thymeleaf.prefix=classpath:/templates/
spring.thymeleaf.suffix=.html
3.创建login.html页面
创建login.html存放到/templates/目录下。
    Login


    一一哥的登录页面...
4.创建Controller接口
package com.yyg.boot.web;

import org.springframework.stereotype.Controller;
import org.springframework.web.bind.annotation.RequestMapping;

/**
 * @Description Description
 * @Author 一一哥Sun
 * @Date Created in 2020/3/21
 */
@Controller
public class WelcomeController {

//    @RequestMapping("/")
//    public String view() {
//        return "forward:home.html";
//    }

    @RequestMapping("/")
    public String login() {
        return "login";
    }
}
5.运行测试
输入地址,http://localhost:8080
即可看到欢迎界面。

四.设置网站图标Favicon
1.Favicon简介
很多时候,企业网站一般都会有一个对应的网站图标(Favicon),在浏览器访问网站时,对应的浏览器标签上会出现对应的图标。例如csdn网站上的小图标。

2.Favicon源码分析
我们可以看看Spring中关于Favicon的源码。
@Configuration
@ConditionalOnProperty(value = {"spring.mvc.favicon.enabled"},matchIfMissing= true)
public static class FaviconConfiguration implements ResourceLoaderAware {
    private final ResourceProperties resourceProperties;
    private ResourceLoader resourceLoader;

    public FaviconConfiguration(ResourceProperties resourceProperties) {
        this.resourceProperties = resourceProperties;
    }

    public void
    setResourceLoader(ResourceLoader resourceLoader) {
        this.resourceLoader = resourceLoader;
    }

    @Bean
    public SimpleUrlHandlerMapping faviconHandlerMapping() {
        SimpleUrlHandlerMapping mapping = new SimpleUrlHandlerMapping();
        mapping.setOrder(-2147483647);
        mapping.setUrlMap(Collections.singletonMap("**/favicon.ico", this.faviconRequestHandler()));
        return mapping;
    }

    @Bean
    public ResourceHttpRequestHandler faviconRequestHandler() {
        ResourceHttpRequestHandler
        requestHandler = new ResourceHttpRequestHandler();
        requestHandler.setLocations(this.resolveFaviconLocations());
        return requestHandler;
    }

    private List resolveFaviconLocations() {
    String[] staticLocations = WebMvcAutoConfiguration.WebMvcAutoConfigurationAdapter.getResourceLocations(this.resourceProperties.getStaticLocations());
    List locations = new ArrayList(staticLocations.length + 1);
    Stream var10000 = Arrays.stream(staticLocations);
    ResourceLoader var10001 = this.resourceLoader;
    var10001.getClass();
    var10000.map(var10001::getResource).forEach(locations::add);
    locations.add(new ClassPathResource("/"));
    return
    Collections.unmodifiableList(locations);
   }
}
3.SpringBoot 1.x与2.x版本区别
在SpringBoot 1.x版本中对Favicon进行了默认支持,并且可以通过如下配置进行关闭操作:
spring.mvc.favicon.enabled=false ## 关闭默认的Favicon图标效果:

但到了SpringBoot2.x版本后,在Spring Boot项目的issues中提出,如果用户不进行自定义的Favicon的设置,而Spring Boot项目会提供默认的图标,而如果提供默认的Favicon图标,则可能会导致泄露网站的开发框架这样的信息。
因此,在Spring Boot2.2.x中,将默认的favicon.ico移除,同时也不再提供上述application.properties中的属性配置。更多详细信息可查看对应的issues:https://github.com/spring-pr
4.SpringBoot2.x项目中添加Favicon
在2.x以前的版本,直接将你需要的favicon.ico文件存放在static下面就可以。
但到了2.2.X以后的版本,去掉了默认的自动配置,需要我们手动在每一个页面添加自己网站的Favicon图标。
我们可以在static目录下创建一个images目录,里面存放自己的Favicon.ico图标。

4.1 html页面中添加
    Login


一一哥的登录页面...
4.2 Thymeleaf页面中添加
Hello Favicon


Hello 一一哥!
5.重启项目测试
我们重新访问页面,可以看到Favicon图标已经换成了我自己的图标。
