python高手之路python处理excel文件(方法汇总)
用python来自动生成excel数据文件。python处理excel文件主要是第三方模块库xlrd、xlwt、xluntils和pyExcelerator,除此之外,python处理excel还可以用win32com和openpyxl模块。
方法一:
小罗问我怎么从excel中读取数据,然后我百了一番,做下记录
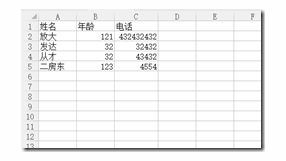
excel数据图(小罗说数据要给客户保密,我随手写了几行数据):
python读取excel文件代码:
|
1
2
3
4
5
6
7
8
9
10
11
12
|
#!/usr/bin/env python
# -*- coding: utf-8 -*-
# 读取excel数据
# 小罗的需求,取第二行以下的数据,然后取每行前13列的数据
import
xlrd
data
=
xlrd.open_workbook(
'test.xls'
)
# 打开xls文件
table
=
data.sheets()[
0
]
# 打开第一张表
nrows
=
table.nrows
# 获取表的行数
for
i
in
range
(nrows):
# 循环逐行打印
if
i
=
=
0
:
# 跳过第一行
continue
print
table.row_values(i)[:
13
]
# 取前十三列
|
excel的写操作等后面用到的时候在做记录
方法二:
使用xlrd读取文件,使用xlwt生成Excel文件(可以控制Excel中单元格的格式)。但是用xlrd读取excel是不能对其进行操作的;而xlwt生成excel文件是不能在已有的excel文件基础上进行修改的,如需要修改文件就要使用xluntils模块。pyExcelerator模块与xlwt类似,也可以用来生成excel文件。
1. [代码]test_xlrd.py
|
1
2
3
4
5
6
7
8
9
10
11
12
13
14
15
16
17
18
19
20
21
22
23
24
25
26
27
28
29
30
31
32
33
34
35
36
37
38
39
40
41
42
43
44
45
46
47
48
49
50
51
52
53
54
55
|
#coding=utf-8
#######################################################
#filename:test_xlrd.py
#author:defias
#date:xxxx-xx-xx
#function:读excel文件中的数据
#######################################################
import
xlrd
#打开一个workbook
workbook
=
xlrd.open_workbook(
'E:\\Code\\Python\\testdata.xls'
)
#抓取所有sheet页的名称
worksheets
=
workbook.sheet_names()
print
(
'worksheets is %s'
%
worksheets)
#定位到sheet1
worksheet1
=
workbook.sheet_by_name(u
'Sheet1'
)
"""
#通过索引顺序获取
worksheet1 = workbook.sheets()[0]
#或
worksheet1 = workbook.sheet_by_index(0)
"""
"""
#遍历所有sheet对象
for worksheet_name in worksheets:
worksheet = workbook.sheet_by_name(worksheet_name)
"""
#遍历sheet1中所有行row
num_rows
=
worksheet1.nrows
for
curr_row
in
range
(num_rows):
row
=
worksheet1.row_values(curr_row)
print
(
'row%s is %s'
%
(curr_row,row))
#遍历sheet1中所有列col
num_cols
=
worksheet1.ncols
for
curr_col
in
range
(num_cols):
col
=
worksheet1.col_values(curr_col)
print
(
'col%s is %s'
%
(curr_col,col))
#遍历sheet1中所有单元格cell
for
rown
in
range
(num_rows):
for
coln
in
range
(num_cols):
cell
=
worksheet1.cell_value(rown,coln)
print
cell
"""
#其他写法:
cell = worksheet1.cell(rown,coln).value
print cell
#或
cell = worksheet1.row(rown)[coln].value
print cell
#或
cell = worksheet1.col(coln)[rown].value
print cell
#获取单元格中值的类型,类型 0 empty,1 string, 2 number, 3 date, 4 boolean, 5 error
cell_type = worksheet1.cell_type(rown,coln)
print cell_type
"""
|
2. [代码]test_xlwt.py
|
1
2
3
4
5
6
7
8
9
10
11
12
13
14
15
16
17
18
19
20
21
22
23
24
25
26
27
28
29
30
31
32
33
|
#coding=utf-8
#######################################################
#filename:test_xlwt.py
#author:defias
#date:xxxx-xx-xx
#function:新建excel文件并写入数据
#######################################################
import
xlwt
#创建workbook和sheet对象
workbook
=
xlwt.Workbook()
#注意Workbook的开头W要大写
sheet1
=
workbook.add_sheet(
'sheet1'
,cell_overwrite_ok
=
True
)
sheet2
=
workbook.add_sheet(
'sheet2'
,cell_overwrite_ok
=
True
)
#向sheet页中写入数据
sheet1.write(
0
,
0
,
'this should overwrite1'
)
sheet1.write(
0
,
1
,
'aaaaaaaaaaaa'
)
sheet2.write(
0
,
0
,
'this should overwrite2'
)
sheet2.write(
1
,
2
,
'bbbbbbbbbbbbb'
)
"""
#-----------使用样式-----------------------------------
#初始化样式
style = xlwt.XFStyle()
#为样式创建字体
font = xlwt.Font()
font.name = 'Times New Roman'
font.bold = True
#设置样式的字体
style.font = font
#使用样式
sheet.write(0,1,'some bold Times text',style)
"""
#保存该excel文件,有同名文件时直接覆盖
workbook.save(
'E:\\Code\\Python\\test2.xls'
)
print
'创建excel文件完成!'
|
3. [代码]test_xlutils.py
|
1
2
3
4
5
6
7
8
9
10
11
12
13
14
15
16
17
18
19
20
|
#coding=utf-8
#######################################################
#filename:test_xlutils.py
#author:defias
#date:xxxx-xx-xx
#function:向excel文件中写入数据
#######################################################
import
xlrd
import
xlutils.copy
#打开一个workbook
rb
=
xlrd.open_workbook(
'E:\\Code\\Python\\test1.xls'
)
wb
=
xlutils.copy.copy(rb)
#获取sheet对象,通过sheet_by_index()获取的sheet对象没有write()方法
ws
=
wb.get_sheet(
0
)
#写入数据
ws.write(
1
,
1
,
'changed!'
)
#添加sheet页
wb.add_sheet(
'sheetnnn2'
,cell_overwrite_ok
=
True
)
#利用保存时同名覆盖达到修改excel文件的目的,注意未被修改的内容保持不变
wb.save(
'E:\\Code\\Python\\test1.xls'
)
|
4. [代码]test_pyExcelerator_read.py
|
1
2
3
4
5
6
7
8
9
10
11
12
|
#coding=utf-8
#######################################################
#filename:test_pyExcelerator_read.py
#author:defias
#date:xxxx-xx-xx
#function:读excel文件中的数据
#######################################################
import
pyExcelerator
#parse_xls返回一个列表,每项都是一个sheet页的数据。
#每项是一个二元组(表名,单元格数据)。其中单元格数据为一个字典,键值就是单元格的索引(i,j)。如果某个单元格无数据,那么就不存在这个值
sheets
=
pyExcelerator.parse_xls(
'E:\\Code\\Python\\testdata.xls'
)
print
sheets
|
5. [代码]test_pyExcelerator.py
|
1
2
3
4
5
6
7
8
9
10
11
12
13
14
15
16
17
18
19
20
21
22
|
#coding=utf-8
#######################################################
#filename:test_pyExcelerator.py
#author:defias
#date:xxxx-xx-xx
#function:新建excel文件并写入数据
#######################################################
import
pyExcelerator
#创建workbook和sheet对象
wb
=
pyExcelerator.Workbook()
ws
=
wb.add_sheet(u
'第一页'
)
#设置样式
myfont
=
pyExcelerator.Font()
myfont.name
=
u
'Times New Roman'
myfont.bold
=
True
mystyle
=
pyExcelerator.XFStyle()
mystyle.font
=
myfont
#写入数据,使用样式
ws.write(
0
,
0
,u
'ni hao 帕索!'
,mystyle)
#保存该excel文件,有同名文件时直接覆盖
wb.save(
'E:\\Code\\Python\\mini.xls'
)
print
'创建excel文件完成!'
|
