flume Source启动过程分析
组件框图
开始之前,先看下基本的组件框架图,熟悉了大致框架流程学习起来必然会更加轻松:


- 接收事件
- 根据配置选择对应的Source运行器(EventDrivenSourceRunner 和 PollableSourceRunner)
- 处理器处理事件(Load-Balancing Sink 和 Failover Sink 处理器)
- 将事件传递给拦截器链
- 将每个事件传递给Channel选择器
- 返回写入事件的Channel列表
- 将所有事件写入每个必需的Channel,只有一个事务被打开
- 可选Channel(配置可选Channel后不管其是否写入成功)
程序入口
flume从 Application.java 文件中的main方法开始运行,main方法开始就是对命令行参数进行解析,然后就是加载配置文件进一步调用相应方法。
Flume-ng支持两种加载配置文件模式,一种是静态配置,也就是只加载一次配置文件;第二种是基于Guava EventBus发布订阅模式的动态配置,只要对配置文件做了更改即便服务已经运行也是会使得更改被识别,即就是动态加载。
//hasOption方法:true if set, false if notboolean reload = !commandLine.hasOption("no-reload-conf");if (isZkConfigured) {//若是通过ZooKeeper配置的,则使用ZooKeeper参数启动,具体步骤和else中类似} else {if (reload) {EventBus eventBus = new EventBus(agentName + "-event-bus");//PollingPropertiesFileConfigurationProvider该类是一个轮询操作,每隔30秒会去检查conf配置文件PollingPropertiesFileConfigurationProvider configurationProvider =new PollingPropertiesFileConfigurationProvider(agentName, configurationFile, eventBus, 30);components.add(configurationProvider);application = new Application(components);eventBus.register(application);} else {//静态加载配置文件,只加载一次PropertiesFileConfigurationProvider configurationProvider =new PropertiesFileConfigurationProvider(agentName, configurationFile);application = new Application();application.handleConfigurationEvent(configurationProvider.getConfiguration());}}application.start();
启动flume时没有指定no-reload-conf(默认false)的话hasOption方法就返回false,因而reload为true。所以这下来就是创建PollingPropertiesFileConfigurationProvider对象动态加载配置文件。然后可以看到eventBus.register(application)语句,其作用就是将对象application注册在eventBus上,当配置文件发生变化,configurationProvider就会发布消息(发布者), EventBus就会调用application中带有@Subscribe注解的方法handleConfigurationEvent(订阅者)。下边看看具体的handleConfigurationEvent方法实现了什么功能?
@Subscribepublic synchronized void handleConfigurationEvent(MaterializedConfiguration conf) {stopAllComponents(); //停止组件,顺序 source->sink->channelstartAllComponents(conf); //启动组件,顺序 channel->sink->source}
该方法主要是实现了组件的启停功能,在每次调用前都会先停止所有组件,然后在启动组件,包括source、channel、sink。现在是研究具体的启动过程,那就进入startAllComponents方法看看。
调用 startAllComponents 方法,其中会按顺序启动channel、sink、source几个组件:
private void startAllComponents(MaterializedConfiguration materializedConfiguration) {/*materializedConfiguration对象中存储如下内容:{ sourceRunners:{r1=PollableSourceRunner: { source:Taildir source: { positionFile: /home/bjtianye1/flume-kafkachannel/position.json, skipToEnd: false, byteOffsetHeader: false, idleTimeout: 120000, writePosInterval: 3000 } counterGroup:{ name:null counters:{} } }}sinkRunners:{k3=SinkRunner: { policy:org.apache.flume.sink.DefaultSinkProcessor@11498436 counterGroup:{ name:null counters:{} } },k1=SinkRunner: { policy:org.apache.flume.sink.DefaultSinkProcessor@7186fe17 counterGroup:{ name:null counters:{} } }, k2=SinkRunner: { policy:org.apache.flume.sink.DefaultSinkProcessor@5593d23b counterGroup:{ name:null counters:{} } }} channels:{c2=org.apache.flume.channel.kafka.KafkaChannel{name: c2}} }*/logger.info("Starting new configuration:{}", materializedConfiguration);this.materializedConfiguration = materializedConfiguration;//启动channelfor (Entry<String, Channel> entry :materializedConfiguration.getChannels().entrySet()) {try {logger.info("Starting Channel " + entry.getKey());supervisor.supervise(entry.getValue(),new SupervisorPolicy.AlwaysRestartPolicy(), LifecycleState.START);} catch (Exception e) {logger.error("Error while starting {}", entry.getValue(), e);}}/** Wait for all channels to start.*/for (Channel ch : materializedConfiguration.getChannels().values()) {while (ch.getLifecycleState() != LifecycleState.START&& !supervisor.isComponentInErrorState(ch)) {try {logger.info("Waiting for channel: " + ch.getName() +" to start. Sleeping for 500 ms");Thread.sleep(500);} catch (InterruptedException e) {logger.error("Interrupted while waiting for channel to start.", e);Throwables.propagate(e);}}}//启动sinkfor (Entry<String, SinkRunner> entry : materializedConfiguration.getSinkRunners().entrySet()) {try {logger.info("Starting Sink " + entry.getKey());supervisor.supervise(entry.getValue(),new SupervisorPolicy.AlwaysRestartPolicy(), LifecycleState.START);} catch (Exception e) {logger.error("Error while starting {}", entry.getValue(), e);}}//启动sourcefor (Entry<String, SourceRunner> entry :materializedConfiguration.getSourceRunners().entrySet()) {try {logger.info("Starting Source " + entry.getKey());supervisor.supervise(entry.getValue(),new SupervisorPolicy.AlwaysRestartPolicy(), LifecycleState.START);} catch (Exception e) {logger.error("Error while starting {}", entry.getValue(), e);}}//加载监控this.loadMonitoring();}
先看下source基本过程,在 startAllComponents 方法中会调用对应source组件的 supervise 方法,在supervise 方法中会创建monitorRunnable线程,然后通过scheduleWithFixedDelay方法根据给定延迟定期运行monitorRunnable线程:
//supervise方法用于对传入组件生命周期的管理public synchronized void supervise(LifecycleAware lifecycleAware,SupervisorPolicy policy, LifecycleState desiredState) {......//MonitorRunnable是一个线程,会定期检查组件的状态MonitorRunnable monitorRunnable = new MonitorRunnable();monitorRunnable.lifecycleAware = lifecycleAware;monitorRunnable.supervisoree = process;monitorRunnable.monitorService = monitorService;supervisedProcesses.put(lifecycleAware, process);/** scheduleWithFixedDelay创建并执行一个在给定初始延迟后首次启用的定期操作,随后,* 在每一次执行终止和下一次执行开始之间都存在给定的延迟。*/ScheduledFuture future = monitorService.scheduleWithFixedDelay(monitorRunnable, 0, 3, TimeUnit.SECONDS);monitorFutures.put(lifecycleAware, future);}
在monitorRunnable线程中的run方法中会根据指定的生命周期中的一种状态关键字选择相应的操作。
定义生命周期中的四种状态的枚举类型如下所示:
//flume-ng-core\src\main\java\org\apache\flume\lifecycle\LifecycleState.javapublic enum LifecycleState {IDLE, START, STOP, ERROR;public static final LifecycleState[] START_OR_ERROR = new LifecycleState[] {START, ERROR };public static final LifecycleState[] STOP_OR_ERROR = new LifecycleState[] {STOP, ERROR };}
现在是启动source,肯定就是传入的START,看看run方法:
public void run() {logger.debug("checking process:{} supervisoree:{}", lifecycleAware,supervisoree);long now = System.currentTimeMillis();......switch (supervisoree.status.desiredState) {case START:try {lifecycleAware.start(); //传入状态为START,就会调用该方法} catch (Throwable e) {......}break;case STOP:try {lifecycleAware.stop();} catch (Throwable e) {......}break;default:logger.warn("I refuse to acknowledge {} as a desired state",supervisoree.status.desiredState);}if (!supervisoree.policy.isValid(lifecycleAware, supervisoree.status)) {logger.error("Policy {} of {} has been violated - supervisor should exit!",supervisoree.policy, lifecycleAware);}}}} catch (Throwable t) {logger.error("Unexpected error", t);}logger.debug("Status check complete");}
会调用lifecycleAware.start()方法。到这块后,想要继续往下深究,我们就需要了解一个Source中称为Source运行器的组件。
SourceRunner运行器
SourceRunner运行器主要用于控制一个Source如何被驱动,目前Source提供了两种机制: PollableSource(轮询拉取)和EventDrivenSource(事件驱动)。PollableSource相关类需要外部驱动来确定source中是否有消息可以使用,而EventDrivenSource相关类不需要外部驱动,自己实现了事件驱动机制。在SourceRunner.java文件中,会根据instanceof 运算符(该运算符是用来在运行时指出对象是否是特定类的一个实例)来确定具体的source实现了哪种机制,然后创建相应的对象。
//SourceRunner.javaif (source instanceof PollableSource) {runner = new PollableSourceRunner();((PollableSourceRunner) runner).setSource((PollableSource) source);} else if (source instanceof EventDrivenSource) {runner = new EventDrivenSourceRunner();((EventDrivenSourceRunner) runner).setSource((EventDrivenSource) source);}
如代码所示会创建具体运行器的实例对象,至此也许有人会问,那这是在那块调用的呢?仔细查看代码从main方法开始,就可以发现在加载配置文件(在main方法中加载配置文件时已经根据配置文件创建了对应SourceRunner的实例对象,configurationProvider.getConfiguration()这步时)时就已经实例化了该对象。那么刚提到的两种驱动方式,都分别对应哪些具体的Source实现呢?看下图可知:
TaildirSource启动
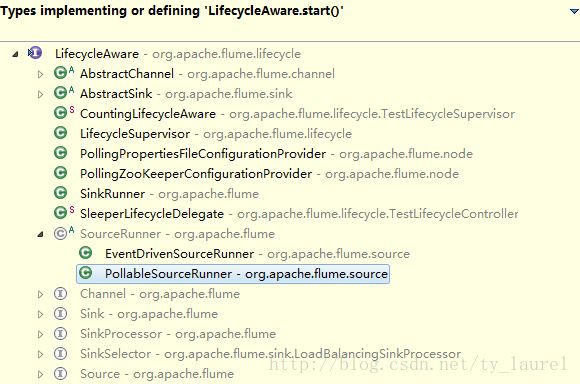
接上上步lifecycleAware.start()调用start方法,代码中那么多的start方法,那究竟接下来调用的是哪个start呢?看了SourceRunner运行器部分相信大家应该想到了,调用的肯定就是SourceRunner的start方法啦。eclipse查看目前Flume就存在EventDrivenSourceRunner和PollableSourceRunner两种方式,如下图:
@Overridepublic void start() {PollableSource source = (PollableSource) getSource();ChannelProcessor cp = source.getChannelProcessor();cp.initialize();source.start();runner = new PollingRunner();runner.source = source;runner.counterGroup = counterGroup;runner.shouldStop = shouldStop;runnerThread = new Thread(runner);runnerThread.setName(getClass().getSimpleName() + "-" +source.getClass().getSimpleName() + "-" + source.getName());runnerThread.start();lifecycleState = LifecycleState.START;}
start方法中调会创建一个PollingRunner的线程并启动该线程,线程的run方法中才会最终调用具体Source的process方法(如 TaildirSource):
@Overridepublic Status process() {Status status = Status.READY;try {existingInodes.clear();existingInodes.addAll(reader.updateTailFiles());for (long inode : existingInodes) {TailFile tf = reader.getTailFiles().get(inode);if (tf.needTail()) {tailFileProcess(tf, true);}}closeTailFiles();try {TimeUnit.MILLISECONDS.sleep(retryInterval);} catch (InterruptedException e) {logger.info("Interrupted while sleeping");}} catch (Throwable t) {logger.error("Unable to tail files", t);status = Status.BACKOFF;}return status;}
process方法是Source中最重要的一个方式,其中实现了事件写入Channel中的事务过程,具体的读写日志、位置记录文件读写等都实现在tailFileProcess方法中:
//TaildirSource.java文件中的tailFileProcess方法中会将event写入channelprivate void tailFileProcess(TailFile tf, boolean backoffWithoutNL)throws IOException, InterruptedException {while (true) {reader.setCurrentFile(tf);List<Event> events = reader.readEvents(batchSize, backoffWithoutNL);if (events.isEmpty()) {break;}sourceCounter.addToEventReceivedCount(events.size());sourceCounter.incrementAppendBatchReceivedCount();try {//processEventBatch方法尝试将event批量放入配置的channel中getChannelProcessor().processEventBatch(events);reader.commit();} catch (ChannelException ex) {logger.warn("The channel is full or unexpected failure. " +"The source will try again after " + retryInterval + " ms");TimeUnit.MILLISECONDS.sleep(retryInterval);retryInterval = retryInterval << 1;retryInterval = Math.min(retryInterval, maxRetryInterval);continue;}retryInterval = 1000;sourceCounter.addToEventAcceptedCount(events.size());sourceCounter.incrementAppendBatchAcceptedCount();if (events.size() < batchSize) {break;}}}
在发送到channel的过程中我们也发现都会有事务的创建(getTransaction())、开始(tx.begin())、提交(tx.commit())、回滚(tx.rollback())、关闭(tx.close())等操作,这是必须的。在sink中这些操作基本都是在process方法中直接显式调用,而在source端则封装在processEvent和processEventBatch(批量写入channel)方法中。
processEventBatch方法的代码在ChannelProcessor.java文件中定义,其实现最终将event写入channel中,会创建事务保证数据完整性,也就是flume中特有的事务机制,具体代码如下:
public void processEventBatch(List<Event> events) {Preconditions.checkNotNull(events, "Event list must not be null");events = interceptorChain.intercept(events); //拦截器处理,根据具体拦截器配置对event添加headersMap<Channel, List<Event>> reqChannelQueue =new LinkedHashMap<Channel, List<Event>>(); //需要的Channel及要发送至该Channel的event列表的LinkedHashMap对象Map<Channel, List<Event>> optChannelQueue =new LinkedHashMap<Channel, List<Event>>(); //可选的Channel及要发送至该Channel的event列表for (Event event : events) {List<Channel> reqChannels = selector.getRequiredChannels(event); //获取需要的Channel列表for (Channel ch : reqChannels) {List<Event> eventQueue = reqChannelQueue.get(ch);if (eventQueue == null) {eventQueue = new ArrayList<Event>();reqChannelQueue.put(ch, eventQueue);}eventQueue.add(event);}List<Channel> optChannels = selector.getOptionalChannels(event); //获取可选的Channel列表for (Channel ch : optChannels) {List<Event> eventQueue = optChannelQueue.get(ch);if (eventQueue == null) {eventQueue = new ArrayList<Event>();optChannelQueue.put(ch, eventQueue);}eventQueue.add(event);}}// Process required channelsfor (Channel reqChannel : reqChannelQueue.keySet()) {Transaction tx = reqChannel.getTransaction();Preconditions.checkNotNull(tx, "Transaction object must not be null");try {tx.begin(); //开始事务List<Event> batch = reqChannelQueue.get(reqChannel);for (Event event : batch) { //遍历event依次放入Channel中reqChannel.put(event);}tx.commit(); //提交事务} catch (Throwable t) {tx.rollback(); //发生异常,回滚事务if (t instanceof Error) {LOG.error("Error while writing to required channel: " + reqChannel, t);throw (Error) t;} else if (t instanceof ChannelException) {throw (ChannelException) t;} else {throw new ChannelException("Unable to put batch on required " +"channel: " + reqChannel, t);}} finally {if (tx != null) {tx.close();}}}......}
至此,TaildirSource启动的一个具体过程就结束了,至于taildirsource具体的读写文件过程这里就不说了,想了解的可以阅读相关代码实现。


