Qt5 学习参考资料之--QSqlQueryModel
源博客位置:http://www.qter.org/portal.php?mod=view&aid=56
----------------------------------------------------------------------------------------------------------------------------------------------------------------------
导语
在上一篇的最后我们讲到,Qt中使用了自己的机制来避免使用SQL语句,为开发者提供了更简单的数据库操作及数据显示模型,分别是只读的QSqlQueryModel,操作单表的QSqlTableModel以及可以支持外键的QSqlRelationalTableModel。这次我们先讲解QSqlQueryModel。
环境:Windows 7 + Qt 5.8.0(包含QtCreator 4.2.1)
目录
一、简单的查询操作
二、QSqlQueryModel常用操作
三、创建自定义QSqlQueryModel
正文
一、简单的查询操作
1.新建Qt Widgets应用,项目名称为querymodel,基类为QMainWindow类名为MainWindow保持默认即可。
2.完成后打开querymodel.pro,将第一行代码更改为:
QT += coregui sql
然后保存该文件。
3.往项目中添加新的C++头文件,名称为connection.h,完成后将其内容更改如下:
- #ifndef CONNECTION_H
- #define CONNECTION_H
- #include
- #include
- static bool createConnection()
- {
- QSqlDatabase db = QSqlDatabase::addDatabase("QSQLITE");
- db.setDatabaseName("database.db");
- if(!db.open()) return false;
- QSqlQuery query;
- query.exec("create table student (id int primary key, namevchar)");
- query.exec("insert into student values (0,'yafei0')");
- query.exec("insert into student values (1,'yafei1')");
- query.exec("insert into student values (2,'yafei2')");
- return true;
- }
- #endif // CONNECTION_H
复制代码
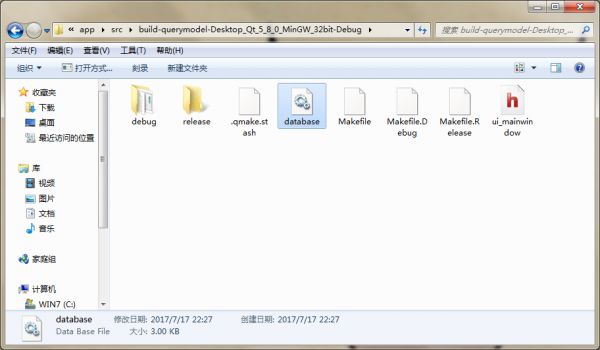
这里使用了db.setDatabaseName("database.db"),我们没有再使用以前的内存数据库,而是使用了真实的文件,这样后面对数据库进行的操作就能保存下来了。
4.然后进入main.cpp文件,更改如下:
- #include "mainwindow.h"
- #include
- #include "connection.h"
- int main(int argc, char *argv[])
- {
- QApplication a(argc, argv);
- if(!createConnection())
- return 1;
- MainWindow w;
- w.show();
- return a.exec();
- }
复制代码
5.下面进入设计模式,向界面上拖入一个Push Button按钮,更改显示文本为“查询”,然后进入其单击信号槽,更改如下:
- void MainWindow::on_pushButton_clicked()
- {
- QSqlQueryModel *model = new QSqlQueryModel(this);
- model->setQuery("select * from student");
- model->setHeaderData(0, Qt::Horizontal, tr("id"));
- model->setHeaderData(1, Qt::Horizontal, tr("name"));
- QTableView *view = new QTableView;
- view->setModel(model);
- view->show();
- }
复制代码
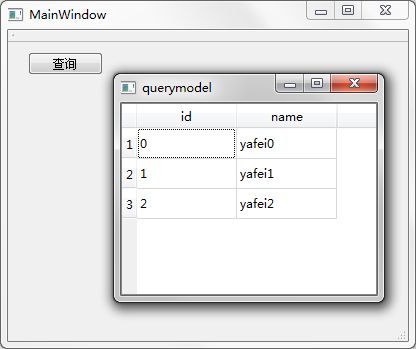
这里新建了QSqlQueryModel类对象model,并用setQuery()函数执行了SQL语句“("select * fromstudent");”用来查询整个student表的内容,可以看到,该类并没有完全避免SQL语句。然后我们设置了表中字段显示时的名字。最后我们建立了一个视图view,并将这个model模型关联到视图中,这样数据库中的数据就能在窗口上的表中显示出来了。
6.在mainwindow.cpp中添加头文件包含:
- #include
- #include
复制代码
7.运行程序,按下查询按钮,效果如下图所示。
8.我们查看一下编译生成的目录,这里面有生成的数据库文件(比如我这里的路径是:E:\app\src\build-querymodel-Desktop_Qt_5_8_0_MinGW_32bit-Debug),如下图所示。
二、QSqlQueryModel常用操作
1.在查询按钮单击信号槽中继续添加如下代码:
- int column = model->columnCount(); //获得列数
- int row = model->rowCount(); // 获得行数
- QSqlRecord record = model->record(1); //获得一条记录
- QModelIndex index = model->index(1, 1); //获得一条记录的一个字段的索引
- qDebug() << "column num is:" << column << endl
- << "row num is:" << row << endl
- <<"the second record is:" << record << endl
- << "the data of index(1,1) is:"<< index.data();
复制代码
2.然后在mainwindow.cpp文件中添加下面的头文件包含:
- #include
- #include
- #include
复制代码
3.运行程序,点击查询按钮,输出内容如下图所示。

4.另外我们可以直接使用上一节讲到的QSqlQuery来执行SQL语句,例如:
- QSqlQuery query = model->query();
- query.exec("select name fromstudent where id = 2 ");
- query.next();
- qDebug() << query.value(0).toString();
复制代码
5.我们将查询按钮单击信号的槽更改如下:
- void MainWindow::on_pushButton_clicked()
- {
- QSqlQueryModel *model = new QSqlQueryModel;
- model->setQuery("select * from student");
- model->setHeaderData(0, Qt::Horizontal, tr("id"));
- model->setHeaderData(1, Qt::Horizontal, tr("name"));
- QTableView *view = new QTableView;
- view->setModel(model);
- view->show();
- QSqlQuery query = model->query();
- query.exec("insertinto student values (10,'yafei10')");
- }
复制代码
这里使用query向表中添加了一条记录。
6.在mainwindow.cpp中添加头文件
- #include
复制代码
然后运行程序,发现最后添加的记录并没有显示出来,当关闭表格窗口,再次单击查询按钮的时候才显示出来。
7.为什么会出现这样的情况呢?那是因为前面我们执行了添加记录的SQL语句,但是在添加记录之前,查询结果就已经显示了,所以我们的更新没能动态的显示出来。为了能让其动态地显示我们的更新,可以将槽最后添加的代码更改如下:
- QSqlQuery query = model->query();
- query.exec("insert into student values (20,'yafei20')");
- model->setQuery("select * from student"); //再次查询整张表
- view->show(); //再次进行显示
复制代码
这里我们修改表以后,再次进行了查询并显示。大家可以运行程序,发现新的记录可以直接显示出来了。
三、创建自定义QSqlQueryModel
前面我们讲到这个模型默认是只读的,所以在窗口上并不能对表格中的内容进行修改。但是我们可以创建自己的模型,然后按照自己的意愿来显示数据和修改数据。要想使其可读写,需要自己的类继承自QSqlQueryModel,并且重写setData() 和 flags() 两个函数。如果我们要改变数据的显示,就要重写data() 函数。
下面的例子中我们让student表查询结果的id字段显示红色,name字段可编辑。
1.向项目中添加新的C++类,类名为MySqlQueryModel,基类Base class保持Custom,然后在下面手动填写QSqlQueryModel。
2.完成后打开mysqlquerymodel.h文件,将其内容更改如下:
- #ifndef MYSQLQUERYMODEL_H
- #define MYSQLQUERYMODEL_H
- #include
- class MySqlQueryModel : public QSqlQueryModel
- {
- Q_OBJECT
- public:
- explicit MySqlQueryModel(QObject *parent = 0);
- Qt::ItemFlags flags(const QModelIndex &index) const;
- bool setData(const QModelIndex &index, const QVariant &value, int role);
- QVariant data(const QModelIndex &item, int role=Qt::DisplayRole) const;
- private:
- bool setName(int studentId, const QString &name);
- void refresh();
- };
- #endif // MYSQLQUERYMODEL_H
复制代码
3.到mysqlquerymodel.cpp文件中,更改如下:
- #include "mysqlquerymodel.h"
- #include
- #include
- MySqlQueryModel::MySqlQueryModel(QObject *parent) :
- QSqlQueryModel(parent)
- {
- }
- Qt::ItemFlags MySqlQueryModel::flags(
- const QModelIndex &index) const //返回表格是否可更改的标志
- {
- Qt::ItemFlags flags = QSqlQueryModel::flags(index);
- if (index.column() == 1) //第二个字段可更改
- flags |= Qt::ItemIsEditable;
- return flags;
- }
- bool MySqlQueryModel::setData(const QModelIndex &index, const QVariant &value, int /* role */)
- //添加数据
- {
- if (index.column() < 1 || index.column() > 2)
- return false;
- QModelIndex primaryKeyIndex = QSqlQueryModel::index(index.row(), 0);
- int id = data(primaryKeyIndex).toInt(); //获取id号
- clear();
- bool ok;
- if (index.column() == 1) //第二个字段可更改
- ok = setName(id, value.toString());
- refresh();
- return ok;
- }
- void MySqlQueryModel::refresh() //更新显示
- {
- setQuery("select * from student");
- setHeaderData(0, Qt::Horizontal, QObject::tr("id"));
- setHeaderData(1, Qt::Horizontal, QObject::tr("name"));
- }
- //添加name字段的值
- bool MySqlQueryModel::setName(int studentId, const QString &name)
- {
- QSqlQuery query;
- query.prepare("update student set name = ? where id = ?");
- query.addBindValue(name);
- query.addBindValue(studentId);
- return query.exec();
- }
- //更改数据显示样式
- QVariant MySqlQueryModel::data(const QModelIndex &index, int role) const
- {
- QVariant value = QSqlQueryModel::data(index, role);
- //第一个字段的字体颜色为红色
- if (role == Qt::TextColorRole && index.column() == 0)
- return qVariantFromValue(QColor(Qt::red));
- return value;
- }
复制代码
4.到mainwindow.cpp文件中先添加头文件包含:
- #include "mysqlquerymodel.h"
复制代码
5.更改查询按钮槽内容如下:
- void MainWindow::on_pushButton_clicked()
- {
- QSqlQueryModel *model = new QSqlQueryModel(this);
- model->setQuery("select* from student");
- model->setHeaderData(0, Qt::Horizontal, tr("id"));
- model->setHeaderData(1, Qt::Horizontal, tr("name"));
- QTableView *view = new QTableView;
- view->setModel(model);
- view->show();
- //创建自己模型的对象
- MySqlQueryModel *myModel = new MySqlQueryModel(this);
- myModel->setQuery("select * from student");
- myModel->setHeaderData(0, Qt::Horizontal, tr("id"));
- myModel->setHeaderData(1, Qt::Horizontal, tr("name"));
- QTableView *view1 = new QTableView;
- view1->setWindowTitle("mySqlQueryModel"); //修改窗口标题
- view1->setModel(myModel);
- view1->show();
- }
复制代码
运行程序,效果如下图所示。
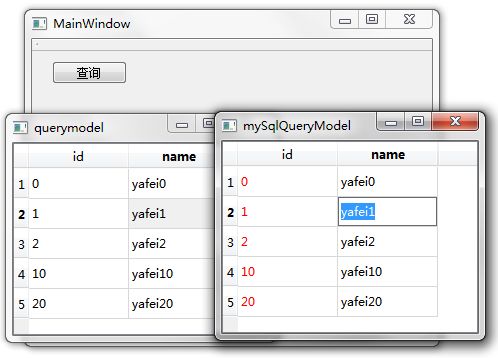
结语
本节讲解了QSqlQueryModel的相关内容,该类默认是一个只读的SQL语句查询模型,不过可以对其进行重写来实现编辑功能。