OpenStack Quantum + OVS + VLAN 基础安装
Quantum 是Openstack里面负责网络的项目。不过,Quantum这个名字似乎是已经被别的公司注册了,社区还在讨论新的名字。这篇文档写的比较早,所以还是延用Quantum这个名字。
整个安装过程的实现是在Ubuntu 12.04上,12.04现在直接安装的就是Openstack的Folsom版本,所以只要保证你的机器可以运行apt-get install 命令,软件的安装是非常容易的。对于Grizzly,只要给Grizzly增加特定的源,也是直接运行apt-get install就行。但是在试验的时候,如果在已经安装了Folsom的机器上直接增加更新源,在更新nova的时候会出现错误,怎么折腾也没搞定。Quantum不知道会不会也这样。
1. 整体结构
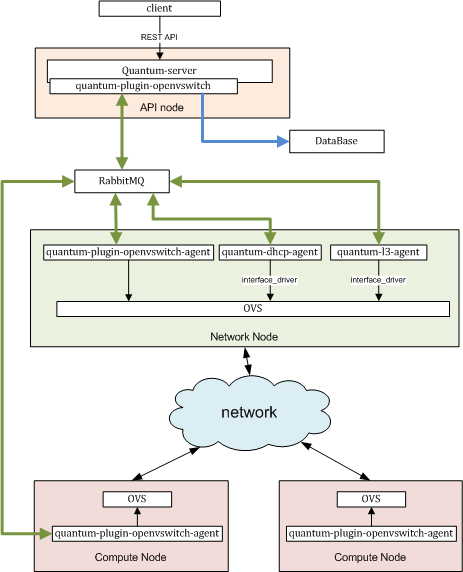
安装完了以后的结构是这样子的:
从图上我们可以看到,与openstack里面的其他服务一样,首先quantum需要一个自己的WSGI server来接收所有来自客户的REST请求,这就是quantum-server。由于需要兼容多种不同的实际虚拟网络的实现,所以quantum采用了一种plugin的方式,来满足不同用户的需求。quantum支持的plugin有很多,基本的有linux bridge以及我们这边实现的openvswitch.
quantum里面所有剩下的服务都称为agent。所谓一个agent,我的理解就是实现特定功能的一个服务进程。在Folsom版本里面,基本的agent有三种, plugin agent, dhcp agent,以及l3 agent。在最新的G版本上,在quantum-server中增加了多agent的调度(好像是针对dhcp和l3的)和metadata proxy等功能,这个暂时还没有搞清楚,先省略了。
Quantum里面的各个服务进程通过message queue进行通讯,我们这里message queue用rabbitmq实现。agent会不会直接访问数据库?我的理解是不会的,所有的信息应该通过message queue交换了,不过没有确认过。
因为所有的虚拟机的网络流量都会经过openvswitch,所有需要和被创建的虚拟网络通讯的机器,都必须安装openvswitch以及它的agent。
2. 安装quantum server和quantum OVS plugin
2.1 安装
apt-get install quantum-server quantum-plugin-openvswitch
2.2 配置quantum使用openvswitch
修改/etc/quantum/quantum.conf,告诉quantum我们现在使用的plugin是openvswitch:
core_plugin = quantum.plugins.openvswitch.ovs_quantum_plugin.OVSQuantumPluginV2
2.3 配置openvswitch plugin
2.3.1 数据库
因为不同的plugin可能会在数据库中创建不同的table,所以数据库的相关配置是在plugin的配置文件中的。这里我们使用mysql作为我们的数据库。
首先,新建一个名字叫做”quantum”的数据库,因为是全新的安装,先保证数据库里面没有重名的,把之前的数据先清除掉:
mysql> drop database quantum;
mysql> create database quantum;
然后,我们设置”quantum”数据库可以用户“quantum”以密码“quantum”进行访问:
mysql> grant all privileges on quantum.* to quantum @'%' identified by 'quantum';
设置好数据库后,就需要把连接数据库的相关信息写入quantum plugin的相应配置文件中。我们使用的是openvswitch,所以修改/etc/quantum/plugins/openvswitch/ovs_quantum_plugin.ini:
[DATABASE] *1
sql_connection = mysql://quantum:quantum@${host-db}/quantum*2
*1/etc/quantum/plugins/openvswitch/ovs_quantum_plugin.ini 被分成几个部分,分别为[DATABASE], [OVS], [AGETN]以及[SECURITYGROUP]。各个模块对应的设置都需要写在各自的模块名字的下面,不然的话它是不会工作的。我们这里,首先要找到 [DATABASE],然后把sql_connection直接写在它后面。
*2 mysql的连接信息的格式是mysql://用户名:密码@数据库ip/数据库名。
2.3.2 设置provider network为vlan
所谓的provider network, 我的理解就是你所拥有的物理网络,也就是说,虚拟网络的建立是基于原物理网络的。在基于物理网络的基础上创建虚拟网络,可以使得你的虚拟机有能力和原来网络中的其他物理机实现直接的网络互连。
举个例子,我在Quantum中创建了一个vlan 2000,IP子网设置为192.168.0.0/16,IP范围被限制在192.168.12.1~192.168.12.254。而此时,我有另一台物理机被设置为192.168.13.2/16,同样运行在vlan 2000,在网络连通的情况下,这个时候我所创建的虚拟机都是可以直接和我的物理机通讯的,而不需要通过floating IP。
Provider network 是一个plugin的固有属性,也就是对于一个plugin来说,如果他支持provider network, 那么在创建虚拟网络时,就必须提供一个物理网络信息给它。openvswitch支持provider network, 所以我们必须在配置文件中对它进行设置。 修改/etc/quantum/plugins/openvswitch/ovs_quantum_plugin.ini:
[OVS]
tenant_network_type=vlan
network_vlan_ranges = default:2000:4094
bridge_mappings = default:br-eth0
首先,告诉quantum我们的物理目前运行在vlan模式,然后把vlan的tag范围限定在我们的物理网络可支持的范围。最后将这个vlan范围对应到一个ovs的bridge上。这个bridge将和一个真正的物理网口相连,在安装openvswitch的部分我们会讲到。
用户可以定义多个vlan段对应到不同的ovs的bridge,但是必须设置default,因为在用户没有提供provider network参数的情况下创建网络时,quantum会选择default的内容作为缺省值。
* 如果是全部安装在一台机器上做试验的话应该选择local模式,应该是不需要其他配置的。我没有试验过。
2.4 quantum-server的其他配置
2.4.1 message queue
在整体结构中我们知道,quantum的各个服务之间通过rabbitmq进行通讯,所以要在配置文件里面写上rabbitmq的IP:
rabbit_host = ${host-ampq}
对于rabbitmq,在完成apt-get install之后,我们没有进行任何的配置,所以只要写一个ip就应该可以工作了。具体rabbitmq的其他参数,我没有研究过,反正默认的都可以工作。
2.4.2 添加keystone验证信息
和Openstack中的其他服务一样,quantum也需要和keystone进行交互,完成用户的验证,所以,首先需要在keystone里为quantum创建具有admin属性的用户。这里我们创建的用户为quantum,密码也为quantum,属于一个名为service的tenant。然后,把这些信息写入/etc/quantum/api-paste.ini:
[filter:authtoken]
paste.filter_factory = keystone.middleware.auth_token:filter_factory
auth_host = ${host-keystone}
auth_port = 35357
auth_protocol = http
admin_tenant_name = service
admin_user = quantum
admin_password = quantum
2.5 启动quantum-server
service quantum-server restart
3. 安装OVS和OVS agent
所有需要和虚拟网络进行通讯的机器都需要安装ovs和ovs agent。
3.1 删除libvirt默认的虚拟网络
这步不做也是可以的,但是有的时候会出现一些很诡异的问题,因为对它和openvswicth都不是非常了解,所以,简便起见:
virsh net-destroy default
virsh net-undefine default
可以用virsh的命令来确认确实被移除了:.
virsh -c qemu:///system list
3.2 安装OVS和OVS agent
apt-get install openvswitch-controller openvswitch-switch openvswitch-datapath-source
apt-get -y install quantum-plugin-openvswitch-agent
注意,这里quantum的配置文件里面的内容必须是和quantum-server的完全一直的,所以如果是有多台机器的话,把之前修改完的配置文件拷贝到对应的机器上。
3.3 创建OVS bridge
什么是OVS bridge? 简单的可以直接把他理解为一个虚拟的交换机,虚拟交换机上有许多的虚拟端口,逐级形成不同的网络结构。
首先,创建两个bridge:
ovs-vsctl add-br br-int
ovs-vsctl add-br br-eth0
这里,br-int是nova在默认情况下会使用的bridge的名字,如果你想要用别的名字,在配置nova的时候也要进行相应的修改。而br-eth0,我们之前在修改quantum ovs配置文件的时候已经提过。这个bridge的名字必须和配置文件中的一致。
然后,将你的物理端口加在 bridge br-eth0上,我们这里是eth0, 它连接在一台支持2000~4094的vlan的交换机上 :
ovs-vsctl add-port br-eth0 eth0*
* 注意:
1. 如果你是在一台机器上做试验,并且没有使用local的网络的话,这个步骤可以跳过不做,因为物理端口是为了让虚拟网络是物理网络相连,都在一台机器上的时候,实际上是不存在物理网络的。
2. openvswitch的一个重要的FAQ:
Q: I created a bridge and added my Ethernet port to it, using commands like these:
ovs-vsctl add-br br0
ovs-vsctl add-port br0 eth0
and as soon as I ran the "add-port" command I lost all connectivity through eth0. Help!
A: A physical Ethernet device that is part of an Open vSwitch bridge should not have an IP address. If one does, then that IP address will not be fully functional.
You can restore functionality by moving the IP address to an OpenvSwitch "internal" device, such as the network device named after the bridge itself. For example, assuming that eth0's IP address is 192.168.128.5, you could run the commands below to fix up the situation:
ifconfig eth0 0.0.0.0
ifconfig br0 192.168.128.5
(If your only connection to the machine running OVS is through the IP address in question, then you would want to run all of these commands on a single command line, or put them into a script.) If there were any additional routes assigned to eth0, then you would also want to use commands to adjust these routes to go through br0.
If you use DHCP to obtain an IP address, then you should kill the DHCP client that was listening on the physical Ethernet interface(e.g. eth0) and start one listening on the internal interface(e.g. br0). You might still need to manually clear the IP address from the physical interface (e.g. with "ifconfig eth0 0.0.0.0").
There is no compelling reason why Open vSwitch must work this way. However, this is the way that the Linux kernel bridge module has always worked, so it's a model that those accustomed to Linux bridging are already used to. Also, the model that most people expect is not implementable without kernel changes on all the versions of Linux that Open vSwitch supports.
By the way, this issue is not specific to physical Ethernet devices. It applies to all network devices except Open vswitch "internal" devices.
4. 网络连接图
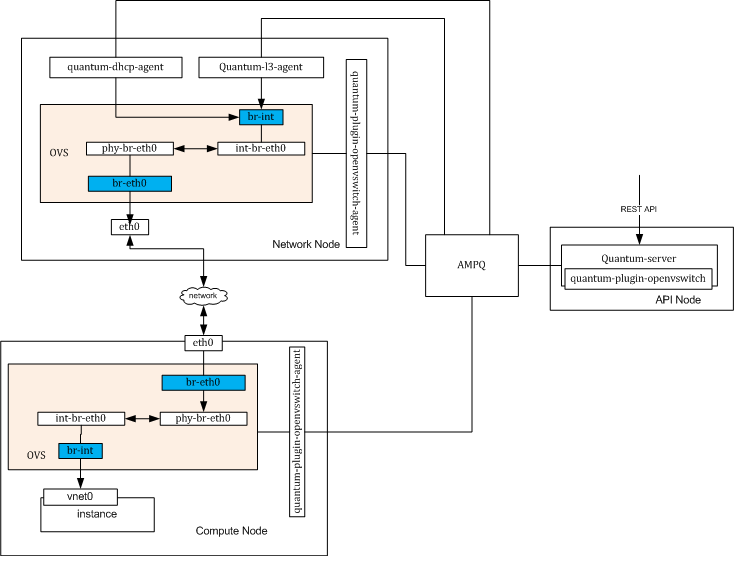
在我们进行下一步之前,我们可以看一下,在完成安装之后的网络连接路径。如下图所表示:
在quantum-plugin-openvswitch启动之后,phy-br-eth0和int-br-eth0会被自动创建并相连,实现两个bridge的连接。
5. 安装DHCP agent
apt-get -y install quantum-dhcp-agent
修改它的配置文件/etc/quantum/dhcp_agent.ini:
interface_driver = quantum.agent.linux.interface.OVSInterfaceDriver
6. 在keystone中为quantum创建endpoint
在完成以上全部的安装以后,quantum的基本安装就完成了。但这个时候,它还不能被访问。我们知道,在openstack中的任意一个用户都需要首先向keystone进行验证,keystone会在验证的过程中告诉用户所有服务的endpoint,然后用户访问endpoint,真正执行用户想要执行的命令。
所以,不要忘记在keystone中为quantum创建endpoint。
7. 配置nova
nova需要和quantum协同工作,所以必然要进行相关的配置:
network_api_class=nova.network.quantumv2.api.API
# only in compute node
quantum_url=http://${host-quantum}:9696
quantum_auth_strategy=keystone
quantum_admin_tenant_name=service
quantum_admin_username=quantum
quantum_admin_password=quantum
quantum_admin_auth_url=http://${host-keystone}:35357/v2.0
# libvirt
libvirt_vif_driver=nova.virt.libvirt.vif.LibvirtOpenVswitchVirtualPortDriver
# same bridge name as your created in ovs.
# you can jump this configuration, because the default value is already “br-int”.
libvirt_ovs_bridge="br-int"
注意:你需要根据你所使用的libvirt版本的不同的选择不同的 libvirt_vif_driver :
When using libvirt (any version) with Nova security filtering:
libvirt_vif_driver=nova.virt.libvirt.vif.LibvirtHybirdOVSBridgeDriver
When using libvirt (version < 0.9.11) without Nova security filtering:
libvirt_vif_driver=nova.virt.libvirt.vif.LibvirtOpenVswitchDriver
When using libvirt (version >= 0.9.11) without Nova security groups:
libvirt_vif_driver=nova.virt.libvirt.vif.LibvirtOpenVswitchVirtualPortDriver
8. 创建并使用网络
8.1 创建一个新的网络
现在我们可以创建一个网络并在启动虚拟机的时候使用了:
quantum net-create --tenant-id ${tenant_id} ${net_name} --provider:network_type vlan --provider:physical_network default --provider:segmentation_id ${vlan_tag}
还要为这个网络创建一个subnet,指定DHCP分配的IP范围:
quantum subnet-create --tenant-id ${tenant_id} ${net_name} 10.1.100.0/24
subnet也有一些其他的网络参数可以设置,我们这里就简单的设置一个dns:
quantum subnet-update {subnet-id} --dns_nameservers list=true 10.248.2.5 10.239.27.228 172.17.6.9
8.2 启动虚拟机并检查网络连接
用nova boot 命令启动一个虚拟机,你可以在boot的参数中指定虚拟机使用的网络ID。当然,如果现在用户网络中只有一个网络的话,默认就是用这唯一的一个,等待虚拟机启动。
有几种方式可以检查你的虚拟机是否获得了可用的ip并正常工作了。
1. 用VNC(或者HORIZON)查看虚拟机启动,并检查是否得到IP.
2. 在网络结点,也就是安装DHCP的机器上运行命令“ip netns”,你应该会看到:
qdhcp-xxx (xxx表示你的subnet id)
在这个name space下ping你的虚拟机的IP:
ip netns exec qdhcp-xxx ping ${ip}

