nodejs操作数据库mongodb
-------mongodb------------
使用:http://www.runoob.com/mongodb/mongodb-osx-install.html
********** 数据库和文件的主要区别
1、 数据库有数据库表、行和列的概念,让我们存储操作数据更方便
2、 数据库提供了非常方便的接口,可以让 nodejs、php java .net 很方便的实现增加修改删 除功能。
**********
由于互联网的迅速发展,云计算与 Web2.0。这样大量的交互给数据库提出了更高的性能要
求,传统的数据库(本文泛指 SQL 数据库),即关系数据库虽然具备良好的事物管理,
但在 处理大量数据 的应用 时很难 在性能 上满足 设计要 求。NoSQL 就是主要为了解决当下大量高并发高要
求的数据 库应用 需求,关系数 据库 具有严 格的参 照性,一致性 ,可用 性,原子性 ,隔离 性等特 点,
因此会产生一些例如表连接等操作,这样会大大降低系统的性能。而在当前很多应用场景下对性 能的要求 远远强 于传统 数据库 关注的 点,NoSQL 就是为了解决大规模数据与多样数 据种类 等问题,尤其是其中大数据的相关问题。 。
NoSQL(NoSQL = Not Only SQL ),意即“不仅仅是 SQL”,它指的是非关系型的数据库,是以 key-value 形式存储,和传统的关系型数据库不一样,不一定遵循传统数据库的一些基本要求,比如说遵循SQL 标准ACID 属性、表结构等等。NoSQL 最早被提出是在 20 世纪 80 年代,在当时更多是强调的是与关系 数据库区 别对待 ,最近这些年被提及的更多是强调协助解决大数据等相关问NoSQL 在大数 据时代有自己的意义。
2.2 NoSQL 应用情况介绍
国内的互联网蓬勃发展,不仅涌现出 BAT(百度,阿里巴巴,腾讯)之类的巨头,也带动了整个互联 网行业的发展,大量的创业型公司如春笋般的涌出,在国家层面也提出了“互联网+”和“万众创业”的口 号。更多传统的行业也开始拥抱互联网。但是无论是做所谓的生态平台还是 传统业务的转型,涉及到的业 务是多种多样的。这个时候企业架构师对于应用系统的核心——数据库管理 不仅有传统的 SQL 选项也有了 NoSQL 这种适合特定场景需求的选项。
NoSQL 数据库在以下的这几种情况下比较适用:
1、数据模型比较简单;
2、需要灵活性更强的 IT 系统; 3、对数据库性能要求较高; 4、不需要高度的数据一致性;
5、对于给定 key,比较容易映射复杂值的环境。
2.3 NoSQL 发展现状
国外: Google 的 BigTable 和 Amazon 的 Dynamo 使用的就是 NoSQL 型数据库。
国内:百度、阿里、腾讯、新浪微博、视觉中国、优酷运营数据分析、飞信空间、豆瓣社区等..
3、 什么时候建议使用 NoSql
1、对数据库高并发读写的需求 2、对海量数据的高效率存储和访问的需求 3、对数据库的高可扩展性和高可用性的需求
4、 NoSql 和传统数据库简单对比。 非结构型数据库。没有行、列的概念。用 JSON 来存储数据。
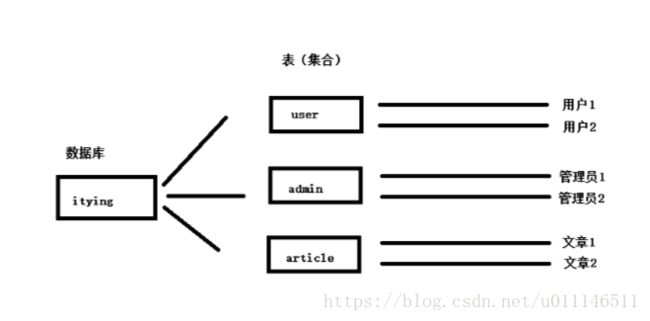
5、 集合就相当于“表 ”,文档就相当于“行”。
****** MongoDb 介绍
MongoDB 是一个介于关系数据库和非关系数据库之间的产品,是非关系数据库当中功能最丰富,最像 关系数据库的。他支持的数据结构非常松散,是类似 json 的 bson 格式,因此可以存储比较复杂的数据类 型。Mongo 最大的特点是他支持的查询语言非常强大,其语法有点类似于面向对象的查询语言,几乎可以 实现类似关系数据库单表查询的绝大部分功能,而且还支持对数据建立索引。它的特点是高 性能 、易部署 、 易使用 ,存储数据非常 方便 。
**** MongoDb 安装 官网:https://www.mongodb.com/
https://github.com/mongodb/mongo
https://docs.mongodb.com/manual/tutorial/query-documents/
手册:https://docs.mongodb.org/manual/ 注意:部分 win7 系统需要安装补丁,KB2731284。 1. 双击 MongoDB 软件下一步下一步安装;
************windows下配置环境变量***
安装完成配置环境变量 C:\Program Files\MongoDB\Server\3.0\bin 加入到系统的path 环境变量中
打开 cmd 输入 :mongo命令看看是否成功。如果出现版本信息说明 mongodb配置成功。

*************使用 MongoDb
使用mogodb前需要到官网下载mongodb;
1. 新建一个存放数据库的文件夹,注意:不能有中文和空格,建议不要放在 C 盘
2.服务端开启数据库服务
mongod --dbpath C:\mongodb
--dbpath 就是选择数据库文档所在的文件夹,就是刚才第一步创建的文件夹。
也就是说,mongoDB 中,真的有物理文件,对应一个个数据库。U 盘可以拷走。 注意:一定要保持,开机这个 CMD 不能动了,不能关,不能 ctrl+c。 一旦这个 cmd 有问题了,数据库就自动关闭了。
3.客户端输入 mongo 命令连接服务端;
mongo 数据库名
或者:mongo 数据库的ip地址:端口号
清屏:cls
查看所有数据库列 表:show dbs
二、 创建数据库
在使用数据库前要执行(use 数据库名)命令;
使用数据库、创建 数据库:use student;如果真的想把这个数据库创建成功,那么必须插入一个数据。 数据库中不能直接插入数据,只能往集合(collectio ns)中插入数 据。不需要专门创建集合,只需要写点语法插入数据就会创建集合:
db.student.insert({“name”:”x iaom ing”});
show collections
删除数据库,删除当前所在的数据库
db.dropDatabase();
删除集合,删除指定的集合 删除表
删除集合 db.COLLECTION_NAME.drop()
db.user.drop()
三、 插入(增加)数据
插入数据,随着数据的插入,数据库创建成功了,集合也创建成功了。
db.表名.insert({"name":"zhangsan"});
四、 查找数据
1、查询所有记 录
db.userInfo.find();
相当于:select* from userInfo;
2、查询去掉后 的当前聚集集合中的某列的重复数据
db.userInfo.di stinct("name");会过滤掉 name 中的相同数据
相当于:select distict name from userInfo;
3、查询 age = 22 的记录
db.userInfo.find({"age": 22});
相当于: select * from userInfo where age = 22;
4、查询 age > 22 的记录db.userInfo.find({age: {$gt: 22}});
相当于:select * from userInfo where age >22;
5、查询 age < 22 的记录
db.userInfo.find({age: {$lt: 22}});
相当于:select * from userInfo where age <22;6、查询 age >= 25 的记录
db.userInfo.find({age: {$gte: 25}});相当于:select * from userInfo where age >= 25;
7、查询 age <= 25 的记录db.userInfo.find({age: {$lte: 25}});
8、查询 age >= 23 并且 age <= 26db.userInfo.find({age: {$gte: 23, $lte: 26}});
9、查询name中包含 mongo的数据db.userInfo.find({name: /mongo/});
//相当于%%
select * from userInfo where name like ‘%mongo%’;
10、查询 name 中以 mongo 开头的db.userInfo.find({name: /^mongo/});
select * from userInfo where name like ‘mongo%’;
11、查询指定列 name、age 数据
db.userInfo.find({}, {name: 1, age: 1});
相当于:select name, age from userInfo;
当然 name 也可以用 true 或 false,当用 ture 的情况下河 name:1 效果一样,如果用 false 就 是排除 name,显示 name 以外的列信息。
12、查询指定列 name、age 数据, age > 25db.userInfo.find({age: {$gt: 25}}, {name: 1, age: 1});相当于:select name, age from userInfo where age >25;13、按照年龄排序 1 升序 -1 降序 升序:db.userInfo.find().sort({age: 1});降序:db.userInfo.find().sort({age: -1});
14、查询 name = zhangsan, age = 22 的数据
db.userInfo.find({name: 'zhangsan', age: 22});
相当于:select * from userInfo where name = ‘zhangsan’ and age = ‘22’;
15、查询前 5 条数据db.userInfo.find().limit(5 );相当于:selecttop 5 * from userInfo;
16、查询 10 条以后的数据
db. userI nfo. fin d(). sk ip(10 );
相当于:select * from userInfo where id not in ( selecttop 10 * from userInfo
);
17、查询在 5-10 之间的数据
db. userI nfo. fin d(). limit (1 0). ski p(5);
可用于分页,limit 是 pageSize,skip 是第几页*pageSize
18、or与 查询
db.userInfo.find({$or: [{age: 22}, {age: 25}]});相当于:select * from userInfo where age = 22 or age = 25;19、findOne 查询第一条数据
db. userI nfo. fin dOne( );
相当于:selecttop 1 * from userInfo; db.userInfo.find().limit(1 );
20、查询某 个结果集的记录条数 统计数量
db.userInfo.find({age: {$gte: 25}}).count();相当于:select count(*) from userInfo where age >= 20;
如果要返回限制之后的记录数量,要使用 count(true)或者 count(非 0) db.users.find().skip(1 0).limit(5).count(true);
四、修改数据
修改里面还有查询条件。你要该谁,要告诉 mongo。 查找名字叫做小明的,把年龄更改为 16 岁:
db.student.update({"name":"小明"},{$set:{"ag e":16}});
查找数学成绩是 70,把年龄更改为 33 岁:
db.student.update({"sc ore.shuxue":70},{$set:{"ag e":33}});
更改所有匹配项目:"
By default, the update() method updates a single document. To update multiple documents, use the multi option in the update() method.
db.student.update({"sex":"男"},{$set:{"age":33}},{multi: true});
完整替换,不出现$set 关键字了: 注意
db.student.update({"name":"小明"},{"name":"大明","age":16});
db.users.update({name: 'Lisi'}, {$inc: {age: 50}}, false, true);
相当于:update users set age = age + 50 where name = ‘Lisi’;
db.users.update({name: 'Lisi'}, {$inc: {age: 50}, $set: {name: 'hoho'}}, false, true);
相当于:update users set age = age + 50, name = ‘hoho’ where name = ‘Lisi’;
五、 删除数据
db.users.remove({age: 132});
db.collectionsNames.remove( { "borough": "Manhattan" } )
//如果存在两个"borough": "Queens",加上后面的条件,就只删除其中一条
db.restaurants.remove( { "borough": "Queens" }, { justOne: true } )
如果删除了数据库中的所有表,name数据库页被删除了;
一、索引基础
索引是对数据库表中一列或多列的值进行排序的一种结构,可以让我们查询数据库变得 更快。MongoDB 的索引几乎与传统的关系型数据库一模一样,这其中也包括一些基本的查 询优化技巧。
下面是创建索引的 命令:
db.user.ensureIndex( {"username":1})
db.user.getIndexes()
删除索引的命令是 :
db.user.dropIndex( {"username":1})
在 MongoDB 中,我们同样可以创建复合索引,如:
数字 1 表示 username 键的索引按升序存储,-1 表示 age 键的索引按照降序方式存储。db.user.ensureIndex({"username":1, "age":-1})
该索引被创建后,基于 username 和 age 的查询将会用到该索引,或者是基于 username 的查询也会用到该索引,但是只是基于 age 的查询将不会用到该复合索引。因此可以说,
如果想用到复合索引,必须在查询条件中包含复合索引中的前 N 个索引列。然而如果查询 条件中的键值顺序和复合索引中的创建顺序不一致的话,MongoDB 可以智能的帮助我们调 整该顺序,
以便使复合索引可以为查询所用。如:
db.user.find({"age": 30, "username": "stephen"})
对于上面示例中的查询条件,MongoDB 在检索之前将会动态的调整查询条件文档的顺 序,以使该查询可以用到刚刚创建的复合索引。
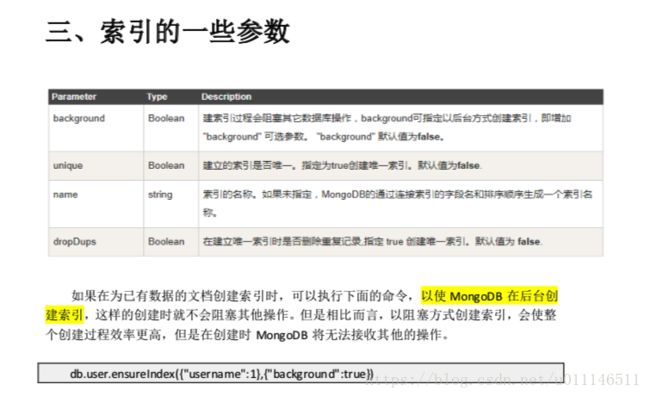
对于上面创建的索引,MongoDB 都会根据索引的 keyname 和索引方向为新创建的索引 自动分配一个索引名,下面的命令可以在创建索引时为其指定索引名,如
db.user.ensureIndex( {"username":1},{"name":"userindex"})
随着集合的增长,需要针对查询中大量的排序做索引。如果没有对索引的键调用 sort, MongoDB 需要将所有数据提取到内存并排序。因此在做无索引排序时,
如果数据量过大以 致无法在内存中进行排序,此时 MongoDB 将会报错。
二、唯一索引
在缺省情况下创建的索引均不是唯一索引。下面的示例将创建唯一索引,如:
如果再次插入 userid 重复的文档时,MongoDB 将报错,以提示插入重复键,如:
db.user.insert({"userid":5})
db.user.insert({"userid":5})
E11000 duplicate key error index: user.user.$userid_1 dup key: { : 5.0 }
如果插入的文档中不包含 userid 键,那么该文档中该键的值为 null,如果多次插入类似 的文档,MongoDB 将会报出同样的错误,如:
db.user.insert({"userid1":5})
db.user.insert({"userid1":5})
E11000 duplicate key error index: user.user.$userid_1 dup key: { : null }
如果在创建唯一索引时已经存在了重复项,我们可以通过下面的命令帮助我们在创建唯 一索引时消除重复文档,仅保留发现的第一个文档,如:
先删除刚刚创建的唯一索引。
db. user. dropI ndex( {" userid" :1} )
插入测试数据,以保证集合中有重复键存在。
db.user.remove()
db.user.insert({"userid":5})
db.user.insert({"userid":5})
重新创建唯一索引
db.user.ensureIndex({"userid":1},{"unique":true })
我们同样可以创建 复合唯一索引,即保证复合键值唯一 即可。如:
db.user.ensureIndex( {"useri d":1,"age":1},{"unique":true})
四、使用 explain
explain 是非常有用的工具,会帮助你获得查询方面诸多有用的信息。只要对游标调用 该方法,就可以得到查询细节。explain 会返回一个文档,而不是游标本身;
explain 会返回查询使用的索引情况,耗时和扫描文档数的统计信息。
五、explain executionStats 查询具体的执行 时间
关注输出的如下数值:explain.executionStats.executionTimeMillis
**************nodejs操作mongodb***************
地址:https://doc s.mongodb.com/getting-started/node/introduction/
https://doc s.mongodb.com/getting-started/node/query/
需要引包:
npm install mongodb --save-dev 或者 cnpm install mongodb --save-dev******连接数据库******
https://blog.csdn.net/cckevincyh/article/details/79719261
https://www.runoob.com/nodejs/nodejs-mongodb.html
/*
*nodejs使用ongodb的
*/
var router = function(app){
  var fs =require('fs');
  var http=require('https');
  var mysql=require('mysql');//调用mysql模块
  var request = require('request');
  var url = require('url');
  var querystring = require('querystring');
  var bodyParser     =         require("body-parser");
  var urlencodedParser = bodyParser.urlencoded({ extended: false })
  app.get('/get',function (req, res) {

// app.post('/one',urlencodedParser,function (req, res) {

/***text/html,application/json", @"text/json", @"text/javascript",
*@"text/html",@"text/xml", @"text/plain; charset=utf-8",image/png
*/
// res.writeHeader(200, {'Content-Type':'image/png;charset=UTF-8'});
res.writeHeader(200, {'Content-Type':'text/html;charset=UTF-8'});
// res.writeHeader(200, {'Content-Type':'application/json;charset=UTF-8'});

// //************建立数据库连接
//  /*要在 MongoDB 中创建一个数据库,首先我们需要创建一个 MongoClient 对象,然后配置好指定的 URL 和 端口号。
// // 如果数据库不存在,MongoDB 将创建数据库并建立连接。*/
// // var MongoClient = require('mongodb').MongoClient;
// // var url = "mongodb://localhost:27017/userInfo";
// // MongoClient.connect(url, function(err, db) {
// //   if (err) throw err;
// //   console.log("数据库已创建!");
// //   res.end("数据库创建成功");
// //   db.close();
// // });


//********** 创建集合
var MongoClient = require('mongodb').MongoClient;
var url = 'mongodb://localhost:27017/userInfo';
MongoClient.connect(url, function (err, db) {
    if (err) throw err;
    console.log('数据库已创建');
    var dbase = db.db("userInfo");
    dbase.createCollection('product', function (err, res) {
        if (err) throw err;
        console.log("创建product集合成功!");
        db.close();
    });
});


//**************插入单条数据
var MongoClient = require('mongodb').MongoClient;
var url = "mongodb://localhost:27017/userInfo";

MongoClient.connect(url, function(err, db) {
    if (err) throw err;
    var dbo = db.db("userInfo");
    var myobj = { name: "lambo001", url: "www.aichi010.com" };
    dbo.collection("user").insertOne(myobj, function(err, res) {
        if (err) throw err;
        console.log("插入成功");
        db.close();
    });
});

 //***********插入多条数据
 var MongoClient = require('mongodb').MongoClient;
var url = "mongodb://localhost:27017/";

MongoClient.connect(url, function(err, db) {
    if (err) throw err;
    var dbo = db.db("userInfo");
    var myobj =  [
        { name: 'lambo002', url: 'lambo', type: 'cn'},
        { name: 'lambo003', url: 'lambo', type: 'en'},
        { name: 'lambo004', url: 'lambo', type: 'en'}
       ];
    dbo.collection("user").insertMany(myobj, function(err, res) {
        if (err) throw err;
        console.log("插入的文档数量为: " + res.insertedCount);//res.insertedCount 为插入的条数
        db.close();
    });
});

//*********更新一条数据
var MongoClient = require('mongodb').MongoClient;
var url = "mongodb://localhost:27017/";

MongoClient.connect(url, function(err, db) {
    if (err) throw err;
    var dbo = db.db("userInfo");
    var whereStr = {"name":'lambo'};  // 查询条件
    var updateStr = {$set: { "url" : "lambo新" }};//更新后的值
    dbo.collection("user").updateOne(whereStr, updateStr, function(err, res) {
        if (err) throw err;
        console.log("更新成功");
        db.close();
    });
});


//********更新多条数据

var MongoClient = require('mongodb').MongoClient;
var url = "mongodb://localhost:27017/";

MongoClient.connect(url, function(err, db) {
    if (err) throw err;
    var dbo = db.db("userInfo");
    var whereStr = {"type":'en'};  // 查询条件
    var updateStr = {$set: { "url" : "更新多条数据" }};
    dbo.collection("user").updateMany(whereStr, updateStr, function(err, res) {
        if (err) throw err;
         console.log(res.result.nModified + " 条文档被更新");//result.nModified 为更新的条数。
        db.close();
    });
});


//**********删除一条数据
var MongoClient = require('mongodb').MongoClient;
var url = "mongodb://localhost:27017/";

MongoClient.connect(url, function(err, db) {
    if (err) throw err;
    var dbo = db.db("userInfo");
    var whereStr = {"name":'lambo'};  // 查询条件
    dbo.collection("user").deleteOne(whereStr, function(err, obj) {
        if (err) throw err;
        console.log("删除成功");
        db.close();
    });
});


//***********删除多条数据
var MongoClient = require('mongodb').MongoClient;
var url = "mongodb://localhost:27017/";

MongoClient.connect(url, function(err, db) {
    if (err) throw err;
    var dbo = db.db("userInfo");
    var whereStr = { type: "en" };  // 查询条件
    dbo.collection("user").deleteMany(whereStr, function(err, obj) {
        if (err) throw err;
        console.log(obj.result.n + " 条文档被删除");//obj.result.n 删除的条数。
        db.close();
    });
});


//***************查询数据
// 可以使用 find() 来查找数据, find() 可以返回匹配条件的所有数据。 如果未指定条件,find() 返回集合中的所有数据。
var MongoClient = require('mongodb').MongoClient;
var url = "mongodb://localhost:27017/";

MongoClient.connect(url, function(err, db) {
    if (err) throw err;
    var dbo = db.db("userInfo");
    dbo.collection("user"). find({}).toArray(function(err, result) { // 返回集合中所有数据
        if (err) throw err;
        console.log(result);
        db.close();
    });
});


//*********查询指定条件的数据
var MongoClient = require('mongodb').MongoClient;
var url = "mongodb://localhost:27017/";

MongoClient.connect(url, function(err, db) {
    if (err) throw err;
    var dbo = db.db("userInfo");
     var whereStr = {"name":'lambo002'};  // 查询条件
    dbo.collection("user").find(whereStr).toArray(function(err, result) {
        if (err) throw err;
        console.log(result);
        db.close();
    });
});


//**********排序


// 排序 使用 sort() 方法,该方法接受一个参数,规定是升序(1)还是降序(-1)。
// 例如:
// { type: 1 }  // 按 type 字段升序
// { type: -1 } // 按 type 字段降序
// 按 type 升序排列:

var MongoClient = require('mongodb').MongoClient;
var url = "mongodb://localhost:27017/";

MongoClient.connect(url, function(err, db) {
    if (err) throw err;
    var dbo = db.db("userInfo");
    var mysort = { type: 1 };
    dbo.collection("user").find().sort(mysort).toArray(function(err, result) {
        if (err) throw err;
        console.log(result);
        db.close();
    });
});


//*************查询分页
// 如果要设置指定的返回条数可以使用 limit() 方法,该方法只接受一个参数,指定了返回的条数。
// limit():读取两条数据
var MongoClient = require('mongodb').MongoClient;
var url = "mongodb://localhost:27017/";

MongoClient.connect(url, function(err, db) {
    if (err) throw err;
    var dbo = db.db("userInfo");
    dbo.collection("user").find().limit(2).toArray(function(err, result) {
        if (err) throw err;
        console.log(result);
        db.close();
  });
});


//********如果要指定跳过的条数,可以使用 skip() 方法。
// skip(): 跳过前面两条数据,读取两条数据
var MongoClient = require('mongodb').MongoClient;
var url = "mongodb://localhost:27017/";

MongoClient.connect(url, function(err, db) {
    if (err) throw err;
    var dbo = db.db("userInfo");
    dbo.collection("user").find().skip(2).limit(2).toArray(function(err, result) {
        if (err) throw err;
        console.log(result);
        db.close();
  });
});


// 连接操作
// mongoDB 不是一个关系型数据库,但我们可以使用 $lookup 来实现左连接。
// 例如我们有两个集合数据分别为:
// 集合1:orders
// [
//   { _id: 1, product_id: 154, status: 1 }
// ]
// 集合2:products
// [
//   { _id: 154, name: '笔记本电脑' },
//   { _id: 155, name: '耳机' },
//   { _id: 156, name: '台式电脑' }
// ]
// $lookup 实现左连接
var MongoClient = require('mongodb').MongoClient;
var url = "mongodb://127.0.0.1:27017/";

MongoClient.connect(url, function(err, db) {
    if (err) throw err;
    var dbo = db.db("userInfo");
    dbo.collection('orders').aggregate([
        { $lookup:
            {
                from: 'products',           // 右集合
                localField: 'product_id',   // 左集合 join字段
                foreignField: '_id',        // 右集合 join字段
                as: 'orderdetails'          // 新生成字段(类型array)
            }
        }
    ], function(err, res) {
    if (err) throw err;
    console.log(JSON.stringify(res));
    db.close();
});


//**********删除集合
// 我们可以使用 drop() 方法来删除集合:
var MongoClient = require('mongodb').MongoClient;
var url = "mongodb://localhost:27017/";

MongoClient.connect(url, function(err, db) {
    if (err) throw err;
    var dbo = db.db("userInfo");
    // 删除 test 集合
    dbo.collection("user").drop(function(err, delOK) {  // 执行成功 delOK 返回 true,否则返回 false
        if (err) throw err;
        if (delOK) console.log("集合已删除");
        db.close();
    });
});


});

}
exports.router = router;
****mongodb的封装***
var MongoClient=require('mongodb').MongoClient;


var DbUrl='mongodb://localhost:27017/productmanage';  /*连接数据库*/


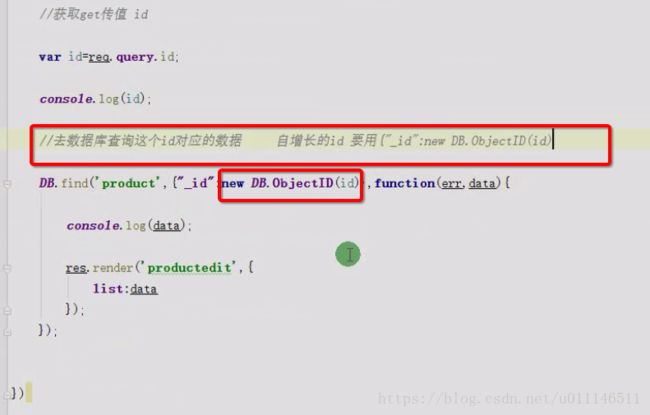
var ObjectID = require('mongodb').ObjectID;//用自增长_id去数据库中查找数据,必须要用new ObjectID(_id),要不然在数据库中查不到

function  __connectDb(callback){ MongoClient.connect(DbUrl,function(err,db){
        if(err){

            console.log('数据库连接失败');
            return;
        }
        //增加 修改 删除
          callback(db);

    })
}


//暴露 ObjectID
exports.ObjectID=ObjectID;

//数据库查找
/*
 Db.find('user',{},function(err,data){
    data数据
})


 */
exports.find=function(collectionname,json,callback){
    __connectDb(function(db){
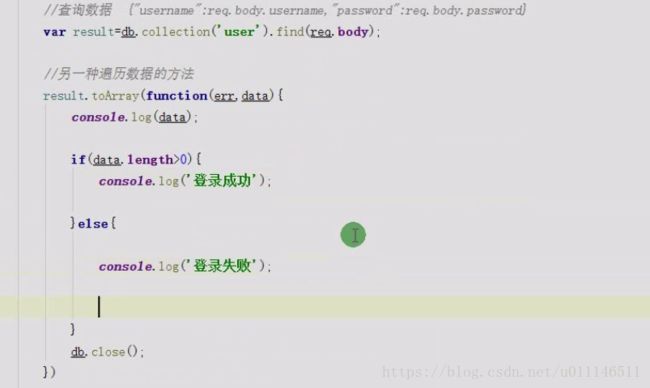
        var result=db.collection(collectionname).find(json);
   result.toArray(function(error,data){
            db.close();/*关闭数据库连接*/
            callback(error,data);/*拿到数据执行回调函数*/
        })
    })
}


//增加数据
exports.insert=function(collectionname,json,callback){
    __connectDb(function(db){
   db.collection(collectionname).insertOne(json,function(error,data){
            callback(error,data);
        })
    })
}


//增加数据
exports.update=function(collectionname,json1,json2,callback){
    __connectDb(function(db){
        db.collection(collectionname).updateOne(json1,{$set:json2},function(error,data){


            callback(error,data);
        })
    })
}


//删除数据
exports.deleteOne=function(collectionname,json,callback){
    __connectDb(function(db){
        db.collection(collectionname).deleteOne(json,function(error,data){
            callback(error,data);
        })
    })
}
*******************************MAC 上使用mogodb************************
下载配置mongoldb:https://www.jianshu.com/p/59fab73f4d91
MongoDB 下载地址: https://www.mongodb.com/download-center?jmp=nav#community
安装mongodb方法一:官网直接下载;
方法二:原理上就是直接下载,终端命令吧。
1,下载
curl -O https://fastdl.mongodb.org/osx/mongodb-osx-x86_64-3.2.1.tgz
2,解压
tar -zxvf mongodb-osx-x86_64-3.2.1.tgz
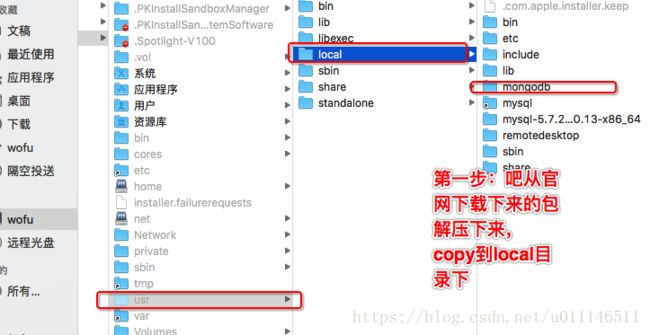
3,复制解压之后的文件夹去mongodb run的目录
mkdir -p mongodb
cp -R -n mongodb-osx-x86_64-3.2.1/ mongodb
4,下一步就是配置了,确保二进制文件的位置在路径变量中,md的二进制文件都在bin/里面,
export PATH=
--------配置数据存储路径和log日志
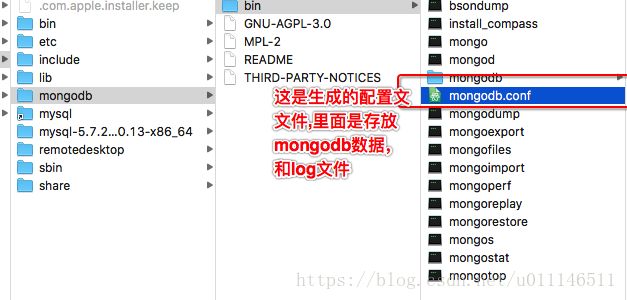
在/usr/local/mongodb/bin下就是mongodb的执行文件了
. 然后在根目录下新建 data 文件夹,里面再建一个db文件夹,就是上图中那个 usr文件夹上面的 那个data文件夹 ,里面是用来存放数据库的,
. 终端切换到/usr/local/mongodb/bin目录下,
打开浏览器,输入localhost:27017,会出现“It looks like you are trying to access MongoDB over HTTP on the native driver port.” 这样一行文字
exception in initAndListen: NonExistentPath: Data directory /data/db not found., terminating
解决方案
方案一、自己创建一个数据库路径
方案二、自己在别处创建一个数据库路径,比更改mongoDB数据库路径
如:mongod --dbpath ~/Documents/mongo/db
在Document目录下创建mongo/db文件夹即可
.服务端开启数据库服务——————在终端输入sudo ./mongod --dbpath /Users/wofu/Desktop/mongodb
以后每次启动就用上面这个带路径的命令;
****运行 MongoDB,利用系统默认的存储目录
1、首先我们创建一个数据库存储目录 /data/db:
sudo mkdir -p /data/db
启动 mongodb,默认数据库目录即为 /data/db:
sudo mongod
# 如果没有创建全局路径 PATH(配置环境变量),需要进入以下目录
cd /usr/local/mongodb/bin
sudo ./mongod
$ cd /usr/local/mongodb/bin
$ ./mongo
出现:MongoDB shell version v3.4.2
connecting to: mongodb://127.0.0.1:27017
MongoDB server version: 3.4.2
Welcome to the MongoDB shell.
注意:如果你的数据库目录不是/data/db,可以通过 --dbpath 来指定。
,我们可以把 MongoDB 的二进制命令文件目录(安装目录/bin)添加到 PATH 路径中:
export PATH=/usr/local/mongodb/bin:$PATH
-------配置数据存储路径和og日志
mongod.conf可以的配置内容:https://www.jianshu.com/p/f9f1454f251f
vim mongodb.conf
****mongod.conf中的内容:
#mongodb config file
dbpath=/Users/wofu/Desktop/mongodb
logpath=/Users/wofu/Desktop/mongod.log
logappend = true
port = 27017
fork = true
auth = true
port: 数据库服务使用端口
dbpath: 数据存放的文件位置
logpath: 日志文件的存放位置
fork: 后台守护进程运行
:wq保存退出;
***客户端输入 mongo 命令连接服务端;
mongo 数据库名
或者:mongo 数据库的ip地址:端口号
如果是本地数据库可以使用:./mongo
清屏:cls
查看所有数据库列 表:show dbs
参考:https://www.jianshu.com/p/2d0a1ecd0c82
两个相关的基本概念:
mongod 是用来连接到mongodb数据库服务器的,即服务器端。
mongo 是用来启动MongoDB shell的,是mongodb的命令行客户端。
***修改环境变量
把mongodb/bin加入$PATH ,如果不加入$PATH我们每次需要输入sudo monogd ,如果加入了$PATH就可以直接输入monogd
$ touch .base_profile
$ vim .base_profile
***加入path:
export MONGO_PATH=/usr/local/mongodb
export PATH=$PATH:$MONGO_PATH/bin
.*****授权文件夹data :
sudo chmod -R 777 data
.*****配置环境变量:
vi ~/.bash_profile
export Mongodb=/Users/xxxx/mongodb3.4/mongodb/bin:$PATH(xxxx是我机器的用户名,)
source ~/.bash_profile 让环境变量生效。
6.然后启动mongodb:
cd /Users/xxxx/mongodb/bin
sudo ./mongod --rest
******配置了环境变量后使用mongod
--启动 mongod --config /usr/local/etc/mongod.conf
--关闭use admin,
db.shutdownServer()
(注:mongod.conf文件中bindIp: 127.0.0.1意思是本机访问,如果是外网访问需要重新设置)
***mongodb 数据默认存在/data/db下,所以需要创建这个文件夹
sudo mkdir -p /data/db
sudo chown xxx /data/db
请把xxx替换为自己当前的用户名,(如果不确定可以在终端输入 whoami查看用户名);
也可以直接使用已经存在的文件夹:
sudo mongod --dbpath 已经存在的目录(这个目录是用来存放mongodb数据库文件的)
