从零开始搭建自己的VueJS2.0+ElementUI单页面网站(二、编写导航页)
前言
在从零开始搭建自己的VueJS2.0+ElementUI单页面网站(一、环境搭建)一文中我们已经配置好了开发所需要的各种环境,在这一篇博文中我们正式进入开发。对于一个单页面应用来说,导航页是至关重要的一个页面,所有的组件都会在这个页面里进行显示。接下来我们就开始进行导航页的开发。
正文
创建导航页组件
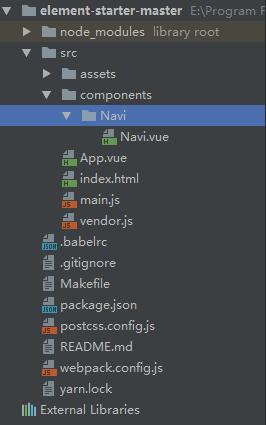
我们在src目录下新建一个文件夹,名为components,今后我们的组件都会放在这个文件夹中。在components目录下新建一个Navi目录,在Navi目录中新建一个名为Navi.vue的组件。至此我们的目录应该是如下图所示:

然后我们修改main.js文件,修改后的文件如下
import Vue from 'vue'
import ElementUI from 'element-ui'
import 'element-ui/lib/theme-default/index.css'
import Navi from './components/Navi/Navi.vue'

Vue.use(ElementUI)

new Vue({
  el: '#app',
  render: h => h(Navi)
})
我们可以看到render函数的参数由之前的App变为我们新创建的Navi组件。从此我们的程序入口中显示的就是这个Navi.vue里面的内容。之前默认生成的App.vue文件已经无用,我们可以删掉它。
接下来我们对导航页进行简单的布局,我们先来看一下布局的代码
Navi.vue
<template>
    <div style="background-color: #EBEBEB;min-height:800px">
        <div style="width:100%;background-color: #636363; overflow: hidden">
            <span class="demonstration" style="float:left;padding-top:10px;color:white;margin-left:1%">
                网站首页
            span>
            <span class="demonstration" style="float:left;padding:5px;color:white;margin-left:2%;width:15%">
                <el-input
                        placeholder="请输入"
                        icon="search"
                        v-model="searchCriteria"
                        :on-icon-click="handleIconClick">
                el-input>
            span>
            <span class="demonstration" style="float:right;padding-top:10px;margin-right:1%">
                <el-dropdown trigger="click">
                  <span class="el-dropdown-link" style="color:white">
                    admin<i class="el-icon-caret-bottom el-icon--right">i>
                  span>
                  <el-dropdown-menu slot="dropdown">
                    <el-dropdown-item>个人信息el-dropdown-item>
                    <el-dropdown-item>退出登录el-dropdown-item>
                  el-dropdown-menu>
                el-dropdown>
            span>
        div>

        <div style="margin-top:5px">
            <el-row :gutter="10">
                <el-col :xs="4" :sm="4" :md="4" :lg="4">
                    <div>
                        <el-menu default-active="1" class="el-menu-vertical-demo" style="min-height:800px">
                            <el-menu-item index="1"><i class="el-icon-message">i>导航一el-menu-item>
                            <el-menu-item index="2"><i class="el-icon-menu">i>导航二el-menu-item>
                            <el-menu-item index="3"><i class="el-icon-setting">i>导航三el-menu-item>
                        el-menu>
                    div>
                el-col>
                <el-col :xs="20" :sm="20" :md="20" :lg="20">
                    <div>
                        <div style="border: 1px solid #A6A6A6; border-radius:6px; padding:5px; margin:2px; background-color: white">
                            <el-breadcrumb separator="/">
                                <el-breadcrumb-item v-for="item in breadcrumbItems">{{item}}el-breadcrumb-item>
                            el-breadcrumb>
                        div>
                    div>
                el-col>
            el-row>
        div>
    div>
template>
<script type="text/ecmascript-6">
    export default {
        data(){
            return {
                searchCriteria: '',
                breadcrumbItems: ['导航一'],
            }
        },

        methods:{
            handleIconClick(ev) {
                console.log(ev);
            }
        },
    }
script>
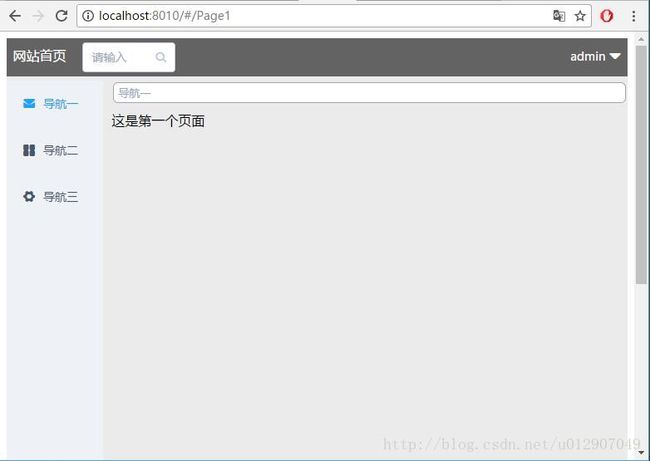
我们可以看一下主页现在的样子

这里面用到了一些ElementUI的组件,比如左侧的菜单栏,和右侧显示着“导航一”的面包屑组件等。使用el-row和el-col的作用是对组件进行响应式处理。这些组件的详细使用方法都可以在ElementUI的官方网站中找到。
配置路由信息
创建好了首页导航栏之后,我们需要对路由信息进行配置,vue-router是vuejs单页面应用的关键。在配置路由信息之前,我们先把需要跳转到的页面创建出来。我们首先在components目录下创建三个新组件:page1、page2和page3,分别在里面加入一行字,例如page1
<template>
    <div>
        这是第一个页面
    div>
template>
<script type="text/ecmascript-6">
    export default {
        data(){
            return {}
        }
    }
script>
page2和page3分别写“这是第二个页面”、“这是第三个页面”。
这三个页面就代表了我们写的三个要跳转的页面。接下来我们使用
npm install vue-router --save安装vue-router。
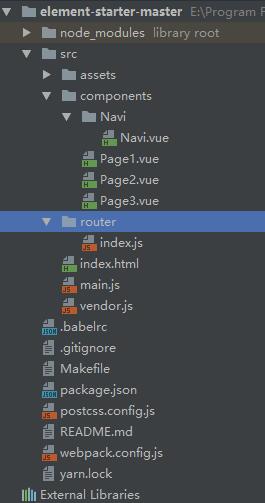
安装完成后,我们在src目录下创建一个新目录,名字为router,然后在router文件夹下建立一个javascript文件,名字为index.js,创建完毕后现在的目录结构为

这个router目录下的index.js就是vue-router的配置文件。我们在这个文件中加入如下代码:
import Vue from 'vue'
import VueRouter from 'vue-router'
import Page1 from '../components/Page1.vue'
import Page2 from '../components/Page2.vue'
import Page3 from '../components/Page3.vue'
Vue.use(VueRouter)

const router = new VueRouter({
    routes:[{
        path: '/Page1', component: Page1
    },{
        path: '/Page2', component: Page2
    },{
        path:'/Page3', component: Page3
    }]
})

export default router;
这里就是对跳转路径的配置。然后修改main.js
import Vue from 'vue'
import ElementUI from 'element-ui'
import 'element-ui/lib/theme-default/index.css'
import Navi from './components/Navi/Navi.vue'
import router from './router/index'

Vue.use(ElementUI)

new Vue({
  el: '#app',
  router,
  render: h => h(Navi)
})
这样我们的router就可以全局使用了。
接下来我们修改Navi.vue,
修改后的文件如下:
<template>
    <div style="background-color: #EBEBEB;min-height:800px">
        <div style="width:100%;background-color: #636363; overflow: hidden">
            <span class="demonstration" style="float:left;padding-top:10px;color:white;margin-left:1%">
                网站首页
            span>
            <span class="demonstration" style="float:left;padding:5px;color:white;margin-left:2%;width:15%">
                <el-input
                        placeholder="请输入"
                        icon="search"
                        v-model="searchCriteria"
                        :on-icon-click="handleIconClick">
                el-input>
            span>
            <span class="demonstration" style="float:right;padding-top:10px;margin-right:1%">
                <el-dropdown trigger="click">
                  <span class="el-dropdown-link" style="color:white">
                    admin<i class="el-icon-caret-bottom el-icon--right">i>
                  span>
                  <el-dropdown-menu slot="dropdown">
                    <el-dropdown-item>个人信息el-dropdown-item>
                    <el-dropdown-item>退出登录el-dropdown-item>
                  el-dropdown-menu>
                el-dropdown>
            span>
        div>

        <div style="margin-top:5px">
            <el-row :gutter="10">
                <el-col :xs="4" :sm="4" :md="4" :lg="4">
                    <div>
                        <el-menu default-active="1" class="el-menu-vertical-demo" style="min-height:800px" @select="handleSelect">
                            <el-menu-item index="1"><i class="el-icon-message">i>导航一el-menu-item>
                            <el-menu-item index="2"><i class="el-icon-menu">i>导航二el-menu-item>
                            <el-menu-item index="3"><i class="el-icon-setting">i>导航三el-menu-item>
                        el-menu>
                    div>
                el-col>
                <el-col :xs="20" :sm="20" :md="20" :lg="20">
                    <div>
                        <div style="border: 1px solid #A6A6A6; border-radius:6px; padding:5px; margin:2px; background-color: white">
                            <el-breadcrumb separator="/">
                                <el-breadcrumb-item v-for="item in breadcrumbItems">{{item}}el-breadcrumb-item>
                            el-breadcrumb>
                        div>
                    div>

                    <div style="margin-top:10px">
                        <router-view>router-view>
                    div>
                el-col>
            el-row>
        div>
    div>
template>
<script type="text/ecmascript-6">
    export default {
        data(){
            return {
                searchCriteria: '',
                breadcrumbItems: ['导航一'],
            }
        },

        methods:{
            handleIconClick(ev) {
                console.log(ev);
            },

            handleSelect(key, keyPath){
                switch(key){
                    case '1':
                        this.$router.push('/Page1');
                        this.breadcrumbItems  = ['导航一']
                        break;
                    case '2':
                        this.$router.push('/Page2')
                        this.breadcrumbItems  = ['导航二']
                        break;
                    case '3':
                        this.$router.push('/Page3')
                        this.breadcrumbItems  = ['导航三']
                        break;
                }
            },

        },
    }
script>
注意文件中多了一个
<div style="margin-top:10px">
    <router-view>router-view>
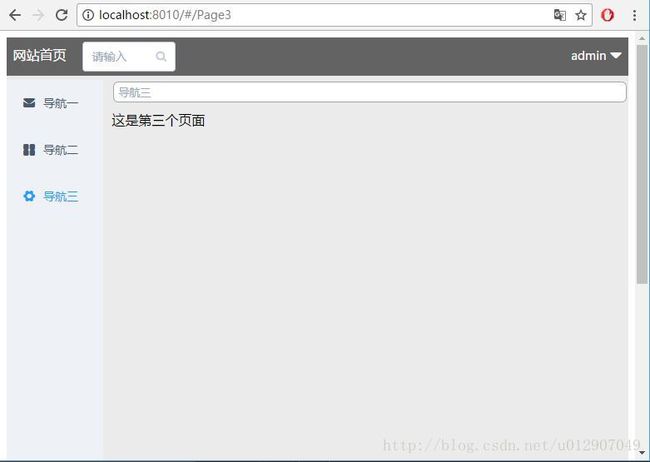
div>这个router-view就是用来显示跳转的页面,也就是page1,page2和page3。我们给左侧的菜单栏添加了一个响应,在响应函数中作出了路由跳转的处理。this.$router.push('/Page1');这句话的意思就是将当前要跳转的页面push到router的数组中。这里使用push而不是直接给数组赋值的原因是希望用户点击浏览器中的后退和前进按钮时可以回到之前操作的页面。修改完成后我们可以看一下效果,注意浏览器地址栏的变化:


可以看到我们在点击左侧导航栏里面不同的条目时,浏览器地址栏里显示的地址作出了改变,右侧显示的文字也分别对应三个page组件。至此,一个可以进行路由跳转的主页就完成了。
结束语
在这篇文章中我们构建了自己的网站导航页,可以看出相对来说还是比较简单。在下一篇博客中我将会介绍各个跳转到的component的详细写法,以及组件化编程中各个组件的通信方法。