深入浅出Netflix Conductor使用
Netflix Conductor框架是典型的服务编排框架,通过Conductor还可以实现工作流和分布式调度,性能非常卓越。
关于Conductor的基本概念在 https://netflix.github.io/conductor/intro/ 文中已经有深入介绍,本篇将以实战案例为出发点深入介绍Conductor的使用。
一、Conductor的功能全景图
在正式使用之前我们先来了解Conductor都有哪些功能,通过流程、任务、历史、监控、客户端、通信和管理后台几个层面来做了功能归类。
- 流程
流程引擎默认是用DSL来编写流程定义文件,这是一种JSON格式的文件,我们的工作流案例就是以这个定义文件为驱动的,但是很可惜目前Conductor只支持手写定义,无法通过界面生成,这块就需要后面通过改造Conductor来增加相应功能。 - 任务
这里面包括的主要是和任务相关的功能,通过这个功能可以进行简单工作流的实现,还可以进行并行计算。 - 历史
如果想要查看之前进行过的(完成,失败等终态)历史任务,通过这个功能就可以实现。 - 监控
当工作流任务流程非常冗长的时候,我们对每个节点的任务运行情况并不了解,这时候就需要有一个任务监控功能及时知道流程的状态方便我们做出相应决策。同时还有一个重要功能是任务调度,通过这个功能可以实现类似xxl-job的功能,满足分布式定时调度的需求。 - 客户端和通信
这二个功能本是一体的,既然Conductor是分布式的任务流程那么核心原理就是通过Server+Worker的方式,利用核心状态机发消息的方式来驱动客户端的任务执行,而Worker的实现是跨语言的,可以用JAVA、Python、go等语言实现,而Worker需要长轮询Server端的状态来判断当然是否有自己的任务来执行。 - 管理后台
通过管理后台可以查看任务和工作流的元数据定义,工作流的执行状态等。
二、Conductor的架构图

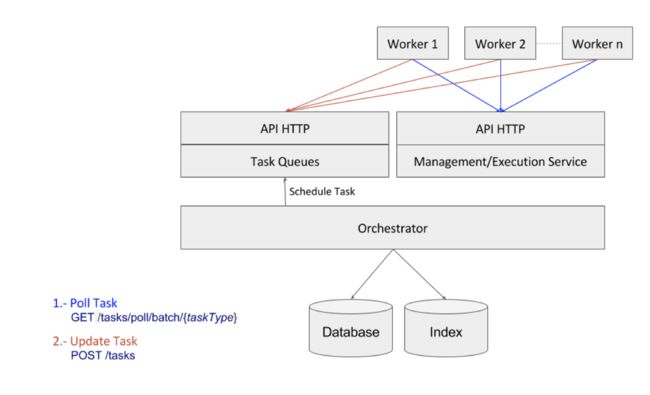
其中:Task Queues使用Dyno-queues做任务延迟。
三、实战案例
通过命令行将Netflix Conductor Sever端启动之后( https://netflix.github.io/conductor/intro/#installing-and-running 介绍了如何安装Conductor),访问localhost:8080地址显示如下页面:
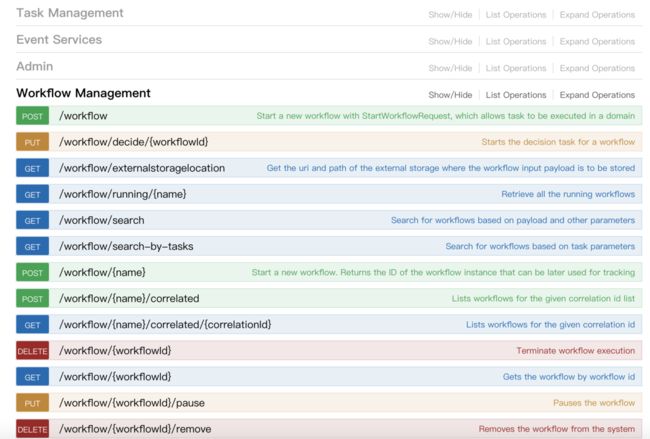
这个页面主要负责的是关于Conductor的任务、工作流的元数据管理,提供了很多http接口可供使用,如下图所示:
我们可以直接调用默认提供的接口页面通过传递参数来进行任务和工作流的定义,当然也可以自己写页面调用相应的URL来进行。首先我们要先进行任务文件的定义,如下图所示:
在这个截图中,我们定义了二个任务,分别是leaderRatify和managerRatify,截图中的原始定义文件如下:
[

{

  "name": "leaderRatify",

  "retryCount": 3,

  "timeoutSeconds": 1200,

  "inputKeys": [

    "staffName",

    "staffDepartment"

  ],

  "outputKeys": [

    "leaderAgree",

    "leaderDisagree"

  ],

  "timeoutPolicy": "TIME_OUT_WF",

  "retryLogic": "FIXED",

  "retryDelaySeconds": 600,

  "responseTimeoutSeconds": 3600

},

{

  "name": "managerRatify",

  "retryCount": 3,

  "timeoutSeconds": 1200,

  "inputKeys": [

    "managerName",

    "managerDeparment"

  ],

  "outputKeys": [

    "managerAgree",

    "managerDisagree"

  ],

  "timeoutPolicy": "TIME_OUT_WF",

  "retryLogic": "FIXED",

  "retryDelaySeconds": 600,

  "responseTimeoutSeconds": 3600

}

]
任务定义好之后,接下来需要通过任务建立工作流定义,如下图所示:

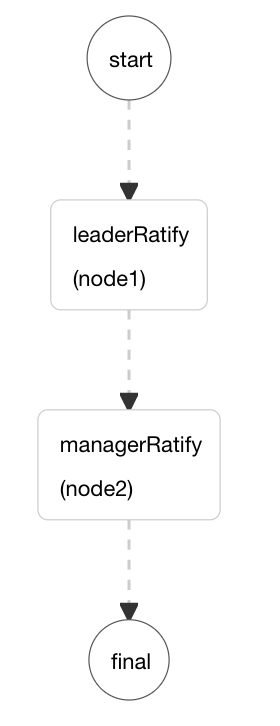
工作流定义文件就是我们整个流程所走的路径,将流程文件转换成流程图如下所示:
流程定义文件的原始文件内容如下:
{
  "updateTime": 1540448903202,
  "name": "Leave process",
  "description": "a demo for workflow",
  "version": 1,
  "tasks": [
    {
      "name": "leaderRatify",
      "taskReferenceName": "node1",
      "inputParameters": {
        "staffName": "${workflow.input.staffName}",
        "staffDepartment": "${workflow.input.staffDepartment}"
      },
      "type": "SIMPLE",
      "startDelay": 0
    },
    {
      "name": "managerRatify",
      "taskReferenceName": "node2",
      "inputParameters": {
        "managerName": "${node1.output.leaderName}",
        "managerDepartment": "${node1.output.leaderDepartment}"
      },
      "type": "SIMPLE",
      "startDelay": 0
    }
  ],
  "outputParameters": {
    "leaderName": "${node1.output.leaderName}",
    "leaderDepartment": "${node1.output.leaderDepartment}",
    "managerAgree": "${node2.output.managerAgree}",
    "managerDisagree": "${node2.output.managerDisagree}"
  },
  "restartable": true,
  "schemaVersion": 2
}
上面的流程主要介绍了Task任务定义文件、工作流流程文件如何定义和上传的,这二个文件主要是提供给Conductor的状态机使用,而我们真正的任务Worker则需要自己写java代码来实现,然后通过长轮询Conductor Server来获取自己的状态以及任务步骤,Worker代码如下所示:
class LeaderRatifyWorker implements Worker {
    private String taskDefName;
    public SampleWorker(String taskDefName) {
        this.taskDefName = taskDefName;
    }
    @Override
    public String getTaskDefName() {
        return taskDefName;
    }
    @Override
    public TaskResult execute(Task task) {
        System.out.printf("Executing %s%n", taskDefName);
        System.out.println("staffName:" + task.getInputData().get("staffName"));
        System.out.println("staffDepartment:" + task.getInputData().get("staffDepartment"));
        TaskResult result = new TaskResult(task);
        result.setStatus(TaskResult.Status.COMPLETED);
        //Register the output of the task
        result.getOutputData().put("outputKey1", "value");
        result.getOutputData().put("oddEven", 1);
        result.getOutputData().put("mod", 4);
        result.getOutputData().put("leaderAgree", "yes");
        result.getOutputData().put("leaderDisagree", "no");
        return result;
    }
}
class ManagerRatifyWorker implements Worker {
    private String taskDefName;
    public SampleWorker2(String taskDefName) {
        this.taskDefName = taskDefName;
    }
    @Override
    public String getTaskDefName() {
        return taskDefName;
    }
    @Override
    public TaskResult execute(Task task) {
        System.out.printf("Executing %s\n", taskDefName);
        System.out.println("managerName:" + task.getInputData().get("managerName"));
        System.out.println("managerDepartment:" + task.getInputData().get("managerDepartment"));
        TaskResult result = new TaskResult(task);
        result.setStatus(TaskResult.Status.COMPLETED);
        //Register the output of the task
        result.getOutputData().put("managerAgree", String.valueOf(task.getInputData().get("managerName")));
        result.getOutputData().put("managerDisagree", String.valueOf(task.getInputData().get("managerDepartment")));

        return result;
    }
}

//在main方法中创建工作Worker以及设置需要访问的Conductor Server端api地址,并将流程进入初始化
 public static void main(String[] args) {
        TaskClient taskClient = new TaskClient();
        taskClient.setRootURI("http://localhost:8080/api/");       //Point this to the server API
        int threadCount = 2;         //number of threads used to execute workers.  To avoid starvation, should be same or more than number of workers
        Worker worker1 = new LeaderRatifyWorker("leaderRatify");
        Worker worker2 = new ManagerRatifyWorker("managerRatify");
        //Create WorkflowTaskCoordinator
        WorkflowTaskCoordinator.Builder builder = new WorkflowTaskCoordinator.Builder();
        WorkflowTaskCoordinator coordinator = builder.withWorkers(worker1, worker2).withThreadCount(threadCount).withTaskClient(taskClient).build();
        //Start for polling and execution of the tasks
        coordinator.init();
}
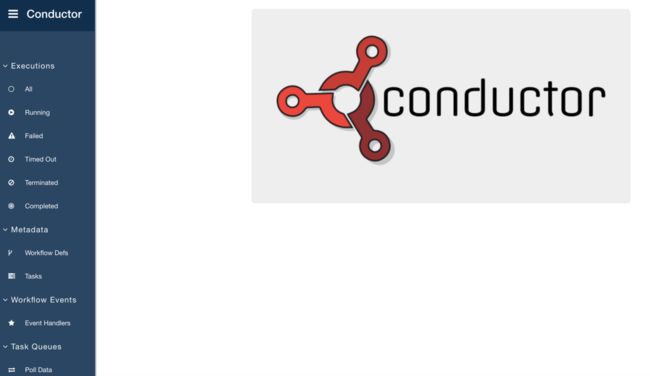
当流程执行完以后,我们来访问Conductor的Admin管理界面,通过localhost:5000端口访问,看到如下图所示界面:
可以看到目前所有工作流的状态均已经是执行完毕,通过Status状态通过看到每个工作流当前的执行状态,分别是Running、Completed、Timed out、Terminated等状态。点击右侧Workflow列表中第一条workflowID显示如下界面:

界面中的流程图节点显示为绿色,表示工作流正常的执行完毕没有报任何故障,而右上角红框的Restart表示可以重启工作流。
###四、小结
通过使用Netflix Conductor后,我们首先来看一下Conductor到底能干什么:
- 以蓝图为主,基于JSON DSL的蓝图定义了执行流程;
- 跟踪和管理工作流;
- 能够暂停,恢复和重新启动流程;
- 用户界面可视化流程;
- 能够在需要时同步处理所有任务;
- 能够扩展到数百万个同时运行的流程;
- 由客户抽象的排队服务提供后端支持;
- 能够通过HTTP或其他传输操作,例如gRPC;
但如果要大规模使用还需要进行一些定制化开发才能使框架的功效发挥到最大:
- 流程定义文件需要自己手写DSL,需要改造成通过流程设计器界面来生成。
- 无人员和权限管理功能,需要改造增加。


