配置nginx反向代理,解决前端测试开发跨域问题
其实跨越的问题就是我们在本地开发测试时才会产生跨域问题,具体什么才是跨域问题我就不唠叨了!开发完成,项目上线是不存在跨域的,因为我们的前端代码和后台接口同处在一个服务器上是不存在跨域的。言归正传,脱离后台解决前端本地开发测试数据的跨域问题:
首先下载安装Nginx,很简单百度搜索并下载安装 Nginx.exe软件
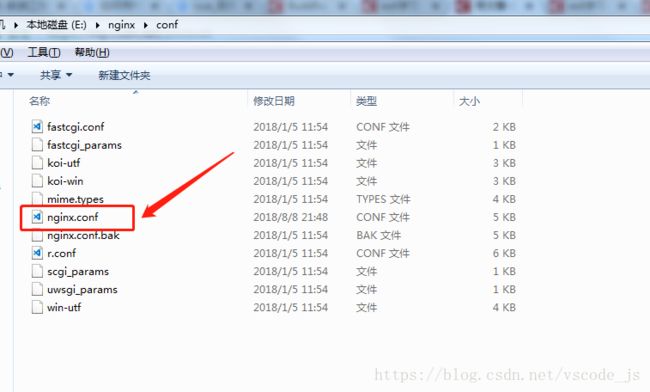
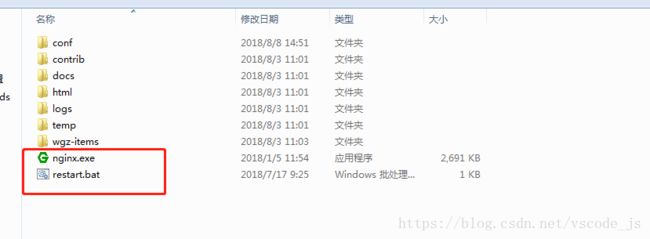
其次,安装完成,绿色图标的nginx.exe就是nginx启动程序了。启动之前我们要进行nginx的配置,否则是无法启动nginx的。
接下来配置nginx.conf文件,找到nginx.conf文件使用前端编辑器或者记事本打开
下面开始配置nginx.conf文件:
#user nobody;
worker_processes 1;
#error_log logs/error.log;
#error_log logs/error.log notice;
#error_log logs/error.log info;
#pid logs/nginx.pid;
events {
worker_connections 1024;
}
http {
include mime.types;
default_type application/octet-stream;
#log_format main '$remote_addr - $remote_user [$time_local] "$request" '
# '$status $body_bytes_sent "$http_referer" '
# '"$http_user_agent" "$http_x_forwarded_for"';
#access_log logs/access.log main;
sendfile on;
#tcp_nopush on;
#keepalive_timeout 0;
keepalive_timeout 65;
#gzip on;
upstream www.zutuan.cn {
server 119.75.216.20:80;#代理的服务器IP 查询IP ping + www.baidu.com,端口没有的话默认应该是80端口
}
server {
listen 8888;#配置端口号,此处的端口号就是nginx代理的端口号
server_name www.baidu.com;#配置服务器域名
gzip on;
#charset koi8-r;
root E:/wgz-items/branch_office_control/build; #本地项目绝对路径,这个路径就是本地开发项目的绝对路径,打开本地盘符粘贴复制,并且将\改为/,我使用的是gulp打包项目的,打包完成的是build文件夹,所以配置nginx代理的本地项目绝对路径根目录是build文件夹
index index.html index.htm;
#access_log logs/host.access.log main;
# location ~ .*\.(?:jpg|jpeg|gif|png|ico)$
# {
# expires 365d;
# }
# location ~ .*\.(?:js|css)$
# {
# expires 365d;
# }
location ~ .*\.(?:htm|html)$
{
expires 3m;
}
# location / {
# root E:/nginx-1.15.2/web/www.zutuan.cn/;
# index index.html index.htm;
# }
location ^~ /api/ {
client_max_body_size 20m;
proxy_pass http://www.baidu.cn/api/;#接口url
}
#error_page 404 /404.html;
# redirect server error pages to the static page /50x.html
#
error_page 500 502 503 504 /50x.html;
location = /50x.html {
root html;
}
# proxy the PHP scripts to Apache listening on 127.0.0.1:80
#
#location ~ \.php$ {
# proxy_pass http://127.0.0.1;
#}
# pass the PHP scripts to FastCGI server listening on 127.0.0.1:9000
#
#location ~ \.php$ {
# root html;
# fastcgi_pass 127.0.0.1:9000;
# fastcgi_index index.php;
# fastcgi_param SCRIPT_FILENAME /scripts$fastcgi_script_name;
# include fastcgi_params;
#}
# deny access to .htaccess files, if Apache's document root
# concurs with nginx's one
#
#location ~ /\.ht {
# deny all;
#}
}
# another virtual host using mix of IP-, name-, and port-based configuration
#
#server {
# listen 8000;
# listen somename:8080;
# server_name somename alias another.alias;
# location / {
# root html;
# index index.html index.htm;
# }
#}
# server {
# # listen 80;
# # server_name nginx.sitezt.cn;
# # location /apis {
# # rewrite ^/apis/(.*)$ /$1 break;
# # proxy_pass http://trade.sitezt.cn;
# # }
# location / {
# root html;
# index index.html index.htm;
# add_header 'Access-Control-Allow-Origin' *;
# }
# location /apis {
# rewrite ^.+apis/?(.*)$ /$1 break;
# proxy_pass http://trade.sitezt.cn/;
# }
# }
# HTTPS server
#
#server {
# listen 443 ssl;
# server_name localhost;
# ssl_certificate cert.pem;
# ssl_certificate_key cert.key;
# ssl_session_cache shared:SSL:1m;
# ssl_session_timeout 5m;
# ssl_ciphers HIGH:!aNULL:!MD5;
# ssl_prefer_server_ciphers on;
# location / {
# root html;
# index index.html index.htm;
# }
#}
}
这是c++语言,#代表注释,注释的代码可有可无,重要代码已经加粗显示了
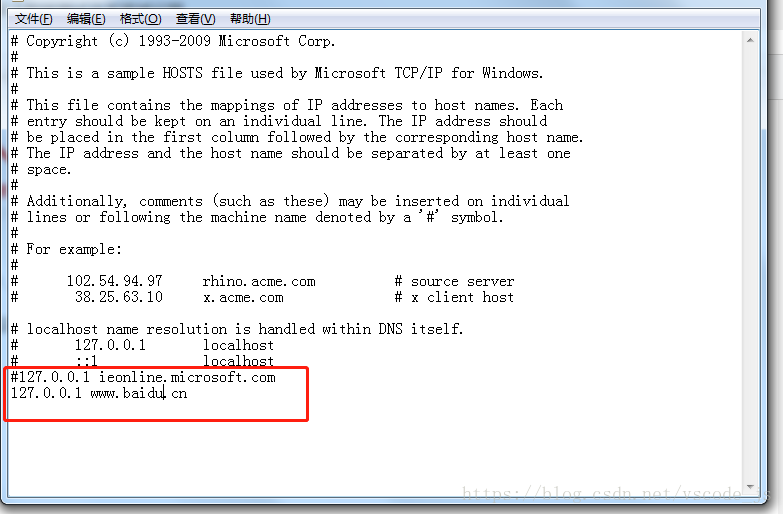
配置完成,我们还要继续配置hosts文件,这样才能实现nginx反向代理
配置hosts文件的第一步:找到hosts文件
接下来打开hosts文件,右键以管理员身份运行
打开后我们看到的是这样的文件内容:
我们要做的就是注释hosts文件最后一行:#127.0.0.1 ieonline.microsoft.com
并在下面一行写入我们使用nginx反向代理的服务器url,即:
我是以www.baidu.com为例的,小伙伴们要改为自己实际项目的域名配置
最后一步就是单击启动nginx程序了,绿色图标的nginx.exe文件
你会看到会看到一个命令框闪退了一下,不要惊慌这就是nginx启动完成了,其次点击restart.bat文件,查看是否启动nginx文件,
点击restart.bat文件,会弹出命令行工具展示,红框标记的这串英文提示我们nginx已经启动了。同时为了验证是否已经启动了nginx,我们可以打开我们的任务管理器查看,启动任务管理器的方式是:ctrl + alt + del 按键,在进程一栏中我们可以看到
nginx.exe *32已经启动了,ok。下面我们就可以启动我们的项目了,我是使用gulp启动项目的,执行gulp build命令。创建build文件夹,不需要执行gulp server命令,因为我们此时需要nginx反向代理到服务器进行数据的访问,打开我们的浏览器输入刚刚配置的nginx代理服务器地址+项目绝对路径,即:http://www.baidu.com:8888/view/index.html,我的html文件是在build根目录下面的view文件夹下的,所以在nginx.conf配置文件内部我们配置的项目绝对路径的根目录是build文件夹
基本上nginx反向代理解决前端项目跨域问题就是这么简单的完成了……


