springboot总结二
文章目录
- 关于配置文件
- 一、参数配置文件的默认约定名称为:
- 二、配置参数文件的默认约定放置位置(优先级从高到底)为:
- 三、自定义配置文件名称和路径
- 四、参数使用详解
- 1、用注解根据参数名称获取
- 2、通过spring Environment对象的getProperty方法获取。
- 3、获取参数随机值
- 五、参数命名规则
- 六、Profiles详解
- 1、通过Profiles知道bean的应用环境
- 2、通过profile指定不同环境的配置参数值
- 3、指定程序启用的profiles
- 七、bean自动配置原理
- 动手制作一个第三方lib的starter
- 1、新建工程
- 2、引入spring-boot-start、spring-boot-auto从figure、第三方jar
- 3、如果需要生成配置元信息,引入spring-boot-configuration-processor依赖
- 4、编写自动配置类
- a、自动配置中的参数装载Bean
- b、创建装载配置类
- 5、配置发现配置文件
- 6、打包发布
- 补充
关于配置文件
一、参数配置文件的默认约定名称为:
application.properties/application.yml
二、配置参数文件的默认约定放置位置(优先级从高到底)为:
- 运行程序的当前工作目录下的config子目录
file:./config - 运行程序的当前工作目录
file:./ classpath:/config子目录classpath:/根目录
三、自定义配置文件名称和路径
springboot是在ConfigFileApplicationListener类里设置配置文件的默认名和默认路径的,以及指定配置文件名和配置文件路径的参数分别为spring.config.name和spring.config.location
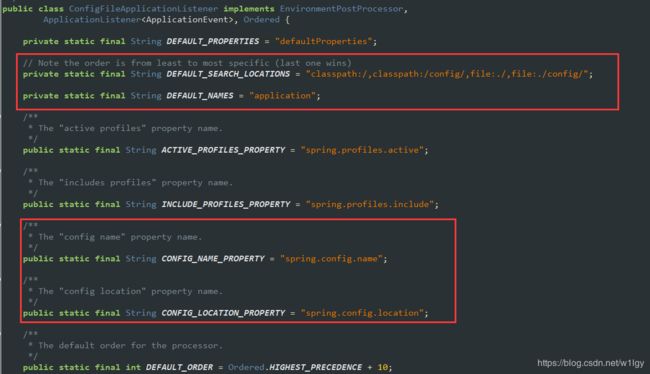
可以通过指定spring.config.name和spring.config.location属性的值来改变约定的默认名称、位置。
指定spring.config.name和spring.config.location属性值的三种方式(优先级从高到底):
- 程序命令行参数:
--spring.confg.name=xxxx
(–用来说明不是一个普通程序参数,而是一个配置参数)
eg:& java -jar myproject.jar --spring.config.name=myproject - JVM参数:
-Dspring.config.name=xxxx - 操作系统环境变量:
spring.config.name=xxxx
spring.config.location也是一样的指定方法,
eg:java -jar myproject.jar --spring.config.location=classpath:/default.properties,classpath:/override.properties
补充:
1、spring.config.name和spring.config.location都可以有多个值,用 , 隔开,查找的顺序(优先级)是配置的反序。
2、当需要额外添加配置信息的时候又不想改变原配置,可以通过属性spring.config.additional-location来指定补充配置文件目录或配置文件,其优先级高于spring.config.location。
四、参数使用详解
1、用注解根据参数名称获取
引用格式:@Value("&{参数名称}") ;
eg:
@Component
public class MyBean {

	@Value("${my.name}")
	private String name;

	@Value("${my.age}")
	private int age;

	@Value("${my.cup}")
	private String cup;

	@Override
	public String toString() {
		return "MyBean [name=" + name + ", age=" + age + ", cup=" + cup + "]";
	}

}
2、通过spring Environment对象的getProperty方法获取。
Environment可以直接注入,spring会自动创建实例填充数据。
@Component
public class UserEnvironmentDemo {

	@Autowired
	private Environment env;

	public void service() {
		System.out.println(env.getProperty("my.name"));
	}
}
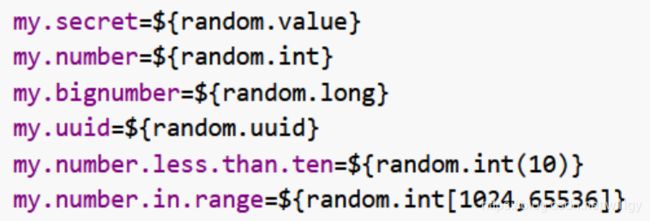
3、获取参数随机值
如果你的配置中需要随机值,可通过RandomValuePropertySource源获得随机的int、long、uuid、字符串
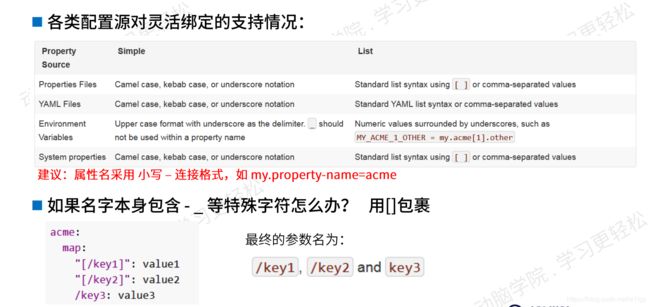
五、参数命名规则
六、Profiles详解
Profiles是spring配置文件提供的一种隔离应用程序配置的方法,使其仅在特定环境中可用。就是可以实现不同环境使用不同的配置。
1、通过Profiles知道bean的应用环境
任何@Component或@Configuration都可以用@Profiles类标记,以便在加载时进行限制。
@Component
@Profile("dev")
public class MyBean {

	@Value("${my.name}")
	private String name;

	@Value("${my.age}")
	private int age;

	@Value("${my.cup}")
	private String cup;

	@Override
	public String toString() {
		return "MyBean [name=" + name + ", age=" + age + ", cup=" + cup + "]";
	}
}
2、通过profile指定不同环境的配置参数值
方式一、通过不同的配置文件来区分
application-{profile}。properties或者application-{profile}.yml,即可以根据文件“、”后的字符来自动匹配profile
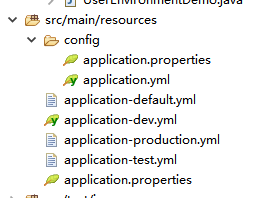
没有带-{profile}的文件表示用于所有环境,当程序有指定启用某profiles并且有地方用到相应带-{profile}的文件里的配置,改配置才能用到。
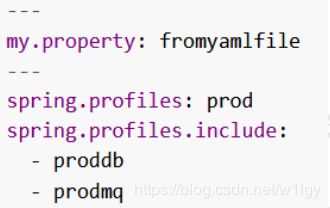
方法二、在同一个yml配置文件中区分
如果不想写多个配置文件的话,在一个yml配置文件里面也可以通过“---”和声明profiles来区分
“---”是内容分隔符,没块内容都要声明spring.profiles是什么,并且一块内容可以两个Profiles公用。
my:
  name: mike-RRRconfig
  age: 80
  cup: A
---
spring:
  profiles: production
my:
  name: mike-productionconfig
  age: 30
  cup: A
---
spring:
  profiles: dev & eu-central
还可以通过spring.profiles.include来指定某个环境包含其他的profile定义
3、指定程序启用的profiles
当没有指定启用的profiles时,只会默认启用application-default.yml和application-default.properties(在有配置有使用下才有意义),否则即使有配置了其他profiles文件也有在程序中使用,也是调用不到的,程序会报错,必须通过配置参数spring.profile.active来指定应用程序启用的profiles,有如下的启用方式
方式一、通过配置在application.properties中、环境变量、jvm参数、命令行程序参数中指定都可以
可以理解为dev配置文件继承了application,相同属性dev会覆盖前面的。
application.properties中:
spring.profiles.active=dev,hsqldb
命令中:
-- spring.profiles.active=dev,hsqldb
方式二、编程是知道启用的环境
在springboot启动类中调用setAdditionalProfiles方法
		 SpringApplication sa = new SpringApplication(SpringBootStudyConfigApplication.class);
		 sa.setAdditionalProfiles("dev", "devdb");
		 sa.run(args);
七、bean自动配置原理
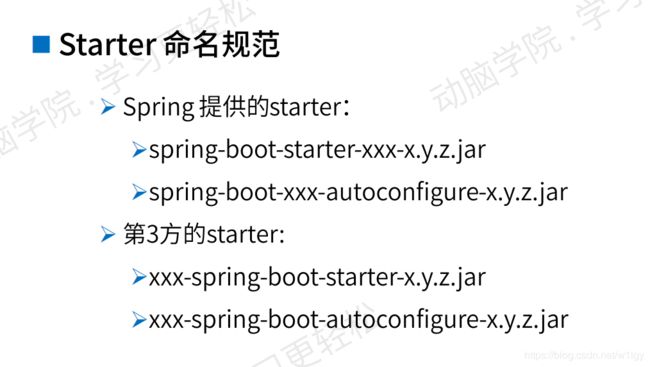
首先springboot要整合某些框架之前当然要把这些框架相应的包引进来,除此之外还要引进springboot整合这些框架的包,才能自动完成bean配置。
需要这些包的命名规范:
下面通过动手制作一个第三方lib的starter来理解
动手制作一个第三方lib的starter
步骤如下:
1、新建工程
可参考 Spring Boot总结一 的第二部分
2、引入spring-boot-start、spring-boot-auto从figure、第三方jar
3、如果需要生成配置元信息,引入spring-boot-configuration-processor依赖
这里第二第三步合并到一起了
	4.0.0

		org.springframework.boot
		spring-boot-starter-parent
		2.1.2.RELEASE


	com.study.mike
	spring-boot-study-starter-use
	0.0.1-SNAPSHOT
	spring-boot-study-starter-use
	Demo project for Spring Boot


		1.8


	    	org.springframework.boot
	    	spring-boot-starter


	    	org.springframework.boot
	    	spring-boot-autoconfigure


	    	org.springframework.boot
	    	spring-boot-configuration-processor


			org.springframework.boot
			spring-boot-starter-test
			test


				org.springframework.boot
				spring-boot-maven-plugin
4、编写自动配置类
a、自动配置中的参数装载Bean
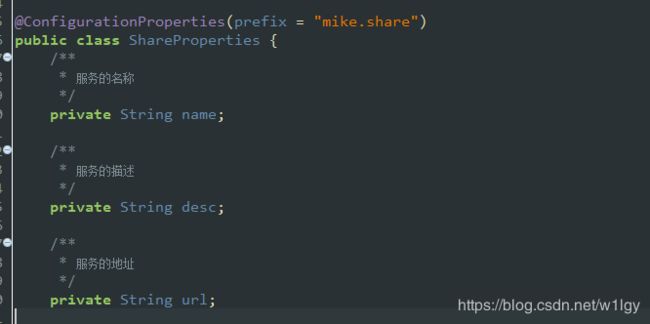
@ConfigurationProperties(prefix = "mike.share") 加在一个bean类上,给bean的属性进行赋值,属性需有getters and setters方法,然后springboot会根据我们在配置文件配置的属性来装配类的相应属性。
新建一个配置文件属性填充类ShareProperties,prefix的值mike.share是配置的前缀(前缀可以根据需要自由修改),各属性对应配置文件的属性。
b、创建装载配置类
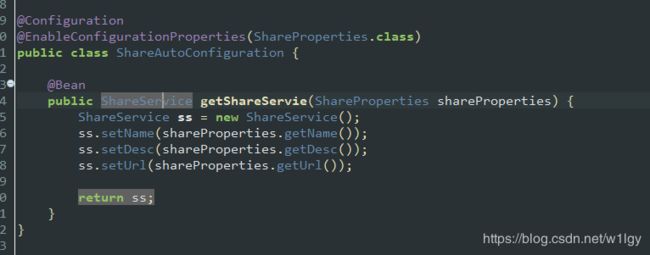
加上@Configuration @EnableConfigurationProperties(ShareProperties.class) 这两个注解,并声明ShareProperties类(我们前面创建的参数装载Bean),如下写一个方法装载bean,就会把配置文件的属性值注入到ShareProperties对应的属性中。
5、配置发现配置文件
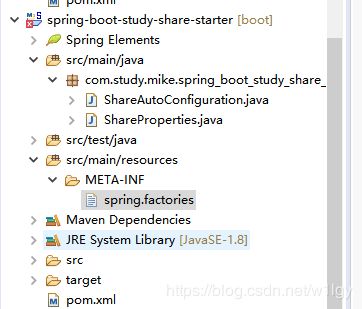
在ClassPath路径下创建META-INF目录,新建spring.factories文件(路径和文件名不能变),springboot会扫描所有包这个路径下的spring.factories文件的配置类来加载初始化配置bean,实现bean的自动加载配置
设置自动装载配置类
# Auto Configure
org.springframework.boot.autoconfigure.EnableAutoConfiguration=\
com.study.mike.spring_boot_study_share_starter.ShareAutoConfiguration
在配置文件配置属性对应值,如此就可以填充到bean对象中,可以从bean对象中提取属性值了。
application.properties
mike.share.name=service1
mike.share.desc=sssssssssss
mike.share.url=http://www.mike.com/serices/service1
@SpringBootApplication
public class SpringBootStudyStarterUseApplication implements ApplicationRunner {

	public static void main(String[] args) {
		SpringApplication.run(SpringBootStudyStarterUseApplication.class, args);
	}

	@Autowired
	private ShareService shareService;

	@Override
	public void run(ApplicationArguments args) throws Exception {
		this.shareService.service();
	}

}
运行结果打印出了以下内容
ShareService [name=service1, desc=sssssssssss, url=http://www.mike.com/serices/service1]
6、打包发布
经过上面的步骤就可以打包发布到maven仓库中,给我们其他的springboot项目使用了。
补充
我们上面创建的自动装载的bean,有另外的实例化方法,可以直接加上 Component 实例化到spring容器中,需要用的时候可以直接注入使用。
直接@Component实例化bean,@ConfigurationProperties注入属性值,prefix是属性前缀。
package com.study.mike.springboot.study.starter.use;

import org.springframework.boot.context.properties.ConfigurationProperties;
import org.springframework.stereotype.Component;

@Component
@ConfigurationProperties(prefix = "acme")
public class AcmeProperties {
	/**
	 * 服务的名称
	 */
	private String name;

	/**
	 * 服务的描述
	 */
	private String desc;

	/**
	 * 服务的地址
	 */
	private String url;

	public String getName() {
		return name;
	}

	public void setName(String name) {
		this.name = name;
	}

	public String getDesc() {
		return desc;
	}

	public void setDesc(String desc) {
		this.desc = desc;
	}

	public String getUrl() {
		return url;
	}

	public void setUrl(String url) {
		this.url = url;
	}

	@Override
	public String toString() {
		return "AcmeProperties [name=" + name + ", desc=" + desc + ", url=" + url + "]";
	}

	public void service() {
		System.out.println(this.toString());
	}

}
启动类
@SpringBootApplication
public class SpringBootStudyStarterUseApplication implements ApplicationRunner {

	public static void main(String[] args) {
		SpringApplication.run(SpringBootStudyStarterUseApplication.class, args);
	}

	@Autowired
	private AcmeProperties acmeProperties;

	@Override
	public void run(ApplicationArguments args) throws Exception {
		this.acmeProperties.service();
	}

}
配置文件:
mike.share.name=service1
mike.share.desc=sssssssssss
mike.share.url=http://www.mike.com/serices/service1

acme.name=acmeService
acme.desc=acmesssssssssss
acme.url=http://www.mike.com/serices/acmeService
运行结果输出:
AcmeProperties [name=acmeService, desc=acmesssssssssss, url=http://www.mike.com/serices/acmeService]

