anadroid inputmanager详细分析
a
先上一张图,对input整体框架有个总体认识:

InputManager是输入控制中心,它有两个关键线程InputReaderThread和InputDispatcherThread,它们的主要功能部分分别在InputReader和InputDispacher。前者用于从设备中读取事件,后者将事件分发给目标窗口。EventHub是输入设备的控制中心,它直接与inputdriver打交道。负责处理输入设备的增减,查询,输入事件的处理并向上层提供getEvents()接口接收事件。在它的构造函数中,主要做三件事:
1. 创建epoll对象,之后就可以把各输入设备的fd挂在上面多路等待输入事件。
2. 建立用于唤醒的pipe,把读端挂到epoll上,以后如果有设备参数的变化需要处理,而getEvents()又阻塞在设备上,就可以调用wake()在pipe的写端写入,就可以让线程从等待中返回。
3. 利用inotify机制监听/dev/input目录下的变更,如有则意味着设备的变化,需要处理。
事件的处理是流水线,需要InputReader先读事件,然后InputDispatcher才能进一步处理和分发。因此InputDispatcher需要监听InputReader。这里使用了Listener模式,InputDispacher作为InputReader构造函数的第三个参数,它实现InputListenerInterface接口。到了InputReader的构造函数中,将之包装成QueuedInputListener。QueuedInputListener中的成员变量mArgsQueue是一个缓冲队列,只有在flush()时,才会一次性通知InputDispatcher。QueuedInputListener应用了Command模式(感觉更像观察者模式,这个设计模式待定),它通过包装InputDispatcher(实现InputListenerInterface接口),将事件的处理请求封装成NotifyArgs,使其有了缓冲执行的功能。
下面分析inputmanager的inputReader和InputDispatcher,分析后应该知道inputReader是怎么发送input事件给InputDispatcher,并且InputDispatcher是怎么把inut事件发送出去的。
先看一张序列图:
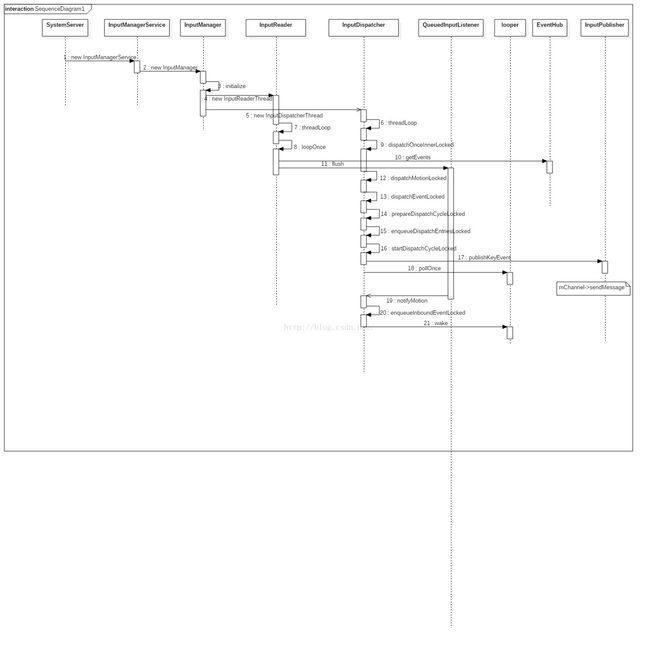
先分析inputReader:
bool InputReaderThread::threadLoop() {
    mReader->loopOnce();
    return true;
}
void InputReader::loopOnce() {
....
size_t count = mEventHub->getEvents(timeoutMillis, mEventBuffer, EVENT_BUFFER_SIZE);
if (count) {
processEventsLocked(mEventBuffer, count);
}
.....
mQueuedListener->flush();
}这里只摘出了,我们需要分析的流程代码,EventHub先读取驱动中上报的input事件,然后再调用mQueueListener->flush()。
这个mQueueListener->flush()是什么东西?
这里用到了通知者模式:
进入InputListener.cpp查看代码可以看到,notifyXXXX,这里以notifyMotion举例说明,
void QueuedInputListener::notifyMotion(const NotifyMotionArgs* args) {
    mArgsQueue.push(new NotifyMotionArgs(*args));
}
这里是实现了被通知者注册的函数,想要被通知方都可以注册,然后当通知方发送通知的时候,被通知方都能够收到消息。
被通知方类:
NotifyMotionArgs::NotifyMotionArgs(......) {
    for (uint32_t i = 0; i < pointerCount; i++) {
        this->pointerProperties[i].copyFrom(pointerProperties[i]);
        this->pointerCoords[i].copyFrom(pointerCoords[i]);
    }
}

NotifyMotionArgs::NotifyMotionArgs(const NotifyMotionArgs& other):.... {
    for (uint32_t i = 0; i < pointerCount; i++) {
        pointerProperties[i].copyFrom(other.pointerProperties[i]);
        pointerCoords[i].copyFrom(other.pointerCoords[i]);
    }
}

void NotifyMotionArgs::notify(const sp& listener) const {
    listener->notifyMotion(this);
} void TouchInputMapper::dispatchMotion(){ ..... NotifyMotionArgs args(when, getDeviceId(), source, policyFlags,
action, flags, metaState, buttonState, edgeFlags,
mViewport.displayId, pointerCount, pointerProperties, pointerCoords,
xPrecision, yPrecision, downTime);
getListener()->notifyMotion(&args);
}这里就注册了被通知者,当然还有一些其他的被通知者类型,大家可以看InputListener.cpp文件。
QueuedInputListener::flush()函数的实现:
void QueuedInputListener::flush() {
    size_t count = mArgsQueue.size();
    for (size_t i = 0; i < count; i++) {
        NotifyArgs* args = mArgsQueue[i];
        args->notify(mInnerListener);
        delete args;
    }
    mArgsQueue.clear();
}void NotifyMotionArgs::notify(const sp& listener) const {InputManager::InputManager(
const sp& eventHub,
const sp& readerPolicy,
const sp& dispatcherPolicy) {
mDispatcher = new InputDispatcher(dispatcherPolicy);
mReader = new InputReader(eventHub, readerPolicy, mDispatcher);
initialize();
} listener->notifyMotion(this);} listener是什么?
listener是mInnerListener,mInnerListener是什么?
QueuedInputListener::QueuedInputListener(const sp& innerListener) :
        mInnerListener(innerListener) {
}
InputReader::InputReader(const sp& eventHub,
const sp& policy,
const sp& listener) {
mQueuedListener = new QueuedInputListener(listener);
{ // acquire lock
AutoMutex _l(mLock);
refreshConfigurationLocked(0);
updateGlobalMetaStateLocked();
} // release lock
}
InputManager::InputManager(
        const sp& eventHub,
        const sp& readerPolicy,
        const sp& dispatcherPolicy) {
    mDispatcher = new InputDispatcher(dispatcherPolicy);
    mReader = new InputReader(eventHub, readerPolicy, mDispatcher);
    initialize();
} 所以
listener->notifyMotion(this);void InputDispatcher::notifyMotion(const NotifyMotionArgs* args) {
....
needWake = enqueueInboundEventLocked(newEntry);
.....
if (needWake) {
mLooper->wake();
}
}enqueueInboundEventLocked()----mInboundQueue.enqueueAtTail(entry); inputevent事件都存在了mInboundQueue中。
mLooper->wake();wake 肯定有mLooper->wait();继续分析。
在上面分析的loopOnce()中,还有processEventsLocked(mEventBuffer, count);函数,该函数里面也运用了观察者模式。
void InputReader::processEventsLocked(const RawEvent* rawEvents, size_t count) {
    for (const RawEvent* rawEvent = rawEvents; count;) {
        int32_t type = rawEvent->type;
        size_t batchSize = 1;
        if (type < EventHubInterface::FIRST_SYNTHETIC_EVENT) {
            int32_t deviceId = rawEvent->deviceId;
            while (batchSize < count) {
                if (rawEvent[batchSize].type >= EventHubInterface::FIRST_SYNTHETIC_EVENT
                        || rawEvent[batchSize].deviceId != deviceId) {
                    break;
                }
                batchSize += 1;
            }
#if DEBUG_RAW_EVENTS
            ALOGD("BatchSize: %d Count: %d", batchSize, count);
#endif
            processEventsForDeviceLocked(deviceId, rawEvent, batchSize);
        } else {
            switch (rawEvent->type) {
            case EventHubInterface::DEVICE_ADDED:
                addDeviceLocked(rawEvent->when, rawEvent->deviceId);
                break;
            case EventHubInterface::DEVICE_REMOVED:
                removeDeviceLocked(rawEvent->when, rawEvent->deviceId);
                break;
            case EventHubInterface::FINISHED_DEVICE_SCAN:
                handleConfigurationChangedLocked(rawEvent->when);
                break;
            default:
                ALOG_ASSERT(false); // can't happen
                break;
            }
        }
        count -= batchSize;
        rawEvent += batchSize;
    }
}
其中
addDeviceLocked(rawEvent->when, rawEvent->deviceId); removeDeviceLocked(rawEvent->when, rawEvent->deviceId);processEventsForDeviceLocked
是通知所有订阅者(为了方便分析,这里把被通知者叫做订阅者),来处理event事件。
现在逐一分析他们,
addDeviceLocked ----- createDeviceLocked ----- device->addMapper(new SingleTouchInputMapper(device));(这里以 SingleTouchInputMapper来举例说明)
这里就添加了一个SingleTouchInputMapper的订阅者。
processEventsForDeviceLocked ----- device->process
void InputDevice::process(const RawEvent* rawEvents, size_t count) {
 size_t numMappers = mMappers.size();
    for (const RawEvent* rawEvent = rawEvents; count--; rawEvent++) {

        if (mDropUntilNextSync) {
            if (rawEvent->type == EV_SYN && rawEvent->code == SYN_REPORT) {
                mDropUntilNextSync = false;

            } else {
....
            }
        } else if (rawEvent->type == EV_SYN && rawEvent->code == SYN_DROPPED) {
            ALOGI("Detected input event buffer overrun for device %s.", getName().string());
            mDropUntilNextSync = true;
            reset(rawEvent->when);
        } else {
	 for (size_t i = 0; i < numMappers; i++) {
                InputMapper* mapper = mMappers[i];
                mapper->process(rawEvent);
            }
        }
    }
}void SingleTouchInputMapper::process(const RawEvent* rawEvent) {
TouchInputMapper::process(rawEvent);
mSingleTouchMotionAccumulator.process(rawEvent);
} TouchInputMapper::process(rawEvent);void TouchInputMapper::process(const RawEvent* rawEvent) {
mCursorButtonAccumulator.process(rawEvent);
mCursorScrollAccumulator.process(rawEvent);
mTouchButtonAccumulator.process(rawEvent);
if (rawEvent->type == EV_SYN && rawEvent->code == SYN_REPORT) {
sync(rawEvent->when);
}
}可以看到这里很多的观察者模式。
下面再来分析InputDispatcher:
bool InputDispatcherThread::threadLoop() {
    mDispatcher->dispatchOnce();
    return true;
}
void InputDispatcher::dispatchOnce() {
nsecs_t nextWakeupTime = LONG_LONG_MAX;
{
....
if (!haveCommandsLocked()) {
dispatchOnceInnerLocked(&nextWakeupTime);
}
....
}
// Wait for callback or timeout or wake. (make sure we round up, not down)
nsecs_t currentTime = now();
int timeoutMillis = toMillisecondTimeoutDelay(currentTime, nextWakeupTime);
mLooper->pollOnce(timeoutMillis);
}
void InputDispatcher::dispatchOnceInnerLocked(nsecs_t* nextWakeupTime) {
.....
mPendingEvent = mInboundQueue.dequeueAtHead();
.....
case EventEntry::TYPE_MOTION: {
......
done = dispatchMotionLocked(currentTime, typedEntry,
                &dropReason, nextWakeupTime);
        break;
    }
.....
}void InputDispatcher::notifyMotion(const NotifyMotionArgs* args) {
.....
MotionEntry* newEntry = new MotionEntry(args->eventTime,
args->deviceId, args->source, policyFlags,
args->action, args->flags, args->metaState, args->buttonState,
args->edgeFlags, args->xPrecision, args->yPrecision, args->downTime,
args->displayId,
args->pointerCount, args->pointerProperties, args->pointerCoords);
needWake = enqueueInboundEventLocked(newEntry);
.....
}void InputDispatcher::dispatchOnceInnerLocked(nsecs_t* nextWakeupTime)
void InputDispatcher::startDispatchCycleLocked(nsecs_t currentTime,
        const sp& connection) {
.....

 while (connection->status == Connection::STATUS_NORMAL
            && !connection->outboundQueue.isEmpty()) {
        DispatchEntry* dispatchEntry = connection->outboundQueue.head;
        dispatchEntry->deliveryTime = currentTime;

        // Publish the event.
        status_t status;
        EventEntry* eventEntry = dispatchEntry->eventEntry;
        switch (eventEntry->type) {

....

case EventEntry::TYPE_MOTION: {

....

            status = connection->inputPublisher.publishMotionEvent(dispatchEntry->seq,
                    motionEntry->deviceId, motionEntry->source,
                    dispatchEntry->resolvedAction, dispatchEntry->resolvedFlags,
                    motionEntry->edgeFlags, motionEntry->metaState, motionEntry->buttonState,
                    xOffset, yOffset,
                    motionEntry->xPrecision, motionEntry->yPrecision,
                    motionEntry->downTime, motionEntry->eventTime,
                    motionEntry->pointerCount, motionEntry->pointerProperties,
                    usingCoords);
            break;
        }
.....

    }
}
status_t InputPublisher::publishMotionEvent(
        uint32_t seq,
        int32_t deviceId,
        int32_t source,
        int32_t action,
        int32_t flags,
        int32_t edgeFlags,
        int32_t metaState,
        int32_t buttonState,
        float xOffset,
        float yOffset,
        float xPrecision,
        float yPrecision,
        nsecs_t downTime,
        nsecs_t eventTime,
        size_t pointerCount,
        const PointerProperties* pointerProperties,
        const PointerCoords* pointerCoords) {

    .....

    InputMessage msg;
    msg.header.type = InputMessage::TYPE_MOTION;
    msg.body.motion.seq = seq;
    msg.body.motion.deviceId = deviceId;
    msg.body.motion.source = source;
    msg.body.motion.action = action;
    msg.body.motion.flags = flags;
    msg.body.motion.edgeFlags = edgeFlags;
    msg.body.motion.metaState = metaState;
    msg.body.motion.buttonState = buttonState;
    msg.body.motion.xOffset = xOffset;
    msg.body.motion.yOffset = yOffset;
    msg.body.motion.xPrecision = xPrecision;
    msg.body.motion.yPrecision = yPrecision;
    msg.body.motion.downTime = downTime;
    msg.body.motion.eventTime = eventTime;
    msg.body.motion.pointerCount = pointerCount;
    for (size_t i = 0; i < pointerCount; i++) {
        msg.body.motion.pointers[i].properties.copyFrom(pointerProperties[i]);
        msg.body.motion.pointers[i].coords.copyFrom(pointerCoords[i]);
    }
    return mChannel->sendMessage(&msg);
接着分析dispatchOnce()函数,看该函数最后调用了mLooper->pollOnce(timeoutMillis);,
意思就是当没有event的时候会在这里wait,那么唤醒它的位置自然就是前面分析的mLooper->wake();
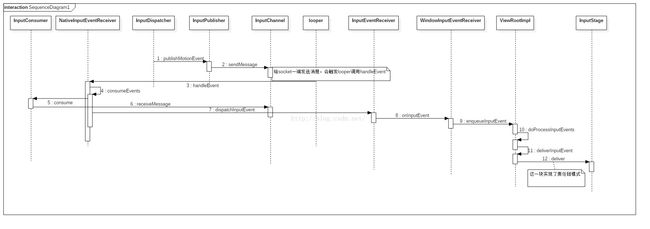
下面分析,InputDispatcher怎么把input事件发送给了应用程序。
InputDispatcher和应用是通过socket,把input事件传递过去的?socket是跨进程通讯了,那他们是那两个进程进行通信的?
答案就是,systemserver进程和acitityThread进程(ui进程)。
先上一张序列图:
android在开启一个应用程序后会调用ViewRootImpl.setView() ----- mWindowSession.addToDisplay()
mWindowSession.addToDisplay()会通过binder跨进程调用到 mService.addWindow(mService是WindowManagerService),
public int addWindow(Session session, IWindow client, int seq,
            WindowManager.LayoutParams attrs, int viewVisibility, int displayId,
            Rect outContentInsets, InputChannel outInputChannel) {

.....

 if (outInputChannel != null && (attrs.inputFeatures
                    & WindowManager.LayoutParams.INPUT_FEATURE_NO_INPUT_CHANNEL) == 0) {
                String name = win.makeInputChannelName();
                InputChannel[] inputChannels = InputChannel.openInputChannelPair(name);
                win.setInputChannel(inputChannels[0]);
                inputChannels[1].transferTo(outInputChannel);

                mInputManager.registerInputChannel(win.mInputChannel, win.mInputWindowHandle);
            }

.....

}
在 addWindow() 中InputChannel.openInputChannelPair(name)会创建一对 InputChannel ( Nativie 层),实际上是创建一对 Socket ,服务端 InputChanel通过mInputManager.registerInputChannel(win.mInputChannel, win.mInputWindowHandle) 被 WMS 注册到 InputDispatcher 中,客户端 InputChannel通过inputChannels[1].transferTo(outInputChannel) 被返回给 ViewRootImpl , ViewRootImpl 将客户端 InputChannel 作为参数 new 一个 InputEventReceiver 对象,在 InputEventReceiver() 构造函数中继续调用 nativeInit() 函数来创建一个 native 层的 NativeInputEventReceiver 对象,前面创建的客户端 InputChannel 会保存在该对象中。
见ViewRootImpl.java如下代码:
public void setView(View view, WindowManager.LayoutParams attrs, View panelParentView) {

.....

res = mWindowSession.addToDisplay(mWindow, mSeq, mWindowAttributes,
                            getHostVisibility(), mDisplay.getDisplayId(),
                            mAttachInfo.mContentInsets, mInputChannel);

.....

 if (mInputChannel != null) {
                    if (mInputQueueCallback != null) {
                        mInputQueue = new InputQueue();
                        mInputQueueCallback.onInputQueueCreated(mInputQueue);
                    }
               mInputEventReceiver = new WindowInputEventReceiver(mInputChannel,
                            Looper.myLooper());
                }

.....


                // Set up the input pipeline.
                CharSequence counterSuffix = attrs.getTitle();
                InputStage syntheticInputStage = new SyntheticInputStage();
                InputStage viewPostImeStage = new ViewPostImeInputStage(syntheticInputStage);
                InputStage nativePostImeStage = new NativePostImeInputStage(viewPostImeStage,
                        "aq:native-post-ime:" + counterSuffix);
                InputStage earlyPostImeStage = new EarlyPostImeInputStage(nativePostImeStage);
                InputStage imeStage = new ImeInputStage(earlyPostImeStage,
                        "aq:ime:" + counterSuffix);
                InputStage viewPreImeStage = new ViewPreImeInputStage(imeStage);
                InputStage nativePreImeStage = new NativePreImeInputStage(viewPreImeStage,
                        "aq:native-pre-ime:" + counterSuffix);

                mFirstInputStage = nativePreImeStage;
                mFirstPostImeInputStage = earlyPostImeStage;
                mPendingInputEventQueueLengthCounterName = "aq:pending:" + counterSuffix;
            }
        }
    }
mInputEventReceiver = new WindowInputEventReceiver(mInputChannel,
Looper.myLooper());就会new一个InputEventReceiver对象,在InputEventReceiver()构造函数中继续调用nativeInit()函数来创建一个native层的NativeInputEventReceiver对象。这里面的Looper.myLooper()实际上是获取activityThread(ui进程)中的looper,从这里也可以看到looper是应用动起来的真因,在AcivityThread中它会监听各个事件并处理,比较input事件,activity的oncreat,onpause包括四大组件等。
为什么loooper是从activityThread这里获取的,因为activity的oncreat是在activityThread进程中执行,在oncreat中,setContentView(R.layout.activity_main);函数会调用ViewRootImpl的setView,所以WindowInputEventReceiver里的looper是从activityThread进程中获取的looper。
如下:
在android_view_InputEventReceiver.cpp中nativeInit
static jint nativeInit(JNIEnv* env, jclass clazz, jobject receiverWeak,
        jobject inputChannelObj, jobject messageQueueObj) {

.....

   sp receiver = new NativeInputEventReceiver(env,
            receiverWeak, inputChannel, messageQueue);
    status_t status = receiver->initialize();

......

}
status_t NativeInputEventReceiver::initialize() {
setFdEvents(ALOOPER_EVENT_INPUT);
return OK;
}
void NativeInputEventReceiver::setFdEvents(int events) {
    if (mFdEvents != events) {
        mFdEvents = events;
        int fd = mInputConsumer.getChannel()->getFd();
        if (events) {
            mMessageQueue->getLooper()->addFd(fd, 0, events, this, NULL);
        } else {
            mMessageQueue->getLooper()->removeFd(fd);
        }
    }
}
mMessageQueue->getLooper()->addFd(fd, 0, events, this, NULL); 将客户端 socket 句柄添加到 Looper 的轮询队列中,参数 this 指向 NativeInputEventReceiver 本身,意味着只要服务端 InputDispatcher 发送输入事件,客户端收到这个事件,就调用 NativeInputEventReceiver 的某个函数,具体调用哪个函数,自然是 NativeInputEventReceiver 实现了 LooperCallback 的接口函数 handleEvent() 。
客户端收到输入事件,即调用NativeInputEventReceiver->handleEvent() ---- consumeEvents() ----- mInputConsumer.consume() ----- mChannel->receiveMessage(&mMsg) 将具体输入事件读取出来,然后调用env->CallVoidMethod(receiverObj.get(), gInputEventReceiverClassInfo.dispatchInputEvent,seq,inputEventObj),可以知道native层读取输入事件后,然后会回调java层InputEventReceiver.java中的dispatchInputEvent()函数。
事实上,
dispatchInputEvent 继续调用 onInputEvent(event); 此时可能并不调用 InputEventReceiver 类中的 onInputEvent() 方法,而是调用子类 onInputEvent() 方法。在 ViewRootImpl 中存在 WindowInputEventReceiver 类型变量 mInputEventReceiver , WindowInputEventReceiver 类继承 InputEventReceiver ,并实现 onInputEvent() 方法。
此可得出结论:native层socket客户端读取输入事件,最终调用InputEventReceiver类子类的onInputEvent()方法,WindowInputEventReceiver继承InputEventReceiver,因此WindowInputEventReceiver.onInputEvent()将被调用。
对于一般的触摸屏事件最终处理者是ViewRootImpl类,对于输入法则处理者是IInputMethodSessionWrapper类,当然WMS是不会处理这些输入事件的。
继续研究ViewRootImpl.onInputEvent()函数,onInputEvent()----doProcessInputEvents()----deliverInputEvent(),deliverInputEvent()函数中会调用stage.deliver(q),stage是mFirstPostImeInputStage或 mFirstInputStage,这个两个InputStage对象在setView中赋值。InputStage类设计就是责任链模式。因为触摸事件是要分发到具体的View上来,所以对于一般的触摸事件最后是传递到ViewPostImeInputStage类中来处理,处理函数是processPointerEvent(q),这个函数调用mView.dispatchPointerEvent(event)将事件分发出去,mView具体是什么呢?mView其实就是DecorView,每一个窗口有且仅有一个DecorView,且处在最顶层,由于DecorView未重写dispatchPointerEvent(),所以调用还是父类View类的dispatchPointerEvent()方法,dispatchPointerEvent会调用onTouchEvent。
public boolean onTouchEvent(MotionEvent event) {

....

switch (event.getAction()) {
                case MotionEvent.ACTION_UP:
....
if (!mHasPerformedLongPress) {
                            // This is a tap, so remove the longpress check
                            removeLongPressCallback();

                            // Only perform take click actions if we were in the pressed state
                            if (!focusTaken) {
                                // Use a Runnable and post this rather than calling
                                // performClick directly. This lets other visual state
                                // of the view update before click actions start.
                                if (mPerformClick == null) {
                                    mPerformClick = new PerformClick();
                                }
                                if (!post(mPerformClick)) {
                                    performClick();
                                }
                            }
                        }
.....
  }
                    break;

.....

          }
            return true;
        }

        return false;
    }
public boolean performClick() {
sendAccessibilityEvent(AccessibilityEvent.TYPE_VIEW_CLICKED);
ListenerInfo li = mListenerInfo;
if (li != null && li.mOnClickListener != null) {
playSoundEffect(SoundEffectConstants.CLICK);
li.mOnClickListener.onClick(this);
return true;
}
return false;
}最后就会调用具体控件的onClick事件。
最后,这些input事件消息(当然还有其它的message)等,把ActivityThread的looper唤醒,然后进行进一步的处理,才使得apk应用程序真正的动起来了。