scrapy实例:爬取中国天气网

1.创建项目

在你存放项目的目录下,按shift+鼠标右键打开命令行,输入命令创建项目:

PS F:\ScrapyProject> scrapy startproject weather      # weather是项目名称

回车即创建成功

这个命令其实创建了一个文件夹而已,里面包含了框架规定的文件和子文件夹.

我们要做的就是编辑其中的一部分文件即可.

其实scrapy构建爬虫就像填空.这么一想就很简单了

cmd执行命令:

PS F:\ScrapyProject> cd weather   #进入刚刚创建的项目目录
PS F:\ScrapyProject\weather>


进入项目根目录.

你已经创建好了一个scrapy项目.

我想,有必要了解一下scrapy构建的爬虫的爬取过程:

scrapy crawl spidername开始运行,程序自动使用start_urls构造Request并发送请求,然后调用parse函数对其进行解析,在这个解析过程中使用rules中的规则从html(或xml)文本中提取匹配的链接,通过这个链接再次生成Request,如此不断循环,直到返回的文本中再也没有匹配的链接,或调度器中的Request对象用尽,程序才停止。

2.确定爬取目标:

这里选择中国天气网做爬取素材,

所谓工欲善其事必先利其器,爬取网页之前一定要先分析网页,要获取那些信息,怎么获取更加 方便.

篇幅有限,网页源代码这里只展示部分:

可以看到这部分包含城市信息,这是我们需要的信息之一.

接下来继续在页面里找其他需要的信息,例如天气,温度等.

3.填写Items.py

Items.py只用于存放你要获取的字段:

给自己要获取的信息取个名字:

# -*- coding: utf-8 -*-
# Define here the models for your scraped items
#
# See documentation in:
# https://doc.scrapy.org/en/latest/topics/items.html
import scrapy

class WeatherItem(scrapy.Item):
    # define the fields for your item here like:
    # name = scrapy.Field()
    city = scrapy.Field()
    city_addition = scrapy.Field()
    city_addition2 = scrapy.Field()
    weather = scrapy.Field()
    data = scrapy.Field()
    temperatureMax = scrapy.Field()
    temperatureMin = scrapy.Field()
    pass


4.填写spider.py

spider.py顾名思义就是爬虫文件.

在填写spider.py之前,我们先看看如何获取需要的信息

刚才的命令行应该没有关吧,关了也没关系

win+R在打开cmd,键入:

C:\Users\admin>scrapy shell http://www.weather.com.cn/weather1d/101020100.shtml#search  #网址是你要爬取的url

这是scrapy的shell命令,可以在不启动爬虫的情况下,对网站的响应response进行处理调试

运行结果:

[s] Available Scrapy objects:
[s]   scrapy     scrapy module (contains scrapy.Request, scrapy.Selector, etc)
[s]   crawler    
[s]   item       {}
[s]   request    #search>
[s]   response   <200 http://www.weather.com.cn/weather1d/101020100.shtml>
[s]   settings   
[s]   spider     'default' at 0x4e37d90>
[s] Useful shortcuts:
[s]   fetch(url[, redirect=True]) Fetch URL and update local objects (by default, redirects are followed)
[s]   fetch(req)                  Fetch a scrapy.Request and update local objects
[s]   shelp()           Shell help (print this help)
[s]   view(response)    View response in a browser
In [1]:

 还有很长一大串日志信息,但不用管,只要你看到Available Scrapy objects(可用的scrapy对象)有response就够了.

response就是scrapy帮你发送request请求到目标网站后接收的返回信息.

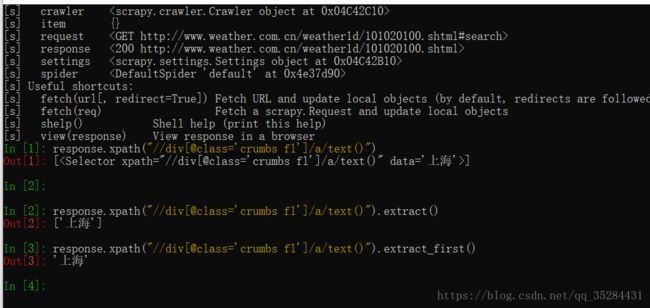
下面做些测试:

scrapy实例:爬取中国天气网_第1张图片

定位元素使用的是xpath,如果此前没接触过xpath,不要紧,百度一下

在此我解释下In[3]的xpath: 获取class="crumbs f1"的div下的a标签的text文本 

至于extract()是用来提取文本

经过测试,In[3]里输入的语句可以获得我们想要的信息

那就把它写进spider里:

import scrapy
from weather.items import WeatherItem
from scrapy.spiders import Rule, CrawlSpider
from scrapy.linkextractors import LinkExtractor
class Spider(CrawlSpider):
    name = 'weatherSpider'  #定义爬虫的名字
    start_urls = [          #爬虫开始爬取数据的url
        "http://www.weather.com.cn/weather1d/101020100.shtml#search"
    ]
    
    
         #执行爬虫的方法
    def parse_item(self, response):
        item = WeatherItem()
                #这里的item['city']就是你定义的items.py里的字段
        item['city'] = response.xpath("//div[@class='crumbs fl']/a/text()").extract_first()  
        
        yield item


爬虫到这里已经可以初步实现了.修改下items.py里只留下city,

执行爬虫:(注意要在项目路径下)

PS F:\ScrapyProject\weather> scrapy crawl weatherSpider # weatherSpider是自己定义的爬虫名称

到这里还只能获取一个"city"字段,还需要在html里获取剩余的字段.

你可以尝试自己写xpath路径.

完整的spider.pyimport scrapy

from weather.items import WeatherItem
from scrapy.spiders import Rule, CrawlSpider
from scrapy.linkextractors import LinkExtractor
class Spider(CrawlSpider):
    name = 'weatherSpider'   #spider的名称
    #allowed_domains = "www.weather.com.cn"      #允许的域名
    start_urls = [                               #爬取开始的url
        "http://www.weather.com.cn/weather1d/101020100.shtml#search"
    ]
    #定义规则,过滤掉不需要爬取的url
    rules = (
        Rule(LinkExtractor(allow=('http://www.weather.com.cn/weather1d/101\d{6}.shtml#around2')), follow=False, callback='parse_item'),
    )#声明了callback属性时,follow默认为False,没有声明callback时,follow默认为True
    
    
    #回调函数,在这里抓取数据,
   #注意多页面爬取时需要自定义方法名称,不能用parse def parse_item(self, response): item = WeatherItem() item['city'] = response.xpath("//div[@class='crumbs fl']/a/text()").extract_first() city_addition = response.xpath("//div[@class='crumbs fl']/span[2]/text()").extract_first() if city_addition == '>': item['city_addition'] = response.xpath("//div[@class='crumbs fl']/a[2]/text()").extract_first() else: item['city_addition'] = response.xpath("//div[@class='crumbs fl']/span[2]/text()").extract_first() item['city_addition2'] = response.xpath("//div[@class='crumbs fl']/span[3]/text()").extract_first() weatherData = response.xpath("//div[@class='today clearfix']/input[1]/@value").extract_first() item['data'] = weatherData[0:6] item['weather'] = response.xpath("//p[@class='wea']/text()").extract_first() item['temperatureMax'] = response.xpath("//ul[@class='clearfix']/li[1]/p[@class='tem']/span[1]/text()").extract_first() item['temperatureMin'] = response.xpath("//ul[@class='clearfix']/li[2]/p[@class='tem']/span[1]/text()").extract_first() yield item


 多了不少东西,这里简单说明一下:

allowed_domains:顾名思义,允许的域名,爬虫只会爬取该域名下的url

rule:定义爬取规则,爬虫只会爬取符合规则的url

  rule有allow属性,使用正则表达式书写匹配规则.正则表达式不熟悉的话可以写好后在网上在线校验,尝试几次后,简单的正则还是比较容易的,我们要用的也不复杂.

  rule有callback属性可以指定回调函数,爬虫在发现符合规则的url后就会调用该函数,注意要和默认的回调函数parse作区分.

  (爬取的数据在命令行里都可以看到)

  rule有follow属性.为True时会爬取网页里所有符合规则的url,反之不会.        我这里设置为了False,因为True的话要爬很久.大约两千多条天气信息.

但要保存爬取的数据的话,还需写下pipeline.py:

5.填写pipeline.py

 这里有三种保存方法,你可以选择其中一种测试

# -*- coding: utf-8 -*-

# Define your item pipelines here
#
# Don't forget to add your pipeline to the ITEM_PIPELINES setting
# See: https://doc.scrapy.org/en/latest/topics/item-pipeline.html
import os
import codecs
import json
import csv
from scrapy.exporters import JsonItemExporter
from openpyxl import Workbook
#保存为json文件
class JsonPipeline(object):
    # 使用FeedJsonItenExporter保存数据
    def __init__(self):
        self.file = open('weather1.json','wb')
        self.exporter = JsonItemExporter(self.file,ensure_ascii =False)
        self.exporter.start_exporting()

    def process_item(self,item,spider):
        print('Write')
        self.exporter.export_item(item)
        return item

    def close_spider(self,spider):
        print('Close')
        self.exporter.finish_exporting()
        self.file.close()

#保存为TXT文件
class TxtPipeline(object):
    def process_item(self, item, spider):
        #获取当前工作目录
        base_dir = os.getcwd()
        filename = base_dir + 'weather.txt'
        print('创建Txt')
        #从内存以追加方式打开文件,并写入对应的数据
        with open(filename, 'a') as f:
            f.write('城市:' + item['city'] + ' ')
            f.write(item['city_addition'] + ' ')
            f.write(item['city_addition2'] + '\n')
            f.write('天气:' + item['weather'] + '\n')
            f.write('温度:' + item['temperatureMin'] + '~' + item['temperatureMax'] + '℃\n')
            
#保存为Excel文件
class ExcelPipeline(object):
    #创建EXCEL,填写表头
    def __init__(self):
        self.wb = Workbook()
        self.ws = self.wb.active
        #设置表头
        self.ws.append(['', '', '县(乡)', '日期', '天气', '最高温', '最低温'])
    
    def process_item(self, item, spider):
        line = [item['city'], item['city_addition'], item['city_addition2'], item['data'], item['weather'], item['temperatureMax'], item['temperatureMin']]
        self.ws.append(line) #将数据以行的形式添加仅xlsx中
        self.wb.save('weather.xlsx')
        return item

 这里写了管道文件,还要在settings.py设置文件里启用这个pipeline:

6.填写settings.py

改下DOWNLOAD_DELAY"下载延迟",避免访问过快被网站屏蔽

把注释符号去掉就行

# Configure a delay for requests for the same website (default: 0)
# See https://doc.scrapy.org/en/latest/topics/settings.html#download-delay
# See also autothrottle settings and docs
DOWNLOAD_DELAY = 1

改下ITEM_PIPELINES:

去掉注释就行,数字的意思是数值小先执行,

# Configure item pipelines
# See https://doc.scrapy.org/en/latest/topics/item-pipeline.html
ITEM_PIPELINES = {
    #'weather.pipelines.TxtPipeline': 600,
        #'weather.pipelines.JsonPipeline': 6,
    'weather.pipelines.ExcelPipeline': 300,
}

完成.

进入项目根目录执行爬虫:

PS F:\ScrapyProject\weather> scrapy crawl weatherSpider

运行部分结果:

2018-10-17 15:16:19 [scrapy.core.engine] INFO: Spider opened
2018-10-17 15:16:19 [scrapy.extensions.logstats] INFO: Crawled 0 pages (at 0 pages/min), scraped 0 items (at 0 items/min)
2018-10-17 15:16:19 [scrapy.extensions.telnet] DEBUG: Telnet console listening on 127.0.0.1:6024
2018-10-17 15:16:20 [scrapy.core.engine] DEBUG: Crawled (200)  (referer: None)
2018-10-17 15:16:21 [scrapy.core.engine] DEBUG: Crawled (200)  (referer: None)
2018-10-17 15:16:22 [scrapy.core.engine] DEBUG: Crawled (200)  (referer: http://www.weather.com.cn/weather1d/101020100.shtml)
2018-10-17 15:16:22 [scrapy.core.scraper] DEBUG: Scraped from <200 http://www.weather.com.cn/weather1d/101191101.shtml>
{'city': '江苏',
 'city_addition': '常州',
 'city_addition2': '城区',
 'data': '10月17日',
 'temperatureMax': '23',
 'temperatureMin': '13',
 'weather': '多云'}
2018-10-17 15:16:23 [scrapy.core.engine] DEBUG: Crawled (200)  (referer: http://www.weather.com.cn/weather1d/101020100.shtml)
2018-10-17 15:16:24 [scrapy.core.scraper] DEBUG: Scraped from <200 http://www.weather.com.cn/weather1d/101190803.shtml>
{'city': '江苏',
 'city_addition': '徐州',
 'city_addition2': '丰县',
 'data': '10月17日',
 'temperatureMax': '20',
 'temperatureMin': '7',
 'weather': '阴'}

根目录下的excel文件:

scrapy实例:爬取中国天气网_第2张图片

写入excel的内容 

scrapy实例:爬取中国天气网_第3张图片

写入txt文件的内容:

scrapy实例:爬取中国天气网_第4张图片

欢迎留言交流!

完整项目代码:https://github.com/sanqiansang/weatherSpider.git
 

转载于:https://www.cnblogs.com/toheart/p/9804565.html

你可能感兴趣的:(scrapy实例:爬取中国天气网)