iBatis.net入门指南
iBatis.net入门指南 - 1 -
什么是iBatis.net ? - 3 -
iBatis.net的原理 - 3 -
新人指路 - 3 -
iBatis.net的优缺点 - 4 -
SQL Mapping金典案例 - 5 -
情景一基本标签(insert,update ,select)及属性(parameterClass,resultClass) - 5 -
情景二子标签(
情景三高阶标签(
情景四储存过程标
ISqlMapper接口 - 12 -
深度私塾 - 14 -
向sql语句中传入多个参数 - 14 -
自动生成键selectkey - 14 -
Oracle - 14 -
SqlServer - 14 -
MySQL - 14 -
SQLite - 14 -
储存过程调用方法 - 15 -
SqlServer - 15 -
Oracle - 15 -
Reference - 16 -
![]()
![]()
参与人员:
| 作者 |
联系方式 |
| 毛凌志 |
|
发布记录
| 版本 |
日期 |
作者 |
说明 |
| 0.0 |
2009-08-21 |
毛凌志 |
初稿 |
什么是iBatis.net ?
以SQL Mapping为核心,提供基于ado.net之上的一层简单抽象,将数据库中数据映射到领域模型的持久层框架
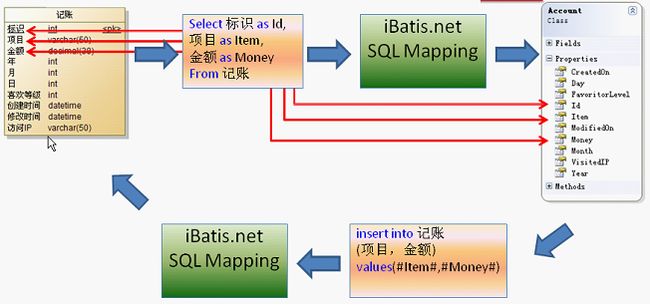
iBatis.net的原理
新人指路
-
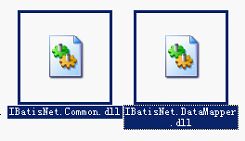
新建工程,添加2个引用文件
-
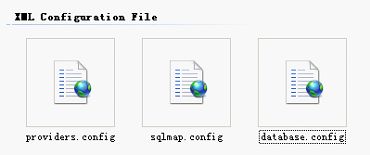
添加并修改配置3个配置文件
-
根据数据库的表结构及业务设计领域模型(可以手动,或利用codesmith等生成器半自动完成
-
由模板或手动生成SQL Mapping文件(e.g.Account.xml),并根据业务需求撰写sql语句
更详细的使用过程,可参见视频。
iBatis.net的优缺点
| 优点 |
缺点 |
|
|
SQL Mapping金典案例
情景一 基本标签(insert,update ,select)及属性(parameterClass,resultClass)
在iBatis.net原理一节示例了使用ibatis.net进行insert和select操作,下面展示介绍如何具体的进行SqlMapping。
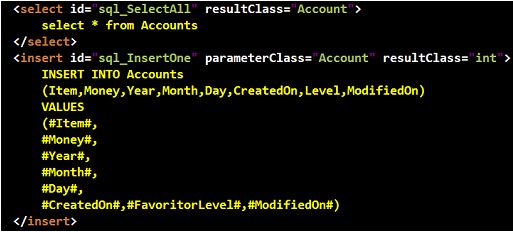
在SqlMapping的配置文件本例中为Account.xml文件中,添加如下的标签段
并将此Account.xml文件的路径加入到sqlmap.config中
在iBatis.net中提供了五种常用的标签如下表示
表1 基本SQL Mapping标签
| 标签 |
说明 |
| |
删除sql语句 |
| |
更新sql语句 |
|
|
选取sql语句 |
| |
删除sql语句 |
| |
调用储存过程 |
在这些容器标签中有一些常用的属性如下所示
表2 基本SQL Mapping标签属性
| 属性 |
说明 |
| Id |
用于唯一标识一条sql语句 |
| resultClass |
用于将sql语句返回的字段和resultClass提定的类进行隐式的自动映射 |
| parameterClass |
用于指定输入参数的类型,如果输入参数有多个应使用Hashtable或是类进行包装 |
下面是关于这两条SQL语句的调用方法和测试
情景二 子标签(
在一些复杂的情景中,为了简化SQL的编写工作,ibatis.net提供了一些标签用于简化SQL的编写操作。可以将可复用的sql语句写在
如下例中所示
在此例中,我们还使用了了,主要是在sql语句中有些特殊的字符如<>等,在xml中不能直接使用,因为我们将包含特殊字符的 SQL语句放入XML的CDATA块中
在此例中,通过Hashtable传入了两个参数,下面介绍了程序中是如何调用上面这段代码的
情景三 高阶标签(
当在进行一些组合查询等需要灵活组装sql的情景时,需要用到dynamic标签。如下所示。
这段代码可以大至翻译为如下的伪代码
Account acc=new Account();
acc.Item="买菜";
if(acc.Item!=null)
sql+="where item like '%"+acc.Item+"%'";
If(acc.Money!=null)
sql+="or Money like '%20%';
this.Response.Write(sql)
表3
| 名称 |
描述 |
| isEqual |
如果参数相等于值则查询条件有效 |
| isNotEqual |
如果参数不等于值则查询条件有效 |
| isGreaterThan |
如果参数大于值则查询条件有效 |
| isGreaterEqual |
如果参数大于等于值则查询条件有效 |
| isLessEqual |
如果参数小于值则查询条件有效 |
| isPropertyAvaiable |
如果参数可用则查询条件有效 |
| isNotPropertyAvaiable |
如果参数不可用则查询条件有效 |
| isNull |
如果参数为Null则查询条件有效 |
| isNotNull |
如果参数不为Null则查询条件有效 |
| isEmpty |
如果参数为空则查询条件有效 |
| isNotEmpty |
如果参数不为空则查询条件有效。参数的数据类型为Collection、string时参数不为 NULLo "" |
| isParameterPresent |
如果参数类为Null则查询条件有效 |
| isNotParameterPresent |
如果参数类不为Null则查询条件有效 |
在上面的属性中使用了resultMap属性,原先使用resultClass是自动隐式的将sql语句映射出的字段。而resultMap属性用于将select输出的语句进行显示的映射, 如下所示
将sql语句取出数据的字段名名称和领域模型进行一个显示的映射。
情景四 储存过程标
在SQL Mapping中专门为储存过程提供了标签,如下所示:
其调用方法是在容器标签中撰写储存过程的名称,此写法适合SQL Server,针对其它数据库的方法参见储存过程调用方法。
注意到在这里我们使用了一个新的属性parameterMap,它的作用是对输入的参数进行显示的映射,之前在情景一中介绍过parameterClass,它和parameterMap类似均是用来对传入sql的参数时行映射,不同的是对parameterClass是隐式映射的,而parameterMap是显示的映射。
注意到,有一个direction属性默认为储存过程的in,可以特别指定用于其它的方式如out或inout等。
在这里我们也使用了resultMap属性,该属性已在情景三中进行了介绍,读者忘了可以再温习一下
关于储存过程的具体的调用方法参见如下的示例,该储存过程的作用是对Accounts表进行分页返回指定页面的记录数和总的记录数。
ISqlMapper接口
当我们执行SQL语句取出需要的数据库,也做了SQL Mapping的映射,最终我们的目的是希望将取出的数据以我们需要的形式(或者说是数据结构)呈现给我们。那么ISqlMapper接口就是来实现这一操作的,如下图所示。
| 方法 |
说明 |
| QueryForObject |
Overloaded. Executes a Sql SELECT statement that returns a single object of the type of the resultObject parameter. |
| QueryForList |
Overloaded. Executes a Sql SELECT statement that returns data to populate a number of result objects. The parameter object is generally used to supply the input data for the WHERE clause parameter(s) of the SELECT statement. |
| QueryForDictionary |
Overloaded. Executes the SQL and retuns all rows selected in a map that is keyed on the property named in the keyProperty parameter. The value at each key will be the value of the property specified in the valueProperty parameter. If valueProperty is null, the entire result object will be entered. |
| Insert(string,object) |
Executes a Sql INSERT statement. Insert is a bit different from other update methods, as it provides facilities for returning the primary key of the newly inserted row (rather than the effected rows). This functionality is of course optional. The parameter object is generally used to supply the input data for the INSERT values. |
| Update(string,object) |
Executes a Sql UPDATE statement. Update can also be used for any other update statement type, such as inserts and deletes. Update returns the number of rows effected. The parameter object is generally used to supply the input data for the UPDATE values as well as the WHERE clause parameter(s). |
| Delete(string,object) |
Executes a Sql DELETE statement. Delete returns the number of rows effected. |
深度私塾
向sql语句中传入多个参数
参见情景二
自动生成键selectkey
在数据库插入一条数据的时候,经常是需要返回插入这条数据的主键。但是数据库供应商之间生成主键的方式都不一样。
有些是预先生成(pre-generate)主键的,如Oracle和PostgreSQL;有些是事后生成(post-generate)主键的,如MySQL和SQL Server。但是不管是哪种方式,我们都可以用iBATIS的节点来获取语句所产生的主键。
Oracle
SELECT STOCKIDSEQUENCE.NEXTVAL AS VALUE FROM DUAL
selectKey>
insert into PRODUCT (PRD_ID,PRD_DESCRIPTION) values (#id#,#description#)
insert>
SqlServer
insert into PRODUCT (PRD_DESCRIPTION)
values (#description#)
select @@IDENTITY as value
MySQL
insert into PRODUCT (PRD_DESCRIPTION)
values (#description#)
select LAST_INSERT_ID() as value
SQLite
INSERT INTO SUBJECT
(SubjectName,QuestionCount,IsNowPaper)
VALUES(#SubjectName#,#QuestionCount#,#IsNowPaper#)
SELECT seq
FROM sqlite_sequence
WHERE (name = 'SUBJECT')
储存过程调用方法
SqlServer
parameterMap="pm_ErickPagination" resultMap="FindAllResult"> ErickPagination
Oracle
{call sendMail(?,?)}
Reference
关键词:IBatis.NET Access mdb cast typeHandler 类型转换
这两天被一个问题折磨得死去活来,终于解决了,写下来以备参考:
问题是这样的:
我在项目中使用了IBatis.Net,数据库使用的是 MS Access。因为Access数据库没有float或double类型,只有Currency类型可以用作浮点数。所以我定义了类似如下的对象,表,以及SQL语句:
1.对象
public class Mark
{
public string Subject{...}
public int Year{...}
public double Point{...}
}
2.数据库Mark
Subject Text
Year Number
Point Currency
3.SQL statement
<statements>
<select id="Query" parameterMap="pMarkMap" resultMap="rMarkMap">
Select Subject, Year, Point
From Mark
<dynamic prepend ="Where">
<isNotNull prepend="AND" property="Subject">
Subject = #Subject#
isNotNull>
<isNotNull prepend="AND" property="Year">
Year = #Year#
isNotNull>
dynamic>
select>
statements>
4.查询数据库
Mark mark = new Mark();
mark.Year = 2005;
ISqlMapper mapper = Mapper.Instance();
Object obj = mapper.QueryForObject("Mark.Query", mark);
mark = obj as Mark;
ArrayList list = new ArrayList();
list.Add(obj);
Grid.DataSource = list;
结果抛出异常:"Specified cast is not valid."
这个问题困扰了我两天,最后才发现两个解决办法:
1. 将对象中的Point属性的类型改成 decimal. 这种方法固然简单,可是在数据库中使用Currency乃不得已,在SQL Server中却有Float类型可以使用,IBatis自动支持从.NET的double类型到数据库Float类型的转换。所以如果为了Currency而使用decimal,则后台数据库变成SQLServer或是Oracle时,在数据库端不得不使用Decimal/Money等类型。或者修改程序中的decimal定义为double类型,这都不是很合理。所以,下面是一个相对复杂一点却合理的解决方法。
注:IBatis.Net自动支持的类型转换请参阅<
2.
使用自定义类型转换函数
·
定义类using System;
using IBatisNet.Common;
using IBatisNet.DataMapper.TypeHandlers;
namespace TestIBatis
{
public class DoubleCurrencyTypeHandler :
IBatisNet.DataMapper.TypeHandlers.ITypeHandlerCallback
{
#region ITypeHandlerCallback Members
// 此类型的null值
public object NullValue
{
get
{
return null;
}
}
public object ValueOf(string s)
{
// 这个函数用于将nullValue值翻译成要比较的null值
// 如果没有,则推荐返回字符串s
return s;
}
public object GetResult(IResultGetter getter)
{
// 用于将从数据库读取的值转换成.NET中的值
// 这里我们知道Currency可以转成decimal类型,
// 再用显示转换将decimal转换成double
decimal v1 = Convert.ToDecimal(getter.Value);
double v2 = (double)v1;
return v2;
}
public void SetParameter(IParameterSetter setter, object parameter)
{
// TODO: 将.NET中的double型转换成decimal,再转换成Currency
decimal v1 = Convert.ToDecimal(parameter);
setter.Value = v1;
}
#endregion
}
}
· 定义SQL中的parameterMap 及 resultMap
在SqlMap.config中加入下面的语句
<alias>
<typeAlias alias="DoubleCurrency"
type="TestIBatis.DoubleCurrencyTypeHandler, TestIBatis" />
alias>
<typeHandlers>
<typeHandler type="double" dbType="Currency" callback="DoubleCurrency" />
typeHandlers>
在SQL statement所在的Mark.xml文件里加上如下语句
<alias>
<typeAlias alias="Mark" type="TestIBatis.Mark, TestIBatis" />
alias>
<parameterMaps>
<parameterMap id="pMarkMap" class="Mark">
<parameter property="Subject" column="Subject" />
<parameter property="Year" column="Year"
type="Int32" dbType="Integer" />
<parameter property="Point" column="Point"
type="double" dbType="Currency" />
parameterMap>
parameterMaps>
<resultMaps>
<resultMap id="rMarkMap" class="Mark">
<result property="Subject" column="Subject" />
<result property="Year" column="Year" type="Int32" dbType="Integer" />
<result property="Point" column="Point"
type="double" dbType="Currency" />
resultMap>
resultMaps>
<statements>
<select id="Query" parameterMap="pMarkMap" resultMap="rMarkMap">
Select Subject, Year, Point
From Mark
<dynamic prepend ="Where">
<isNotNull prepend="AND" property="Subject">
Subject = #Subject#
isNotNull>
<isNotNull prepend="AND" property="Year">
Year = #Year#
isNotNull>
dynamic>
select>
statements>
运行程序,一切正常
注:关于自定义类型转换,请参阅<
大概一年左右的时间里Club数据库的CPU一直处于很高的负荷中,从40%一直攀升到如今的80%,随着数据量的增加,负担越来越重,已经频繁超时,且濒临无法服务的边缘。
经长期的调查发现这是Ibatis.net的一个性能问题(同样适用于Ibatis)。
问题是这样的:Club的主要业务表是Comment表,其中的主键是一个varchar(36)类型的Guid,当每次搜索一条记录时我们会使用这样的一个statement:
select Id, ReferenceId, ReferenceName, ReferenceType, ReferenceImage, ReferenceTime, Title, Pros, Cons, Content, Score, ViewCount, ReplyCount, UsefulVoteCount, UselessVoteCount, UserId, UserImage, UserLevelId, UserRegisterTime, UserProvince, UserIp, CreationTime, Status, Remark
from Comment with (nolock)
where Id = #value# and Status >= 0
虽然看着十分正常,但是却是问题的关键,因为parameterClass是string,当Ibatis.net动态组成的sql语句会将其默认定为一个nvchar(36)来对数据库进行查询,这样与原有数据库的类型不一样,
造成了全表扫描,解决办法是制定传入类型的dbType(inline方法为):
select Id, ReferenceId, ReferenceName, ReferenceType, ReferenceImage, ReferenceTime, Title, Pros, Cons, Content, Score, ViewCount, ReplyCount, UsefulVoteCount, UselessVoteCount, UserId, UserImage, UserLevelId, UserRegisterTime, UserProvince, UserIp, CreationTime, Status, Remark
from Comment with (nolock)
where Id = #value:VarChar# and Status >= 0
当然也可以使用parameterMap来解决(具体参考Ibatis手册)。通过这个办法Club数据库压力已经只有17%左右,非常有效。我认为在string作为参数且数据库字段是一个varchar的时候都可以使用该方法,且效率很高。
下面我通过一个简单例子来看一下如何在我们的代码中调用Castle.DynamicProxy:
一般情况下要有三个类:
1、接口类:
3、代理类:
然后看一下调用的方式:
1、更新类型的存储过程
2、查询类型的存储过程
下面就来看看具体的调用方式:
1、更新类型的存储过程
sp_InsertAccount:
这里要注意的就是ParameterMap中的参数个数和顺序要和sp_InsertAccount存储过程中的一致
Ado中的调用代码:
这里使用的是sqlMap.Insert的方法,为了看起来直观一点,其实使用sqlMap.QueryForObject方法的话效果也是一样的:)
2、查询类型的存储过程
GetAccountByName:
Map配置文件:
Ado中的调用代码:
Dao对象也就是操作数据库的类,通过配置文件我们可以选择DataMapper的方式、Ado的方式、NHibernet的方式以前其他第三方的方式来操作数据库。有利于系统的灵活性和可扩展性。
通过分析动态选择Dao的设计可以加深对IBatis.Net的理解,更好的使用它,同时也可以借鉴它的好的设计模式,应用到我们的程序开发中去。
源代码是最好的分析方式,下面是一些重点代码和说明:
前提:需要在dao.config中配置:
在代码中首先需要进行初始化:
和dao注册相关的代码如下:
最主要的就是最后一句代码,DaoProxy.NewInstance的实现如下:
DaoProxy实现IInterceptor接口,也就是AOP中常有的拦截机。以后当我们通过IDao接口调用实际的Dao时,都会先通过DaoProxy,由DaoProxy拦截后进行一些必要的处理,然后再动态决定调用哪一个Dao来进行数据库操作
生成好之后都会放在DaoManager的静态属性中,下次要用的时候直接从里面去就可以了:
以上涉及到的主要的类图如下:
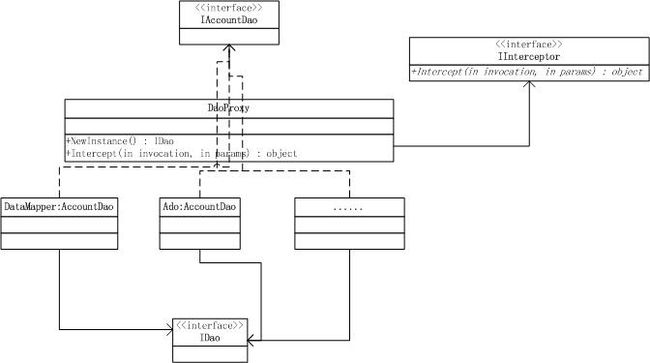
在IBatis.Net中提供了方便的数据库查询方式。
在Dao代码部分主要有两种方式:
1、查询结果为一个对象:
配置文件的写法:
在IBatis.Net中提供了多种查询配置的写法,我这里列出几种比较常用的方式:
1、获得一张表的所有数据
2、根据条件查询(简单方式):
3、根据条件查询(较复杂方式):
并且查询时可以根据条件是否为空动态拼写sql语句
PS:输入参数同样可以使用Account类,注意对应的键要和类中的属性名一致(大小写也要一样)
4、多表查询
多表查询时返回参数有三种方式,一种是新建一个类,在这个类中包含这多个表的所有属性,还有一种就是直接返回Hastable就可以了:
第三种方式是使用IBatis中的复杂属性( 感谢 Anders Cui 的提醒)
比如现在有两张表Account和Degree,使用Account_ID关联,那么需要在原有的基础上修改:
1、修改Account实体类,加入一个属性:
2、修改配置文件:
在 resultMaps节加入:
在 statements节加入:
1、比较麻烦,不够灵活
2、性能受影响:
这种方式其实和Hibernet比较类似了,查询时首先执行
select * from Accounts order by Account_ID
然后根据这条语句的结果,比如有100条记录,那就要执行100次以下的语句:
select * from Degree where Account_id = @param0
关于输入输出:
从上面可以看到输入时可以使用: parameterClass和parameterMap,输出时可以使用:resultClass和resultMap
对于resultMap和parameterMap我们需要另外进行配置(如上所示)
对于parameterClass和resultClass,如果是C#固有类型可以直接使用,如果是我们自定义类可以在SqlMap.config中先统一声明一下:
第一种方式当数据关联很多的情况下,实体类会很复杂;
第二种方式比较灵活,但是不太符合OO的思想(不过,可以适当使用
第三种方式最主要的问题就是性能不太理想,配置比较麻烦。
下面是第四种多表查询的方式,相对第二种多了一点配置,但是其他方面都很好
(当然可能还有其他更好地解决方法,希望能多提宝贵意见-_-)
例子还是一样:两张表Account和Degree,使用Account_ID关联,需要查出两张表的所有纪录
首先:修改实体类,增加以下属性:
然后:修改配置文件,这也是最重要的地方(PS:IBatis.Net中的配置文件真的很强)
在 resultMaps节加入:
在 statements节加入:
在IBatis中提供了数据库缓存的模式,可以提高访问效率。对于一些不常更新的表可以直接利用IBatis的缓存方式。
要使用IBatis的数据库缓存,只要利用配置文件就可以了,实现起来比较简单:
其中:implementation="MEMORY"是设置缓存的实现方式,可以指定LRU、FIFO等,有点类似于内存的页替换策略。MEMORY是最常使用的一种方式。
flushOnExecute设置的是当执行了这些语句时更新缓存。
配置好之后我进行了一个简单的测试,基本上是可以的,但也有一点问题:
1、第一次查询结果是4条记录,当我手工往数据库中插入一条记录时,第二次查询还是4条记录
2、当我把系统时间改成第二天(24小时后),再查,得到的结果是5条记录
3、当我执行了InsertAccountViaParameterMap语句插入一条记录时,再查询得到的是6条记录
也就是说:当系统中的表从不进行手工维护,也不由第三方程序修改时,可以使用数据库缓存的方式提高效率
1、常规方式
和我们之前的ADO.NET开发较为类似,都是将sql语句写在cs代码中进行调用:
首先通过配置文件初始化:
2、配置方式
将sql语句放在配置文件中,书写和修改较灵活, 这也是比较常用的方式
首先通过配置文件初始化:
3、使用Hibernet方式
也就是使用Hibernet的数据库操作。
最近这段时间一直在用IBatis来进行开发。现在把这段时间的一些开发心得写出来,跟大家一起分享。
首先,IBatis可以说转变了我以前的一些思想。我们以前开发项目的时候,总是先建立好数据库,分析清楚表与表之间的关系,才开始根据这些表进行实际的开发。实际上并没有完全把面向对象的优势展现出来。
现在的使用IBatis。顺序可以是这样,首先项目经理会分析整个项目,可以分成为几个对象,每个对象具有什么属性,什么方法。同时会用visio画出UML图来。这样可以说把面向对象的优势完全体现出来了。 然后程序员会根据UML图来操作对象,实现每个对象的属性和方法。这样就可以完全脱离数据库,去考虑程序的问题。这种开发方式特别适合于团队开发,团队中有专门的人去负责数据的建立,他可以根据项目中的Maps图清晰的知道每个数据表中的字段。
iBatis中的动态查询还是比较好用的
如果想深入学习,可以参考 Manning.iBATIS.in.Action.Jan.2007
下面给出几个例子和dtd定义:
update SGS_KEY_FLOW set
KEY_FLOW_ID =#keyFlowId#
BRANCH_NAME = #branchName#
OPERATION = #operation#
INITIATOR = #initiator#
INITIATOR_EMAIL = #initiatorEmail#
INIT_DATE = #initDate#
APPROVER = #approver#
APPROVER_EMAIL = #approverEmail#
APPROVE_DATE = #approveDate#
KEY_NUM = #keyNum#
APPLY_REASON = #applyReason#
REJECT_REASON = #rejectReason#
where
KEY_FLOW_ID =#keyFlowId#
0:26 2008-2-20补充:
让iBatis中的insert返回主键 [ibatis insert 返回 自增主键]
iBatis SQL-map 文件书写注意事项
http://ibatis.apache.org/dtd/sql-map-2.dtd 中有
prepend CDATA #IMPLIED
open CDATA #IMPLIED
close CDATA #IMPLIED
>
prepend CDATA #IMPLIED
open CDATA #IMPLIED
close CDATA #IMPLIED
property CDATA #IMPLIED
removeFirstPrepend (true|false) #IMPLIED
>
prepend CDATA #IMPLIED
open CDATA #IMPLIED
close CDATA #IMPLIED
property CDATA #IMPLIED
removeFirstPrepend (true|false) #IMPLIED
>
prepend CDATA #IMPLIED
open CDATA #IMPLIED
close CDATA #IMPLIED
property CDATA #REQUIRED
removeFirstPrepend (true|false) #IMPLIED
>
prepend CDATA #IMPLIED
open CDATA #IMPLIED
close CDATA #IMPLIED
property CDATA #REQUIRED
removeFirstPrepend (true|false) #IMPLIED
>
prepend CDATA #IMPLIED
open CDATA #IMPLIED
close CDATA #IMPLIED
property CDATA #IMPLIED
removeFirstPrepend (true|false) #IMPLIED
compareProperty CDATA #IMPLIED
compareValue CDATA #IMPLIED
>
prepend CDATA #IMPLIED
open CDATA #IMPLIED
close CDATA #IMPLIED
property CDATA #IMPLIED
removeFirstPrepend (true|false) #IMPLIED
compareProperty CDATA #IMPLIED
compareValue CDATA #IMPLIED
>
prepend CDATA #IMPLIED
open CDATA #IMPLIED
close CDATA #IMPLIED
property CDATA #IMPLIED
removeFirstPrepend (true|false) #IMPLIED
compareProperty CDATA #IMPLIED
compareValue CDATA #IMPLIED
>
prepend CDATA #IMPLIED
open CDATA #IMPLIED
close CDATA #IMPLIED
property CDATA #IMPLIED
removeFirstPrepend (true|false) #IMPLIED
compareProperty CDATA #IMPLIED
compareValue CDATA #IMPLIED
>
prepend CDATA #IMPLIED
open CDATA #IMPLIED
close CDATA #IMPLIED
property CDATA #IMPLIED
removeFirstPrepend (true|false) #IMPLIED
compareProperty CDATA #IMPLIED
compareValue CDATA #IMPLIED
>
prepend CDATA #IMPLIED
open CDATA #IMPLIED
close CDATA #IMPLIED
property CDATA #IMPLIED
removeFirstPrepend (true|false) #IMPLIED
compareProperty CDATA #IMPLIED
compareValue CDATA #IMPLIED
>
prepend CDATA #IMPLIED
open CDATA #IMPLIED
close CDATA #IMPLIED
property CDATA #IMPLIED
removeFirstPrepend (true|false) #IMPLIED
>
prepend CDATA #IMPLIED
open CDATA #IMPLIED
close CDATA #IMPLIED
property CDATA #IMPLIED
removeFirstPrepend (true|false) #IMPLIED
>
prepend CDATA #IMPLIED
open CDATA #IMPLIED
close CDATA #IMPLIED
removeFirstPrepend (true|false) #IMPLIED
>
prepend CDATA #IMPLIED
open CDATA #IMPLIED
close CDATA #IMPLIED
removeFirstPrepend (true|false) #IMPLIED
>
prepend CDATA #IMPLIED
property CDATA #IMPLIED
removeFirstPrepend (true|false|iterate) #IMPLIED
open CDATA #IMPLIED
close CDATA #IMPLIED
conjunction CDATA #IMPLIED
>
本文来自CSDN博客,转载请标明出处:http://blog.csdn.net/alex197963/archive/2008/11/27/3391551.aspx
iBatis解决sql注入
(1) ibatis xml配置:下面的写法只是简单的转义 name like '%$name$%'
(2) 这时会导致sql注入问题,比如参数name传进一个单引号“'”,生成的sql语句会是:name like '%'%'
(3) 解决方法是利用字符串连接的方式来构成sql语句 name like '%'||'#name#'||'%'
(4) 这样参数都会经过预编译,就不会发生sql注入问题了。
(5) #与$区别:
#xxx# 代表xxx是属性值,map里面的key或者是你的pojo对象里面的属性, ibatis会自动在它的外面加上引号,表现在sql语句是这样的 where xxx = 'xxx' ;
$xxx$ 则是把xxx作为字符串拼接到你的sql语句中, 比如 order by topicId , 语句这样写 ... order by #xxx# ibatis 就会把他翻译成 order by 'topicId' (这样就会报错) 语句这样写 ... order by $xxx$ ibatis 就会把他翻译成 order by topicId
