2019独角兽企业重金招聘Python工程师标准>>> ![]()
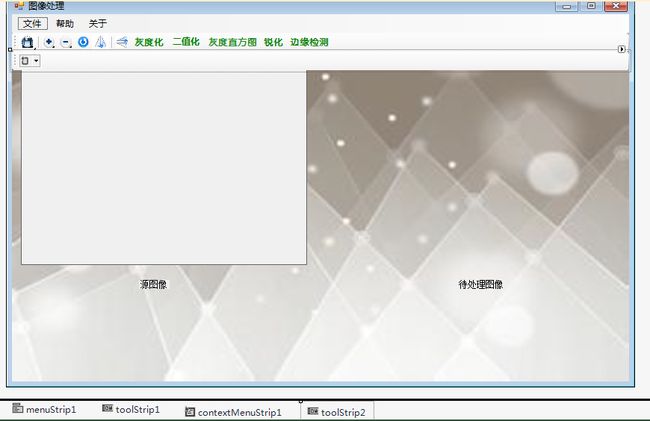
对于整个窗体的设计,菜单组件(MenuStrip)和工具条(ToolStrip)来添加相应的功能事件当然还有右击鼠标就能弹出相应的属性框,也是使用了叫contextMenuStrip的组件。
*每次加载的图片,都要重绘在窗体上,以及后面的对图片的处理都需要刷新图片,对同一个位图变量bitmap sourceBitmap进行重绘。代码如下:
  //重绘
        private void Form1_Paint(object sender, PaintEventArgs e)
        {
            try
            {

                if (sourceBitmap != null)
                {

                    Graphics g = e.Graphics;

                    g.DrawImage(sourceBitmap, 420, 63, pictureBox1.Width, pictureBox1.Height);
                }

            }
            catch (Exception ex)
            {
                MessageBox.Show(ex.Message);
            }

        }
我以前总觉得在窗体上只能画些简单的几何图形,没想到有专门的函数画下一张图片。呵呵。可见眼界的狭窄。
当然对图片进行重绘之前,当然是加载图片啦!代码如下:
  private void 打开ToolStripMenuItem_Click(object sender, EventArgs e)
        {
            OpenFileDialog openFileDialog1 = new OpenFileDialog();
            openFileDialog1.Filter = "所有图片文件(*.bmp/*.jpg/*.gif)|*.*|Jpeg文件(*.jpg)|*.jpg|Bitmap文件(*.bmp)|*.bmp|gif文件(*.gif)|*.gif";
            openFileDialog1.FilterIndex = 2;
            openFileDialog1.RestoreDirectory = true;
            if (DialogResult.OK == openFileDialog1.ShowDialog())
            {
                currentImageFile = openFileDialog1.FileName;
                pictureBox1.Image = Bitmap.FromFile(currentImageFile, false);
                sourceBitmap = (Bitmap)Image.FromFile(currentImageFile);
                Invalidate();//
                this.label1.Text = "源图像";
                this.label2.Text = "源图像(待处理)";
            }
        }
对于的图片的使用当然会用到图片保存的功能啦:这个也是方便以后查阅如何保存相应的文件啦
//保存处理后的图片
        private void 保存ToolStripMenuItem_Click(object sender, EventArgs e)
        {
            if (sourceBitmap != null)
            {
                Bitmap bitmap = sourceBitmap;
                SaveFileDialog savaFiledialog1 = new SaveFileDialog();
                savaFiledialog1.Filter = "Bitmap文件(*.bmp)|*.bmp|JPEG文件 (*.jpg)|*.jpg|gif文件(*.gif)|*gif";
                savaFiledialog1.FilterIndex = 2;
                savaFiledialog1.RestoreDirectory = true;
                if (DialogResult.OK == savaFiledialog1.ShowDialog())
                {
                    bitmap.Save(savaFiledialog1.FileName);
                }
            }
            else
            {
                MessageBox.Show("无处理后的图像可保存", "提示", MessageBoxButtons.OK, MessageBoxIcon.Error);
            }
        }
/*对于上面的图片保存的练歌语句的相应解释:
1savaFiledialog1.Filter = "Bitmap文件(*.bmp)|*.bmp|JPEG文件 (*.jpg)|*.jpg|gif文件(*.gif)|*gif";
saveFileDialog1.FilterIndex = 2; //索引设成2,那么当出现对话框时,文件保存类型,默认为".jpg"
2.saveFileDialog1.RestoreDirectory = true; 设为true时,对话框选择的目录会重新回到关闭此对话框时候的当前目录,就是点保存后,对话选择的默认目录为上次关闭时的目录*/*灰度化相关代码:
           //灰度化
            public static bool GrayScale(Bitmap b)
            {

                BitmapData bmData = b.LockBits(new Rectangle(0, 0, b.Width, b.Height), ImageLockMode.ReadWrite, PixelFormat.Format24bppRgb);//将该图片的内存数据锁存起来
                int stride = bmData.Stride;//一张图片的步幅
                System.IntPtr scan0 = bmData.Scan0;
                unsafe
                {
                    byte* p = (byte*)(void*)scan0;//获取第一个像素的指针
                    int noffset = stride - b.Width * 3;//步幅减掉width*3个字节即是空出来的偏移量,每张图都是这样布局的总是多出来一点
                    byte red, green, blue;
                    for (int y = 0; y < b.Height; y++)
                    {
                        for (int x = 0; x < b.Width; x++)
                        {
                            blue = p[0];
                            green = p[1];
                            red = p[2];
                            p[0] = p[1] = p[2] = (byte)(.299 * red + .587 * green + .114 * blue);//红绿蓝的颜色值都相同的时候,即实现了灰度化。
                            p += 3;
                        }
                        p += noffset;
                    }
                }
                b.UnlockBits(bmData);
                return true;
            }
上述代码中使用到了safe{}这种非托管代码,需要进入主菜单上的项目选项里,选择最后一个,项目属性,点击生成选项,勾选”允许不安全代码“即可使用指针了。还有其他功能转到下几篇写吧。写的太长感觉太压抑
