2019独角兽企业重金招聘Python工程师标准>>> ![]()
1. 简述
在上一节《spring-cloud-sleuth+zipkin追踪服务实现(一)》中,我们使用microservice-zipkin-server、microservice-zipkin-client、microservice-zipkin-client-backend 三个程序实现了使用http方式进行通信,数据持久化到内存中的服务调用链路追踪实现。
在这里我们做两点改动,首先是数据从保存在内存中改为持久化到数据库,其次是将http通信改为mq异步方式通信。
我们还是使用之前上一节中的三个程序做修改,方便大家看到对比不同点。这里每个项目名都加了一个stream,用来表示区别。
2、microservice-zipkin-stream-server
要将http方式改为通过MQ通信,我们要将依赖的原来依赖的io.zipkin.java:zipkin-server换成spring-cloud-sleuth-zipkin-stream和spring-cloud-starter-stream-rabbit
同时要使用mysql持久化,我们需要添加mysql相关依赖。
全部maven依赖如下:
```

        org.springframework.boot
        spring-boot-starter


        org.springframework.boot
        spring-boot-starter-test
        test


        org.springframework.cloud
        spring-cloud-sleuth-zipkin-stream


        org.springframework.cloud
        spring-cloud-starter-stream-rabbit


        io.zipkin.java
        zipkin-autoconfigure-ui
        runtime


        mysql
        mysql-connector-java


        org.springframework.boot
        spring-boot-starter-jdbc


```
添加以上maven依赖后,我们将启动类ZipkinServer中@EnableZipkinServer注解替换成@EnableZipkinStreamServer,
具体如下:
package com.yangyang.cloud;

import org.springframework.boot.SpringApplication;
import org.springframework.boot.autoconfigure.SpringBootApplication;
import org.springframework.cloud.sleuth.zipkin.stream.EnableZipkinStreamServer;

/**
 * Created by chenshunyang on 2017/5/24.
 */
@EnableZipkinStreamServer// //使用Stream方式启动ZipkinServer
@SpringBootApplication
public class ZipkinStreamServerApplication {
    public static void main(String[] args) {
        SpringApplication.run(ZipkinStreamServerApplication.class,args);
    }
}
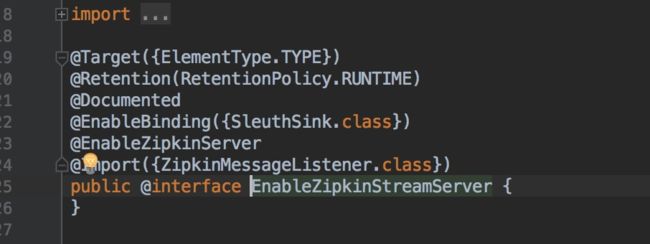
点击@EnableZipkinStreamServer注解的源码我们可以看到它也引入了@EnableZipkinServer注解,同时还创建了一个rabbit-mq的消息队列监听器。
以方便接收从消息客户端收集发过来的mq消息。
由于使用了消息中间件rabbit mq以及mysql,所以我们还需要在配置文件application.properties加入相关的配置:
 server.port=11020
spring.application.name=microservice-zipkin-stream-server
#zipkin数据保存到数据库中需要进行如下配置
#表示当前程序不使用sleuth
spring.sleuth.enabled=false
#表示zipkin数据存储方式是mysql
zipkin.storage.type=mysql
#数据库脚本创建地址,当有多个是可使用[x]表示集合第几个元素
spring.datasource.schema[0]=classpath:/zipkin.sql
#spring boot数据源配置
spring.datasource.url=jdbc:mysql://localhost:3306/zipkin?autoReconnect=true&useUnicode=true&characterEncoding=UTF-8&zeroDateTimeBehavior=convertToNull&useSSL=false
spring.datasource.username=root
spring.datasource.password=123456
spring.datasource.driver-class-name=com.mysql.jdbc.Driver
spring.datasource.initialize=true
spring.datasource.continue-on-error=true


#rabbitmq配置
spring.rabbitmq.host=localhost
spring.rabbitmq.port=5672
spring.rabbitmq.username=guest
spring.rabbitmq.password=guest
其中zipkin.sql直接到官网去拷贝,也可以从本demo中拷贝
为了避免http通信的干扰,我们将原来的监听端口有11008更改为11020,启动程序,未报错且能够看到rabbit连接日志,说明程序启动成功。
3.microservice-zipkin-stream-client、microservice-zipkin-client-stream-backend
与上一节中的配置一样,客户端的配置也非常简单,maven依赖只需要将原来的spring-cloud-starter-zipkin替换为如下两个依赖即可
            org.springframework.cloud
            spring-cloud-sleuth-zipkin-stream


            org.springframework.cloud
            spring-cloud-starter-stream-rabbit


            org.springframework.cloud
            spring-cloud-starter-sleuth
此外,在配置文件中也加上连接MQ的配置
server:
  port: 11021

spring:
  application:
    name: microservice-zipkin-stream-client

 #rabbitmq配置
  rabbitmq:
    host: 127.0.0.1
    port : 5672
    username: guest
    password: guest
当然为了以示区别,端口也做了相应的调整
4.测试
按照上一节的方式访问:http://localhost:11021/call/1,我们可以上一节,说明rabbit-mq方式通信的sleuth功能已经生效了。
我们多次访问consumer的地址可以看到日志中,请求的耗时时间不会再次出现突然耗时特长的情况。
为了体验MQ通信给我们带来的数据不丢失的特点,我们将数据库中的数据清空,然后刷新zipkin server的界面,可以看到不再有数据
然后我们将zipkin-server程序想关闭,然后再多次访问consumer的地址,之后,我们重启zipkin server程序,启动成功后访问UI界面
很快看到Span Name选项有数据可以选择了,同时数据库中的记录条数也不再是之前的0条了
如此说明我们的zipkin重启后,从MQ中成功获取出了在关闭这段时间里provider和consumer产生的信息数据。这样我们使用spring-cloud-sleuth-stream+zipkin方式的rest服务调用追踪功能就OK了。
5.项目源码:
https://git.oschina.net/shunyang/spring-cloud-microservice-study.git
https://github.com/shunyang/spring-cloud-microservice-study.git
6.参考文档:
spring cloud 官方文档:https://github.com/spring-cloud/spring-cloud-sleuth
第三方:https://yq.aliyun.com/articles/78128?utm_campaign=wenzhang&utm_medium=article&utm_source=QQ-qun&201758&utm_content=m_19862