手写一个Tomcat
(参考了公众号:java架构沉思录中的文章:教你写一个迷你版的tomcat
原文:https://www.jianshu.com/p/dcelee01fb90)
作为一个java学习的起步者,对tomcat的认识还是有很多的欠缺,在无意中发现了这篇文章,便在自己的环境下尝试搭建,收获良多:
分以下几个步骤:
(1)提供Socket服务
(2)进行请求的转发
(3)把请求和响应封装成request/response
代码实现如下:
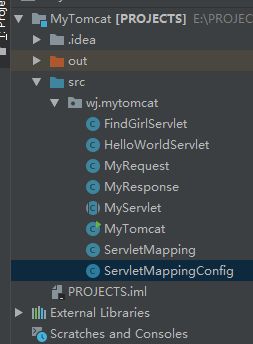
1、工程截图:

2、封装请求对象:通过输入流,对HTTP协议进行解析,拿到了HTTP请求头的方法和URL:
/**
 * @author wangjie
 * @version 2018/11/9
 * 封装请求对象
 * 通过输入流,对http协议进行解析,拿到http请求头的方法和url
 */
public class MyRequest {
    private String url;
    private String method;

    public MyRequest(InputStream inputStream) throws IOException{
        String httpRequest ="";
        byte[] httpRequestBytes =new byte[1024];
        int length =0;
        if((length=inputStream.read(httpRequestBytes)) >0){
            httpRequest=new String(httpRequestBytes,0,length);
        }

        String httpHead = httpRequest.split("\n")[0];
        url=httpHead.split("\\s")[1];
        method=httpHead.split("\\s")[0];
        System.out.println(this);
    }
    public String getUrl() {
        return url;
    }
    public void setUrl(String url) {
        this.url = url;
    }
    public String getMethod() {
        return method;
    }
    public void setMethod(String method) {
        this.method = method;
    }
}
3、封装响应对象:基于HTTP协议的格式进行输出写入。
/**
 * @author wangjie
 * @version 2018/11/9
 * 封装响应对象
 * 基于HTTP协议的格式进行输出写入。
 */
public class MyResponse {
    private OutputStream outputStream;

    public MyResponse(OutputStream outputStream){
        this.outputStream = outputStream;
    }

    public void write(String content)throws IOException {
        StringBuffer httpResponse = new StringBuffer();
        httpResponse.append("HTTP/1.1 200 OK\n")
                .append("Content-Type: text/html\n")
                .append("\r\n")
                .append("")
                .append(content)
                .append("");
        outputStream.write(httpResponse.toString().getBytes());
        outputStream.close();
    }
}
4、servlet请求处理基类:Tomcat是满足Servlet规范的容器,所以Tomcat需要提供API:doGet/doPost/service。
/**
 * @author wangjie
 * @version 2018/11/9
 * Servlet请求处理基类
 */
public abstract class MyServlet {
    public abstract void doGet(MyRequest myRequest,MyResponse myResponse);
    public abstract void doPost(MyRequest myRequest,MyResponse myResponse);
    public void service(MyRequest myRequest,MyResponse myResponse){
        if(myRequest.getMethod().equalsIgnoreCase("POST")){
            doPost(myRequest,myResponse);
        }else if(myRequest.getMethod().equalsIgnoreCase("GET")){
            doGet(myRequest,myResponse);
        }
    }
}
5、Servlet实现类:提供2个实现类,用于测试。
/**
 * @author wangjie
 * @version 2018/11/9
 * servlet实现类
 */
public class FindGirlServlet extends MyServlet{
    @Override
    public void doGet(MyRequest myRequest,MyResponse myResponse){
        try{
            myResponse.write("get gril....");
        }catch (IOException e){
            e.printStackTrace();
        }
    }
    @Override
    public void doPost(MyRequest myRequest,MyResponse myResponse){
        try{
            myResponse.write("post girl...");
        } catch (IOException e){
            e.printStackTrace();
        }
    }
}
/**
 * @author wangjie
 * @version 2018/11/9
 */
public class HelloWorldServlet extends MyServlet {
    @Override
    public void doGet(MyRequest myRequest,MyResponse myResponse){
        try{
            myResponse.write("get world...");
        }catch (IOException e){
            e.printStackTrace();
        }
    }

    @Override
    public void doPost(MyRequest myRequest,MyResponse myResponse){
        try{
            myResponse.write("post world...");
        }catch (IOException e){
            e.printStackTrace();
        }
    }
}
6、Servlet配置:对比之前在web开发中,会在web.xml中通过和指定哪个URL交给哪个servlet来处理。
/**
 * @author wangjie
 * @version 2018/11/9
 * servlet配置
 */
public class ServletMapping {
    private String servletName;
    private String url;
    private String clazz;

    public ServletMapping(String servletName, String url, String clazz){
        this.servletName=servletName;
        this.url=url;
        this.clazz=clazz;
    }

    public String getServletName() {
        return servletName;
    }
    public void setServletName(String servletName) {
        this.servletName = servletName;
    }
    public String getUrl() {
        return url;
    }
    public void setUrl(String url) {
        this.url = url;
    }
    public String getClazz() {
        return clazz;
    }
    public void setClazz(String clazz) {
        this.clazz = clazz;
    }
}
/**
 * @author wangjie
 * @version 2018/11/9
 */
public class ServletMappingConfig {
    public static List servletMappingList =new ArrayList<>();
    //制定哪个URL交给哪个servlet来处理
    static{
        servletMappingList.add(new ServletMapping("findGirl","/girl","wj.mytomcat.FindGirlServlet"));
        servletMappingList.add(new ServletMapping("helloWorld","/world","wj.mytomcat.HelloWorldServlet"));
    }
}
7、启动类:
tomcat的处理流程:把URL对应处理的Servlet关系形成,解析HTTP协议,封装请求/响应对象,利用反射实例化具体的Servlet进行处理。
/**
 * @author wangjie
 * @version 2018/11/9
 * tomcat启动类
 */
public class MyTomcat {
    private int port=8088;
    private Map urlServletMap =new HashMap();
    public MyTomcat(int port){
        this.port=port;
    }

    public void start(){
//        初始化URL与对应处理的servlet的关系
        initServletMapping();

        ServerSocket serverSocket=null;
        try{
            serverSocket = new ServerSocket(port);
            System.out.println("MyTomcat is start...");

            while(true){
                Socket socket= serverSocket.accept();
                InputStream inputStream=socket.getInputStream();
                OutputStream outputStream=socket.getOutputStream();

                MyRequest myRequest= new MyRequest(inputStream);
                MyResponse myResponse =new MyResponse(outputStream);

//                请求分发
                dispatch(myRequest,myResponse);
                socket.close();
            }
        }catch (IOException e){
            e.printStackTrace();
        }finally {
            if (null != serverSocket){
                try{
                    serverSocket.close();
                }catch (IOException e){
                    e.printStackTrace();
                }
            }
        }
    }

    private void initServletMapping(){
        for(ServletMapping servletMapping:ServletMappingConfig.servletMappingList){
            urlServletMap.put(servletMapping.getUrl(),servletMapping.getClazz());
        }
    }

    public void dispatch(MyRequest myRequest,MyResponse myResponse){
        String clazz =urlServletMap.get(myRequest.getUrl());

        //反射
        try{
            Class myServletClass =(Class) Class.forName(clazz);
            MyServlet myServlet= myServletClass.newInstance();

            myServlet.service(myRequest,myResponse);
        }catch (ClassNotFoundException e){
            e.printStackTrace();
        }catch (InstantiationException e){
            e.printStackTrace();
        }catch (IllegalAccessException e){
            e.printStackTrace();
        }
    }
    public static void main(String[] args){
        new MyTomcat(8088).start();
    }
}
8、测试:
运行项目后,在浏览器输入:localhost:8088/girl

在浏览器输入:localhost:8088/world

实践完成。