mysql 主从复制 + mycat读写分离搭建
一、Mycat简介
1. Mycat是什么?
从定义和分类来看,它是一个开源的分布式数据库系统,是一个实现了MySQL协议的Server,前端用户可以把它看做是一个数据库代理,用MySQL客户端工具和命令行访问,而其后端可以用MySQL原生(Native)协议与多个MySQL服务器通信,也可以用JDBC协议与大多数主流数据库服务器通信,其核心功能是分库分表,即将一个大表水平分割为N个小表,存储在后端MySQL服务器里或者其他数据库里。
Mycat发展到目前版本,已经不在是一个单纯的MySQL代理了,它的后端可以支持MySQL、SQL Server、Oracle、DB2、PostgreSQL等主流数据库,也支持MongoDB这种新型NOSQL方式的存储,未来还会支持更多类型的存储。而在最终用户看来,无论是那种存储方式,在Mycat里,都是一个传统的数据库表,支持标准的SQL语句进行数据的操作,这样一来,对前端业务系统来说,可以大幅度降低开发难度,提升开发速度,在测试阶段,可以将一表定义为任何一种Mycat支持的存储方式,比如MySQL的MyASM表、内存表、或者MongoDB、LeveIDB以及号称是世界上最快的内存数据库MemSQL上。
Mycat的原理中最重要的一个动词是“拦截”,它拦截了用户发送过来的SQL语句,首先对SQL语句做了一些特定的分析:如分片分析、路由分析、读写分离分析、缓存分析等,然后将此SQL发往后端的真实数据库,并将返回的结果做适当的处理,最终再返回给用户。![]()
![]()
二、应用场景
1. 单纯的读写分离,此时配置最为简单,支持读写分离,主从切换。
2. 分表分库,对于超过1000万的表进行分片,最大支持1000亿的单表分片。
3. 多租户应用,每个应用一个库,但应用程序只连接Mycat,从而不改造程序本身,实现多租户化。
4. 报表系统,借助于Mycat的分表能力,处理大规模报表的统计。
5. 代替Hbase,分析大数据。
6. 查询的记录需要在3秒内查询出来结果, 除了基于主键的查询,还可能存在范围查询或其他属性查询,此时Mycat可能是最简单有效的选择。
三、mysql概念
MySQL是一个关系型数据库管理系统,由瑞典MySQL AB 公司开发,目前属于 Oracle 旗下产品。MySQL 是最流行的关系型数据库管理系统之一,在 WEB 应用方面,MySQL是最好的 RDBMS (Relational Database Management System,关系数据库管理系统) 应用软件。
MySQL是一种关系数据库管理系统,关系数据库将数据保存在不同的表中,而不是将所有数据放在一个大仓库内,这样就增加了速度并提高了灵活性。
mysql主从原理:从库生成两个线程,一个I/O线程,一个SQL线程;i/o线程去请求主库 的binlog,并将得到的binlog日志写到relay log(中继日志) 文件中;主库会生成一个 log dump 线程,用来给从库 i/o线程传binlog;SQL 线程,会读取relay log文件中的日志,并解析成具体操作,来实现主从的操作一致,而最终数据一致。![]()
四、环境介绍
1. 硬件介绍
| 主机名 | IP | 角色 |
|---|---|---|
| master | 192.168.120.150 | 主节点 |
| slave1 | 192.168.120.135 | 从节点 |
| mycat | 192.168.120.151 | mycat节点 |
2. 软件介绍
| 操作系统 | centos 6.5 |
|---|---|
| mycat节点jdk版本 | 1.8.0 |
| mysql版本 | mysql 5.6.34 |
五、mysql主从搭建配置
1.上传MySQL5.6的tar包
第一步:创建目录:
mkdir /usr/local/src/mysql5.6
第二步:上传MySQL-5.6.34-1.rhel5.x86_64.rpm-bundle.tar 到上面的目录中
2. 安装
第一步:检测是否已经安装了mysql
rpm -qa | grep mysql
如果已经安装将其卸载,如:rpm -e --nodeps mysql-libs-5.1.71-1.el6.x86_64
第二步:解压
tar -xvf MySQL-5.6.34-1.rhel5.x86_64.rpm-bundle.tar
第三步:安装MySQL的服务端
rpm -ivh MySQL-server-5.6.34-1.rhel5.x86_64.rpm
第四步:安装MySQL的客户端
rpm -ivh MySQL-client-5.6.34-1.rhel5.x86_64.rpm
第五步:查看启动MySQL服务并查看运行状态
service mysql start
service mysql status
![]()
第六步:使用root账号登录mysql
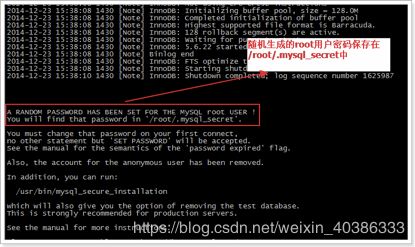
在安装mysql server时有句提示:
注意:这个密码是不安全的,所有需要修改初始密码。
1. 使用密码登录mysql账号:
mysql -uroot -p2. 修改root密码:
SET PASSWORD = PASSWORD('root');3. 开机自动启动设置
加入到系统服务:
chkconfig --add mysql自动启动:
chkconfig mysql on查询列表:
chkconfig说明:都没关闭(off)时是没有自动启动。
3. 开启远程访问
登录:
mysql -uroot -proot设置远程访问(使用root密码):
grant all privileges on *.* to 'root' @'%' identified by 'root';

flush privileges;
退出mysql,在centos环境下打开3306防火墙
/sbin/iptables -I INPUT -p tcp --dport 3306 -j ACCEPT

/etc/rc.d/init.d/iptables save

/etc/init.d/iptables status
六、主从配置
1. 配置master
编辑master配置文件
vim /etc/my.cnf

-----------------

# For advice on how to change settings please see

# http://dev.mysql.com/doc/refman/5.6/en/server-configuration-defaults.html

# *** DO NOT EDIT THIS FILE. It's a template which will be copied to the

# *** default location during install, and will be replaced if you

# *** upgrade to a newer version of MySQL.

[mysqld]

log-bin=mysql-bin
server-id=1
binlog-ignore-db=information_schema
binlog-ignore-db=cluster
binlog-ignore-db=mysql
重启mysql并登陆
service mysql restart
mysql
授权并查看状态
mysql> GRANT ALL PRIVILEGES ON *.* TO 'root'@'%' IDENTIFIED BY 'master_666';
mysql> FLUSH PRIVILEGES;
mysql> show master status;
配置完毕查看结果:
mysql> show master status;
+------------------+----------+--------------+----------------------------------+-------------------+
| File             | Position | Binlog_Do_DB | Binlog_Ignore_DB                 | Executed_Gtid_Set |
+------------------+----------+--------------+----------------------------------+-------------------+
| mysql-bin.000002 |     5771 |              | information_schema,cluster,mysql |                   |
+------------------+----------+--------------+----------------------------------+-------------------+
1 row in set (0.00 sec)
2. 配置slave
编辑slave配置文件
vim /etc/my.cnf

-------------------
# For advice on how to change settings please see

# http://dev.mysql.com/doc/refman/5.6/en/server-configuration-defaults.html

# *** DO NOT EDIT THIS FILE. It's a template which will be copied to the

# *** default location during install, and will be replaced if you

# *** upgrade to a newer version of MySQL.

[mysqld]

log-bin=mysql-bin
server-id=2
relay-log=mysql-relay   #启用中继日志文件
binlog-ignore-db=information_schema
binlog-ignore-db=cluster
binlog-ignore-db=mysql
#replicate-do-db=sky
replicate-ignore-db=mysql
log-slave-updates
slave-skip-errors=all
slave-net-timeout=60
重启mysql并登陆
service mysql restart
mysql
停止并配置slave
mysql> stop slave;
mysql> change master to master_host='192.168.120.150',master_user='root',master_password='master_666',
master_log_file='mysql-bin.0000021', master_log_pos=5771;
启动并验证:
mysql> start slave;
mysql> show slave status;
mysql> show slave status \G;
*************************** 1. row ***************************
               Slave_IO_State: Waiting for master to send event
                  Master_Host: 192.168.120.150
                  Master_User: root
                  Master_Port: 3306
                Connect_Retry: 60
              Master_Log_File: mysql-bin.000002
          Read_Master_Log_Pos: 5771
               Relay_Log_File: mysql-relay.000003
                Relay_Log_Pos: 5298
        Relay_Master_Log_File: mysql-bin.000002
             Slave_IO_Running: Yes
            Slave_SQL_Running: Yes
              Replicate_Do_DB:
          Replicate_Ignore_DB: mysql
           Replicate_Do_Table:
       Replicate_Ignore_Table:
      Replicate_Wild_Do_Table:
  Replicate_Wild_Ignore_Table:
                   Last_Errno: 0
                   Last_Error:
                 Skip_Counter: 0
          Exec_Master_Log_Pos: 5771
              Relay_Log_Space: 5630
              Until_Condition: None
               Until_Log_File:
                Until_Log_Pos: 0
           Master_SSL_Allowed: No
           Master_SSL_CA_File:
           Master_SSL_CA_Path:
              Master_SSL_Cert:
            Master_SSL_Cipher:
               Master_SSL_Key:
        Seconds_Behind_Master: 0
Master_SSL_Verify_Server_Cert: No
                Last_IO_Errno: 0
                Last_IO_Error:
               Last_SQL_Errno: 0
               Last_SQL_Error:
  Replicate_Ignore_Server_Ids:
             Master_Server_Id: 1
                  Master_UUID: db0a6494-b37f-11e9-89e6-00505633c61c
             Master_Info_File: /var/lib/mysql/master.info
                    SQL_Delay: 0
          SQL_Remaining_Delay: NULL
      Slave_SQL_Running_State: Slave has read all relay log; waiting for the slave I/O thread to update it
           Master_Retry_Count: 86400
                  Master_Bind:
      Last_IO_Error_Timestamp:
     Last_SQL_Error_Timestamp:
               Master_SSL_Crl:
           Master_SSL_Crlpath:
           Retrieved_Gtid_Set:
            Executed_Gtid_Set:
                Auto_Position: 0
1 row in set (0.00 sec)
七、配置mycat
1. 安装jdk1.8
先卸载open-jdk

java -version
rpm -qa | grep java

rpm -e --nodeps java-1.7.0-openjdk-1.7.0.45-2.4.3.3.el6.x86_64
rpm -e --nodeps java-1.6.0-openjdk-1.6.0.0-1.66.1.13.0.el6.x86_64

开始安装:
mkdir /usr/local/src/java
rz 上传jdk tar包
tar -zxvf jdk-8u181-linux-x64.tar.gz
配置环境变量:
① vi /etc/profile

② 在末尾行添加
	#set java environment
	JAVA_HOME=/usr/local/src/jdk/jdk1.8.0_181
	CLASSPATH=.:$JAVA_HOME/lib.tools.jar
	PATH=$JAVA_HOME/bin:$PATH
	export JAVA_HOME CLASSPATH PATH
保存退出
③source /etc/profile  使更改的配置立即生效
④java -version  查看JDK版本信息,如果显示出java version "1.8.0_181"证明成功
2. 安装mycat
第一步:mycat安装包上传到:/user/local/src/mycat
第二步:解压mycat
tar -zxvf Mycat-web-linux.tar.gz第三步:配置环境变量
echo "export PATH=/usr/local/src/mycat/bin:$PATH">>/etc/profile
source /etc/profile
3. 创建用户
举例:在master1上创建两个数据库用户,rep用户用来写入,rep_r用来读。
mysql -uroot -pmaster_666

mysql> CREATE USER 'rep'@'%' IDENTIFIED BY '123456';
mysql> CREATE USER 'rep_r'@'%' IDENTIFIED BY '123456';
mysql> GRANT ALL PRIVILEGES ON *.* TO 'rep'@'localhost' IDENTIFIED BY '123456';
mysql> GRANT ALL PRIVILEGES ON *.* TO 'rep_r'@'localhost' IDENTIFIED BY '123456';
mysql> GRANT ALL PRIVILEGES ON *.* TO 'rep'@'%' IDENTIFIED BY '123456';
mysql> GRANT ALL PRIVILEGES ON *.* TO 'rep_r'@'%' IDENTIFIED BY '123456';
mysql> flush privileges;
4. 修改server.xml文件
cd /usr/local/src/mycat/conf/
vim server.xml
	druidparser


		123456

		TESTDB


		123456
		TESTDB
		true
5. 修改schema.xml文件
vim schema.xml
select user()
6. 启动mycat
mycat start
cd /usr/local/src/mycat/logs/
cat wrapper.log
八、验证
用 mycat 的账号密码登录到主虚拟机的 mycat,查看并添加一条数据
[root@CentOS6 bin]# mysql -urep -p123456 -h192.168.120.151 -P8066 TESTDB

mysql> show databases;
+----------+
| DATABASE |
+----------+
| TESTDB   |
+----------+
1 row in set (0.00 sec)

mysql> use TESTDB
Database changed
mysql> show tables;
+----------------+
| Tables_in_test |
+----------------+
| user_info      |
+----------------+
1 row in set (0.00 sec)

mysql> select * from user_info;
+----+----------+----------+-------+
| id | username | password | phone |
+----+----------+----------+-------+
|  1 | 1        | 1        | 1     |
|  2 | 2        | 2        | 2     |
|  3 | 3        | 3        | 3     |
|  4 | 4        | 4        | 4     |
|  5 | 5        | 5        | 5     |
|  6 | 6        | 6        | 6     |
|  7 | 7        | 7        | 7     |
+----+----------+----------+-------+
7 rows in set (0.07 sec)

mysql> insert into user_info values(8,'8','8','8');
Query OK, 1 row affected (0.05 sec)
再切到从虚拟机,用 mysql -uroot -p 登录 mysql,看看刚刚在主虚拟机的 mycat 添加的数据 tom 在从虚拟机能不能看到
mysql -uroot -p


mysql> use test;
mysql> select * from user_info;
+----+----------+----------+-------+
| id | username | password | phone |
+----+----------+----------+-------+
|  1 | 1        | 1        | 1     |
|  2 | 2        | 2        | 2     |
|  3 | 3        | 3        | 3     |
|  4 | 4        | 4        | 4     |
|  5 | 5        | 5        | 5     |
|  6 | 6        | 6        | 6     |
|  7 | 7        | 7        | 7     |
|  8 | 8        | 8        | 8     |
+----+----------+----------+-------+
8 rows in set (0.00 sec)

