「React Hooks」如何用120行代码,实现一个交互良好的拖拽上传组件
前言
你将在该篇学到:
- 如何将现有组件改写为
React Hooks函数组件 useState、useEffect、useRef是如何替代原生命周期和Ref的。- 一个完整拖拽上传行为覆盖的四个事件:
dragover、dragenter、drop、dragleave - 如何使用
React Hooks编写自己的UI组件库。
How To Implement Drag and Drop for Files in React
文章讲了React拖拽上传的精简实现,但直接翻译照搬显然不是我的风格。
于是我又用React Hooks 重写了一版,除CSS的代码总数 120行。
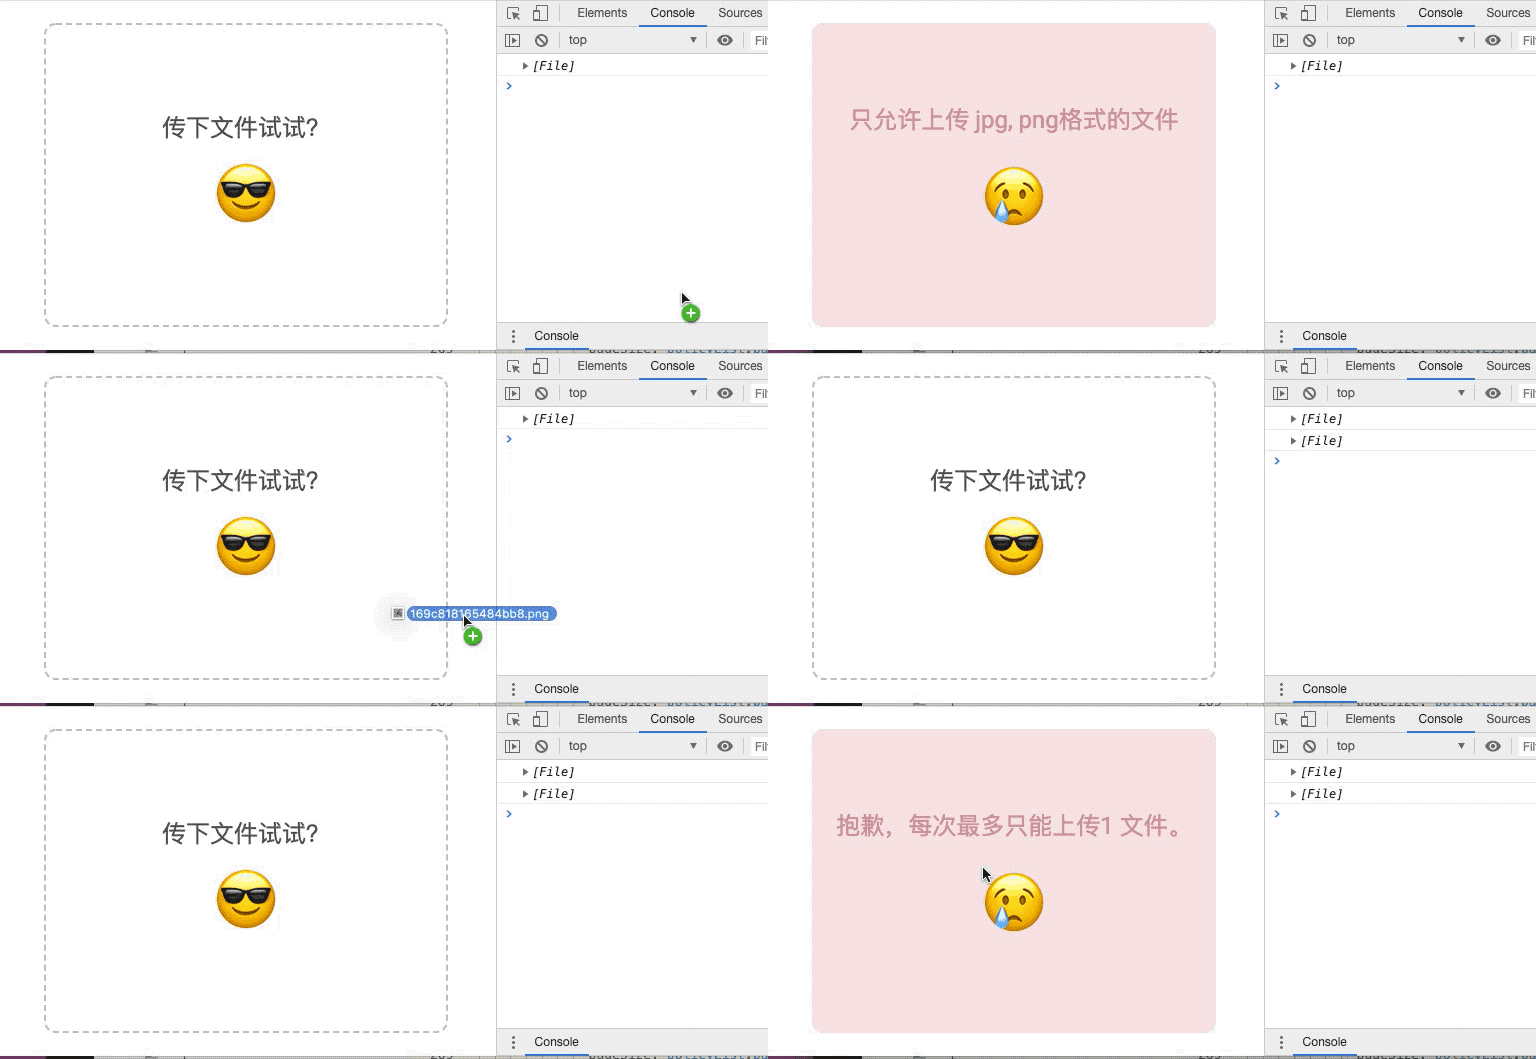
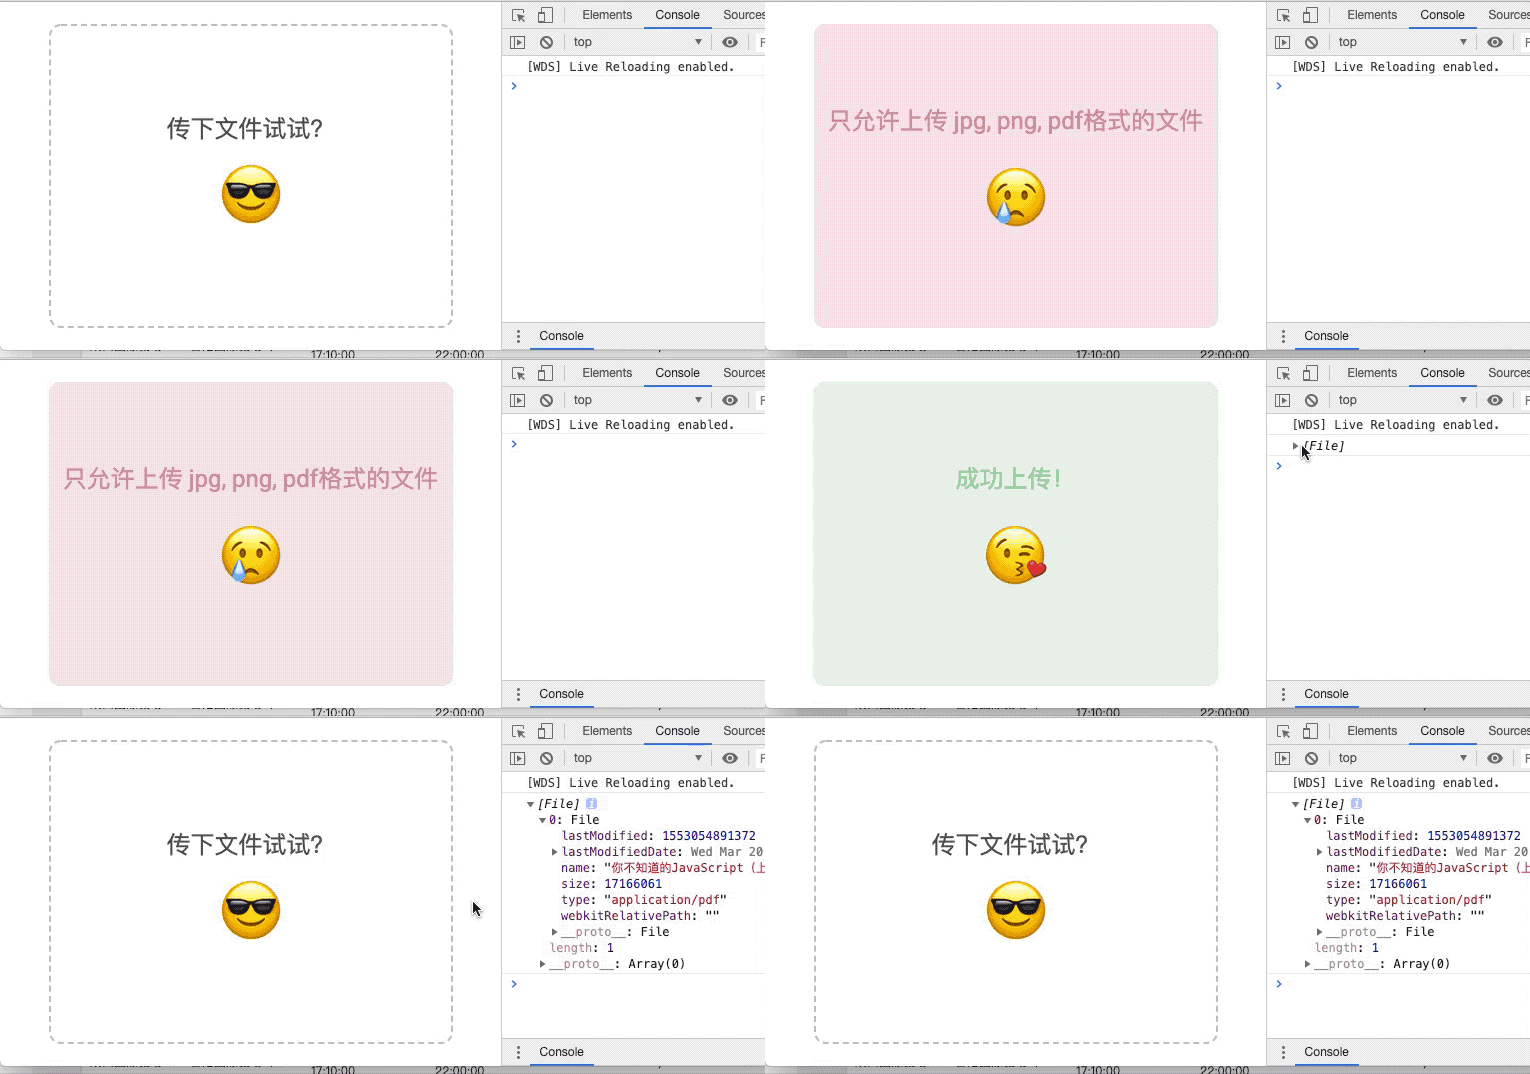
效果如下:
1. 添加基本目录骨架
app.js
import React from 'react';
import PropTypes from 'prop-types';
import { FilesDragAndDrop } from '../components/Common/FilesDragAndDropHook';
export default class App extends React.Component {
static propTypes = {};
onUpload = (files) => {
console.log(files);
};
render() {
return (
FilesDragAndDrop.js(非Hooks):
import React from 'react';
import PropTypes from 'prop-types';

import '../../scss/components/Common/FilesDragAndDrop.scss';

export default class FilesDragAndDrop extends React.Component {
    static propTypes = {
        onUpload: PropTypes.func.isRequired,
    };

    render() {
        return (

                传下文件试试?

                    😎


        );
    }
}
1. 如何改写为Hooks组件?
请看动图:
2. 改写组件
Hooks版组件属于函数组件,将以上改造:
import React, { useEffect, useState, useRef } from "react";
import PropTypes from 'prop-types';
import classNames from 'classnames';
import classList from '../../scss/components/Common/FilesDragAndDrop.scss';
const FilesDragAndDrop = (props) => {
    return (

            传下文件试试?

                😎


    );
}

FilesDragAndDrop.propTypes = {
    onUpload: PropTypes.func.isRequired,
    children: PropTypes.node.isRequired,
    count: PropTypes.number,
    formats: PropTypes.arrayOf(PropTypes.string)
}

export { FilesDragAndDrop };
FilesDragAndDrop.scss
.FilesDragAndDrop {
  .FilesDragAndDrop__area {
    width: 300px;
    height: 200px;
    padding: 50px;
    display: flex;
    align-items: center;
    justify-content: center;
    flex-flow: column nowrap;
    font-size: 24px;
    color: #555555;
    border: 2px #c3c3c3 dashed;
    border-radius: 12px;

    .area__icon {
      font-size: 64px;
      margin-top: 20px;
    }
  }
}
2. 实现分析
从操作DOM、组件复用、事件触发、阻止默认行为、以及Hooks应用方面分析。
1. 操作DOM:useRef
由于需要拖拽文件上传以及操作组件实例,需要用到ref属性。
React Hooks 中 新增了useRef API
语法
const refContainer = useRef(initialValue);
useRef返回一个可变的ref对象,。- 其 .current 属性被初始化为传递的参数(
initialValue) - 返回的对象将存留在整个组件的生命周期中。
...
const drop = useRef();

return (

    ...
    )
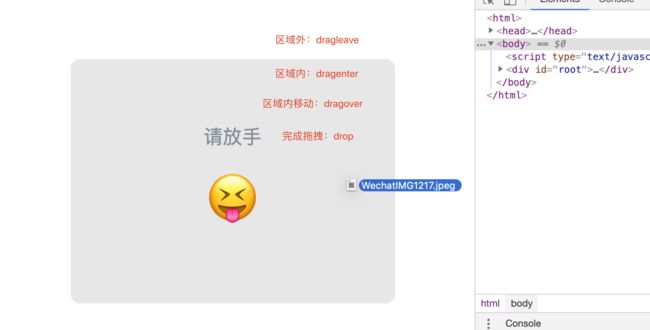
2. 事件触发
- 区域外:
dragleave, 离开范围 - 区域内:
dragenter,用来确定放置目标是否接受放置。 - 区域内移动:
dragover,用来确定给用户显示怎样的反馈信息 - 完成拖拽(落下):
drop,允许放置对象。
这四个事件并存,才能阻止 Web 浏览器默认行为和形成反馈。
3. 阻止默认行为
代码很简单:
e.preventDefault() //阻止事件的默认行为(如在浏览器打开文件)
e.stopPropagation() // 阻止事件冒泡
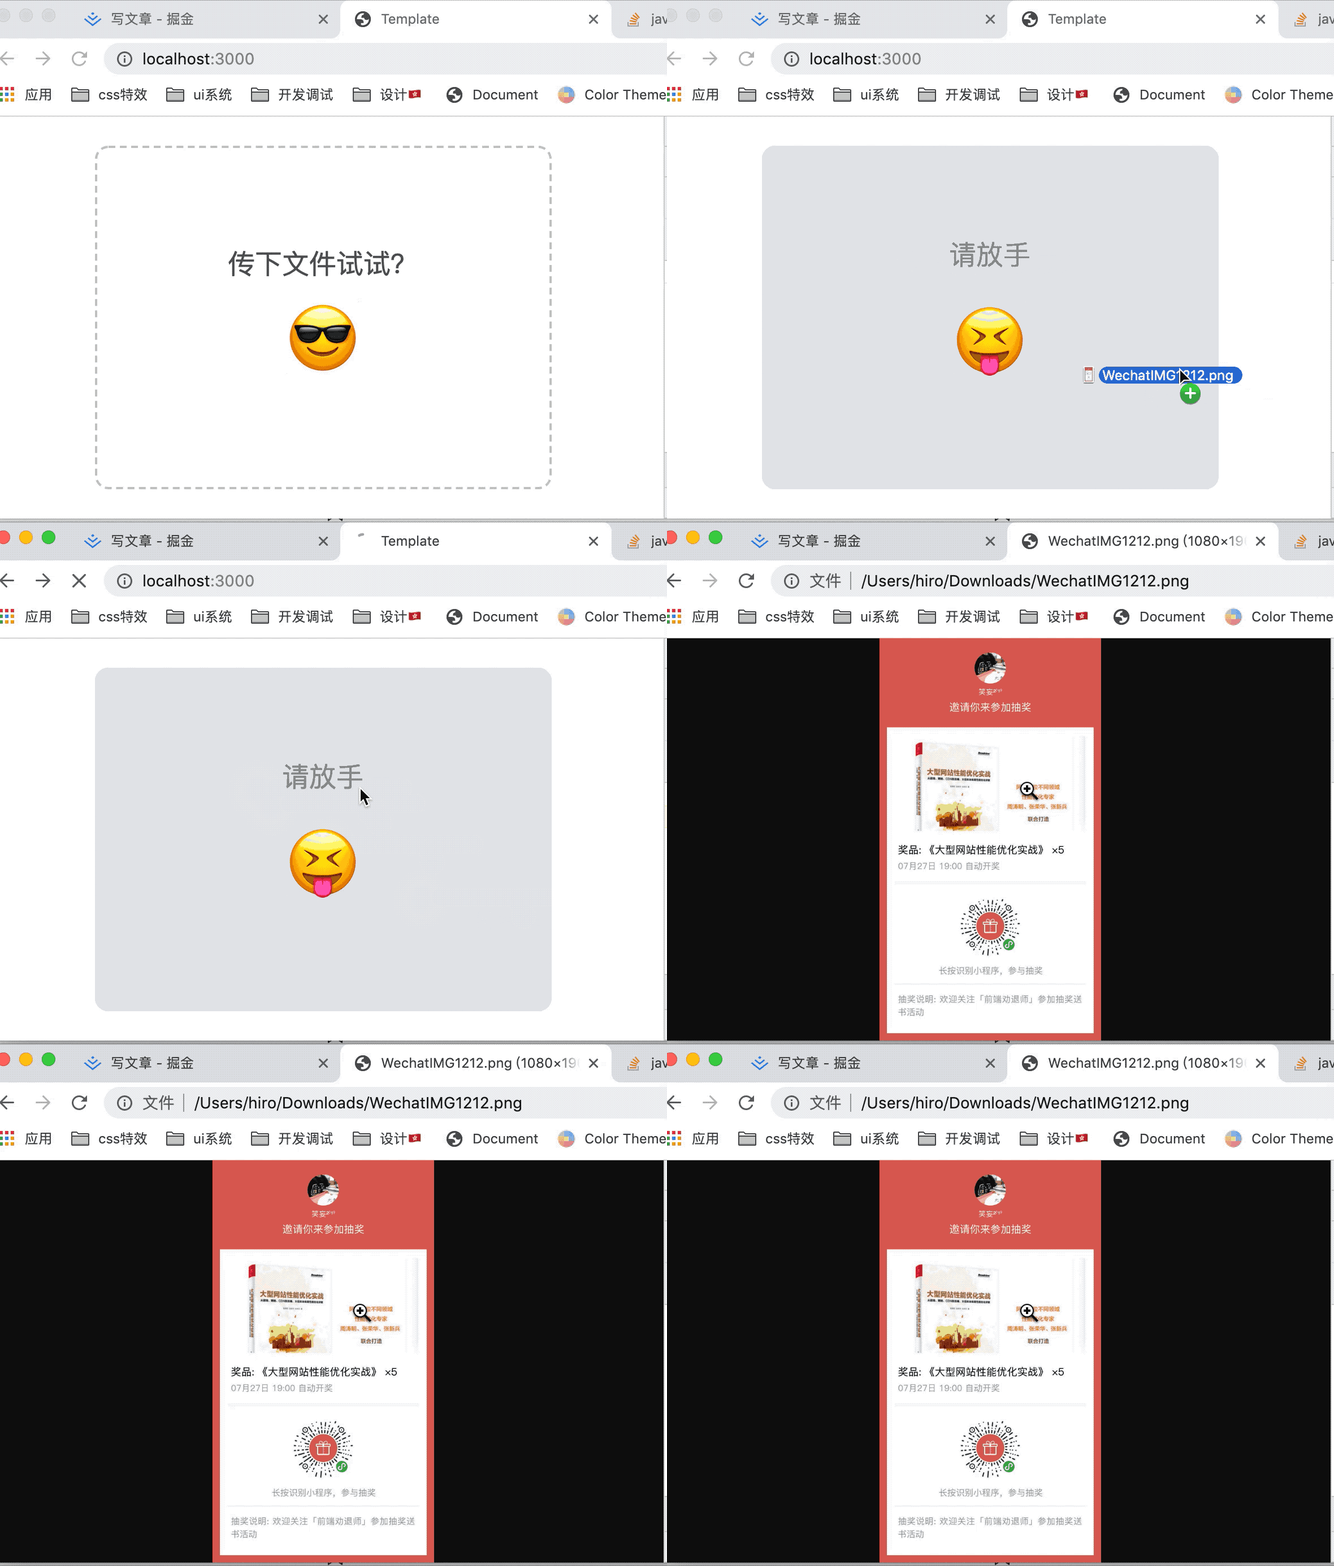
每个事件阶段都需要阻止,为啥呢?举个?栗子:
const handleDragOver = (e) => {
    // e.preventDefault();
    // e.stopPropagation();
};
不阻止的话,就会触发打开文件的行为,这显然不是我们想看到的。
4. 组件内部状态: useState
拖拽上传组件,除了基础的拖拽状态控制,还应有成功上传文件或未通过验证时的消息提醒。
状态组成应为:
state = {
    dragging: false,
    message: {
        show: false,
        text: null,
        type: null,
    },
};
写成对应useState前先回归下写法:
const [属性, 操作属性的方法] = useState(默认值);
于是便成了:
const [dragging, setDragging] = useState(false);
const [message, setMessage] = useState({ show: false, text: null, type: null });
5. 需要第二个叠加层
除了drop事件,另外三个事件都是动态变化的,而在拖动元素时,每隔 350 毫秒会触发 dragover事件。
此时就需要第二ref来统一控制。
所以全部的`ref``为:
const drop = useRef(); // 落下层
const drag = useRef(); // 拖拽活动层
6. 文件类型、数量控制
我们在应用组件时,prop需要传入类型和数量来控制
        传下文件试试?

            😎
onUpload:拖拽完成处理事件count: 数量控制formats: 文件类型。
对应的组件Drop内部事件:handleDrop:
const handleDrop = (e) => {
    e.preventDefault();
    e.stopPropagation();
    setDragging(false)
    const { count, formats } = props;
    const files = [...e.dataTransfer.files];
    if (count && count < files.length) {
        showMessage(`抱歉,每次最多只能上传${count} 文件。`, 'error', 2000);
        return;
    }
    if (formats && files.some((file) => !formats.some((format) => file.name.toLowerCase().endsWith(format.toLowerCase())))) {
        showMessage(`只允许上传 ${formats.join(', ')}格式的文件`, 'error', 2000);
        return;
    }
    if (files && files.length) {
        showMessage('成功上传!', 'success', 1000);
        props.onUpload(files);
    }
};
.endsWith是判断字符串结尾,如:"abcd".endsWith("cd"); // true
showMessage则是控制显示文本:
const showMessage = (text, type, timeout) => {
    setMessage({ show: true, text, type, })
    setTimeout(() =>
        setMessage({ show: false, text: null, type: null, },), timeout);
};
需要触发定时器来回到初始状态
7. 事件在生命周期里的触发与销毁
原本EventListener的事件需要在componentDidMount添加,在componentWillUnmount中销毁:
componentDidMount () {
    this.drop.addEventListener('dragover', this.handleDragOver);
}

componentWillUnmount () {
    this.drop.removeEventListener('dragover', this.handleDragOver);
}
但Hooks中有内部操作方法和对应useEffect来取代上述两个生命周期
useEffect示例:
useEffect(() => {
  document.title = `You clicked ${count} times`;
}, [count]); // 仅在 count 更改时更新
而 每个effect都可以返回一个清除函数。如此可以将添加(componentDidMount)和移除(componentWillUnmount) 订阅的逻辑放在一起。
于是上述就可以写成:
useEffect(() => {
    drop.current.addEventListener('dragover', handleDragOver);
    return () => {
        drop.current.removeEventListener('dragover', handleDragOver);
    }
})
3. 完整代码:
FilesDragAndDropHook.js:
import React, { useEffect, useState, useRef } from "react";
import PropTypes from 'prop-types';
import classNames from 'classnames';
import classList from '../../scss/components/Common/FilesDragAndDrop.scss';

const FilesDragAndDrop = (props) => {
    const [dragging, setDragging] = useState(false);
    const [message, setMessage] = useState({ show: false, text: null, type: null });
    const drop = useRef();
    const drag = useRef();
    useEffect(() => {
        // useRef 的 drop.current 取代了 ref 的 this.drop
        drop.current.addEventListener('dragover', handleDragOver);
        drop.current.addEventListener('drop', handleDrop);
        drop.current.addEventListener('dragenter', handleDragEnter);
        drop.current.addEventListener('dragleave', handleDragLeave);
        return () => {
            drop.current.removeEventListener('dragover', handleDragOver);
            drop.current.removeEventListener('drop', handleDrop);
            drop.current.removeEventListener('dragenter', handleDragEnter);
            drop.current.removeEventListener('dragleave', handleDragLeave);
        }
    })
    const handleDragOver = (e) => {
        e.preventDefault();
        e.stopPropagation();
    };

    const handleDrop = (e) => {
        e.preventDefault();
        e.stopPropagation();
        setDragging(false)
        const { count, formats } = props;
        const files = [...e.dataTransfer.files];

        if (count && count < files.length) {
            showMessage(`抱歉,每次最多只能上传${count} 文件。`, 'error', 2000);
            return;
        }

        if (formats && files.some((file) => !formats.some((format) => file.name.toLowerCase().endsWith(format.toLowerCase())))) {
            showMessage(`只允许上传 ${formats.join(', ')}格式的文件`, 'error', 2000);
            return;
        }

        if (files && files.length) {
            showMessage('成功上传!', 'success', 1000);
            props.onUpload(files);
        }
    };

    const handleDragEnter = (e) => {
        e.preventDefault();
        e.stopPropagation();
        e.target !== drag.current && setDragging(true)
    };

    const handleDragLeave = (e) => {
        e.preventDefault();
        e.stopPropagation();
        e.target === drag.current && setDragging(false)
    };

    const showMessage = (text, type, timeout) => {
        setMessage({ show: true, text, type, })
        setTimeout(() =>
            setMessage({ show: false, text: null, type: null, },), timeout);
    };

    return (

            {message.show && (

                    {message.text}

                        {message.type === 'error' ? <>😢 : <>😘}


            )}
            {dragging && (

                    请放手

                        😝


            )}
            {props.children}

    );
}

FilesDragAndDrop.propTypes = {
    onUpload: PropTypes.func.isRequired,
    children: PropTypes.node.isRequired,
    count: PropTypes.number,
    formats: PropTypes.arrayOf(PropTypes.string)
}

export { FilesDragAndDrop };
App.js:
import React, { Component } from 'react';
import { FilesDragAndDrop } from '../components/Common/FilesDragAndDropHook';
import classList from '../scss/components/Common/FilesDragAndDrop.scss';

export default class App extends Component {
    onUpload = (files) => {
        console.log(files);
    };
    render () {
        return (


                    传下文件试试?

                        😎


        )
    }
}
FilesDragAndDrop.scss:
.FilesDragAndDrop {
  position: relative;

  .FilesDragAndDrop__placeholder {
    position: absolute;
    top: 0;
    left: 0;
    right: 0;
    bottom: 0;
    width: 100%;
    height: 100%;
    z-index: 9999;
    display: flex;
    align-items: center;
    justify-content: center;
    flex-flow: column nowrap;
    background-color: #e7e7e7;
    border-radius: 12px;
    color: #7f8e99;
    font-size: 24px;
    opacity: 1;
    text-align: center;
    line-height: 1.4;

    &.FilesDragAndDrop__placeholder--error {
      background-color: #f7e7e7;
      color: #cf8e99;
    }

    &.FilesDragAndDrop__placeholder--success {
      background-color: #e7f7e7;
      color: #8ecf99;
    }

    .area__icon {
      font-size: 64px;
      margin-top: 20px;
    }
  }
}

.FilesDragAndDrop__area {
  width: 300px;
  height: 200px;
  padding: 50px;
  display: flex;
  align-items: center;
  justify-content: center;
  flex-flow: column nowrap;
  font-size: 24px;
  color: #555555;
  border: 2px #c3c3c3 dashed;
  border-radius: 12px;

  .area__icon {
    font-size: 64px;
    margin-top: 20px;
  }
}
然后你就可以拿到文件慢慢耍了。。。
❤️ 前端劝退师公众号交流群
- 添加微信:huab119,回复:加群。加入前端劝退师公众号交流群。
