nginx负载均衡配置
Nginx是一个高性能的HTTP和反向代理服务器,可以在4层/7层来实现负载均衡
配置环境:
负载均衡器:server4(172.25.254.4)
real server1:server2(172.25.254.2)
real server2:server3(172.25.254.3)
一、开始配置
server4安装nginx,本次选择nginx-1.14.0.tar.gz版本
[root@server4 ~]# ls
nginx-1.14.0.tar.gz
[root@server4 ~]# tar zxf nginx-1.14.0.tar.gz
[root@server4 ~]# cd nginx-1.14.0
[root@server4 nginx-1.14.0]# ls
auto     CHANGES.ru  configure  html     man     src
CHANGES  conf        contrib    LICENSE  README
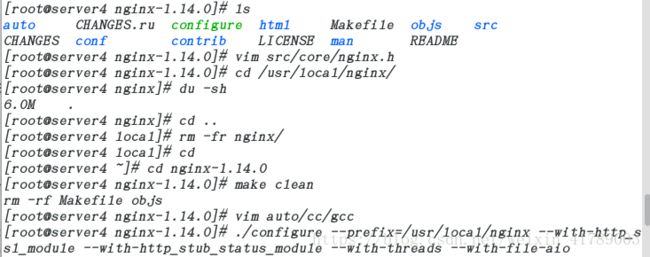
为了得到纯净的nginx,我们需要将~/nginx-1.14.0/auto/cc/gcc 中的debug注释掉

如果不注释掉,我们得到的nginx将会大很多
这个为未注释掉的,我们注释掉删除nginx后重新编译

并且隐藏nginx的版本号
[root@server4 nginx-1.14.0]# vim src/core/nginx.h
#define nginx_version      1014000
#define NGINX_VERSION      "1.14.0"
#define NGINX_VER          "nginx/"
重新编译:
[root@server4 nginx-1.14.0]# ./configure --prefix=/usr/local/nginx --with-http_ssl_module --with-http_stub_status_module --with-threads --with-file-aio          ##编译时指定安装路径,并加载相应模块
yum install -y gcc
yum install -y pcre-devel
yum install -y openssl-develyum install -y gcc
安装相应的依赖包
[root@server4 nginx-1.14.0]# make && make install  ##编译完成后检测并安装
[root@server4 nginx-1.14.0]# cd /usr/local/nginx/
[root@server4 nginx]# ls
conf  html  logs  sbin
[root@server4 nginx]# ln -s /usr/local/nginx/sbin/nginx /sbin/   ##创建nginx执行脚本软连接
[root@server4 nginx]# du -sh
980K	.               ##没有debug后的nginx
[root@server4 nginx]# nginx -t            ##查看nginx是否有问题
nginx: the configuration file /usr/local/nginx/conf/nginx.conf syntax is ok
nginx: configuration file /usr/local/nginx/conf/nginx.conf test is successful
[root@server4 nginx]# nginx    开启nginx 开启后不能restart,只能-s reload重新加载  开启之前要确保80端口没有被占用
[root@server4 nginx]# curl -I localhost
HTTP/1.1 200 OK
Server: nginx/1.14.0
Date: Wed, 27 Jun 2018 14:53:46 GMT
Content-Type: text/html
Content-Length: 612
Last-Modified: Wed, 27 Jun 2018 14:50:49 GMT
Connection: keep-alive
ETag: "5b33a449-264"
Accept-Ranges: bytes
二、修改配置文件
vim /usr/local/nginx/conf/nginx.conf
   1
  2 user  nginx nginx;   ##nginx以nginx用户身份运行,需要建立nginx用户
  3 worker_processes  1;  ##工作进程,一般设置为auto自动
  4
  5 #error_log  logs/error.log;
  6 #error_log  logs/error.log  notice;
  7 #error_log  logs/error.log  info;
  8
  9 #pid        logs/nginx.pid;
 10
 11
 12 events {
 13         use epoll;
 14     worker_connections  65535;    ##线程,并且在系统中给到比他大的线程
 15 }
 16
 17
 18 http {
 19         upstream westos{      ##算法
 20         server 172.25.254.2:80 weight=2;   ##监控server的80端口,weigh为权重,2每访问两次,3访问一词
 21         server 172.25.254.3:80;
 22         }
 23     include       mime.types;
121
122
123 server {                  ##设置虚拟主机
124         listen 80;
125         server_name www.westos.org;
126
127         location / {    调度算法
128                 proxy_pass http://westos;
129         }
130 }
131 }
修改系统允许的线程
[root@server4 nginx-1.14.0]# vim /etc/security/limits.conf
 50 # End of file
 51 nginx           -       nofile          65536
 [root@server4 nginx-1.14.0]# su -
[root@server4 ~]# su - nginx
[nginx@server4 ~]$ ulimit -a
core file size          (blocks, -c) 0
data seg size           (kbytes, -d) unlimited
scheduling priority             (-e) 0
file size               (blocks, -f) unlimited
pending signals                 (-i) 7820
max locked memory       (kbytes, -l) 64
max memory size         (kbytes, -m) unlimited
open files                      (-n) 65536
pipe size            (512 bytes, -p) 8
POSIX message queues     (bytes, -q) 819200
real-time priority              (-r) 0
stack size              (kbytes, -s) 10240
cpu time               (seconds, -t) unlimited
max user processes              (-u) 1024
virtual memory          (kbytes, -v) unlimited
file locks                      (-x) unlimited
三、real server配置
开启httpd服务,并保证httpd的端口为80
[root@server2 ~]# /etc/init.d/httpd start
Starting httpd: httpd: Could not reliably determine the server's fully qualified domain name, using 172.25.254.2 for ServerName
                                                           [  OK  ]
[root@server2 ~]# curl localhost
server2
[root@server2 ~]# netstat -antuple | grep 80
tcp        0      0 :::80                       :::*                        LISTEN      0          8688       1036/httpd
[root@server3 ~]# /etc/init.d/httpd start
Starting httpd: Warning: DocumentRoot [/www/html] does not exist
httpd: Could not reliably determine the server's fully qualified domain name, using 172.25.254.3 for ServerName
                                                           [  OK  ]
[root@server3 ~]# curl localhost
server3
[root@server3 ~]# netstat -antuple | grep 80
tcp        0      0 :::80                       :::*                        LISTEN      0          8689       1033/httpd
测试:物理机做域名解析后访问:
[root@foundation77 Desktop]# vim /etc/hosts
[root@foundation77 Desktop]# for i in {1..10};do curl www.westos.org;done
server2
server3
server2
server2
server3
server2
server2
server3
server2
server2
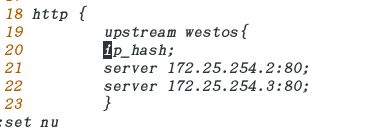
四、nginx的其他算法
[root@server4 ~]# nginx -t
nginx: the configuration file /usr/local/nginx/conf/nginx.conf syntax is ok
nginx: configuration file /usr/local/nginx/conf/nginx.conf test is successful
[root@server4 ~]# vim /usr/local/nginx/conf/nginx.conf
[root@server4 ~]# nginx -s reload
物理机测试:
[root@foundation77 Desktop]# for i in {1..10};do curl www.westos.org;done
server2
server2
server2
server2
server2
server2
server2
server2
server2
server2
2、设置buckup

修改完重新加载nginx
设置完成后修改server4的httpd端口为8080,并打开httpd服务,将server2和server3的httpd服务stop后物理机测试:
[root@foundation77 Desktop]# for i in {1..10};do curl www.westos.org;done
server4
server4
server4
server4
server4
server4
server4
server4
server4
server4
3、cookie
因为nginx1.14不支持此模块,我们用1.10来实现
nginx-1.10.1.tar.gznginx-1.10.1.tar.gz
nginx-sticky-module-ng.tar.gz
[root@server4 ~]# tar zxf nginx-1.10.1.tar.gz
[root@server4 ~]# tar zxf nginx-sticky-module-ng.tar.gz
[root@server4 ~]# cd nginx-1.10.1
[root@server4 nginx-1.10.1]# ./configure --prefix=/opt/nginx --add-module=/root/nginx-sticky-module-ng
[root@server4 nginx-1.10.1]# make && make install
[root@server4 nginx-1.10.1]# cd /opt/nginx/conf/
[root@server4 conf]# cp /usr/local/nginx/conf/nginx.conf .
cp: overwrite `./nginx.conf'? y
[root@server4 conf]# vim nginx.conf
[root@server4 nginx]# sbin/nginx -t
nginx: the configuration file /opt/nginx/conf/nginx.conf syntax is ok
nginx: configuration file /opt/nginx/conf/nginx.conf test is successful
[root@server4 nginx]# sbin/nginx
配置完成后真机apache测试


