【实战】OpenCV+Python项目实战--停车场车位识别
文章目录
- 1 准备工作
- 1.1 glob模块
- 1.2 cv2.imread()和plt.imread()
- 1.3 map
- 1.4 PS中找图像像素坐标
- 1.5 PyCharm之python书写规范--消去提示波浪线
- 1.6 cv2.destroyAllWindows()
- 1.7 for列表循环
- 1.8 operator.itemgetter()
- 1.9 keys()
- 1.10 set()
- 1.11 with open() as 读写文件
- 1.12 dump
- 2 定位每一个车位并编号
1 准备工作
1.1 glob模块
glob模块
是python自己带的一个文件操作相关模块,用它可以查找符合自己目的的文件,类似于Windows下的文件搜索,支持通配符操作,*,?,[]这三个通配符,*代表0个或多个字符,?代表一个字符,[]匹配指定范围内的字符,如[0-9]匹配数字。两个主要方法如下。
glob方法
glob模块的主要方法就是glob,该方法返回所有匹配的文件路径列表(list);该方法需要一个参数用来指定匹配的路径字符串(字符串可以为绝对路径也可以为相对路径),其返回的文件名只包括当前目录里的文件名,不包括子文件夹里的文件。
iglob方法
获取一个迭代器( iterator )对象,使用它可以逐个获取匹配的文件路径名。与glob.glob()的区别是:glob.glob同时获取所有的匹配路径,而 glob.iglob一次只获取一个匹配路径。
例如:

import glob
# glob模块
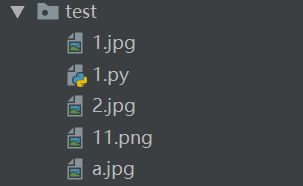
print(glob.glob("test/*.jpg"))
for name in glob.glob("test/*.jpg"):
print(name)
print("---------------")
for name in glob.glob("test/*"):
print(name)
print("---------------") # 也可以这样print("-" * 20)
for name in glob.glob("test/[0:1].jpg"):
print(name)
print("---------------")
for name in glob.glob("./*.py"):
print(name)
# iglob模块
print("---------------")
f = glob.iglob("test/*.jpg")
print(list(f))
print(f)
for img in f:
print(img)
# ['test\\1.jpg', 'test\\2.jpg', 'test\\a.jpg']
# test\1.jpg
# test\2.jpg
# test\a.jpg
# ---------------
# test\1.jpg
# test\1.py
# test\11.png
# test\2.jpg
# test\a.jpg
# ---------------
# test\1.jpg
# ---------------
# .\Parking.py
# .\park_test.py
# .\prepare.py
# ---------------
# ['test\\1.jpg', 'test\\2.jpg', 'test\\a.jpg']
# 1.2 cv2.imread()和plt.imread()
import matplotlib.pyplot as plt
import cv2
path = "test/1.jpg"
b = cv2.imread(path) # 读取的是BGR的数组1.3 map
def a(x):
return x**2
d = map(a, [1, 2, 3, 4])
print(d) #
print(list(d)) # [1, 4, 9, 16]
e = map(lambda x: x**2, [1, 2, 3, 4])
print(e) #
print(list(e)) # [1, 4, 9, 16]
1.4 PS中找图像像素坐标
(1)编辑——首选项——单位与标尺——把单位更改成像素
(2)F8进行查看,可以看坐标,也可以看当前rgb值
1.5 PyCharm之python书写规范–消去提示波浪线
Pycharm默认的代码格式化:Ctrl+Shift+Alt+L
1.6 cv2.destroyAllWindows()
cv2.imshow()
cv2.waitkey(0) # 第一张图显示完,按任意键图片不消失,程序继续执行,
cv2.imshow()
cv2.waitkey(0)
cv2.destroyAllWindows() # 第一张和第二张图同时显示完,按任意键图片消失,程序继续执行,
1.7 for列表循环
for x1, y1, x2, y2 in [[1, 2, 3, 3]]:
    print(x1)  # 1
    print(x2)  # 3

for x, y, z in [[1, 3, 4], [12, 3, 3]]:
    print(x)  # 返回值为1 和 12

for x1, y1, x2, y2 in [1, 2, 3, 3]:
    print(x2)  # 这个会报错
1.8 operator.itemgetter()
itemgetter 用于获取对象的哪些位置的数据,参数即为代表位置的序号值。
注意:itemgetter 获取的不是值,而是定义了一个函数,通过该函数作用到目标对象上,取出目标对象对应维度的值
from operator import itemgetter
# 或者import operator  # 调用时需要写成operator.itemgetter

a = [1,2,3]
b = [[1,2,3],[4,5,6],[7,8,9]]
# 注: Python列表、元祖、字典等对象的下标均是从0开始的

# 我们定义取出对象位置1上的数据:
get_1 = itemgetter(1)
get_1(a)  # 2
get_1(b)  # [4,5,6]
# 类似:取出对象1,2位置上的数据,并且调整一下顺序:
get_21 = itemgetter(2,1)
get_21(a)  # [3,2]
get_21(b)  # [[7,8,9],[4,5,6]]
import operator
cleaned = [(1, 1, 1), (2, 4, 1), (2, 3, 2), (1, 5, 2), (1, 4, 1)]
list1 = sorted(cleaned, key=operator.itemgetter(0, 2))  # 先按照第0位,由小到大排序,再在每一个范围里面,按第2位排
print(list1)
# [(1, 1, 1), (1, 4, 1), (1, 5, 2), (2, 4, 1), (2, 3, 2)]
# [(1, 1), (1, 5), (2, 3), (2, 4)]
# 可用于,先进行x轴由小到大排序,再进行y轴由小到大排序
1.9 keys()
返回一个字典所有的键。
dict = {'Name': 'Zara', 'Age': 7, 1: 2}
print("Value : %s" % dict.keys())
print(list(dict.keys()))
# Value : dict_keys(['Name', 'Age', 1])
# ['Name', 'Age', 1]
print(dict.values) # clusters = {0: []} # 定义了一个value为列表的字典
dIndex = 0
clusters[dIndex].append(1)
clusters[dIndex].append(2)
clusters[dIndex].append("a")
print(clusters) # {0: [1, 2, 'a']}
1.10 set()
set() 函数创建一个无序不重复元素集,可进行关系测试,删除重复数据,还可以计算交集、差集、并集等。
set 语法: class set(iterable)
参数说明:iterable – 可迭代对象对象; 返回值 返回新的集合对象。
x = set('runoob')
z = set([1, 1, 2, (1, 2), (2, 1), (2, 1)])
print(x) # {'b', 'r', 'u', 'o', 'n'}
print(type(x)) # 1.11 with open() as 读写文件
参考网址:https://blog.csdn.net/xrinosvip/article/details/82019844
读文件:
要以读文件的模式打开一个文件对象,使用Python内置的open()函数,传入文件名和标示符:
f = open('E:\python\python\test.txt', 'r')
标示符’r’表示读,这样,我们就成功地以读模式打开了一个文件。
如果文件不存在,open()函数就会抛出一个IOError的错误,并且给出错误码和详细的信息告诉你文件不存在:
如果文件打开成功,接下来,调用read()方法可以一次读取文件的全部内容,Python把内容读到内存,用一个str对象表示:
f.read()
‘Hello, python!’
最后一步是调用close()方法关闭文件。文件使用完毕后必须关闭,因为文件对象会占用操作系统的资源,并且操作系统同一时间能打开的文件数量也是有限的:
f.close()
由于文件读写时都有可能产生IOError,一旦出错,后面的f.close()就不会调用。所以,为了保证无论是否出错都能正确地关闭文件,我们可以使用try … finally来实现:
    try:
        f = open('/path/', 'r')
        print(f.read())
    finally:
        if f:
            f.close()
每次都这么写实在太繁琐,所以,Python引入了with语句来自动帮我们调用close()方法:(重点)
with open('/path/to/file', 'r') as f:
    print(f.read())
写文件 写文件和读文件是一样的,唯一区别是调用open()函数时,传入标识符’w’或者’wb’表示写文本文件或写二进制文件:
f = open('E:\python\python\test.txt', 'w')
f.write('Hello, python!')
f.close()
可以反复调用write()来写入文件,但是务必要调用f.close()来关闭文件。当我们写文件时,操作系统往往不会立刻把数据写入磁盘,而是放到内存缓存起来,空闲的时候再慢慢写入。只有调用close()方法时,操作系统才保证把没有写入的数据全部写入磁盘。忘记调用close()的后果是数据可能只写了一部分到磁盘,剩下的丢失了。所以,还是用with语句来得保险:(重点)
with open('E:\python\python\test.txt', 'w') as f:
    f.write('Hello, python!')
    # TypeError: write() argument must be str, not dict
注意:write只能写入字符串,不能写入字典,字典用dump的方法,见1.12
1.12 dump
import pickle

obj = {"1": 2, "2": 2}
with open('./1.pkl', 'wb') as f:
    pickle.dump(obj, f, pickle.HIGHEST_PROTOCOL)


with open('./1.pkl', 'rb') as f:
    print(pickle.load(f))  # {'1': 2, '2': 2}
2 定位每一个车位并编号
注意:该项目为了用到更多的图像处理知识所以使用下述方法,实际上可以直接手动标出坐标,更加精确。