SpringBoot的缓存技术(整合Ehcache )
1.修改pom.xml
<project xmlns="http://maven.apache.org/POM/4.0.0"
	xmlns:xsi="http://www.w3.org/2001/XMLSchema-instance"
	xsi:schemaLocation="http://maven.apache.org/POM/4.0.0 http://maven.apache.org/xsd/maven-4.0.0.xsd">
	<modelVersion>4.0.0modelVersion>
	<parent>
		<groupId>org.springframework.bootgroupId>
		<artifactId>spring-boot-starter-parentartifactId>
		<version>1.5.10.RELEASEversion>
	parent>
	<groupId>com.bjsxtgroupId>
	<artifactId>23-spring-boot-ehcacheartifactId>
	<version>0.0.1-SNAPSHOTversion>

	<properties>
		<thymeleaf.version>3.0.2.RELEASEthymeleaf.version>
		<thymeleaf-layout-dialect.version>2.0.4thymeleaf-layout-dialect.version>
	properties>

	<dependencies>

		<dependency>
			<groupId>org.springframework.bootgroupId>
			<artifactId>spring-boot-starter-webartifactId>
		dependency>

		<dependency>
			<groupId>org.springframework.bootgroupId>
			<artifactId>spring-boot-starter-thymeleafartifactId>
		dependency>

		<dependency>
			<groupId>org.springframework.bootgroupId>
			<artifactId>spring-boot-starter-data-jpaartifactId>
		dependency>

		<dependency>
			<groupId>org.springframework.bootgroupId>
			<artifactId>spring-boot-starter-testartifactId>
		dependency>

		<dependency>
			<groupId>mysqlgroupId>
			<artifactId>mysql-connector-javaartifactId>
		dependency>

		<dependency>
			<groupId>com.alibabagroupId>
			<artifactId>druidartifactId>
			<version>1.0.9version>
		dependency>


		<dependency>
			<groupId>org.springframework.bootgroupId>
			<artifactId>spring-boot-starter-cacheartifactId>
		dependency>

		<dependency>
			<groupId>net.sf.ehcachegroupId>
			<artifactId>ehcacheartifactId>
		dependency>
	dependencies>
project>
2.创建Ehcache的配置文件
文件名:ehcache.xml
位置:src/main/resources/ehcache.xml
<ehcache xmlns:xsi="http://www.w3.org/2001/XMLSchema-instance"
	xsi:noNamespaceSchemaLocation="../config/ehcache.xsd">

	<diskStore path="java.io.tmpdir" />

	<defaultCache
			maxElementsInMemory="10000"
			eternal="false"
			timeToIdleSeconds="120"
			timeToLiveSeconds="120"
			maxElementsOnDisk="10000000"
			diskExpiryThreadIntervalSeconds="120"
			memoryStoreEvictionPolicy="LRU">
		<persistence strategy="localTempSwap" />
	defaultCache>


	<cache  name="users"
			maxElementsInMemory="10000"
			eternal="false"
			timeToIdleSeconds="120"
			timeToLiveSeconds="120"
			maxElementsOnDisk="10000000"
			diskExpiryThreadIntervalSeconds="120"
			memoryStoreEvictionPolicy="LRU">
		<persistence strategy="localTempSwap" />
	cache>
ehcache>
3.创建application.properties文件(mysql与springDateJpa相关配置)
spring.datasource.driverClassName=com.mysql.jdbc.Driver
spring.datasource.url=jdbc:mysql://localhost:3306/demo01?useSSL=false
spring.datasource.username=root
spring.datasource.password=root
spring.datasource.type=com.alibaba.druid.pool.DruidDataSource
spring.jpa.hibernate.ddl-auto=update
spring.jpa.show-sql=true
spring.cache.ehcache.cofnig=ehcache.xml

这里还是和大家解释一下,MySql在高版本需要指明是否进行SSL连接,这里因为自己的数据库安装的是mysql8.0所以需要加上这个东西,如果用的是mysql5点几版本的朋友可以自行忽略…
什么是SSL
4.启动类
/**
 * 启动类
 *
 * @author admin
 *
 */
@SpringBootApplication
@EnableCaching
public class App {
	public static void main(String[] args) {
		SpringApplication.run(App.class, args);
	}
}
5.创建实体类Users
package com.entity;

import java.io.Serializable;

import javax.persistence.Column;
import javax.persistence.Entity;
import javax.persistence.GeneratedValue;
import javax.persistence.GenerationType;
import javax.persistence.Id;
import javax.persistence.Table;

@Entity
@Table(name = "t_users")
public class Users implements Serializable {

	@Id
	@GeneratedValue(strategy = GenerationType.IDENTITY)
	@Column(name = "id")
	private Integer id;

	@Column(name = "name")
	private String name;

	@Column(name = "age")
	private Integer age;

	@Column(name = "address")
	private String address;

	public Integer getId() {
		return id;
	}

	public void setId(Integer id) {
		this.id = id;
	}

	public String getName() {
		return name;
	}

	public void setName(String name) {
		this.name = name;
	}

	public Integer getAge() {
		return age;
	}

	public void setAge(Integer age) {
		this.age = age;
	}

	public String getAddress() {
		return address;
	}

	public void setAddress(String address) {
		this.address = address;
	}

	@Override
	public String toString() {
		return "Users [id=" + id + ", name=" + name + ", age=" + age + ", address=" + address + "]";
	}

	public Users(Integer id, String name, Integer age, String address) {
		super();
		this.id = id;
		this.name = name;
		this.age = age;
		this.address = address;
	}

	public Users() {

	}

}
6.创建service接口,并定义对应得接口方法
package com.service;

import java.util.List;

import org.springframework.data.domain.Page;
import org.springframework.data.domain.Pageable;

import com.entity.Users;

public interface UsersService {
	List<Users> findUserAll();

	Users findUserById(Integer id);

	Page<Users> findUserByPage(Pageable pageable);

	void saveUsers(Users users);
}
7.接口的实现
package com.service.Impl;

import java.util.List;

import org.springframework.beans.factory.annotation.Autowired;
import org.springframework.cache.annotation.Cacheable;
import org.springframework.data.domain.Page;
import org.springframework.data.domain.Pageable;
import org.springframework.stereotype.Service;

import com.dao.UsersRepository;
import com.entity.Users;
import com.service.UsersService;

/**
 * UsersService接口实现类
 *
 * @author Administrator
 *
 */
@Service
public class UsersServiceImpl implements UsersService {
	@Autowired
	private UsersRepository usersRepository;

	@Override
	public List<Users> findUserAll() {
		return this.usersRepository.findAll();
	}

	@Override
	// @Cacheable:对当前查询的对象进行缓存处理
	// @Cacheable(value = "users")
	public Users findUserById(Integer id) {
		return this.usersRepository.findOne(id);
	}

	@Override
	public Page<Users> findUserByPage(Pageable pageable) {
		return this.usersRepository.findAll(pageable);
	}

	@Override
	public void saveUsers(Users users) {
		this.usersRepository.save(users);
	}

}

8.定义UsersRepository(来自jpa的神奇力量)
package com.dao;


import org.springframework.data.jpa.repository.JpaRepository;

import com.entity.Users;

/**
 * 参数一 T :当前需要映射的实体
 * 参数二 ID :当前映射的实体中的OID的类型
 *
 */
public interface UsersRepository extends JpaRepository<Users,Integer>{

}
9.开始测试
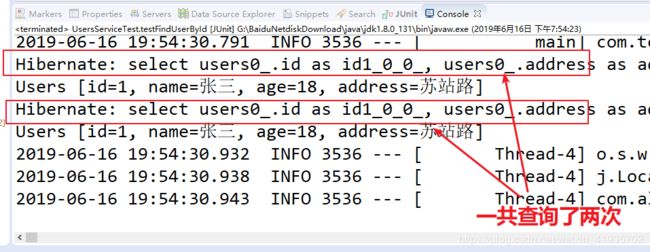
- 第一次测试
package com.test;

import org.junit.Test;
import org.junit.runner.RunWith;
import org.springframework.beans.factory.annotation.Autowired;
import org.springframework.boot.test.context.SpringBootTest;
import org.springframework.test.context.junit4.SpringJUnit4ClassRunner;

import com.App;
import com.entity.Users;
import com.service.UsersService;

/**
 * UsersService测试
 *
 * @author Administrator
 *
 */
@RunWith(SpringJUnit4ClassRunner.class)
@SpringBootTest(classes = App.class)
public class UsersServiceTest {
	@Autowired
	private UsersService usersService;

	@Test
	public void addUser() {
		Users users=new Users();
		users.setId(1);
		users.setAddress("苏站路");
		users.setAge(18);
		users.setName("张三");
		usersService.saveUsers(users);
		System.out.println("执行完毕");
	}
	@Test
	public void testFindUserById() {
		//第一次查询
		System.out.println(this.usersService.findUserById(1));
		//第二次查询
		System.out.println(this.usersService.findUserById(1));
	}
}
-
第二次测试‘’
这里我们将之前在 UserServiceImpl里面的 @Cacheable(value = “users”)取消注释

再次启动项目测试

-
第三次测试
修改UsersServiceImpl里面findUserByPage的方法指定为pageable.pageSize,默认的是pageable
修改测试类
新增方法testFindUserByPage
@Test
	public void testFindUserByPage() {
		Pageable pageable = new PageRequest(0, 2);
		// 第一次查询
		System.out.println(this.usersService.findUserByPage(pageable).getTotalElements());

		// 第二次查询
		System.out.println(this.usersService.findUserByPage(pageable).getTotalElements());
	}
- 第四次测试(清除缓存:@CacheEvict)
首先在UsersServiceTest中添加测试方法testFindAll,代码如下
@Test
	public void testFindAll() {
		//第一次查询
		System.out.println(this.usersService.findUserAll().size());
		//添加用户
		Users users = new Users();
		users.setId(4);
		users.setAddress("苏站路");
		users.setAge(18);
		users.setName("张三4");
		usersService.saveUsers(users);
		//第二次查询
		System.out.println(this.usersService.findUserAll().size());
	}
测试结果一:

由于缓存机制的存在,所以数据库的元素改变了,但是我们用的却还是之前缓存的内容,很显然这不合适。如何解决呢,我们修改UsersServiceImpl,在saveUsers上面填上注解@CacheEvict(value=“users”,allEntries=true)
@Override
	//@CacheEvict(value="users",allEntries=true)  清除缓存中以users缓存策略缓存的对象
	@CacheEvict(value="users",allEntries=true)
	public void saveUsers(Users users) {
		this.usersRepository.save(users);
	}
再次测试,结果如下:


