Faster RCNN源码分析
原理参考:一文读懂Faster RCNN( 详细!)
code参考:
PyTorch faster_rcnn之一—复现代码
PyTorch faster_rcnn之一源码解读二 model_util
PyTorch-faster-rcnn之一源码解读三model
PyTorch-faster-rcnn之一源码解读四train
文件目录
.
├── data                       # 训练测试数据准备与处理
|   ├── __init__.py
|   ├── dataset.py
|   ├── util.py
|   └── voc_dataset.py
├── misc
|   ├── convert_caffe_pretain.py
|   └── train_fast.py
├── model
|   ├── utils
|   |   ├── __init__.py
|   |   ├── bbox_tools.py
|   |   ├── creator_tool.py
|   |   ├── roi_cupy.py
|   |   └── nms
|   |       ├── __init__.py
|   |       ├── _nms_gpu_post.py
|   |       ├── build.py
|   |       └── non_maximum_suppression.py
|   ├── __init__.py
|   ├── faster_rcnn.py
|   ├── faster_rcnn_vgg16.py
|   ├── region_proposal_network.py
|   └── roi_module.py
├── utils
|   ├── __init__.py
|   ├── array_tool.py   # 类别转换脚本,实现tensor、numpy、Variable之间的转换。
|   ├── config.py       # 配置文件。包括数据及地址、visdom环境、预训练权重类型、学习率及各超参数。
|   ├── eval_tool.py    # 评估检测结果
|   └── vis_tool.py     # 显示训练中的图像
├── demo.ipynb
├── train.py
└── trainer.py
1.data:数据预处理文件
逐字理解目标检测simple-faster-rcnn-pytorch-master代码(一)
2.model
(1)model/util/bbox_tools.py
model/util/文件夹主要是进行一些配置文件
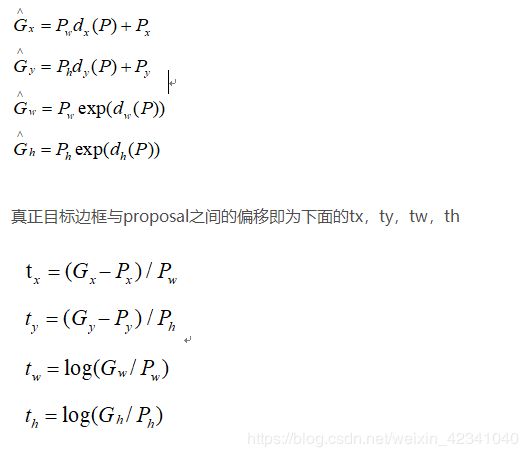
首先看的是bbox_tools.py文件,其中涉及RCNN中提出的边框回归公式,G^表示近似目标边框,P表示proposal边框,回归学习就是偏移量dx,dy,dh,dw这四个变换,让CNN提取的特征乘以w的转置

1.函数loc2bbox(src_bbox, loc):输入anchors box和偏移系数(loc)返回近似目标框.
 Args:
       	 src_bbox (array): A coordinates of bounding boxes.
            Its shape is :math:`(R, 4)`. These coordinates are
            :math:`p_{ymin}, p_{xmin}, p_{ymax}, p_{xmax}`.
        loc (array): An array with offsets and scales.
            The shapes of :obj:`src_bbox` and :obj:`loc` should be same.
            This contains values :math:`t_y, t_x, t_h, t_w`.

  Returns:
       array:
       Decoded bounding box coordinates. Its shape is :math:`(R, 4)`. \
       The second axis contains four values \
       :math:`\\hat{g}_{ymin}, \\hat{g}_{xmin},
       \\hat{g}_{ymax}, \\hat{g}_{xmax}`.
2.函数bbox2loc(src_bbox, dst_bbox):返回 真正目标边框 gt 与 proposal边框p之间的offsets and scales : ty,tx,th,tw
Args:
    src_bbox (array): An image coordinate array whose shape is
        :math:`(R, 4)`. :math:`R` is the number of bounding boxes.
        These coordinates are
        :math:`p_{ymin}, p_{xmin}, p_{ymax}, p_{xmax}`.
    dst_bbox (array): An image coordinate array whose shape is
        :math:`(R, 4)`.
        These coordinates are
        :math:`g_{ymin}, g_{xmin}, g_{ymax}, g_{xmax}`.

Returns:
    array:
    Bounding box offsets and scales from :obj:`src_bbox` \
    to :obj:`dst_bbox`. \
    This has shape :math:`(R, 4)`.
    The second axis contains four values :math:`t_y, t_x, t_h, t_w`.
3. bbox_iou(bbox_a, bbox_b):计算iou
Args:
    bbox_a (array): An array whose shape is :math:`(N, 4)`.
         :math:`N` is the number of bounding boxes.
         The dtype should be :obj:`numpy.float32`.
     bbox_b (array): An array similar to :obj:`bbox_a`,
         whose shape is :math:`(K, 4)`.
         The dtype should be :obj:`numpy.float32`.

Returns:
  array:
	   An array whose shape is :math:`(N, K)`. \
	   An element at index :math:`(n, k)` contains IoUs between \
	   :math:`n` th bounding box in :obj:`bbox_a` and :math:`k` th bounding \
	   box in :obj:`bbox_b`.
4. 函数generate_anchor_base(base_size=16, ratios=[0.5, 1, 2], anchor_scales=[8, 16, 32]):对特征图features以基准长度为16、选择合适的ratios和scales取基准锚点anchor_base。(选择长度为16的原因是图片大小为600*800左右,基准长度16对应的原图区域是256*256,考虑放缩后的大小有128*128,512*512比较合适)根据基准点生成9个基本的anchor的功能,ratios=[0.5,1,2],anchor_scales=[8,16,32]是长宽比和缩放比例,anchor_scales也就是在base_size的基础上再增加的量,本代码中对应着三种面积的大小 ( 16 ∗ 8 ) 2 (16*8)^2 (16∗8)2 , ( 16 ∗ 16 ) 2 (16*16)^2 (16∗16)2 , ( 16 ∗ 32 ) 2 (16*32)^2 (16∗32)2 也就是128,256,512的平方大小
Args:
        base_size (number): The width and the height of the reference window.
        ratios (list of floats): This is ratios of width to height of
            the anchors.
        anchor_scales (list of numbers): This is areas of anchors.
            Those areas will be the product of the square of an element in
            :obj:`anchor_scales` and the original area of the reference
            window.

    Returns:
        ~numpy.ndarray:
        An array of shape :math:`(R, 4)`.
        Each element is a set of coordinates of a bounding box.
        The second axis corresponds to
        :math:`(y_{min}, x_{min}, y_{max}, x_{max})` of a bounding box.
(2) model / region_proposal_network.py
函数_enumerate_shifted_anchor(anchor_base, feat_stride, height, width):#利用anchor_base生成所有对应feature map的anchor
 """
   Args:
    anchor_base: (1, A, 4) A = 9
    feat_stride: 16
    height: H / 16
    width: W / 16
    K = H / 16 * W / 16
  Return: (K * A, 4)
    """
(3)model/creator_tool.py(重点!)
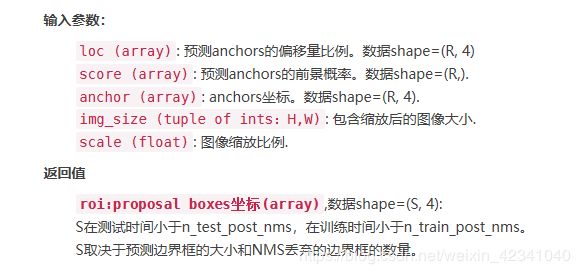
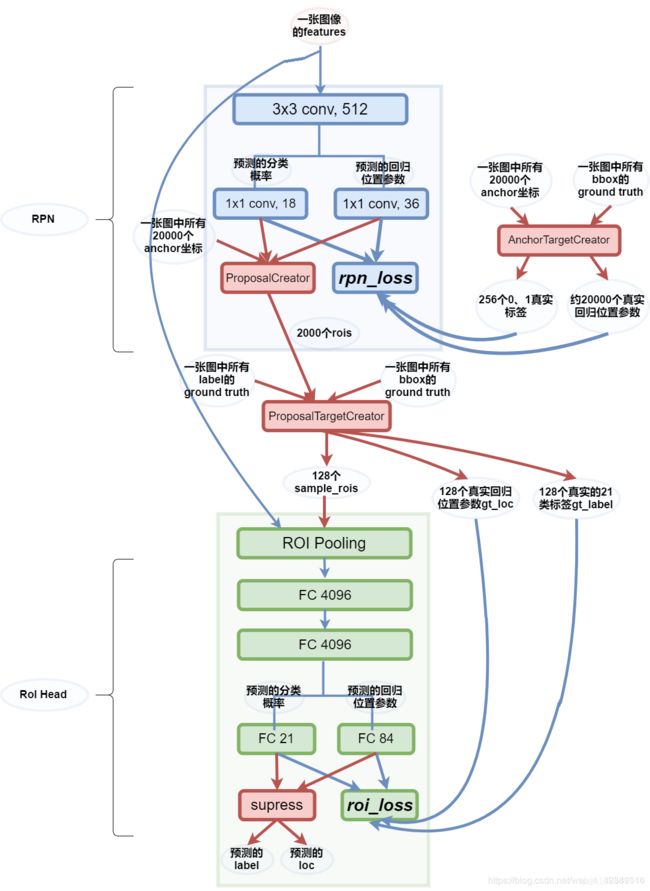
1.class ProposalCreator: 对于每张图片,利用它的feature map,计算(H/16)*(W/16)*9(大概20000)个anchor属于前景的概率,然后从中选取概率较大的12000张,利用位置回归参数,修正这12000个anchor的位置, 利用非极大值抑制, 选出2000个ROIS以及对应的位置参数。

可调用类实现步骤:
1).2w个anchors通过调用loc2bbox(anchor, loc), 产生近似gt的框(即rois)
2).裁剪将rois的ymin,ymax限定在[0,H], xmin, xmax限定在[0,W] (只是裁剪,不丢弃)
3).确保rois的长宽大于最小阈值(长或者宽小于16的rois删!)
4).对剩下的ROIs进行打分(根据region_proposal_network中rois的预测的前景概率)取前12000个(train)或者前6000个(test)
5).nms取2000个(train)或者300个(test),阈值nms_thresh=0.7
class ProposalCreator:
    def __init__(self,
                 parent_model,
                 nms_thresh=0.7,
                 n_train_pre_nms=12000,
                 n_train_post_nms=2000,
                 n_test_pre_nms=6000,
                 n_test_post_nms=300,
                 min_size=16
                 ):
        self.parent_model = parent_model
        self.nms_thresh = nms_thresh
        self.n_train_pre_nms = n_train_pre_nms
        self.n_train_post_nms = n_train_post_nms
        self.n_test_pre_nms = n_test_pre_nms
        self.n_test_post_nms = n_test_post_nms
        self.min_size = min_size

    # 这里的loc和score是经过region_proposal_network中经过1x1卷积分类和回归得到的
    def __call__(self, loc, score, anchor, img_size, scale=1.):
        # NOTE: when test, remember
        # faster_rcnn.eval()
        # to set self.traing = False
        if self.parent_model.training:
            n_pre_nms = self.n_train_pre_nms    # 12000
            n_post_nms = self.n_train_post_nms  # 经过NMS后有2000个
        else:
            n_pre_nms = self.n_test_pre_nms     # 6000
            n_post_nms = self.n_test_post_nms   # 经过NMS后有300个

        # Convert anchors into proposal via bbox transformations.
        # 将bbox转换为近似groudtruth的anchor(即rois)
        roi = loc2bbox(anchor, loc)

        # Clip predicted boxes to image.
        # 裁剪将rois的ymin,ymax限定在[0,H]
        # slice(start,stop,step)
        roi[:, slice(0, 4, 2)] = np.clip(roi[:, slice(0, 4, 2)], 0, img_size[0])
        # 裁剪将rois的xmin,xmax限定在[0,W]
        roi[:, slice(1, 4, 2)] = np.clip(roi[:, slice(1, 4, 2)], 0, img_size[1])

        # Remove predicted boxes with either height or width < threshold.
        min_size = self.min_size * scale    # 16
        hs = roi[:, 2] - roi[:, 0]          # rois的宽
        ws = roi[:, 3] - roi[:, 1]          # rois的高
        keep = np.where((hs >= min_size) & (ws >= min_size))[0]  # 确保rois的长宽大于最小阈值
        roi = roi[keep, :]
        # 对剩下的ROIs进行打分(根据region_proposal_network中rois的预测前景概率)
        score = score[keep]

        # 将score拉伸并逆序(从高到低)排序.
        order = score.ravel().argsort()[::-1]
        # train时从20000中取前12000个rois,test取前6000个
        if n_pre_nms > 0:
            order = order[:n_pre_nms]
        roi = roi[order, :]

        # (具体需要看NMS的原理以及输入参数的作用)调用非极大值抑制函数,将重复的抑制掉,就可以将筛选后ROIS进行返回。
        # 经过NMS处理后Train数据集得到2000个框,Test数据集得到300个框
        # TODO: remove cuda.to_gpu
        keep = non_maximum_suppression(
            cp.ascontiguousarray(cp.asarray(roi)),
            thresh=self.nms_thresh)
        if n_post_nms > 0:
            keep = keep[:n_post_nms]
        roi = roi[keep]
        # 取出最终的2000或300个rois
        return roi
2.class ProposalTargetCreator(object): 选出128个roi用于roi训练

步骤:
1)首先将2000个roi和m个gtbox给concatenate了一下成为新的roi(2000+m,4)
2)计算每一个roi与每一个gtbox的iou
3)每个roi与哪个gtbox的iou最大(返回索引gt_assignment )
4)每个roi与对应gtbox最大的iou : max_iou
5)根据max_iou将正负样本找出来,pos_iou_thresh=0.5,neg_iou_thresh_hi=0.5, neg_iou_thresh_lo=0.0 随机挑出正样本32个负样本96个
6)正样本的标签是样本对应的gtbox类别gt_assignment (1-20)负样本标签则为0
7)得到sample_roi(128个)。计算rois和gt的offest——gt_roi_loc = bbox2loc(sample_roi, bbox[gt_assignment[keep_index]]),并进行归一化处理
class ProposalTargetCreator(object):
    """
    目的:为2000个rois赋予ground truth!(严格讲挑出128个赋予ground truth!)
    输入:2000个rois、一个batch(一张图)中所有的bbox ground truth(R,4)、对应bbox所包含的label(R,1)(VOC2007来说20类0-19)
    输出:128个sample roi(128,4)、128个gt_roi_loc(128,4)、128个gt_roi_label(128,1)用于roi训练!

    """

    def __init__(self,
                 n_sample=128,
                 pos_ratio=0.25, pos_iou_thresh=0.5,
                 neg_iou_thresh_hi=0.5, neg_iou_thresh_lo=0.0
                 ):
        self.n_sample = n_sample
        self.pos_ratio = pos_ratio
        self.pos_iou_thresh = pos_iou_thresh
        self.neg_iou_thresh_hi = neg_iou_thresh_hi
        self.neg_iou_thresh_lo = neg_iou_thresh_lo  # NOTE:default 0.1 in py-faster-rcnn

    def __call__(self, roi, bbox, label, loc_normalize_mean=(0., 0., 0., 0.), loc_normalize_std=(0.1, 0.1, 0.2, 0.2)):
        # 因为这些数据是要放入到整个大网络里进行训练的,比如说位置数据,所以要对其位置坐标进行数据增强处理(归一化处理)

        n_bbox, _ = bbox.shape
        # 首先将2000个roi和m个gtbox给concatenate了一下成为新的roi(2000+m,4)。
        roi = np.concatenate((roi, bbox), axis=0)
        # n_sample = 128,pos_ratio=0.25,round 对传入的数据进行四舍五入
        pos_roi_per_image = np.round(self.n_sample * self.pos_ratio)
        # 计算每一个roi与每一个gtbox的iou
        iou = bbox_iou(roi, bbox)
        # 返回的是每个roi与哪个gtbox的iou最大(返回索引)
        gt_assignment = iou.argmax(axis=1)
        # 每个roi与对应gtbox最大的iou
        max_iou = iou.max(axis=1)
        # 从1开始的类别序号,给每个类得到真正的label(将0-19变为1-20)
        gt_roi_label = label[gt_assignment] + 1

        # 同样的根据iou的最大值将正负样本找出来,pos_iou_thresh=0.5
        pos_index = np.where(max_iou >= self.pos_iou_thresh)[0]
        # 需要保留的roi个数(满足大于pos_iou_thresh条件的roi数目值与128*0.25之间较小的一个)
        pos_roi_per_this_image = int(min(pos_roi_per_image, pos_index.size))
        if pos_index.size > 0:
            # 找出的样本数目过多就随机丢掉一些
            # np.random.choice 从pos_index(必须是一维)随机挑出size个,且数据不重复(replace=FALSE)
            pos_index = np.random.choice(pos_index, size=pos_roi_per_this_image, replace=False)

        # Select background RoIs as those within
        # [neg_iou_thresh_lo, neg_iou_thresh_hi).
        neg_index = np.where((max_iou < self.neg_iou_thresh_hi) &
                             (max_iou >= self.neg_iou_thresh_lo))[0]
        # 需要保留的roi个数(满足大于neg_iou_thresh_lo小于neg_iou_thresh_hi条件的roi数目值与128*0.75之间较小的一个)
        neg_roi_per_this_image = self.n_sample - pos_roi_per_this_image
        neg_roi_per_this_image = int(min(neg_roi_per_this_image, neg_index.size))
        if neg_index.size > 0:
            # 找出的样本数目过多就随机丢掉一些
            # np.random.choice 从neg_index(必须是一维)随机挑出size个,且数据不重复(replace=FALSE)
            neg_index = np.random.choice(neg_index, size=neg_roi_per_this_image, replace=False)

        # The indices that we're selecting (both positive and negative).
        keep_index = np.append(pos_index, neg_index)
        gt_roi_label = gt_roi_label[keep_index]
        gt_roi_label[pos_roi_per_this_image:] = 0  # 负样本label 设为0

        # 那么此时输出的128*4的sample_roi就可以去扔到 RoIHead网络里去进行分类与回归了。同样,
        # RoIHead网络利用这sample_roi+featue为输入,输出是分类(21类)和回归(进一步微调bbox)的预测值,
        # 那么分类回归的groud truth就是ProposalTargetCreator输出的gt_roi_label和gt_roi_loc
        sample_roi = roi[keep_index]
        # Compute offsets and scales to match sampled RoIs to the GTs.
        gt_roi_loc = bbox2loc(sample_roi, bbox[gt_assignment[keep_index]])
        # ProposalTargetCreator首次用到了真实的21个类的label,且该类最后对loc进行了归一化处理,所以预测时要进行均值方差处理
        gt_roi_loc = ((gt_roi_loc - np.array(loc_normalize_mean, np.float32)) / np.array(loc_normalize_std, np.float32))

        return sample_roi, gt_roi_loc, gt_roi_label
3.class AnchorTargetCreator(object): 128正+128负用于rpn训练

步骤:
1)2w个anchor,将那些超出图片范围的anchor全部去掉,只保留位于图片内部的序号
2) 随机筛选出符合条件的正例128个负例128并给它们附上相应的label 正样本1负样本0其他都为-1
3)计算每一个anchor与对应gt box(求得iou最大的gtbox)计算偏移量(注意这里是位于图片范围内部的每一个anchor)
4)map up to original set of anchors(2w个)
位于图片内部的框的label对应到所有生成的20000个框中(默认-1)
位于图片内部的框的loc对应到所有生成的20000个框中(默认0
)
class AnchorTargetCreator(object):
    """
    为Faster-RCNN专有的RPN网络提供自我训练的样本,RPN网络正是利用AnchorTargetCreator产生
    的样本作为数据进行网络的训练和学习的,这样产生的预测anchor的类别和位置才更加精确,anchor
    变成真正的ROIS需要进行位置修正,而AnchorTargetCreator产生的带标签的样本就是给RPN网络进行训练学习用哒

    """

    # 利用每张图中gtbox的真实标签来为所有任务分配ground truth!
    def __init__(self,
                 n_sample=256,
                 pos_iou_thresh=0.7, neg_iou_thresh=0.3,
                 pos_ratio=0.5):
        self.n_sample = n_sample
        self.pos_iou_thresh = pos_iou_thresh    # IOU高于此阈值的锚定将被指定为正.
        self.neg_iou_thresh = neg_iou_thresh    # IOU低于此阈值的锚定将被指定为负.
        self.pos_ratio = pos_ratio              # 采样区域中正区域的比率

    def __call__(self, bbox, anchor, img_size):

        img_H, img_W = img_size

        n_anchor = len(anchor)      # 一般对应20000个左右anchor
        # 将那些超出图片范围的anchor全部去掉,只保留位于图片内部的序号
        inside_index = _get_inside_index(anchor, img_H, img_W)
        anchor = anchor[inside_index]
        # 筛选出符合条件的正例128个负例128并给它们附上相应的label
        argmax_ious, label = self._create_label(inside_index, anchor, bbox)

        # 计算每一个anchor与对应gt box求得iou最大的bbox计算偏移量(注意这里是位于图片内部的每一个)
        loc = bbox2loc(anchor, bbox[argmax_ious])

        # map up to original set of anchors
        # 将位于图片内部的框的label对应到所有生成的20000个框中(label原本为所有在图片中的框的)
        label = _unmap(label, n_anchor, inside_index, fill=-1)  # n_anchor大约2w,inside_index为位于图片内部的anchor序号,默认都为-1
        # 将回归的框对应到所有生成的20000个框中(label原本为所有在图片中的框的)默认0
        loc = _unmap(loc, n_anchor, inside_index, fill=0)

        return loc, label


    def _create_label(self, inside_index, anchor, bbox):
        """
            随机选出128正+128负

        """
        # label: 1 is positive, 0 is negative, -1 is dont care
        label = np.empty((len(inside_index),), dtype=np.int32)
        label.fill(-1)
        # 得到每个anchor与哪个gtbox的iou最大以及这个iou值、每个gtbox与哪个anchor的iou最大(需要体会从行和列取最大值的区别)
        argmax_ious, max_ious, gt_argmax_ious = self._calc_ious(anchor, bbox, inside_index)   # inside_index为所有在图片范围内的anchor序号

        # 把每个anchor与对应的GT框求得的iou值与负样本阈值比较,若小于负样本阈值,则label设为0,pos_iou_thresh=0.7, neg_iou_thresh=0.3
        label[max_ious < self.neg_iou_thresh] = 0
        # 把与每个GTbox求得iou值最大的anchor的label设为1
        label[gt_argmax_ious] = 1
        # 把每个anchor与对应的框求得的iou值与正样本阈值比较,若大于正样本阈值,则label设为1
        label[max_ious >= self.pos_iou_thresh] = 1

        # 按照比例计算出正样本数量,pos_ratio=0.5,n_sample=256,n_pos=128
        n_pos = int(self.pos_ratio * self.n_sample)
        # 得到所有正样本的索引
        pos_index = np.where(label == 1)[0]
        # 如果选取出来的正样本数多于预设定的正样本数,则随机抛弃,将那些抛弃的样本的label设为-1(随机取128个记为正样本)
        if len(pos_index) > n_pos:
            disable_index = np.random.choice(pos_index, size=(len(pos_index) - n_pos), replace=False)
            label[disable_index] = -1

        # subsample negative labels if we have too many
        n_neg = self.n_sample - np.sum(label == 1)
        # 得到所有负样本的索引
        neg_index = np.where(label == 0)[0]
        # 如果选取出来的负样本数多于预设定的正样本数,则随机抛弃,将那些抛弃的样本的label设为-1(随机取128个记为负样本)
        if len(neg_index) > n_neg:
            disable_index = np.random.choice(neg_index, size=(len(neg_index) - n_neg), replace=False)
            label[disable_index] = -1

        return argmax_ious, label

    def _calc_ious(self, anchor, bbox, inside_index):
        # ious between the anchors and the gt boxes
        # 计算iou between anchors and gt
        # 调用bbox_iou函数计算anchor与gtbox的IOU, ious:(N,K),N为anchor中第N个,K为bbox中第K个,N大概有15000个
        ious = bbox_iou(anchor, bbox)
        # 1.
        # 求出每个anchor与哪个gtbox的iou最大, 返回的是索引
        argmax_ious = ious.argmax(axis=1)
        # 求出每个anchor与哪个bbox的iou最大,以及最大值,max_ious.shape:[N,]
        max_ious = ious[np.arange(len(inside_index)), argmax_ious]
        # 2.
        # 求出每个gt与哪个anchor的iou最大, 返回的是索引
        gt_argmax_ious = ious.argmax(axis=0)
        # 求出每个gt与哪个anchor的iou最大,以及最大值,gt_max_ious.shape:[K,]
        gt_max_ious = ious[gt_argmax_ious, np.arange(ious.shape[1])]
        # 然后返回最大iou的索引(每个GTbox与哪个anchor的iou最大),有K个
        gt_argmax_ious = np.where(ious == gt_max_ious)[0]

        return argmax_ious, max_ious, gt_argmax_ious

def _unmap(data, count, index, fill=0):
    # Unmap a subset of item (data) back to the original set of items (of
    # size count)
    # 一维数据
    if len(data.shape) == 1:
        ret = np.empty((count,), dtype=data.dtype)
        ret.fill(fill)
        ret[index] = data
    # 二维数据
    else:
        ret = np.empty((count,) + data.shape[1:], dtype=data.dtype)
        ret.fill(fill)
        ret[index, :] = data
    return ret


# 将那些超出图片范围的anchor全部去掉,只保留位于图片内部的序号
def _get_inside_index(anchor, H, W):
    # Calc indicies of anchors which are located completely inside of the image
    # whose size is speficied.
    index_inside = np.where(
        (anchor[:, 0] >= 0) &
        (anchor[:, 1] >= 0) &
        (anchor[:, 2] <= H) &
        (anchor[:, 3] <= W)
    )[0]
    return index_inside
(4)model/region_proposal_network.py
class RegionProposalNetwork(nn.Module):

class RegionProposalNetwork(nn.Module):

    def __init__(
            self, in_channels=512, mid_channels=512, ratios=[0.5, 1, 2],
            anchor_scales=[8, 16, 32], feat_stride=16,
            proposal_creator_params=dict(),
    ):
        super(RegionProposalNetwork, self).__init__()
        # 生成以左上角(0,0)为中心的9个anchors
        self.anchor_base = generate_anchor_base(anchor_scales=anchor_scales, ratios=ratios)
        # s:16
        self.feat_stride = feat_stride
        # 对于每张图片,利用它的feature map,计算(H / 16)x(W / 16) x 9(大概20000)个anchor属于前景的概率,
        # 然后从中选取概率较大的12000张,利用位置回归参数,修正这12000个anchor的位置, 利用非极大值抑制,
        # 选出2000个ROIS以及对应的位置参数。
        self.proposal_layer = ProposalCreator(self, **proposal_creator_params)
        n_anchor = self.anchor_base.shape[0]  # 9
        self.conv1 = nn.Conv2d(in_channels, mid_channels, 3, 1, 1)
        self.score = nn.Conv2d(mid_channels, n_anchor * 2, 1, 1, 0)
        self.loc = nn.Conv2d(mid_channels, n_anchor * 4, 1, 1, 0)
        # 归一化
        normal_init(self.conv1, 0, 0.01)
        normal_init(self.score, 0, 0.01)
        normal_init(self.loc, 0, 0.01)

    def forward(self, x, img_size, scale=1.):
        n, _, hh, ww = x.shape
        # 在9个base_anchor基础上生成hh*ww*9个anchor,对应到原图坐标
        anchor = _enumerate_shifted_anchor(np.array(self.anchor_base), self.feat_stride, hh, ww)
        # hh*ww*9/hh*ww=9
        n_anchor = anchor.shape[0] // (hh * ww)
        # 512x3x3卷积(n, 512, H/16,W/16)
        h = F.relu(self.conv1(x))
        # 1.回归分支
        # n_anchor(9)*4个1x1卷积,回归坐标偏移量。(n,9*4,hh,ww)
        rpn_locs = self.loc(h)
        # 转换为(n,hh,ww,9*4)后变为(n,hh*ww*9,4)
        rpn_locs = rpn_locs.permute(0, 2, 3, 1).contiguous().view(n, -1, 4)

        # 2.分类分支
        # n_anchor(9)*2个1x1卷积,回归类别。(9*2,hh,ww)
        rpn_scores = self.score(h)
        # 转换为(n,hh,ww,9*2)
        rpn_scores = rpn_scores.permute(0, 2, 3, 1).contiguous()
        # 计算{Softmax}(x_{i}) = \{exp(x_i)}{\sum_j exp(x_j)}
        rpn_softmax_scores = F.softmax(rpn_scores.view(n, hh, ww, n_anchor, 2), dim=4)
        # 得到前景的分类概率
        rpn_fg_scores = rpn_softmax_scores[:, :, :, :, 1].contiguous()
        # 得到所有anchor的前景分类概率
        rpn_fg_scores = rpn_fg_scores.view(n, -1)
        # 得到每一张feature map上所有anchor的网络输出值
        rpn_scores = rpn_scores.view(n, -1, 2)

        rois = list()
        roi_indices = list()
        # 对一个batchsize内的每一张图片调用ProposalCreator
        for i in range(n):
            # 调用ProposalCreator函数, rpn_locs维度(hh*ww*9,4),rpn_fg_scores维度为(hh*ww*9),
            # anchor的维度为(hh*ww*9,4), img_size的维度为(3,H,W),H和W是经过数据预处理后的。
            # 计算(H/16)x(W/16)x9(大概20000)个anchor属于前景的概率,取前12000个并经过NMS得到2000个近似目标框G^的坐标。
            # roi的维度为(2000,4)
            roi = self.proposal_layer(
                rpn_locs[i].cpu().data.numpy(),
                rpn_fg_scores[i].cpu().data.numpy(),
                anchor, img_size,
                scale=scale)
            batch_index = i * np.ones((len(roi),), dtype=np.int32)
            # rois为所有batch_size的roi
            rois.append(roi)
            roi_indices.append(batch_index)
        # 按行拼接(即没有batch_size的区分,每一个[]里都是一个anchor的四个坐标)
        rois = np.concatenate(rois, axis=0)
        # 这个 roi_indices在此代码中是多余的,因为我们实现的是batch_siae=1的网络,
        # 一个batch只会输入一张图象。如果多张图象的话就需要存储索引以找到对应图像的roi
        roi_indices = np.concatenate(roi_indices, axis=0)
        # rpn_locs的维度(hh*ww*9,4),rpn_scores维度为(hh*ww*9,2), rois的维度为(2000,4),
        # roi_indices用不到,anchor的维度为(hh*ww*9,4)
        return rpn_locs, rpn_scores, rois, roi_indices, anchor
(5)roi_pooling
Pytorch中RoI pooling layer的几种实现


主要利用cupy实现ROI Pooling的前向传播和反向传播。NMS和ROI pooling利用了:cupy和chainer。其主要任务是对于一张图象得到的feature map(512, w/16, h/16),然后利用sample_roi的bbox坐标去在特征图上裁剪下来. 所有roi对应的特征图(训练:128, 512, w/16, h/16)、(测试:300,512,w/16,h/16)。
# 将大小不同的roi变成大小一致,得到pooling后的特征,大小为[300, 512, 7, 7]。
# 反正意思为将每个feature map 变成统一大小为7x7的。
class RoI(Function):
    def __init__(self, outh, outw, spatial_scale):
        self.forward_fn = load_kernel('roi_forward', kernel_forward)
        self.backward_fn = load_kernel('roi_backward', kernel_backward)
        self.outh, self.outw, self.spatial_scale = outh, outw, spatial_scale

    def forward(self, x, rois):
        # 变成在内存中连续分布的形式
        x = x.contiguous()
        rois = rois.contiguous()
        self.in_size = B, C, H, W = x.size()
        # 每张图所有的anchors数
        self.N = N = rois.size(0)
        output = t.zeros(N, C, self.outh, self.outw).cuda()
        self.argmax_data = t.zeros(N, C, self.outh, self.outw).int().cuda()
        self.rois = rois
        # data_ptr()返回一个时间戳,numel()返回一个tensor变量内所有元素
        args = [x.data_ptr(), rois.data_ptr(),
                output.data_ptr(),
                self.argmax_data.data_ptr(),
                self.spatial_scale, C, H, W,
                self.outh, self.outw,
                output.numel()]
        stream = Stream(ptr=torch.cuda.current_stream().cuda_stream)
        # 这一步是实现RoI pooling的关键,通过Cupy实现在线编译,调用roi_cupy代码
        self.forward_fn(args=args,
                        block=(CUDA_NUM_THREADS, 1, 1),
                        grid=(GET_BLOCKS(output.numel()), 1, 1),
                        stream=stream)
        return output

    def backward(self, grad_output):
        ##NOTE: IMPORTANT CONTIGUOUS
        # TODO: input
        grad_output = grad_output.contiguous()
        B, C, H, W = self.in_size
        grad_input = t.zeros(self.in_size).cuda()
        stream = Stream(ptr=torch.cuda.current_stream().cuda_stream)
        args = [grad_output.data_ptr(),
                self.argmax_data.data_ptr(),
                self.rois.data_ptr(),
                grad_input.data_ptr(),
                self.N, self.spatial_scale, C, H, W, self.outh, self.outw,
                grad_input.numel()]
        self.backward_fn(args=args,
                         block=(CUDA_NUM_THREADS, 1, 1),
                         grid=(GET_BLOCKS(grad_input.numel()), 1, 1),
                         stream=stream
                         )
        return grad_input, None
(6).trainer.py
LossTuple = namedtuple('LossTuple',
                       ['rpn_loc_loss',
                        'rpn_cls_loss',
                        'roi_loc_loss',
                        'roi_cls_loss',
                        'total_loss'
                        ])


class FasterRCNNTrainer(nn.Module):
    """wrapper for conveniently training. return losses

    The losses include:
	4类损失函数:
    * :obj:`rpn_loc_loss`: The localization loss for \
        Region Proposal Network (RPN).
    * :obj:`rpn_cls_loss`: The classification loss for RPN.
    * :obj:`roi_loc_loss`: The localization loss for the head module.
    * :obj:`roi_cls_loss`: The classification loss for the head module.
    * :obj:`total_loss`: The sum of 4 loss above.

    Args:
        faster_rcnn (model.FasterRCNN):
            A Faster R-CNN model that is going to be trained.
    """

    def __init__(self, faster_rcnn):
        super(FasterRCNNTrainer, self).__init__()

        self.faster_rcnn = faster_rcnn
        self.rpn_sigma = opt.rpn_sigma
        self.roi_sigma = opt.roi_sigma  # 是在_faster_rcnn_loc_loss调用用来计算位置损失函数用到的超参数(rpn网络计算回归误差用到smoothL1用到的超参数)

        # 用于从20000个候选anchor中产生256个anchor进行二分类和位置回归,也就是为rpn网络产生的预
        # 测位置和预测类别提供真正的ground_truth标准
        self.anchor_target_creator = AnchorTargetCreator()
        # AnchorTargetCreator和ProposalTargetCreator是为了生成训练的目标(或称ground truth),
        # 只在训练阶段用到,ProposalCreator是RPN为Fast R-CNN生成RoIs,在训练和测试阶段都会用到。
        # 所以测试阶段直接输进来300个RoIs,而训练阶段会有AnchorTargetCreator的再次干预
        self.proposal_target_creator = ProposalTargetCreator()
        # (0., 0., 0., 0.)
        self.loc_normalize_mean = faster_rcnn.loc_normalize_mean
        # (0.1, 0.1, 0.2, 0.2)
        self.loc_normalize_std = faster_rcnn.loc_normalize_std
        # SGD
        self.optimizer = self.faster_rcnn.get_optimizer()
        # 可视化,vis_tool.py
        self.vis = Visualizer(env=opt.env)

        # 混淆矩阵,就是验证预测值与真实值精确度的矩阵ConfusionMeter(2)括号里的参数指的是类别数
        self.rpn_cm = ConfusionMeter(2)
        # roi的类别有21种(20个object类+1个background)
        self.roi_cm = ConfusionMeter(21)
        self.meters = {k: AverageValueMeter() for k in LossTuple._fields}  # average loss

    def forward(self, imgs, bboxes, labels, scale):
        """Forward Faster R-CNN and calculate losses.

        Here are notations used.

        * :math:`N` is the batch size.
        * :math:`R` is the number of bounding boxes per image.

        Currently, only :math:`N=1` is supported.

        Args:
            imgs (~torch.autograd.Variable): A variable with a batch of images.
            bboxes (~torch.autograd.Variable): A batch of bounding boxes.
                Its shape is :math:`(N, R, 4)`.
            labels (~torch.autograd..Variable): A batch of labels.
                Its shape is :math:`(N, R)`. The background is excluded from
                the definition, which means that the range of the value
                is :math:`[0, L - 1]`. :math:`L` is the number of foreground
                classes.
            scale (float): Amount of scaling applied to
                the raw image during preprocessing.

        Returns:
            namedtuple of 5 losses
        """
        # 获取batch个数
        n = bboxes.shape[0]
        # 本程序只支持batch_size=1
        if n != 1:
            raise ValueError('Currently only batch size 1 is supported.')

        _, _, H, W = imgs.shape
        img_size = (H, W)

        # vgg16 conv5_3之前的部分提取图片的特征
        features = self.faster_rcnn.extractor(imgs)

        # rpn_locs的维度(hh*ww*9,4),rpn_scores维度为(hh*ww*9,2), rois的维度为(2000,4),
        # roi_indices用不到,anchor的维度为(hh*ww*9,4),H和W是经过数据预处理后的。
        # 计算(H/16)x(W/16)x9(大概20000)个anchor属于前景的概率,取前12000个并经过NMS得到2000个近似目标框G^的坐标。
        # roi的维度为(2000,4)
        rpn_locs, rpn_scores, rois, roi_indices, anchor = \
            self.faster_rcnn.rpn(features, img_size, scale)

        # Since batch size is one, convert variables to singular form
        bbox = bboxes[0]    # bbox维度(N, R, 4)
        label = labels[0]   # labels维度为(N,R)
        rpn_score = rpn_scores[0]   # (hh*ww*9,4)
        rpn_loc = rpn_locs[0]   # hh*ww*9
        roi = rois       # (2000,4)

        # 调用proposal_target_creator函数生成sample roi(128,4)、gt_roi_loc(128,4)、gt_roi_label(128,1),
        # RoIHead网络利用这sample_roi+featue为输入,输出是分类(21类)和回归(进一步微调bbox)的预测值,那么分类回归的
        # groud truth就是ProposalTargetCreator输出的gt_roi_label和gt_roi_loc。
        sample_roi, gt_roi_loc, gt_roi_label = self.proposal_target_creator(
            roi,
            at.tonumpy(bbox),
            at.tonumpy(label),
            self.loc_normalize_mean,
            self.loc_normalize_std)
        # NOTE it's all zero because now it only support for batch=1 now
        sample_roi_index = t.zeros(len(sample_roi))
        # roi回归输出的是128*84和128*21,然而真实位置参数是128*4和真实标签128*1
        roi_cls_loc, roi_score = self.faster_rcnn.head(
            features,
            sample_roi,
            sample_roi_index)

        # ------------------ RPN losses -------------------#
        gt_rpn_loc, gt_rpn_label = self.anchor_target_creator(
            at.tonumpy(bbox),
            anchor,
            img_size)  # 输入20000个anchor和bbox,调用anchor_target_creator函数得到256个anchor与GTbox的偏移量与label
        gt_rpn_label = at.totensor(gt_rpn_label).long()
        gt_rpn_loc = at.totensor(gt_rpn_loc)

        # 下面分析_fast_rcnn_loc_loss函数。rpn_loc为rpn网络回归出来的偏移量(20000个),
        # gt_rpn_loc为anchor_target_creator函数得到256个anchor与gtbox的偏移量,rpn_sigma=1.
        rpn_loc_loss = _fast_rcnn_loc_loss(
            rpn_loc,
            gt_rpn_loc,
            gt_rpn_label.data,
            self.rpn_sigma)

        # NOTE: default value of ignore_index is -100 ...
        # rpn_score为rpn网络得到的(20000个)与anchor_target_creator得到的256个label求交叉熵损失
        rpn_cls_loss = F.cross_entropy(rpn_score, gt_rpn_label.cuda(), ignore_index=-1)
        # 不计算背景类
        _gt_rpn_label = gt_rpn_label[gt_rpn_label > -1]
        _rpn_score = at.tonumpy(rpn_score)[at.tonumpy(gt_rpn_label) > -1]
        self.rpn_cm.add(at.totensor(_rpn_score, False), _gt_rpn_label.data.long())

        # ------------------ ROI losses (fast rcnn loss) -------------------#
        n_sample = roi_cls_loc.shape[0]      # roi_cls_loc为VGG16RoIHead的输出(128*84), n_sample=128
        roi_cls_loc = roi_cls_loc.view(n_sample, -1, 4)  # roi_cls_loc=(128,21,4)
        roi_loc = roi_cls_loc[t.arange(0, n_sample).long().cuda(), at.totensor(gt_roi_label).long()]
        gt_roi_label = at.totensor(gt_roi_label).long()  # proposal_target_creator()生成的128个proposal与bbox求得的偏移量dx,dy,dw,dh
        gt_roi_loc = at.totensor(gt_roi_loc)    # 128个标签

        # 输入分别为rpn回归框的偏移量与anchor与GTbox的偏移量以及label
        roi_loc_loss = _fast_rcnn_loc_loss(
            roi_loc.contiguous(),
            gt_roi_loc,
            gt_roi_label.data,
            self.roi_sigma)     # 采用smooth_l1_loss

        roi_cls_loss = nn.CrossEntropyLoss()(roi_score, gt_roi_label.cuda())    # 求交叉熵损失

        self.roi_cm.add(at.totensor(roi_score, False), gt_roi_label.data.long())
        # -----------------total loss-------------------------------
        losses = [rpn_loc_loss, rpn_cls_loss, roi_loc_loss, roi_cls_loss]   # 四个loss加起来
        losses = losses + [sum(losses)]

        return LossTuple(*losses)

    def train_step(self, imgs, bboxes, labels, scale):
        # 1.首先self.optimizer.zero_grad()将梯度数据全部清零
        self.optimizer.zero_grad()
        # 2.然后利用刚刚介绍的self.forward(imgs,bboxes,labels,scales)函数将所有的损失计算出来
        losses = self.forward(imgs, bboxes, labels, scale)
        # 3.接着进行依次losses.total_loss.backward()反向传播计算梯度,
        losses.total_loss.backward()
        # 4.self.optimizer.step()进行一次参数更新过程,
        self.optimizer.step()
        # 5.self.update_meters(losses)就是将所有损失的数据更新到可视化界面上,最后将losses返回
        self.update_meters(losses)
        return losses

    def save(self, save_optimizer=False, save_path=None, **kwargs):
        """serialize models include optimizer and other info
        return path where the model-file is stored.

        Args:
            save_optimizer (bool): whether save optimizer.state_dict().
            save_path (string): where to save model, if it's None, save_path
                is generate using time str and info from kwargs.

        Returns:
            save_path(str): the path to save models.
        """
        save_dict = dict()

        save_dict['model'] = self.faster_rcnn.state_dict()
        save_dict['config'] = opt._state_dict()
        save_dict['other_info'] = kwargs
        save_dict['vis_info'] = self.vis.state_dict()

        if save_optimizer:
            save_dict['optimizer'] = self.optimizer.state_dict()

        if save_path is None:
            timestr = time.strftime('%m%d%H%M')
            save_path = 'checkpoints/fasterrcnn_%s' % timestr
            for k_, v_ in kwargs.items():
                save_path += '_%s' % v_

        save_dir = os.path.dirname(save_path)
        if not os.path.exists(save_dir):
            os.makedirs(save_dir)

        t.save(save_dict, save_path)
        self.vis.save([self.vis.env])
        return save_path

    def load(self, path, load_optimizer=True, parse_opt=False, ):
        state_dict = t.load(path)
        if 'model' in state_dict:
            self.faster_rcnn.load_state_dict(state_dict['model'])
        else:  # legacy way, for backward compatibility
            self.faster_rcnn.load_state_dict(state_dict)
            return self
        if parse_opt:
            opt._parse(state_dict['config'])
        if 'optimizer' in state_dict and load_optimizer:
            self.optimizer.load_state_dict(state_dict['optimizer'])
        return self

    def update_meters(self, losses):
        loss_d = {k: at.scalar(v) for k, v in losses._asdict().items()}
        for key, meter in self.meters.items():
            meter.add(loss_d[key])

    def reset_meters(self):
        for key, meter in self.meters.items():
            meter.reset()
        self.roi_cm.reset()
        self.rpn_cm.reset()

    def get_meter_data(self):
        return {k: v.value()[0] for k, v in self.meters.items()}


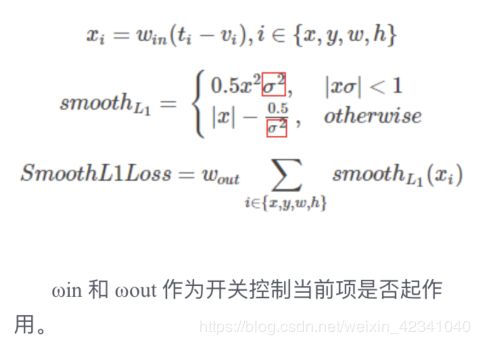
def _smooth_l1_loss(x, t, in_weight, sigma):
    sigma2 = sigma ** 2
    diff = in_weight * (x - t)
    abs_diff = diff.abs()
    flag = (abs_diff.data < (1. / sigma2)).float()
    y = (flag * (sigma2 / 2.) * (diff ** 2) +
         (1 - flag) * (abs_diff - 0.5 / sigma2))
    return y.sum()


# 输入分别为rpn回归框的偏移量与anchor与GTbox的偏移量以及label
def _fast_rcnn_loc_loss(pred_loc, gt_loc, gt_label, sigma):
    in_weight = t.zeros(gt_loc.shape).cuda()
    # Localization loss is calculated only for positive rois.
    # NOTE:  unlike origin implementation,
    # we don't need inside_weight and outside_weight, they can calculate by gt_label
    in_weight[(gt_label > 0).view(-1, 1).expand_as(in_weight).cuda()] = 1
    loc_loss = _smooth_l1_loss(pred_loc, gt_loc, in_weight.detach(), sigma)  # sigma设置为1
    # Normalize by total number of negtive and positive rois.
    loc_loss /= ((gt_label >= 0).sum().float())  # ignore gt_label==-1 for rpn_loss #除去背景类
    return loc_loss
其中rpn loss
  # ------------------ RPN losses -------------------#
        gt_rpn_loc, gt_rpn_label = self.anchor_target_creator(
            at.tonumpy(bbox),
            anchor,
            img_size)  # 输入20000个anchor和bbox,调用anchor_target_creator函数得到256个anchor与GTbox的偏移量与label
        gt_rpn_label = at.totensor(gt_rpn_label).long()
        gt_rpn_loc = at.totensor(gt_rpn_loc)

        # 下面分析_fast_rcnn_loc_loss函数。rpn_loc为rpn网络回归出来的偏移量(20000个),
        # gt_rpn_loc为anchor_target_creator函数得到256个anchor与gtbox的偏移量,rpn_sigma=1.
        rpn_loc_loss = _fast_rcnn_loc_loss(
            rpn_loc,
            gt_rpn_loc,
            gt_rpn_label.data,
            self.rpn_sigma)# smoothl1 loss

        # NOTE: default value of ignore_index is -100 ...
        # rpn_score为rpn网络得到的(20000个)与anchor_target_creator得到的256个label求交叉熵损失
        rpn_cls_loss = F.cross_entropy(rpn_score, gt_rpn_label.cuda(), ignore_index=-1)
        # 不计算背景类label=-1
        _gt_rpn_label = gt_rpn_label[gt_rpn_label > -1]
        _rpn_score = at.tonumpy(rpn_score)[at.tonumpy(gt_rpn_label) > -1]
        self.rpn_cm.add(at.totensor(_rpn_score, False), _gt_rpn_label.data.long())

def _smooth_l1_loss(x, t, in_weight, sigma):
    sigma2 = sigma ** 2
    diff = in_weight * (x - t)
    abs_diff = diff.abs()
    flag = (abs_diff.data < (1. / sigma2)).float()
    y = (flag * (sigma2 / 2.) * (diff ** 2) +
         (1 - flag) * (abs_diff - 0.5 / sigma2))
    return y.sum()


# 输入分别为rpn回归框的偏移量与anchor与GTbox的偏移量以及label
def _fast_rcnn_loc_loss(pred_loc, gt_loc, gt_label, sigma):
    in_weight = t.zeros(gt_loc.shape).cuda()
    # Localization loss is calculated only for positive rois.
    # NOTE:  unlike origin implementation,
    # we don't need inside_weight and outside_weight, they can calculate by gt_label
    in_weight[(gt_label > 0).view(-1, 1).expand_as(in_weight).cuda()] = 1
    loc_loss = _smooth_l1_loss(pred_loc, gt_loc, in_weight.detach(), sigma)  # sigma设置为1
    # Normalize by total number of negtive and positive rois.
    loc_loss /= ((gt_label >= 0).sum().float())  # ignore gt_label==-1 for rpn_loss #除去背景类
    return loc_loss
smooth L1
其中roi loss
 # ------------------ ROI losses (fast rcnn loss) -------------------#
        n_sample = roi_cls_loc.shape[0]      # roi_cls_loc为VGG16RoIHead的输出(128*84), n_sample=128,21类别
        roi_cls_loc = roi_cls_loc.view(n_sample, -1, 4)  # roi_cls_loc=(128,21,4)
        roi_loc = roi_cls_loc[t.arange(0, n_sample).long().cuda(), at.totensor(gt_roi_label).long()]
        # 128个标签
        gt_roi_label = at.totensor(gt_roi_label).long()
        # proposal_target_creator()生成的128个proposal与bbox求得的偏移量dx,dy,dw,dh
        gt_roi_loc = at.totensor(gt_roi_loc)

        # 输入分别为rpn回归框的偏移量与anchor与GTbox的偏移量以及label
        roi_loc_loss = _fast_rcnn_loc_loss(
            roi_loc.contiguous(),
            gt_roi_loc,
            gt_roi_label.data,
            self.roi_sigma)     # 采用smooth_l1_loss

        roi_cls_loss = nn.CrossEntropyLoss()(roi_score, gt_roi_label.cuda())    # 求交叉熵损失

        self.roi_cm.add(at.totensor(roi_score, False), gt_roi_label.data.long())
rpn_loss与roi_loss的异同:
 N c l s = 256 N_{cls}=256 Ncls=256, N r e g ≈ 2400 N_{reg}\approx2400 Nreg≈2400 , λ = 10 \lambda=10 λ=10, 起平衡作用,回归分支中忽视 l a b e l = − 1 label=-1 label=−1的样本且真正参与的只有正样本(负样本 p i ∗ = 0 p_i*=0 pi∗=0)

(7)train.py
def eval(dataloader, faster_rcnn, test_num=10000):
    # 6个list分别是预测框的位置,预测框的类别和分数以及相应的真实值的类别分数
    pred_bboxes, pred_labels, pred_scores = list(), list(), list()
    gt_bboxes, gt_labels, gt_difficults = list(), list(), list()
    # for循环,从 enumerate(dataloader)里面依次读取数据,读取的内容是: imgs图片,sizes尺寸,
    # gt_boxes真实框的位置 gt_labels真实框的类别以及gt_difficults这些
    for ii, (imgs, sizes, gt_bboxes_, gt_labels_, gt_difficults_) in tqdm(enumerate(dataloader)):
        # 然后利用faster_rcnn.predict(imgs,[sizes]) 得出预测的pred_boxes_,pred_labels_,pred_scores_预测框位置,
        # 预测框标记以及预测框的分数等等!这里的predict是真正的前向传播过程!完成真正的预测目的!
        # 之后将pred_bbox,pred_label,pred_score ,gt_bbox,gt_label,gt_difficult预测和真实的值全部依次添加
        # 到开始定义好的列表里面去,如果迭代次数等于测试test_num,那么就跳出循环!
        sizes = [sizes[0][0].item(), sizes[1][0].item()]
        pred_bboxes_, pred_labels_, pred_scores_ = faster_rcnn.predict(imgs, [sizes])
        gt_bboxes += list(gt_bboxes_.numpy())
        gt_labels += list(gt_labels_.numpy())
        gt_difficults += list(gt_difficults_.numpy())
        pred_bboxes += pred_bboxes_
        pred_labels += pred_labels_
        pred_scores += pred_scores_
        if ii == test_num: break
    # 调用 eval_detection_voc函数,接收上述的六个列表参数,完成预测水平的评估!得到预测的结果!
    result = eval_detection_voc(
        pred_bboxes, pred_labels, pred_scores,
        gt_bboxes, gt_labels, gt_difficults,
        use_07_metric=True)
    return result


def train(**kwargs):
    # 将调用函数时候附加的参数用,config.py文件里面的opt._parse()进行解释,然后获取其数据存储的路径,之后放到Dataset里面!
    opt._parse(kwargs)

    dataset = Dataset(opt)
    print('load data')
    # Dataset完成的任务见第一篇博客数据预处理部分,这里简单解释一下,就是用VOCBboxDataset作为数据读取库,
    # 然后依次从样例数据库中读取图片出来,还调用了Transform(object)函数,完成图像的调整和随机反转工作!
    dataloader = data_.DataLoader(dataset,
                                  batch_size=1,
                                  shuffle=True,
                                  # pin_memory=True,
                                  num_workers=opt.num_workers)

    # 将数据装载到dataloader中,shuffle=True允许数据打乱排序,num_workers是设置数据分为几批处理,
    # 同样的将测试数据集也进行同样的处理,然后装载到test_dataloader中!
    testset = TestDataset(opt)
    test_dataloader = data_.DataLoader(testset,
                                       batch_size=1,
                                       num_workers=opt.test_num_workers,
                                       shuffle=False,
                                       pin_memory=True
                                       )
    # 接下来定义faster_rcnn=FasterRCNNVGG16()定义好模型
    faster_rcnn = FasterRCNNVGG16()
    print('model construct completed')
    # 设置trainer = FasterRCNNTrainer(faster_rcnn).cuda()将FasterRCNNVGG16作为fasterrcnn的模型送入到
    # FasterRCNNTrainer中并设置好GPU加速
    trainer = FasterRCNNTrainer(faster_rcnn).cuda()
    if opt.load_path:
        # 接下来判断opt.load_path是否存在,如果存在,直接从opt.load_path读取预训练模型,然后将训练数据的label进行可视化操作
        trainer.load(opt.load_path)
        print('load pretrained model from %s' % opt.load_path)
    trainer.vis.text(dataset.db.label_names, win='labels')
    best_map = 0
    lr_ = opt.lr
    for epoch in range(opt.epoch):
        # 首先在可视化界面重设所有数据
        trainer.reset_meters()
        for ii, (img, bbox_, label_, scale) in tqdm(enumerate(dataloader)):
            scale = at.scalar(scale)
            # 然后从训练数据中枚举dataloader,设置好缩放范围,将img,bbox,label,scale全部设置为可gpu加速
            img, bbox, label = img.cuda().float(), bbox_.cuda(), label_.cuda()
            # 调用trainer.py中的函数trainer.train_step(img,bbox,label,scale)进行一次参数迭代优化过程
            trainer.train_step(img, bbox, label, scale)

            if (ii + 1) % opt.plot_every == 0:
                if os.path.exists(opt.debug_file):
                    # 判断数据读取次数是否能够整除plot_every(是否达到了画图次数),如果达到判断debug_file是否存在,
                    # 用ipdb工具设置断点,调用trainer中的trainer.vis.plot_many(trainer.get_meter_data())将训练
                    # 数据读取并上传完成可视化!
                    ipdb.set_trace()

                # plot loss
                trainer.vis.plot_many(trainer.get_meter_data())

                # plot groud truth bboxes
                ori_img_ = inverse_normalize(at.tonumpy(img[0]))
                gt_img = visdom_bbox(ori_img_,
                                     at.tonumpy(bbox_[0]),
                                     at.tonumpy(label_[0]))
                # 将每次迭代读取的图片用dataset文件里面的inverse_normalize()函数进行预处理,将处理后的图片调用Visdom_bbox
                trainer.vis.img('gt_img', gt_img)

                # plot predicti bboxes
                # 调用faster_rcnn的predict函数进行预测,预测的结果保留在以_下划线开头的对象里面
                _bboxes, _labels, _scores = trainer.faster_rcnn.predict([ori_img_], visualize=True)
                pred_img = visdom_bbox(ori_img_,
                                       at.tonumpy(_bboxes[0]),
                                       at.tonumpy(_labels[0]).reshape(-1),
                                       at.tonumpy(_scores[0]))
                # 利用同样的方法将原始图片以及边框类别的预测结果同样在可视化工具中显示出来!
                trainer.vis.img('pred_img', pred_img)

                # rpn confusion matrix(meter)
                # 调用 trainer.vis.text将rpn_cm也就是RPN网络的混淆矩阵在可视化工具中显示出来
                trainer.vis.text(str(trainer.rpn_cm.value().tolist()), win='rpn_cm')
                # roi confusion matrix
                trainer.vis.img('roi_cm', at.totensor(trainer.roi_cm.conf, False).float())
        eval_result = eval(test_dataloader, faster_rcnn, test_num=opt.test_num)
        # 调用trainer.vis.img将Roi_cm将roi的可视化矩阵以图片的形式显示出来
        trainer.vis.plot('test_map', eval_result['map'])
        # 设置学习的learning rate
        lr_ = trainer.faster_rcnn.optimizer.param_groups[0]['lr']
        log_info = 'lr:{}, map:{},loss:{}'.format(str(lr_),
                                                  str(eval_result['map']),
                                                  str(trainer.get_meter_data()))
        # 将损失学习率以及map等信息及时显示更新
        trainer.vis.log(log_info)
        # 用if判断语句永远保存效果最好的map
        if eval_result['map'] > best_map:
            best_map = eval_result['map']
            best_path = trainer.save(best_map=best_map)
        # if判断语句如果学习的epoch达到了9就将学习率*0.1变成原来的十分之一
        if epoch == 9:
            trainer.load(best_path)
            trainer.faster_rcnn.scale_lr(opt.lr_decay)
            lr_ = lr_ * opt.lr_decay
        # 判断epoch==13结束训练验证过程
        if epoch == 13:
            break

