Harbor私有镜像仓库
Harbor简介
CA认证
https通过ssl的加密认证形式;要求http拥有加密认证证书才能转换成https。
私有镜像仓库需要启动https的模式
- VMware的开源项目https://github.com/vmware/harbor
- Harbor可帮助用户迅速搭建企业级的注册服务。它提供了管理图形界面,基于角色的访问控制(Role Based Access Control),镜像远程复制(同步),AD/LDAP集成,以及审计日志等企业用户需求的功能,同时还原生支持中文,深受中国用户的喜爱。
- 该项目自推出以来,在GitHub获得了超过3300多个star和900多个forks。
- 基于角色的访问控制
用户与Docker镜像仓库通过“项目”进行组织管理,一个用户可以对多个镜像仓库在同一命名空间(project)里有不同的权限。 - 图形化用户界面
用户可以通过浏览器来浏览,检索当前Docker镜像仓库,管理项目和命名空间 - 审计管理
所有针对镜像仓库的操作都可以被记录追溯,用于审计管理。 - 国际化
基于英文与中文语言进行了本地化。可以增加更多的语言支持。 - RESTful API:
提供给管理员对于Harbor更多的操控,使得与其他管理软件集成变得更容易。 - LDAP认证
- 镜像复制
基于策略的Docker镜像复制功能,可在不同的数据中心,不同的运行环境之间同步镜像,并提供友好的管理界面,大大简化了实际运维中的镜像管理工作。 - 与Clair集成
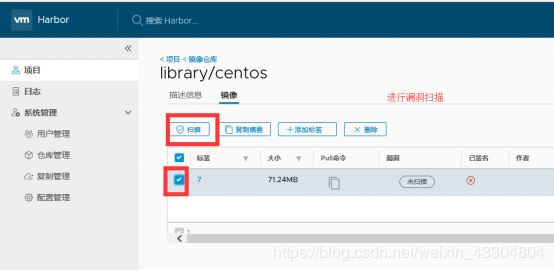
与Clair集成,添加漏洞扫描功能。Clair是coreos开源的容器漏洞扫描工具,在容器逐渐普及的今天,容器镜像安全问题日益严重。Clair是目前少数的开源安全扫描工具。 - Notary签名工具
Notary是Docker镜像的签名工具,用来保证镜像在pull,push和传输工程中的一致性和完整性,避免中间人攻击,避免非法的镜像更新和运行。
为Harbor签发域名证书
openssl是目前最流行的SSL密码库工具,提供了一个通用,功能完备的工具套件,用以支持SSL/TLS协议的实现。
官网:https://www.openssl.org/source/
环境准备
| 主机名 | IP | 用途 | 最小资源配比 | 最佳资源配比 |
|---|---|---|---|---|
| harbor | 192.168.100.105 | harbor私有镜像仓库 | 2CPU | 4CPU |
| 4GBMEM | 8GB |
官方文档:https://github.com/vmware/harbor/blob/master/docs/configure_https.md
#创建自己的CA证书
[root@localhost ~]# which openssl
/usr/bin/openssl
[root@localhost ~]# mkdir -p /data/ssl
[root@localhost ~]# cd /data/ssl
[root@localhost ssl]# openssl req -newkey rsa:4096 -nodes -sha256 -keyout ca.key -x509 -days 365 -out ca.crt
Generating a 4096 bit RSA private key
.......................................................................................................................................................................................................................................................................................................................................................................................................................................................................................................................................................................................................................................++
.............................................................................................................++
writing new private key to 'ca.key'
-----
You are about to be asked to enter information that will be incorporated
into your certificate request.
What you are about to enter is what is called a Distinguished Name or a DN.
There are quite a few fields but you can leave some blank
For some fields there will be a default value,
If you enter '.', the field will be left blank.
-----
Country Name (2 letter code) [XX]:CN
State or Province Name (full name) []:Beijing
Locality Name (eg, city) [Default City]:Beijing
Organization Name (eg, company) [Default Company Ltd]:yunjisuan
Organizational Unit Name (eg, section) []:yunjisuan
Common Name (eg, your name or your server's hostname) []:www.yunjisuan.com
Email Address []:

#生成证书签名请求
[root@localhost ssl]#  openssl req -newkey rsa:4096 -nodes -sha256 -keyout www.yunjisuan.com.key -out www.yunjisuan.com.csr
Generating a 4096 bit RSA private key
................................................................................................................................................................................................................................................................................................................................................................++
.......................................................................................................................................................++
writing new private key to 'www.yunjisuan.com.key'
-----
You are about to be asked to enter information that will be incorporated
into your certificate request.
What you are about to enter is what is called a Distinguished Name or a DN.
There are quite a few fields but you can leave some blank
For some fields there will be a default value,
If you enter '.', the field will be left blank.
-----
Country Name (2 letter code) [XX]:CN
State or Province Name (full name) []:Beijing
Locality Name (eg, city) [Default City]:Beijing
Organization Name (eg, company) [Default Company Ltd]:yunjisuan
Organizational Unit Name (eg, section) []:yunjisuan
Common Name (eg, your name or your server's hostname) []:www.yunjisuan.com
Email Address []:

Please enter the following 'extra' attributes
to be sent with your certificate request
A challenge password []:
An optional company name []:

#生成注册表主机的证书
[root@localhost ssl]# openssl x509 -req -days 365 -in www.yunjisuan.com.csr -CA ca.crt -CAkey ca.key -CAcreateserial -out www.yunjisuan.com.crt
Signature ok
subject=/C=CN/ST=Beijing/L=Beijing/O=yunjisuan/OU=yunjisuan/CN=www.yunjisuan.com
Getting CA Private Key

#查看证书情况
[root@localhost ssl]# ll
total 24
-rw-r--r--. 1 root root 2049 Jan 14 21:41 ca.crt
-rw-r--r--. 1 root root 3272 Jan 14 21:41 ca.key
-rw-r--r--. 1 root root   17 Jan 14 21:43 ca.srl
-rw-r--r--. 1 root root 1931 Jan 14 21:43 www.yunjisuan.com.crt
-rw-r--r--. 1 root root 1716 Jan 14 21:43 www.yunjisuan.com.csr
-rw-r--r--. 1 root root 3276 Jan 14 21:43 www.yunjisuan.com.key
信任自签发的域名证书
由于CA证书是我们自己签发的Linux操作系统是不信任的,因此我们需要把证书加入到系统的信任证书里
#将自签ca证书添加到系统信任
[root@localhost ~]# cd /data/ssl/
[root@localhost ssl]# cp www.yunjisuan.com.crt /etc/pki/ca-trust/source/anchors/

#让系统ca信任设置立刻生效
[root@localhost ssl]# update-ca-trust enable
[root@localhost ssl]# update-ca-trust extract
Harbor 1.4 版本配置与安装
- 安装docker-ce社区版
[root@localhost ~]# sestatus
SELinux status:                 disabled

#安装依赖包
[root@localhost ~]# yum -y install yum-utils device-mapper-persistent-data lvm2

#添加docker的CE版本的yum源配置文件
[root@localhost ~]# curl https://download.docker.com/linux/centos/docker-ce.repo -o /etc/yum.repos.d/docker-ce.repo
  % Total    % Received % Xferd  Average Speed   Time    Time     Time  Current
                                 Dload  Upload   Total   Spent    Left  Speed
100  2424  100  2424    0     0   4879      0 --:--:-- --:--:-- --:--:--  4877
[root@localhost ~]# ll /etc/yum.repos.d/docker-ce.repo
-rw-r--r-- 1 root root 2424 Jan 11 10:52 /etc/yum.repos.d/docker-ce.repo

#安装CE版本的docker
[root@localhost ~]# yum -y install docker-ce
[root@localhost ~]# systemctl start docker					#启动docker
[root@localhost ~]# systemctl enable docker						#添加开机启动
Created symlink from /etc/systemd/system/multi-user.target.wants/docker.service to /usr/lib/systemd/system/docker.service.
[root@localhost ~]# docker version						#查看docker版本
Client:
 Version:           18.09.1
 API version:       1.39
 Go version:        go1.10.6
 Git commit:        4c52b90
 Built:             Wed Jan  9 19:35:01 2019
 OS/Arch:           linux/amd64
 Experimental:      false

Server: Docker Engine - Community
 Engine:
  Version:          18.09.1
  API version:      1.39 (minimum version 1.12)
  Go version:       go1.10.6
  Git commit:       4c52b90
  Built:            Wed Jan  9 19:06:30 2019
  OS/Arch:          linux/amd64
  Experimental:     false
- 下载并安装harbor私有仓库
#创建harbor的证书目录,并复制
[root@localhost ~]# mkdir -p /etc/ssl/harbor
[root@localhost ~]# cp /data/ssl/www.yunjisuan.com.key /etc/ssl/harbor/
[root@localhost ~]# cp /data/ssl/www.yunjisuan.com.crt /etc/ssl/harbor/
[root@localhost ~]# ll /etc/ssl/harbor/
total 8
-rw-r--r-- 1 root root 1931 Jan 15 08:58 www.yunjisuan.com.crt
-rw-r--r-- 1 root root 3276 Jan 15 08:57 www.yunjisuan.com.key

#创建harbor下载目录并下载harbor-offline-installer-v1.5.0.tgz
[root@localhost ~]# mkdir -p /data/install
[root@localhost ~]# cd /data/install
[root@localhost install]# wget http://harbor.orientsoft.cn/harbor-v1.5.0/harbor-offline-installer-v1.5.0.tgz
[root@localhost install]# ls
harbor-offline-installer-v1.5.0.tgz
[root@localhost install]# tar xf harbor-offline-installer-v1.5.0.tgz
[root@localhost install]# ls
harbor  harbor-offline-installer-v1.5.0.tgz
[root@localhost install]# cd harbor
[root@localhost harbor]# ll
total 854960
drwxr-xr-x 3 root root        23 Jan 15 09:13 common
-rw-r--r-- 1 root root      1185 May  2  2018 docker-compose.clair.yml
-rw-r--r-- 1 root root      1725 May  2  2018 docker-compose.notary.yml
-rw-r--r-- 1 root root      3596 May  2  2018 docker-compose.yml
drwxr-xr-x 3 root root       156 May  2  2018 ha
-rw-r--r-- 1 root root      6687 May  2  2018 harbor.cfg
-rw-r--r-- 1 root root 875401338 May  2  2018 harbor.v1.5.0.tar.gz
-rwxr-xr-x 1 root root      5773 May  2  2018 install.sh
-rw-r--r-- 1 root root     10771 May  2  2018 LICENSE
-rw-r--r-- 1 root root       482 May  2  2018 NOTICE
-rwxr-xr-x 1 root root     27379 May  2  2018 prepare
[root@localhost harbor]# cp harbor.cfg{,.bak}

#修改harbor.cfg配置文件
[root@localhost harbor]# vim harbor.cfg.bak
    7  hostname = www.yunjisuan.com
    11  ui_url_protocol = https
    23  ssl_cert = /etc/ssl/harbor/www.yunjisuan.com.crt
    24  ssl_cert_key = /etc/ssl/harbor/www.yunjisuan.com.key
    68  harbor_admin_password = Harbor12345

#安装命令docker-compose(需要1.21版本)
[root@Harbor ~]# curl -L https://github.com/docker/compose/releases/download/1.21.2/docker-compose-$(uname -s)-$(uname -m) -o /usr/local/bin/docker-compose
  % Total    % Received % Xferd  Average Speed   Time    Time     Time  Current
                                 Dload  Upload   Total   Spent    Left  Speed
100   617    0   617    0     0    136      0 --:--:--  0:00:04 --:--:--   176
100 10.3M  100 10.3M    0     0   161k      0  0:01:05  0:01:05 --:--:--  181k
[root@localhost bin]# ll /usr/local/bin/docker-compose
-rw-r--r-- 1 root root 10858808 Jul 24 09:26 /usr/local/bin/docker-compose
[root@localhost bin]# chmod +x /usr/local/bin/docker-compose
[root@localhost bin]# which docker-compose
/usr/local/bin/docker-compose
[root@localhost bin]# docker-compose --version
docker-compose version 1.21.2, build a133471

#安装harbor私有镜像仓库
[root@localhost harbor]# ./install.sh --with-notary --with-clair			#--with-notary启用镜像签名;--with-clair启用漏洞扫描

#查看harbor启动的镜像
[root@localhost harbor]# docker ps -a
CONTAINER ID        IMAGE                                       COMMAND                  CREATED             STATUS                         PORTS                       NAMES
6a1f5b30bc94        vmware/harbor-jobservice:v1.5.0             "/harbor/start.sh"       47 seconds ago      Up 30 seconds                                              harbor-jobservice
3f2c4e9b8659        vmware/nginx-photon:v1.5.0                  "nginx -g 'daemon of…"   47 seconds ago      Restarting (1) 3 seconds ago                               nginx
5745e29cc01e        vmware/notary-server-photon:v0.5.1-v1.5.0   "/bin/server-start.sh"   48 seconds ago      Up 45 seconds                                              notary-server
47744858cee6        vmware/notary-signer-photon:v0.5.1-v1.5.0   "/bin/signer-start.sh"   50 seconds ago      Up 47 seconds                                              notary-signer
8aeea747d713        vmware/clair-photon:v2.0.1-v1.5.0           "/docker-entrypoint.…"   50 seconds ago      Up 36 seconds (healthy)        6060-6061/tcp               clair
6d8a332411c4        vmware/harbor-ui:v1.5.0                     "/harbor/start.sh"       50 seconds ago      Up 47 seconds (healthy)                                    harbor-ui
ee87386c226c        vmware/postgresql-photon:v1.5.0             "/entrypoint.sh post…"   52 seconds ago      Up 50 seconds (healthy)        5432/tcp                    clair-db
5c2eaec388f6        vmware/mariadb-photon:v1.5.0                "/usr/local/bin/dock…"   52 seconds ago      Up 50 seconds                  3306/tcp                    notary-db
57c3b1e6374a        vmware/harbor-adminserver:v1.5.0            "/harbor/start.sh"       52 seconds ago      Up 50 seconds (healthy)                                    harbor-adminserver
fce41b88cca5        vmware/harbor-db:v1.5.0                     "/usr/local/bin/dock…"   52 seconds ago      Up 50 seconds (healthy)        3306/tcp                    harbor-db
093047f82467        vmware/registry-photon:v2.6.2-v1.5.0        "/entrypoint.sh serv…"   52 seconds ago      Up 50 seconds (healthy)        5000/tcp                    registry
e6e83d8bc040        vmware/redis-photon:v1.5.0                  "docker-entrypoint.s…"   52 seconds ago      Up 51 seconds                  6379/tcp                    redis
c1b35187a777        vmware/harbor-log:v1.5.0                    "/bin/sh -c /usr/loc…"   54 seconds ago      Up 52 seconds (healthy)        127.0.0.1:1514->10514/tcp   harbor-log
通过浏览器进行访问测试
https://192.168.100.105
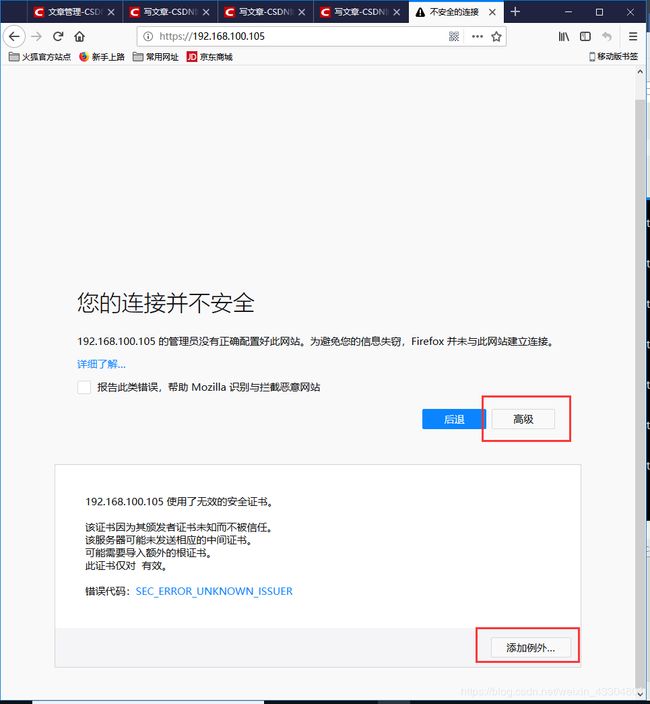
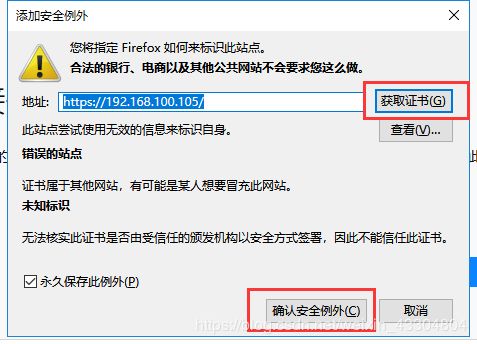

最后我还需要修改一下安全模式
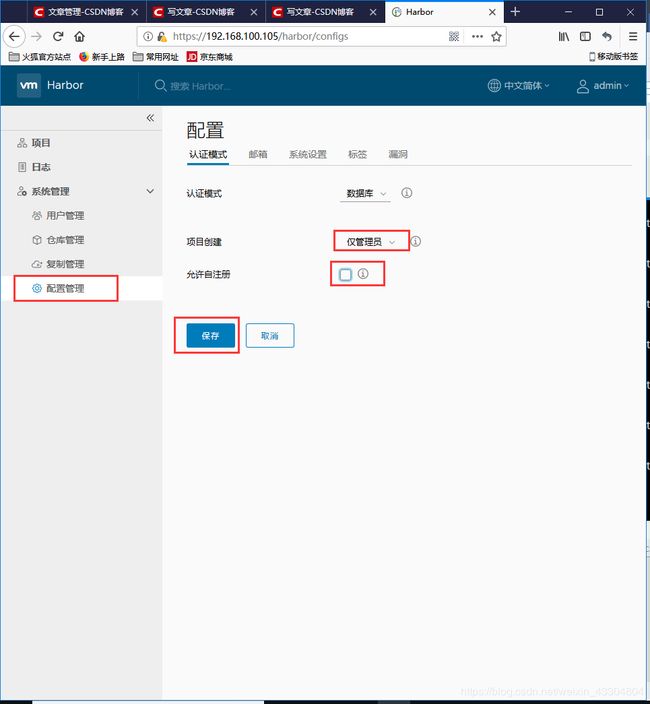
项目创建:设定为仅管理员(企业中不会让注册用户随便创建)
不允许自动注册
#登陆私有镜像仓库账号
[root@localhost harbor]# docker login -uadmin -pHarbor12345 www.yunjisuan.com
WARNING! Your password will be stored unencrypted in /root/.docker/config.json.
Configure a credential helper to remove this warning. See
https://docs.docker.com/engine/reference/commandline/login/#credentials-store

Login Succeeded

[root@localhost harbor]# docker tag centos:latest www.yunjisuan.com/library/centos:v1   #将公有仓库的镜像改名复制
[root@localhost harbor]# docker push www.yunjisuan.com/library/centos:v1		#将改名后的镜像推送至私有仓库
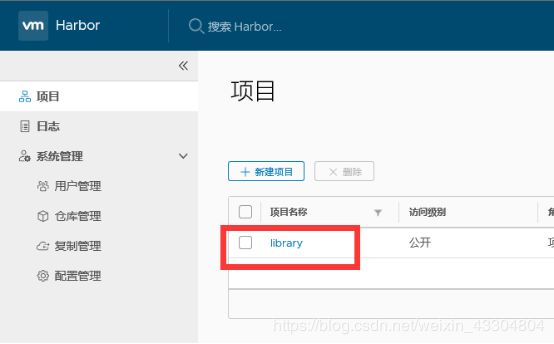
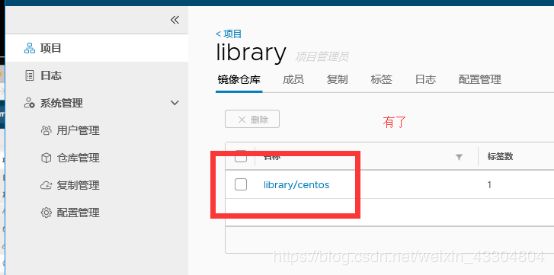
此时,在私有镜像仓库web端就可以查看了,
在harbor-slave服务器连接harbor-master的私有镜像仓库:
(1)在harbor-slave映射文件添加:harbor-masterIP:www.yunjisuan.com域名
(2)创建harbor证书的目录,并复制(scp)harbor-master的证书
(3)登陆www.yunjisuan.com的私有镜像仓库
(4)测试连接情况:拉取私有镜像仓库的镜像
镜像管理与安全:漏洞扫描和镜像签名
- 添加docker国内公有镜像源
[root@harbor harbor]# cat /etc/docker/daemon.json
{
  "registry-mirrors":[ "https://registry.docker-cn.com" ]
}
[root@harbor harbor]# systemctl daemon-reload
[root@harbor harbor]# systemctl restart docker
- 重新启动Harbor私有镜像仓库
#让harbor修改过的配置立刻生效
[root@harbor harbor]# ./prepare
Clearing the configuration file: ./common/config/adminserver/env
Clearing the configuration file: ./common/config/ui/env
Clearing the configuration file: ./common/config/ui/app.conf
Clearing the configuration file: ./common/config/ui/private_key.pem
Clearing the configuration file: ./common/config/db/env
Clearing the configuration file: ./common/config/jobservice/env
Clearing the configuration file: ./common/config/jobservice/config.yml
Clearing the configuration file: ./common/config/registry/config.yml
Clearing the configuration file: ./common/config/registry/root.crt
Clearing the configuration file: ./common/config/nginx/conf.d/notary.upstream.conf
Clearing the configuration file: ./common/config/nginx/conf.d/notary.server.conf
Clearing the configuration file: ./common/config/nginx/cert/www.yunjisuan.com.crt
Clearing the configuration file: ./common/config/nginx/cert/www.yunjisuan.com.key
Clearing the configuration file: ./common/config/nginx/nginx.conf
Clearing the configuration file: ./common/config/log/logrotate.conf
Clearing the configuration file:

#清理所有harbor容器进程
[root@harbor harbor]# docker-compose down
Stopping harbor-jobservice  ... done
Stopping nginx              ... done
Stopping harbor-ui          ... done
Stopping harbor-adminserver ... done
Stopping redis              ... done
Stopping registry           ... done
Stopping harbor-log         ... done
WARNING: Found orphan containers (notary-server, notary-signer, clair-db) for this project. If you removed or renamed this service in your compose file, you can run this command with the --remove-orphans flag to clean it up.
Removing harbor-jobservice  ... done
Removing nginx              ... done
Removing harbor-ui          ... done
Removing harbor-db          ... done
Removing harbor-adminserver ... done
Removing redis              ... done
Removing registry           ... done
Removing harbor-log         ... done
Removing network harbor_harbor

#后台启动所有harbor容器进程
[root@harbor harbor]# docker-compose up -d
Creating network "harbor_harbor" with the default driver
WARNING: Found orphan containers (notary-server, notary-signer, clair-db) for this project. If you removed or renamed this service in your compose file, you can run this command with the --remove-orphans flag to clean it up.
Creating harbor-log ... done
Creating harbor-adminserver ... done
Creating registry           ... done
Creating harbor-db          ... done
Creating redis              ... done
Creating harbor-ui          ... done
Creating harbor-jobservice  ... done
Creating nginx              ... done
- 下载一个公有镜像并上传到harbor
#harbor本地下载一个公有仓库镜像centos:7
[root@harbor harbor]# docker pull centos:7
7: Pulling from library/centos
7dc0dca2b151: Pull complete
Digest: sha256:b67d21dfe609ddacf404589e04631d90a342921e81c40aeaf3391f6717fa5322
Status: Downloaded newer image for centos:7

#本地映射私有仓库域名
[root@harbor harbor]# tail -1 /etc/hosts
192.168.200.145 www.yunjisuan.com

#将centos:7镜像改名并上传私有镜像仓库
[root@harbor harbor]# docker tag centos:7 www.yunjisuan.com/library/centos:7
[root@harbor harbor]# docker images | grep centos
centos                             7                   49f7960eb7e4        6 weeks ago         200MB
www.yunjisuan.com/library/centos   7                   49f7960eb7e4        6 weeks ago         200MB
[root@harbor harbor]# docker push www.yunjisuan.com/library/centos:7
The push refers to repository [www.yunjisuan.com/library/centos]
bcc97fbfc9e1: Preparing
denied: requested access to the resource is denied  #我们发现与私有仓库的连接被拒绝,这是因为我们还没有登陆验证

#登陆验证harbor私有仓库,并上传镜像
[root@harbor harbor]# docker login www.yunjisuan.com
Username: admin
Password:
Login Succeeded
[root@harbor harbor]# docker push www.yunjisuan.com/library/centos:7
The push refers to repository [www.yunjisuan.com/library/centos]
bcc97fbfc9e1: Pushed
7: digest: sha256:eed5b251b615d1e70b10bcec578d64e8aa839d2785c2ffd5424e472818c42755 size: 529
| 主机名 | IP | 用途 | 最小资源配比 |
|---|---|---|---|
| docker-client | 192.168.100.104 | docker客户端 | |
| harbor | 192.168.100.105 | harbor私有镜像仓库 | 2CPU |
| 4GBMEM | |||
| 40GBDISK |
#映射harbor私有仓库域名
[root@docker-client ~]# cat /etc/redhat-release
CentOS Linux release 7.5.1804 (Core)
[root@docker-client ~]# uname -r
3.10.0-862.3.3.el7.x86_64
[root@docker-client ~]# hostname -I
192.168.100.104 172.17.0.1
[root@docker-client ~]# tail -1 /etc/hosts
192.168.100.105 www.yunjisuan.com

#安装docker-ce社区版
[root@docker-client ~]# sestatus
SELinux status:                 disabled
[root@docker-client ~]# systemctl stop firewalld
[root@docker-client ~]# systemctl disable firewalld
[root@docker-client ~]# yum -y install yum-utils device-mapper-persistent-data lvm2
[root@docker-client ~]# curl https://download.docker.com/linux/centos/docker-ce.repo -o /etc/yum.repos.d/docker-ce.repo
  % Total    % Received % Xferd  Average Speed   Time    Time     Time  Current
                                 Dload  Upload   Total   Spent    Left  Speed
100  2424  100  2424    0     0    437      0  0:00:05  0:00:05 --:--:--   601
[root@docker-client ~]# yum -y install docker-ce
[root@docker-client ~]# systemctl start docker
[root@docker-client ~]# systemctl enable docker
Created symlink from /etc/systemd/system/multi-user.target.wants/docker.service to /usr/lib/systemd/system/docker.service.
[root@docker-client ~]# docker version

#配置国内公有镜像源
[root@docker-client ~]# cat /etc/docker/daemon.json
{
  "registry-mirrors":[ "https://registry.docker-cn.com" ]
}
[root@docker-client ~]# systemctl daemon-reload
[root@docker-client ~]# systemctl restart docker

#下载mongo公有镜像
[root@docker-client ~]# docker pull mongo
Using default tag: latest
latest: Pulling from library/mongo
3620e2d282dc: Pull complete
ef22f5e4b3b2: Pull complete
99f229f854da: Pull complete
4fe433abe16a: Pull complete
c9b72a16d85e: Pull complete
f1757e0920c9: Pull complete
6ad61d16333c: Pull complete
1b55b55716bc: Pull complete
b9e1a31a5de8: Pull complete
a871e8da652e: Pull complete
0015ffced2ab: Pull complete
ee8e51b51b8e: Pull complete
210e26b24d82: Pull complete
a2f5ff21092f: Pull complete
Digest: sha256:2e5e54f94429839d4904c9962b6933ef631b1938b6223c1cf84a0442421f111d
Status: Downloaded newer image for mongo:latest
[root@docker-client ~]# docker images
REPOSITORY          TAG                 IMAGE ID            CREATED             SIZE
mongo               latest              af93d1bb9e2a        23 hours ago        379MB

#为docker客户端下发域名(在harbor本地执行操作)
#将harbor上自签发的域名证书www.yunjisuan.com.crt复制到docker客户端对应目录下
[root@harbor ssl]# scp www.yunjisuan.com.crt 192.168.200.142:/etc/pki/ca-trust/source/anchors/
[email protected] s password:
www.yunjisuan.com.crt                                                                                            100% 1931

#在docker客户端上执行操作,让证书立刻生效
[root@docker-client ~]# update-ca-trust enable
[root@docker-client ~]# update-ca-trust extract

#下发证书后必须重启动docker-client的docker服务
[root@docker-client anchors]# systemctl restart docker

#docker-client登陆harbor仓库进行登陆验证
[root@docker-client anchors]# docker login www.yunjisuan.com
Username: admin
Password:
Login Succeeded

#修改镜像的名字并上传harbor私有仓库
[root@docker-client ~]# docker tag mongo:latest www.yunjisuan.com/library/mongo
[root@docker-client ~]# docker images
REPOSITORY                        TAG                 IMAGE ID            CREATED             SIZE
www.yunjisuan.com/library/mongo   latest              af93d1bb9e2a        23 hours ago        379MB
mongo                             latest              af93d1bb9e2a        23 hours ago        379MB
[root@docker-client anchors]# docker push www.yunjisuan.com/library/mongo   #上传镜像仓库
The push refers to repository [www.yunjisuan.com/library/mongo]
286bc1096109: Pushed
4a7d1d8fcfa6: Pushed
1dcddd0f87ed: Pushed
ca717ad13c2c: Pushed
5a025566f67e: Pushed
2cfea46080b7: Pushed
892f0d18231e: Pushed
1bf645743d38: Pushed
defd6b59a2f3: Pushed
709bdd00b1a4: Pushed
07b9c3c04cbd: Pushed
6eaddaf493f1: Pushed
a0e188d0e278: Pushed
711e4cb62f50: Pushed
latest: digest: sha256:810e499962b39a05131c5d25230fc92ba385f9353fc44ee8ed27a14ce49c8bac size: 3235
浏览器登陆harbor进行查看:
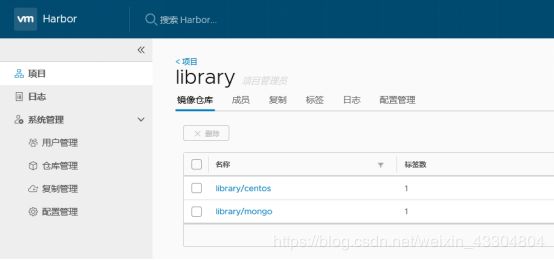 出现漏洞的镜像截图:
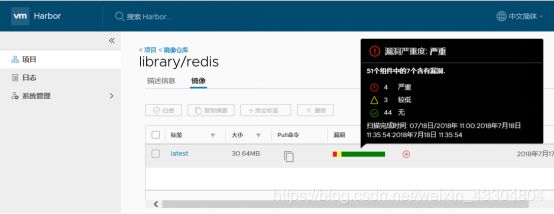 7. FAQ:问题解答
7.1 windows10最新版本默认拒绝非认证的域名证书
如果同学们启动harbor采用的https加密证书的方式,最新版本windows10浏览器访问的话,默认会直接说“站点不安全,拒绝连接”。
那么我们可以采用非https的方式启动harbor
[root@Harbor-Master harbor]# sed -n '11p' /data/install/harbor/harbor.cfg
ui_url_protocol = http
但是我们要是采用非https加密方式启动harbor的话。最新版本的docker是登陆不了的。这是因为新版本docker默认是以https方式登陆harbor
[root@Harbor-Slave docker]# docker login -uadmin -pHarbor12345 www.yunjisuan.com
WARNING! Using --password via the CLI is insecure. Use --password-stdin.
Error response from daemon: Get https://www.yunjisuan.com/v2/: dial tcp 192.168.200.201:443: connect: connection refused
为了解决登陆问题,我们需要在/etc/docker/下创建一个daemon.json名字的文件,加入http方式登陆的harbor域名
[root@Harbor-Slave docker]# cat /etc/docker/daemon.json
{
    "insecure-registries":[ "www.yunjisuan.com" ]
}
[root@Harbor-Slave docker]# systemctl restart docker    #需要重启

#然后我们再次登陆harbor
[root@Harbor-Slave docker]# docker login -uadmin -pHarbor12345 www.yunjisuan.com
WARNING! Using --password via the CLI is insecure. Use --password-stdin.
WARNING! Your password will be stored unencrypted in /root/.docker/config.json.
Configure a credential helper to remove this warning. See
https://docs.docker.com/engine/reference/commandline/login/#credentials-store

Login Succeeded     #登陆成功
harbor镜像的复制与同步
harbor私有仓库的主从复制,类似于MySQL,属于1对多的复制
| 主机名 | IP | 用途 | 最小资源配比 | 最佳资源配比 |
|---|---|---|---|---|
| docker-client | 192.168.200.142 | docker客户端 | ||
| harbor | 192.168.100.105 | harbor私有镜像仓库 | 2CPU | 4CPU |
| 4GBMEM | 8GB | |||
| harbor-slave | 192.168.100.104 | harbor从库 | 2CPU | 4CPU |
| 4GBMEM | 8GB |
- 部署Habor-Slave
再安装一个harbor私有仓库作为harbor的从库,域名为www2.yunjisuan.com
请参考Harbor-Master搭建过程
[root@localhost /]# mkdir -p /data/ssl
[root@localhost /]# cd /data/ssl
[root@localhost ssl]#
[root@localhost ssl]# openssl req -newkey rsa:4096 -nodes -sha256 -keyout ca.key -x509 -days 365 -out ca.crt
Generating a 4096 bit RSA private key
.........................................................................................++
......................................................................................................................................................................++
writing new private key to 'ca.key'
-----
You are about to be asked to enter information that will be incorporated
into your certificate request.
What you are about to enter is what is called a Distinguished Name or a DN.
There are quite a few fields but you can leave some blank
For some fields there will be a default value,
If you enter '.', the field will be left blank.
-----
Country Name (2 letter code) [XX]:CN
State or Province Name (full name) []:Beijing
Locality Name (eg, city) [Default City]:Beijing
Organization Name (eg, company) [Default Company Ltd]:yunjisuan
Organizational Unit Name (eg, section) []:yunjisuan
Common Name (eg, your name or your server's hostname) []:www2.yunjisuan.com
Email Address []:
[root@localhost ssl]# openssl req -newkey rsa:4096 -nodes -sha256 -keyout www2.yunjisuan.com.key -out www2.yunjisuan.com.csr
Generating a 4096 bit RSA private key
.........................................................++
......................++
writing new private key to 'www2.yunjisuan.com.key'
-----
You are about to be asked to enter information that will be incorporated
into your certificate request.
What you are about to enter is what is called a Distinguished Name or a DN.
There are quite a few fields but you can leave some blank
For some fields there will be a default value,
If you enter '.', the field will be left blank.
-----
Country Name (2 letter code) [XX]:CN
State or Province Name (full name) []:Beijing
Locality Name (eg, city) [Default City]:Beijing
Organization Name (eg, company) [Default Company Ltd]:yunjisuan
Organizational Unit Name (eg, section) []:yunjisuan
Common Name (eg, your name or your server's hostname) []:www2.yunjisuan.com
Email Address []:

Please enter the following 'extra' attributes
to be sent with your certificate request
A challenge password []:
An optional company name []:
[root@localhost ssl]# openssl x509 -req -days 365 -in www2.yunjisuan.com.csr -CA ca.crt -CAkey ca.key -CAcreateserial -out www2.yunjisuan.com.crt
Signature ok
subject=/C=CN/ST=Beijing/L=Beijing/O=yunjisuan/OU=yunjisuan/CN=www2.yunjisuan.com
Getting CA Private Key
[root@localhost ssl]# ll
total 24
-rw-r--r--. 1 root root 2053 Jan 15 22:07 ca.crt
-rw-r--r--. 1 root root 3272 Jan 15 22:07 ca.key
-rw-r--r--. 1 root root   17 Jan 15 22:08 ca.srl
-rw-r--r--. 1 root root 1935 Jan 15 22:08 www2.yunjisuan.com.crt
-rw-r--r--. 1 root root 1716 Jan 15 22:08 www2.yunjisuan.com.csr
-rw-r--r--. 1 root root 3272 Jan 15 22:08 www2.yunjisuan.com.key
[root@localhost ssl]# cp www2.yunjisuan.com.crt /etc/pki/ca-trust/source/anchors/
[root@localhost ssl]# update-ca-trust enable
[root@localhost ssl]# update-ca-trust extract
[root@localhost ssl]# systemctl restart docker
主库主动连接从库,将从库的证书给主一份
在harbor-slave上操作
[root@localhost ssl]# scp www2.yunjisuan.com.crt 192.168.100.105:/etc/pki/ca-trust/source/anchors/The authenticity of host '192.168.100.105 (192.168.100.105)' can't be established.
ECDSA key fingerprint is SHA256:14NKIeIbfU5Cx3usA72K/AmnoeDt/UyH+SII8+rV1dA.
ECDSA key fingerprint is MD5:60:ab:53:4a:f8:fc:74:2b:93:1e:6f:b3:4c:e4:33:de.
Are you sure you want to continue connecting (yes/no)? yes
Warning: Permanently added '192.168.100.105' (ECDSA) to the list of known hosts.
[email protected]'s password:
www2.yunjisuan.com.crt                                          100% 1935   389.8KB/s   00:00
#在harbor-master上操作
[root@localhost harbor]# update-ca-trust enable
[root@localhost harbor]# update-ca-trust extract
[root@localhost harbor]# systemctl restart docker
在从库安装harbor
[root@localhost ssl]# mkdir -p /data/install
[root@localhost ssl]# cd ~
[root@localhost ~]# tar xf harbor-offline-installer-v1.5.0.tgz -C /data/install
[root@localhost ~]# cd /data/install
[root@localhost install]# ls
harbor
[root@localhost install]# cd harbor/
[root@localhost harbor]# ls
common                     docker-compose.yml  harbor.v1.5.0.tar.gz  NOTICE
docker-compose.clair.yml   ha                  install.sh            prepare
docker-compose.notary.yml  harbor.cfg          LICENSE
[root@localhost harbor]# vim harbor.cfg
  7 hostname = www2.yunjisuan.com
 11 ui_url_protocol = https
 23 ssl_cert = /etc/ssl/harbor/www2.yunjisuan.com.crt
 24 ssl_cert_key = /etc/ssl/harbor/www2.yunjisuan.com.key
 68 harbor_admin_password = Harbor12345

[root@localhost harbor]# mkdir -p /etc/ssl/harbor
[root@localhost harbor]# cd /data/ssl/
[root@localhost ssl]# cp www2.yunjisuan.com.crt www2.yunjisuan.com.key /etc/ssl/harbor/
[root@localhost ssl]# cd /data/install/harbor/
[root@localhost harbor]# cd ~
[root@localhost ~]# ls
anaconda-ks.cfg  docker-compose  harbor-offline-installer-v1.5.0.tgz
[root@localhost ~]# chmod +x docker-compose
[root@localhost ~]# mv docker-compose /usr/bin/
[root@localhost ~]# cd /data/install/harbor/
[root@localhost harbor]# ./install.sh --with-clair
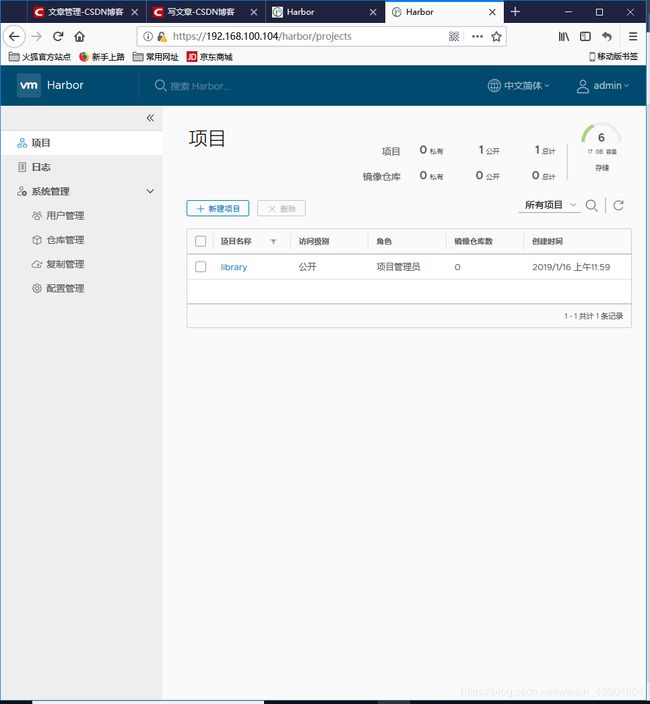 在Harbor-Master和Harbor-Slave上做域名映射
#主Harbor
[root@localhost ~]# vim /etc/hosts
192.168.100.105 www.yunjisuan.com
192.168.100.104 www2.yunjisuan.com

#从Harbor
[root@localhost ~]# vim /etc/hosts
192.168.100.105 www.yunjisuan.com
192.168.100.104 www2.yunjisuan.com
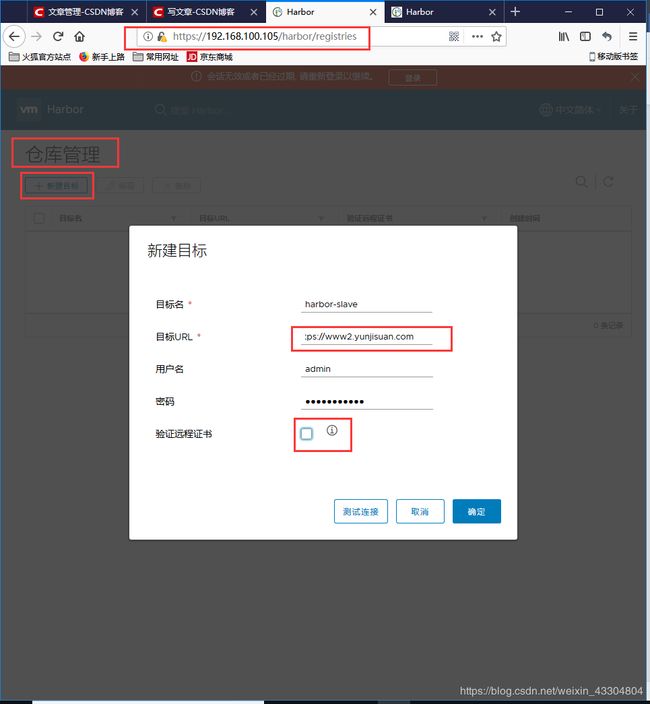
特别提示:
离线方式安装的Habor容器默认会从LDNS处获取对应的域名的IP解析,并不找本地的hosts文件
由于我们是自己设定的域名,因此,需要搭建用于内网解析的LDNS域名解析服务器
- 搭建LDNS域名解析服务器
| 主机名 | IP | 用途 | 最小资源配比 | 最佳资源配比 |
|---|---|---|---|---|
| harbor | 192.168.100.105 | harbor私有镜像仓库 | 2CPU | 4CPU |
| 4GBMEM | 8GB | |||
| harbor-slave | 192.168.100.104 | harbor从库 | 2CPU | 4CPU |
| 4GBMEM | 8GB | |||
| LDNS | 192.168.100.106 | 本地DNS |
[root@localhost ~]# yum -y install bind bind-chroot bind-utils
[root@localhost ~]# cd /etc/
[root@localhost etc]# cp named.conf{,.bak}
[root@localhost etc]# vim named.conf
options {
        listen-on port 53 { 192.168.100.106; };
        listen-on-v6 port 53 { ::1; };
        directory       "/var/named";
        dump-file       "/var/named/data/cache_dump.db";
        statistics-file "/var/named/data/named_stats.txt";
        memstatistics-file "/var/named/data/named_mem_stats.txt";
        allow-query     { any; };
                forwarders { 192.168.100.2; };

        /*
         - If you are building an AUTHORITATIVE DNS server, do NOT enable recursion.
         - If you are building a RECURSIVE (caching) DNS server, you need to enable
           recursion.
         - If your recursive DNS server has a public IP address, you MUST enable access
           control to limit queries to your legitimate users. Failing to do so will
           cause your server to become part of large scale DNS amplification
           attacks. Implementing BCP38 within your network would greatly
           reduce such attack surface
        */
        recursion yes;

        dnssec-enable no;
        dnssec-validation no;

        /* Path to ISC DLV key */
        bindkeys-file "/etc/named.iscdlv.key";

        managed-keys-directory "/var/named/dynamic";

        pid-file "/run/named/named.pid";
        session-keyfile "/run/named/session.key";
};

logging {
        channel default_debug {
                file "data/named.run";
                severity dynamic;
        };
};

zone "." IN {
        type hint;
        file "named.ca";
};

zone "yunjisuan.com" IN {
        type master;
        file "yunjisuan.com.zone";
};

include "/etc/named.rfc1912.zones";
include "/etc/named.root.key";

#检查配置文件是否有错
[root@localhost etc]# named-checkconf /etc/named.conf

#创建正向解析文件
[root@localhost etc]# cd /var/named
[root@localhost named]# ls
chroot  data  dynamic  named.ca  named.empty  named.localhost  named.loopback  slaves
[root@localhost named]# cp -p named.empty yunjisuan.com.zone
[root@localhost named]# vim yunjisuan.com.zone
$TTL 3H
@       IN SOA  yunjisuan.com. root.ns1.yumjisuam.com. (
                                        0       ; serial
                                        1D      ; refresh
                                        1H      ; retry
                                        1W      ; expire
                                        3H )    ; minimum
        NS      ns1.yunjisuan.com.
ns1 A 192.168.100.106
www A 192.168.100.105
www2 A 192.168.100.104

#测试正向解析文件是否有错
[root@localhost named]# named-checkzone yunjisuan.com yunjisuan.com.zone
zone yunjisuan.com/IN: loaded serial 0
OK

#启动域名解析服务
[root@localhost named]# systemctl start named
[root@localhost named]# ss -antup | grep named
udp    UNCONN     0      0      192.168.100.106:53                    *:*                   users:(("named",pid=11767,fd=512))
udp    UNCONN     0      0       ::1:53                   :::*                   users:(("named",pid=11767,fd=513))
tcp    LISTEN     0      10     192.168.100.106:53                    *:*                   users:(("named",pid=11767,fd=21))
tcp    LISTEN     0      128    127.0.0.1:953                   *:*                   users:(("named",pid=11767,fd=23))
tcp    LISTEN     0      10      ::1:53                   :::*                   users:(("named",pid=11767,fd=22))
tcp    LISTEN     0      128     ::1:953                  :::*                   users:(("named",pid=11767,fd=24))

#将本地DNS改成自己,进行解析测试
[root@localhost named]# vim /etc/resolv.conf

; generated by /usr/sbin/dhclient-script
search localdomain
#nameserver 192.168.100.2
nameserver 192.168.100.106
[root@localhost named]# nslookup www.baidu.com
Server:		192.168.100.106
Address:	192.168.100.106#53

Non-authoritative answer:
www.baidu.com	canonical name = www.a.shifen.com.
Name:	www.a.shifen.com
Address: 180.149.131.98
[root@localhost named]# nslookup www.yunjisuan.com
Server:		192.168.100.106
Address:	192.168.100.106#53

Name:	www.yunjisuan.com
Address: 192.168.100.105
[root@localhost named]# nslookup www2.yunjisuan.com
Server:		192.168.100.106
Address:	192.168.100.106#53

Name:	www2.yunjisuan.com
Address: 192.168.100.104
- 构建Harbor主从同步
提示:如果Harbor不是已经绑定的公网域名,那么必须构建自己的本地LDNS
#修改Harbor-master上的域名解析DNS服务器为本地构建的LDNS
[root@localhost harbor]# vim /etc/resolv.conf

; generated by /usr/sbin/dhclient-script
search localdomain 17.0.1
nameserver 192.168.100.106
[root@localhost harbor]# nslookup www2.yunjisuan.com
Server:		192.168.100.106
Address:	192.168.100.106#53

Name:	www2.yunjisuan.com
Address: 192.168.100.104

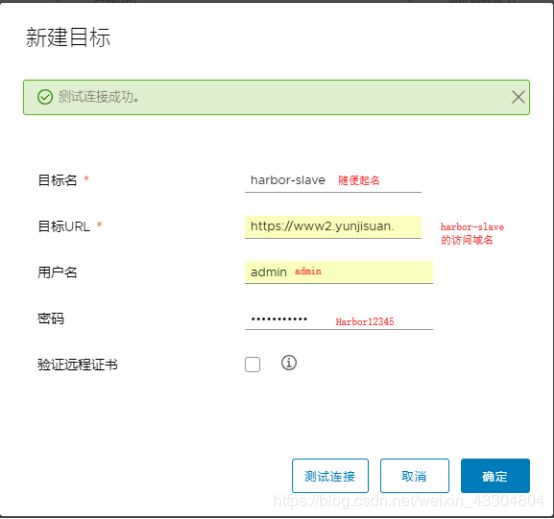
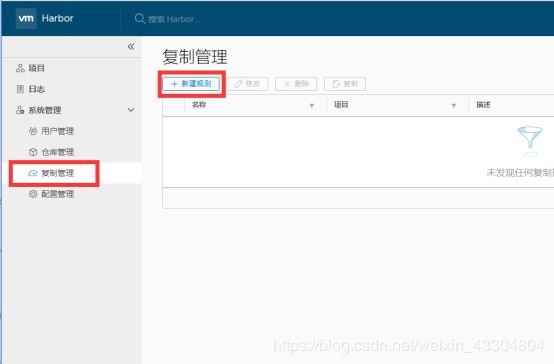
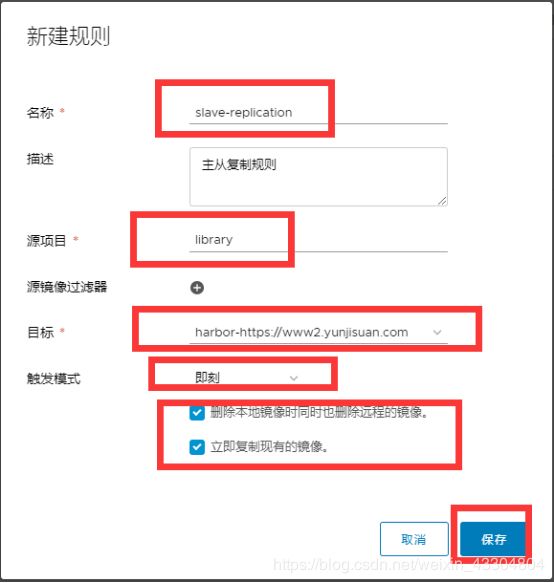 至此,Harbor仓库主从复制已经构建完毕,同学们可以自行测试。
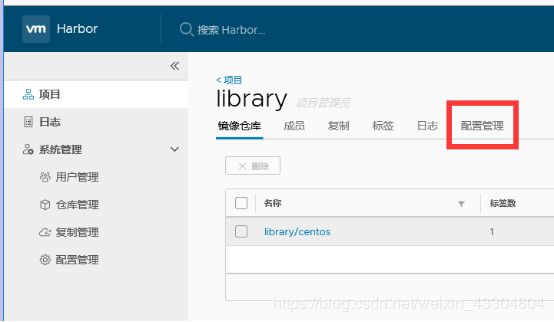
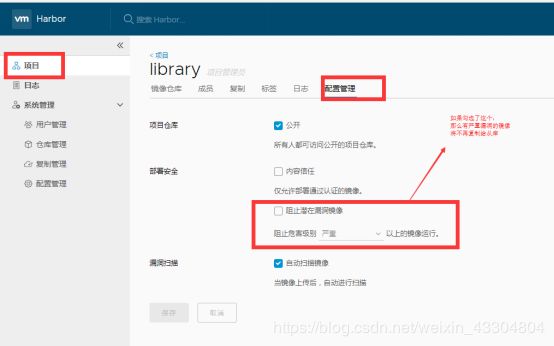
备注:如果勾选了阻止潜在漏洞的选项会影响harbor主从复制
 特别提示:
特别提示:
如果是harbor经历过vmware虚拟机的暂停和恢复。那么很可能之前能够访问的harbor仓库,恢复后却不行了。此时,需要重启dorker进程并重新harbor容器进程。
