caffe-ssd训练自己的数据集(同时记录自己遇到的各种错误)
ONE:
首先当然是caffe的编译和安装啦,这里不详细阐述,下面内容都是基于caffe-ssd版本来做的。进行下一步之前,确保你的caffe是ssd版本且没有任何问题!
TWO:
— 准备数据集,jpeg,jpg,png…都可以,反正是你自己的数据集。
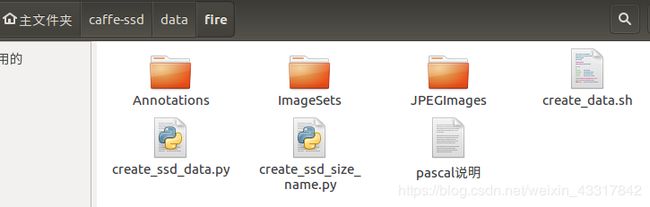
—创建文件夹,在你的caffe/data/路径下创建一个数据集文件,博主为如下图:
然后在imageSets文件夹再新建空文本:labelmap_fire.prototxt(当然,你也可以自己命名)
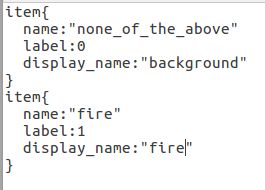 (按照自己情况自己修改)
—用标注工具对你自己的数据集进行标记:(将脚本放在data/fire/ImageSets下进行,比较方便)
博主在这里用的是labelImg,标注后会生成对应的xml文件,存在Annotations文件夹内。标注完成后将你的所有图片全都存进JPEGImages文件夹中,并在该文件夹下创建trainval和test两个文件,分别存放你要进行训练和测试的数据集,博主按照4:1进行存放
—接下来:
编辑trainval.txt和test.txt。用如下脚本进行:(路径自行修改)
#! /usr/bin/python
# -*- coding:UTF-8 -*-

import os, sys
import glob
#训练集和测试集路径
trainval_dir = "/home/ff/caffe-ssd/data/fire/JPEGImages/trainval"
test_dir = "/home/ff/caffe-ssd/data/fire/JPEGImages/test"

trainval_img_lists = glob.glob(trainval_dir + '/*.jpg') #获取trainval中所有.jpg的文件
trainval_img_names = []  #获取名称
for item in trainval_img_lists:
    temp1, temp2 = os.path.splitext(os.path.basename(item))
    trainval_img_names.append(temp1)

test_img_lists = glob.glob(test_dir + '/*.jpg')    #获取test中所有.png文件
test_img_names = []
for item in test_img_lists:
    temp1, temp2 = os.path.splitext(os.path.basename(item))
    test_img_names.append(temp1)
#图片路径和xml路径
dist_img_dir = "data/fire/JPEGImages"  #需要写入txt的trainval和test路径,因为我们在PNGImges目录下除了有trainval和test文件夹外还有所有图片,所以只用写到PNGImages
dist_anno_dir = "/data/fire/Annotations"   #需要写入的xml路径    !!!从caffe跟目录下第一个文件开始写

trainval_fd = open("/home/ff/caffe-ssd/data/fire/ImageSets/trainval.txt", 'w')   #存到哪里,及存储的名称
test_fd = open("/home/ff/caffe-ssd/data/fire/ImageSets/test.txt", 'w')

for item in trainval_img_names:
    trainval_fd.write(dist_img_dir + '/' + str(item) + '.jpg' + ' ' + dist_anno_dir + '/' + str(item) + '.xml\n')

for item in test_img_names:
    test_fd.write(dist_img_dir + '/' + str(item) + '.jpg' + ' ' + dist_anno_dir + '/' + str(item) + '.xml\n')
—接下来,编辑test_name_size.txt(同样的,路径自行修改)
#! /usr/bin/python
# -*- coding:UTF-8 -*-

import os, sys
import glob
from PIL import Image #读图

#图的路径
img_dir = "/home/ff/caffe-ssd/data/fire/JPEGImages/test"

#获取制定路径下的所有png图片的名称
img_lists = glob.glob(img_dir + '/*.jpg')

#在指定路径下创建文件
test_name_size = open('/home/ff/caffe-ssd/data/fire/test_name_size_fire.txt', 'w')

for item in img_lists:
    img = Image.open(item)
    width, height = img.size
    temp1, temp2 = os.path.splitext(os.path.basename(item))
    test_name_size.write(temp1 + ' ' + str(height) + ' ' + str(width) + '\n')
—至此,自己的数据集已经形成voc格式,接下来,将这些文件,转换成caffe的lmdb模式:
(此处博主踩过许多坑!错误附在最后进行描述),运用下面的shell文件进行(注意,此处不是py文件,是shell文件,你们也可以从caffe/data/voc2007里面将create_data.sh拷贝至你的数据文件夹再进行修改):
cur_dir=$(cd $( dirname ${BASH_SOURCE[0]} ) && pwd )
root_dir='/home/ff/caffe-ssd'

cd $root_dir

redo=1
data_root_dir="$HOME/caffe-ssd"
dataset_name="fire/ImageSets"
mapfile="/home/ff/caffe-ssd/data/fire/ImageSets/labelmap_fire.prototxt"
anno_type="detection"
db="lmdb"
min_dim=0
max_dim=0
width=0
height=0

extra_cmd="--encode-type=jpg --encoded"
if [ $redo ]
then
  extra_cmd="$extra_cmd --redo"
fi
for subset in test trainval
do
  python $root_dir/scripts/create_annoset.py --anno-type=$anno_type --label-map-file=$mapfile --min-dim=$min_dim --max-dim=$max_dim --resize-width=$width --resize-height=$height --check-label $extra_cmd $data_root_dir $root_dir/data/$dataset_name/$subset.txt $data_root_dir/$dataset_name/$db/$dataset_name"_"$subset"_"$db examples/$dataset_name
done
—至此,lmdb文件已经形成
接下来!进入正题!训练啦!(此处出现多个意想不到的BUG,大概耽搁了我两天的时间排错)
—第一步,将examples/ssd/ssd_pascal.py拷贝至你创建的文件目录下(LMDB文件夹,修改相应的文件夹位置和迭代次数等,参考 https://blog.csdn.net/chenlufei_i/article/details/80068953 (这位博主写的很详细)
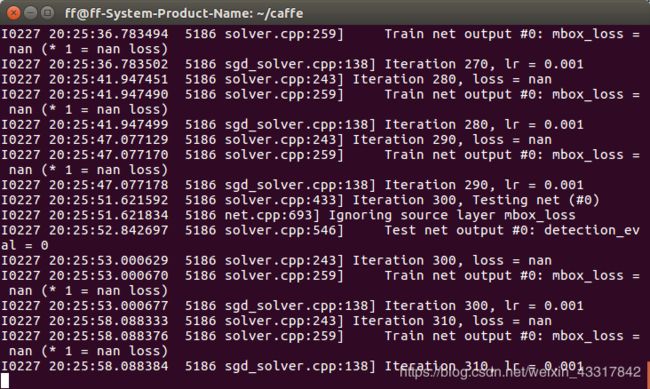
—开心的开始训练!过程如下
训练完成后,运用以下脚本进行测试:
# -*- coding: utf-8 -*
import numpy as np

import timeit
from PIL import Image
from PIL import ImageDraw
import os
import numpy as np
import matplotlib.pyplot as plt

plt.rcParams['figure.figsize'] = (10, 10)
plt.rcParams['image.interpolation'] = 'nearest'
plt.rcParams['image.cmap'] = 'gray'

# Make sure that the work directory is caffe_root
caffe_root = './'
# modify img_dir to your path of testing images of kitti
#需要测试的集合的图片
img_dir = '/home/ff/caffe-ssd/data/fire/test_data/'
import os
os.chdir(caffe_root)
import sys
sys.path.insert(0, 'python')
from google.protobuf import text_format
from caffe.proto import caffe_pb2

import caffe
#from _ensemble import *

caffe.set_device(0)
caffe.set_mode_gpu()
#deploy,模型,和labelmap的位置
model_def = '/home/ff/caffe-ssd/models/VGGNet/fire/SSD_300x300/deploy.prototxt'
model_weights = '/home/ff/caffe-ssd/models/VGGNet/fire/SSD_300x300/VGG_fire_testSSD_300x300_iter_10000.caffemodel'
voc_labelmap_file = caffe_root+'data/fire/ImageSets/labelmap_fire.prototxt'
#最后标记完保存的路径
save_dir = 'data/fire/result/'
txt_dir = 'data/fire/result/'
#f = open (r'out_3d.txt','w')

if not(os.path.exists(txt_dir)):
	os.makedirs(txt_dir)
if not(os.path.exists(save_dir)):
	os.makedirs(save_dir)
file = open(voc_labelmap_file, 'r')
labelmap = caffe_pb2.LabelMap()
text_format.Merge(str(file.read()), labelmap)

net = caffe.Net(model_def,      # defines the structure of the model
                model_weights,  # contains the trained weights
                caffe.TEST)     # use test mode (e.g., don't perform dropout)

# input preprocessing: 'data' is the name of the input blob == net.inputs[0]
transformer = caffe.io.Transformer({'data': net.blobs['data'].data.shape})
transformer.set_transpose('data', (2, 0, 1))
transformer.set_mean('data', np.array([104,117,123])) # mean pixel
transformer.set_raw_scale('data', 255)  # the reference model operates on images in [0,255] range instead of [0,1]
transformer.set_channel_swap('data', (2,1,0))  # the reference model has channels in BGR order instead of RGB

# set net to batch size of 1

image_width = 300
image_height = 300

net.blobs['data'].reshape(1,3,image_height,image_width)

def get_labelname(labelmap, labels):
    num_labels = len(labelmap.item)
    labelnames = []
    if type(labels) is not list:
        labels = [labels]
    for label in labels:
        found = False
        for i in xrange(0, num_labels):
            if label == labelmap.item[i].label:
                found = True
                labelnames.append(labelmap.item[i].display_name)
                break
        assert found == True
    return labelnames

im_names = list(os.walk(img_dir))[0][2]

for im_name in im_names:

    img_file = img_dir + im_name
    image = caffe.io.load_image(img_file)

    transformed_image = transformer.preprocess('data', image)
    net.blobs['data'].data[...] = transformed_image

    #t1 = timeit.Timer("net.forward()","from __main__ import net")
    #print t1.timeit(2)

    # Forward pass.
    detections = net.forward()['detection_out']

    # Parse the outputs.
    det_label = detections[0,0,:,1]
    det_conf = detections[0,0,:,2]
    det_xmin = detections[0,0,:,3]
    det_ymin = detections[0,0,:,4]
    det_xmax = detections[0,0,:,5]
    det_ymax = detections[0,0,:,6]

    # Get detections with confidence higher than 0.001
    top_indices = [i for i, conf in enumerate(det_conf) if conf >= 0.15]
    top_conf = det_conf[top_indices]
    top_label_indices = det_label[top_indices].tolist()
    top_labels = get_labelname(labelmap, top_label_indices)
    top_xmin = det_xmin[top_indices]
    top_ymin = det_ymin[top_indices]
    top_xmax = det_xmax[top_indices]
    top_ymax = det_ymax[top_indices]

    #colors = plt.cm.hsv(np.linspace(0, 1, 21)).tolist()

    #img = Image.open(img_dir + "%06d.jpg"%(img_idx))
    img = Image.open(img_file)
    draw = ImageDraw.Draw(img)
    for i in xrange(top_conf.shape[0]):
        xmin = top_xmin[i] * image.shape[1]
        ymin = top_ymin[i] * image.shape[0]
        xmax = top_xmax[i] * image.shape[1]
        ymax = top_ymax[i] * image.shape[0]

        h = float(ymax - ymin)
        w = float(xmax - xmin)
        #if (w==0) or (h==0):
        #   continue
        #if (h/w >=2)and((xmin<10)or(xmax > 1230)):
        #   continue

        score = top_conf[i]
        label_num = top_label_indices[i]
        if score > 0.3:
            draw.line(((xmin,ymin),(xmin,ymax),(xmax,ymax),(xmax,ymin),(xmin,ymin)),fill=(0,255,0))
            draw.text((xmin,ymin),'%s%.2f'%(top_labels[i], score),fill=(255,255,255))
        #elif score > 0.02:
        #    draw.line(((xmin,ymin),(xmin,ymax),(xmax,ymax),(xmax,ymin),(xmin,ymin)),fill=(255,0,255))
        #    draw.text((xmin,ymin),'%.2f'%(score),fill=(255,255,255))

    #img.save(save_dir+"%06d.jpg"%(img_idx))
    img.save(save_dir+im_name)
××××××错误汇总!
**1,**VOC转LMDB时候,运行shell文件出现:“AttributeError: ‘module’ object has no attribute ‘LabelMap’
”的错误,该错误是因为caffe的python路径没有配置好,参考了许多博主后找到如下方法,打开对应的caffe/script/create_annoset.py,加入:sys.path.insert(0,’/home/xxx/caffe_ssd/python’)
**2,**VOC转LMDB出现,参数不够,参数太少的报错。主要是因为sh文件路径有误,继续仔细观察并修改
**3,**运行ssd_pascal.py 出现./build/tools/caffe: not found,这个错误简直让人无法想象,找了一下午原因,最终发现,在运行该脚本时,只需要返回caffe根本录下运行,就不会出错了!绝了!
**4,**运行ssd_pascal.py 出现no model等错误,主要是因为python 路径的原因,参考了https://www.cnblogs.com/sddai/p/10210666.html 这位博主试着将PYTHON路径加进去,似乎可以解决问题,但本人觉得还是因为没有在caffe根目录下运行的原因!本人还没有尝试,小伙伴们可以尝试下。
**5,**loss一直震荡:可能是因为
正常情况:
train loss 不断下降,test loss不断下降,说明网络仍在学习;
异常情况:
train loss 不断下降,test loss趋于不变,说明网络过拟合;
train loss 趋于不变,test loss不断下降,说明数据集100%有问题;
train loss 趋于不变,test loss趋于不变,说明学习遇到瓶颈,需要减小学习率或批量数目;
train loss 不断上升,test loss不断上升,说明网络结构设计不当,训练超参数设置不当,数据集经过清洗等问题。