OpenCV Python开发 第一章课后 自定义实现API
OpenCV Python开发 第一章课后 自定义实现API
- 同专栏博客
- 二维离散傅里叶变换DFT
- 二维图像卷积
- Canny边缘检测
- 本篇完整代码
同专栏博客
Python3.6.7+Opencv3.4.2.16环境配置
PythonOpenCV开发 前言
OpenCV Python开发 第一章 图像处理基础
本篇我们来自定义实现第一章博客中的几个API:
- 二维离散傅里叶变换DFT
- 二维图像卷积
- Canny边缘检测
什么是DFT, 卷积, 边缘检测我已经在第一章博客中介绍过或者引用链接了, 本片不再重复介绍算法原理, 仅仅用python自定义实现这3个算法, 并与标准的API结果进行对比
二维离散傅里叶变换DFT
二维离散傅里叶变换DFT的公式如下
F ( u , v ) = ∑ x = 0 M − 1 ∑ y = 0 N − 1 f ( x , y ) e − j 2 π ( u x M + v y N ) (1.1) F(u, v) = \sum_{x=0}^{M-1}\sum_{y=0}^{N-1}f(x, y)e^{-j2\pi(\frac{ux}{M}+\frac{vy}{N})} \tag{1.1} F(u,v)=x=0∑M−1y=0∑N−1f(x,y)e−j2π(Mux+Nvy)(1.1)
如果直接计算, 部分代码如下:
for u in range(M):
    for v in range(N):
        for x in range(M):
            for y in range(N):
                comp = np.exp(-2j * np.pi * (u * x / M + v * y / N))
可以看到, 用了4个for循环嵌套, 而且四个变量的数量级都在几百, 整个算法的时间复杂度在亿的量级, 实在太高.
因此我们将式(1.1)变形成矩阵的形式, 利用NumPy进行并行计算, 可以大大加速计算过程
我们定义以下两个矩阵
G 1 = [ e − j 2 π 0 × 0 M e − j 2 π 0 × 1 M . . . e − j 2 π 0 × ( M − 1 ) M e − j 2 π 1 × 0 M e − j 2 π 1 × 1 M . . . e − j 2 π 1 × ( M − 1 ) M . . . . . . . . . . . . e − j 2 π ( M − 1 ) × 0 M e − j 2 π ( M − 1 ) × 1 M . . . e − j 2 π ( M − 1 ) × ( M − 1 ) M ] G 2 = [ e − j 2 π 0 × 0 N e − j 2 π 0 × 1 N . . . e − j 2 π 0 × ( N − 1 ) N e − j 2 π 1 × 0 N e − j 2 π 1 × 1 N . . . e − j 2 π 1 × ( N − 1 ) N . . . . . . . . . . . . e − j 2 π ( N − 1 ) × 0 N e − j 2 π ( N − 1 ) × 1 N . . . e − j 2 π ( N − 1 ) × ( N − 1 ) N ] G_1 = \left[ \begin{matrix} e^{-j2\pi\frac{0\times0}{M}}&e^{-j2\pi\frac{0\times1}{M}}&...&e^{-j2\pi\frac{0\times(M-1)}{M}}\\e^{-j2\pi\frac{1\times0}{M}}&e^{-j2\pi\frac{1\times1}{M}}&...&e^{-j2\pi\frac{1\times(M-1)}{M}}\\ ... & ... & ... & ...\\e^{-j2\pi\frac{(M-1)\times0}{M}}&e^{-j2\pi\frac{(M-1)\times1}{M}}&...&e^{-j2\pi\frac{(M-1)\times(M-1)}{M}}\end{matrix} \right] \\ \\ G_2 = \left[ \begin{matrix} e^{-j2\pi\frac{0\times0}{N}}&e^{-j2\pi\frac{0\times1}{N}}&...&e^{-j2\pi\frac{0\times(N-1)}{N}}\\e^{-j2\pi\frac{1\times0}{N}}&e^{-j2\pi\frac{1\times1}{N}}&...&e^{-j2\pi\frac{1\times(N-1)}{N}}\\ ... & ... & ... & ...\\e^{-j2\pi\frac{(N-1)\times0}{N}}&e^{-j2\pi\frac{(N-1)\times1}{N}}&...&e^{-j2\pi\frac{(N-1)\times(N-1)}{N}}\end{matrix} \right] G1=⎣⎢⎢⎢⎡e−j2πM0×0e−j2πM1×0...e−j2πM(M−1)×0e−j2πM0×1e−j2πM1×1...e−j2πM(M−1)×1............e−j2πM0×(M−1)e−j2πM1×(M−1)...e−j2πM(M−1)×(M−1)⎦⎥⎥⎥⎤G2=⎣⎢⎢⎢⎡e−j2πN0×0e−j2πN1×0...e−j2πN(N−1)×0e−j2πN0×1e−j2πN1×1...e−j2πN(N−1)×1............e−j2πN0×(N−1)e−j2πN1×(N−1)...e−j2πN(N−1)×(N−1)⎦⎥⎥⎥⎤
这样一来, 式(1.1)就可以变形成
F ( u , v ) = G 1 f ( x , y ) G 2 (1.2) F(u, v) = G_1f(x, y)G_2 \tag{1.2} F(u,v)=G1f(x,y)G2(1.2)
式(1.2)再结合NumPy, 可以快速地实现DFT. 代码如下
m, n = img.shape[:2]
img_fft = np.zeros((m, n), dtype=np.complex)    # 经过计算得到的图像的像素是复数
G1 = dftMatrix(m)
G2 = dftMatrix(n)
img_fft = G1.dot(img).dot(G2)
img_fft = np.abs(img_fft)   # 取绝对值, 将复数映射到实数
img_fft = np.log(img_fft)   # 将像素值映射到0~255
其中dftMatrix函数如下
def dftMatrix(N):
    i, j = np.meshgrid(np.arange(N), np.arange(N))
    return np.power(np.exp(-2j * np.pi / N), i * j)
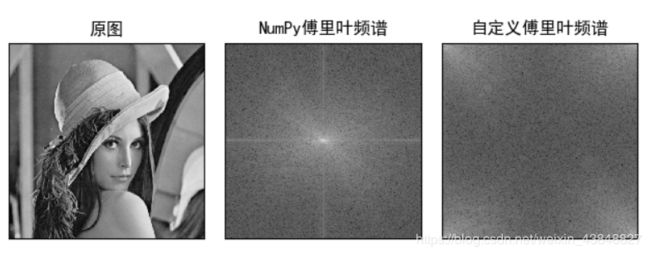
到这里还有一个问题, 这里我们得到的img_fft虽然已经是原图的傅里叶频谱, 但是没有中心化. 像下面这样
处理的方法是将频谱按如下方式进行一次平移, 1象限和3象限互换, 2象限和4象限互换, 就得到了中心化后的傅里叶频谱
我们首先要将图像分成上图所示的1, 2, 3, 4四个象限, 然后重新对其进行拼接.
先用切片对图像进行分割, 然后用NumPy进行拼接. 实现代码如下, 算法不难理解, 就是比较绕
# 将图像四个象限对换
def transform(img):
    (n, m) = img.shape
    nmid, mmid = n // 2, m // 2
    if (n & 1) and (m & 1):  # n, m都为奇数

        piece1 = img[0:nmid, :][:, 0:mmid]
        piece2 = img[0:nmid, :][:, mmid + 1:]
        piece3 = img[nmid + 1:, :][:, mmid + 1:]
        piece4 = img[nmid + 1:, :][:, 0:mmid]
        block1 = img[0:nmid, mmid].reshape((mmid, 1))
        block2 = img[nmid + 1:, mmid].reshape((mmid, 1))
        block3 = np.array([img[nmid, :]])

        part1 = np.hstack((piece3, block1))
        part1 = np.hstack((part1, piece4))
        part2 = np.hstack((piece2, block2))
        part2 = np.hstack((part2, piece1))
        part1 = np.concatenate((part1, block3), axis=0)
        whole = np.concatenate((part1, part2), axis=0)
        return whole

    elif (n & 1) and not (m & 1):  # n为奇数, m为偶数
        piece1 = img[0:nmid, :][:, 0:mmid]
        piece2 = img[0:nmid, :][:, mmid:]
        piece3 = img[nmid + 1:, :][:, mmid:]
        piece4 = img[nmid + 1:, :][:, 0:mmid]
        block1 = np.array([img[nmid, :]])

        part1 = np.hstack((piece3, piece4))
        part2 = np.hstack((piece2, piece1))
        part1 = np.concatenate((part1, block1), axis=0)
        whole = np.concatenate((part1, part2), axis=0)
        return whole

    elif not (n & 1) and (m & 1):  # n为偶数, m为奇数
        piece1 = img[0:nmid, :][:, 0:mmid]
        piece2 = img[0:nmid, :][:, mmid + 1:]
        piece3 = img[nmid:, :][:, mmid + 1:]
        piece4 = img[nmid:, :][:, 0:mmid]
        block1 = img[:, mmid].reshape((n, 1))

        part1 = np.concatenate((piece3, piece2), axis=0)
        part2 = np.concatenate((piece4, piece1), axis=0)
        part1 = np.hstack((part1, block1))
        whole = np.hstack((part1, part2))
        return whole

    else:
        piece1 = img[0:nmid, :][:, 0:mmid]
        piece2 = img[0:nmid, :][:, mmid:]
        piece3 = img[nmid:, :][:, mmid:]
        piece4 = img[nmid:, :][:, 0:mmid]

        part1 = np.concatenate((piece3, piece2), axis=0)
        part2 = np.concatenate((piece4, piece1), axis=0)
        whole = np.hstack((part1, part2))
        return whole
至此, 我们自定义实现了二维离散傅里叶变换DFT, 函数如下
def myFFT(img):
    """
    对图像img做DFT变换, 返回傅里叶频谱
    :param img:
    :return:
    """
    # 先将图片转换成灰度图
    if 2 == len(img.shape):  # 长度为2说明ff_img已经是灰度图
        pass
    else:
        img = cv.cvtColor(img, cv.COLOR_BGR2GRAY)
    m, n = img.shape[:2]

    img_fft = np.zeros((m, n), dtype=np.complex)  # 经过计算得到的图像的像素是复数
    G1 = dftMatrix(m)
    G2 = dftMatrix(n)
    img_fft = G1.dot(img).dot(G2)
    img_fft = np.abs(img_fft)  # 取绝对值, 将复数映射到实数
    img_fft = np.log(img_fft)  # 将像素值映射到0~255

    # 将四个象限对调
    return transform(img_fft)

def testFFT(img):
    if 2 == len(img.shape):  # 长度为2说明ff_img已经是灰度图
        pass
    else:
        img = cv.cvtColor(img, cv.COLOR_BGR2GRAY)
    img_orig = deepcopy(img)
    img_fshift = np.fft.fftshift(np.fft.fft2(img))  # 转移像素做幅度普
    img_fft_np = np.log(np.abs(img_fshift))  # 取绝对值,将复数变化成实数,取对数是为了将数据变化到0-255
    img_fft_my = myFFT(deepcopy(img))
    images = [img_orig, img_fft_np, img_fft_my]
    titles = ['原图', 'NumPy傅里叶频谱', '自定义傅里叶频谱']
    for i in range(3):
        plt.subplot(1, 3, i + 1)
        plt.imshow(images[i], cmap='gray')
        plt.title(titles[i])
        plt.xticks([]), plt.yticks([])  # 隐藏X,Y轴
    plt.show()
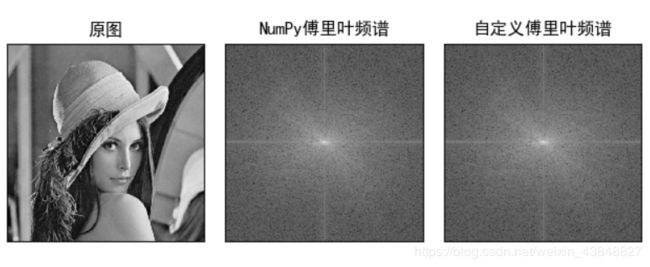
运行结果如下
可以看到两者的结果是非常接近的
我们总结二维离散傅里叶变换的三个步骤:
- 计算加速矩阵 G 1 , G 2 G_1, G_2 G1,G2
- 计算原始傅里叶频谱
- 将原始傅里叶频谱中心化
二维图像卷积
对于矩阵 A n × n A_{n \times n} An×n, 我们定义卷积核 K e r n e l m × m Kernel_{m \times m} Kernelm×m, 那么有
A [ i ] [ j ] = ∑ p r o d u c t A[i][j] = \sum product A[i][j]=∑product
其中 p r o d u c t product product为 A n × n A_{n \times n} An×n和 K e r n e l m × m Kernel_{m \times m} Kernelm×m重合的元素对应的乘积
卷积的过程有如下三步:
- 将卷积核 K e r n e l Kernel Kernel上下翻转
- 对被卷积矩阵 A A A做padding边界填充
- 将 K e r n e l Kernel Kernel作为滑动窗口, 在被卷积矩阵 A A A上滑动, 同时计算卷积结果
算法本身没有什么难点, 问题在于对矩阵索引的选取比较烦, 容易出错.这里直接给出卷积函数.
计算的时候需要注意, 卷积结果不能直接保存在被卷积矩阵 A n × n A_{n \times n} An×n中, A n × n A_{n \times n} An×n的任何元素在卷积过程中不允许任何改动. 所以卷积结果应该保存在另一个新建的矩阵 c o n v o l _ m a t r i x n × n convol\_matrix_{n \times n} convol_matrixn×n 中
所有关键地方都给出了注释, 就不再单独解释了
def myConvol2D(convol_img, kernel, padding_values=0):
    """

    :param convol_img:      被卷积的图像,必须为灰度图
    :param kernel:          卷积核,必须为方阵,且长宽为奇数
    :param padding_values:  边界填充值,默认为0
    :return convol_matrix:  卷积后的矩阵, shape同convol_img
    """
    if 2 != len(convol_img.shape):  # 判断convol_img是否为灰度图
        raise TypeError('wrong shape of parameter img:{}'.format(convol_img.shape))
    elif (kernel.shape[0] != kernel.shape[1]) or (1 != kernel.shape[0] % 2):  # 判断kernel是否为奇数尺寸的方阵
        raise TypeError('wrong shape of parameter kernel:{}'.format(kernel.shape))
    else:
        # 使用原图像的复制矩阵, 避免在处理时改变原图像
        convol_matrix = np.zeros(convol_img.shape, dtype=np.uint8)
        kernel = kernel[::-1]  # 上下翻转卷积核
        kernel_rows_cols = kernel.shape[0]  # 卷积核的尺寸
        pad_num = kernel_rows_cols // 2  # 填充深度
        (convol_matrix_rows, convol_matrix_cols) = convol_matrix.shape  # 原矩阵形状

        padded_convol_img = np.pad(convol_img, ((pad_num, pad_num), (pad_num, pad_num)),
                                      'constant', constant_values=padding_values)  # 边界填充
        # 开始卷积
        for x in range(pad_num, pad_num + convol_matrix_rows):
            for y in range(pad_num, pad_num + convol_matrix_cols):
                # 以下两行选取以padded_convol_img[x][y]为中心,和kernel一样形状的矩阵
                x_filtered_matrix = padded_convol_img[x - pad_num: x - pad_num + kernel_rows_cols]
                x_y_filtered_matrix = x_filtered_matrix[:, y - pad_num: y - pad_num + kernel_rows_cols]

                # np.multiply(a,b)返回矩阵a和矩阵b所有元素的乘积之和
                temp_sum = np.sum(np.multiply(x_y_filtered_matrix, kernel))

                # 防止溢出, 并将像素值数据类型转换为8位无符号整数0~255
                if temp_sum < 0:
                    temp_sum = np.uint8(0)
                elif temp_sum > 255:
                    temp_sum = np.uint8(255)
                else:
                    temp_sum = np.uint8(temp_sum)
                # 将卷积结果存入对应的convol_matrix[x][y]
                convol_matrix[x - pad_num][y - pad_num] = temp_sum

        return convol_matrix


def testConvol2D(img):
    if 2 == len(img.shape):  # 长度为2说明ff_img已经是灰度图
        pass
    else:
        img = cv.cvtColor(img, cv.COLOR_BGR2GRAY)
    kernel = np.array([[-1, -1, -1, -1, -1],
                       [-1, 1, 2, 1, -1],
                       [-1, 2, 4, 2, -1],
                       [-1, 1, 2, 1, -1],
                       [-1, -1, -1, -1, -1]])
    img_orig = deepcopy(img)
    img_con_cv = cv.filter2D(img, -1, kernel)
    img_con_my = myConvol2D(img, kernel)
    images = [img_orig, img_con_my, img_con_cv]
    titles = ['原图', '自定义卷积', 'OpenCV卷积']

    for i in range(3):
        plt.subplot(1, 3, i + 1)
        plt.imshow(images[i], cmap='gray')
        plt.title(titles[i])
        plt.xticks([]), plt.yticks([])  # 隐藏X,Y轴
    plt.show()
运行结果如下, 和OpenCV的API卷积出来的差别在可接受的误差范围内.
Canny边缘检测
canny边缘检测的算法过于复杂, 这里我引用另一博主的文章
整理了他的代码, 如下
def myCanny(img):
    # 先将图片转换成灰度图
    if 2 == len(img.shape):  # 长度为2说明ff_img已经是灰度图
        pass
    else:
        img = cv.cvtColor(img, cv.COLOR_BGR2GRAY)
    sigma1 = sigma2 = 1
    sum = 0
    gaussian = np.zeros([5, 5])
    for i in range(5):
        for j in range(5):
            gaussian[i, j] = math.exp(-1 / 2 * (np.square(i - 3) / np.square(sigma1)  # 生成二维高斯分布矩阵
                                                + (np.square(j - 3) / np.square(sigma2)))) / (
                                         2 * math.pi * sigma1 * sigma2)
            sum = sum + gaussian[i, j]

    gaussian = gaussian / sum

    # step1.高斯滤波
    W, H = img.shape
    new_gray = np.zeros([W - 5, H - 5])
    for i in range(W - 5):
        for j in range(H - 5):
            new_gray[i, j] = np.sum(img[i:i + 5, j:j + 5] * gaussian)  # 与高斯矩阵卷积实现滤波

    # step2.增强 通过求梯度幅值
    W1, H1 = new_gray.shape
    dx = np.zeros([W1 - 1, H1 - 1])
    dy = np.zeros([W1 - 1, H1 - 1])
    d = np.zeros([W1 - 1, H1 - 1])
    for i in range(W1 - 1):
        for j in range(H1 - 1):
            dx[i, j] = new_gray[i, j + 1] - new_gray[i, j]
            dy[i, j] = new_gray[i + 1, j] - new_gray[i, j]
            d[i, j] = np.sqrt(np.square(dx[i, j]) + np.square(dy[i, j]))  # 图像梯度幅值作为图像强度值

    # setp3.非极大值抑制 NMS
    W2, H2 = d.shape
    NMS = np.copy(d)
    NMS[0, :] = NMS[W2 - 1, :] = NMS[:, 0] = NMS[:, H2 - 1] = 0
    for i in range(1, W2 - 1):
        for j in range(1, H2 - 1):
            if d[i, j] == 0:
                NMS[i, j] = 0
            else:
                gradX = dx[i, j]
                gradY = dy[i, j]
                gradTemp = d[i, j]
                # 如果Y方向幅度值较大
                if np.abs(gradY) > np.abs(gradX):
                    weight = np.abs(gradX) / np.abs(gradY)
                    grad2 = d[i - 1, j]
                    grad4 = d[i + 1, j]
                    # 如果x,y方向梯度符号相同
                    if gradX * gradY > 0:
                        grad1 = d[i - 1, j - 1]
                        grad3 = d[i + 1, j + 1]
                    # 如果x,y方向梯度符号相反
                    else:
                        grad1 = d[i - 1, j + 1]
                        grad3 = d[i + 1, j - 1]
                # 如果X方向幅度值较大
                else:
                    weight = np.abs(gradY) / np.abs(gradX)
                    grad2 = d[i, j - 1]
                    grad4 = d[i, j + 1]
                    # 如果x,y方向梯度符号相同
                    if gradX * gradY > 0:
                        grad1 = d[i + 1, j - 1]
                        grad3 = d[i - 1, j + 1]
                    # 如果x,y方向梯度符号相反
                    else:
                        grad1 = d[i - 1, j - 1]
                        grad3 = d[i + 1, j + 1]
                gradTemp1 = weight * grad1 + (1 - weight) * grad2
                gradTemp2 = weight * grad3 + (1 - weight) * grad4
                if gradTemp >= gradTemp1 and gradTemp >= gradTemp2:
                    NMS[i, j] = gradTemp
                else:
                    NMS[i, j] = 0


    # step4. 双阈值算法检测、连接边缘
    W3, H3 = NMS.shape
    DT = np.zeros([W3, H3])
    # 定义高低阈值
    TL = 0.2 * np.max(NMS)
    TH = 0.3 * np.max(NMS)
    for i in range(1, W3 - 1):
        for j in range(1, H3 - 1):
            if (NMS[i, j] < TL):
                DT[i, j] = 0
            elif (NMS[i, j] > TH):
                DT[i, j] = 1
            elif ((NMS[i - 1, j - 1:j + 1] < TH).any() or (NMS[i + 1, j - 1:j + 1]).any()
                  or (NMS[i, [j - 1, j + 1]] < TH).any()):
                DT[i, j] = 1

    return DT

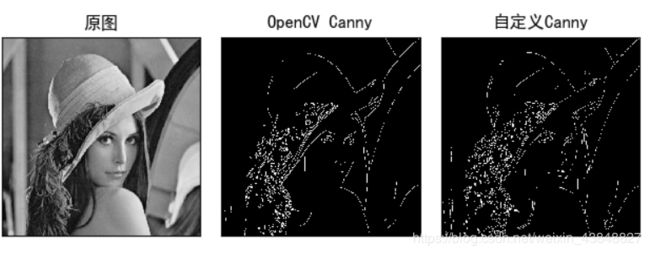
def testCanny(img):
    if 2 == len(img.shape):  # 长度为2说明ff_img已经是灰度图
        pass
    else:
        img = cv.cvtColor(img, cv.COLOR_BGR2GRAY)
    img_orig = deepcopy(img)
    img_canny_cv = cv.Canny(deepcopy(img), 200, 300)
    img_canny_my = myCanny(deepcopy(img))
    images = [img_orig, img_canny_cv, img_canny_my]
    titles = ['原图', 'OpenCV Canny', '自定义Canny']
    for i in range(3):
        plt.subplot(1, 3, i + 1)
        plt.imshow(images[i], cmap='gray')
        plt.title(titles[i], loc='center')
        plt.xticks([]), plt.yticks([])  # 隐藏X,Y轴
    plt.show()
本篇完整代码
完整代码以上传至个人资源, 无需积分, 审核完毕后即可下载


