Spring之IOC和单例、多例
文章目录
- spring之IOC
- 搭建spring框架的过程:
- 第一步
- 第二步
- 第三步
- spring的对象声明
- spring中单例与多例
- 第一种方法
- 第二种方法
spring之IOC
搭建spring框架的过程:
第一步
新建一个Java Project,并建立一个lib文件夹,然后导入spring的jar包

第二步
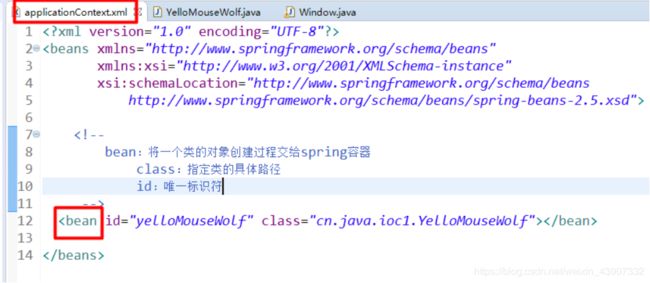
书写主配置文件(applicationContext.xml)
不是必须这个名字,但是规范是这么写,一般大家都会遵守规范。
先建一个class这里叫黄鼠狼
package cn.java.ioc1;
/**
 * @Title:  YellowMouseWolf.java
 * @Package cn.java.ioc1
 * @author: Matthew
 * @date: 2019年3月6日 下午6:00:24
 */

public class YellowMouseWolf {

	public YellowMouseWolf() {
		System.out.println("YellowMouseWolf......一只黄鼠狼出生了");
	}

	public void behavior(){
		System.out.println("偷鸡");
	}
}
然后书写applicationContext.xml一般的默认格式是这样的。
<beans xmlns="http://www.springframework.org/schema/beans"
       xmlns:xsi="http://www.w3.org/2001/XMLSchema-instance"
       xsi:schemaLocation="http://www.springframework.org/schema/beans
           http://www.springframework.org/schema/beans/spring-beans-2.5.xsd">


	<bean id="yellowMouseWolf" class="cn.java.ioc1.YellowMouseWolf">bean>

beans>
第三步
启动框架测试
package cn.java.ioc1;

import org.springframework.context.ApplicationContext;
import org.springframework.context.support.ClassPathXmlApplicationContext;

/**
 * @Title:  Window.java
 * @Package cn.java.ioc1
 * @author: Matthew
 * @date: 2019年3月6日 下午6:01:58
 */

public class Window {

	public static void main(String[] args) {
//		YellowMouseWolf yellow = new YellowMouseWolf();
//		1.启动框架(context代表spring容器)
		ApplicationContext context = new ClassPathXmlApplicationContext("applicationContext.xml");
	}
}
结果为:
YellowMouseWolf…一只黄鼠狼出生了
spring的对象声明
在Window文件下面这样写
YellowMouseWolf yellowMouseWolf1 = (YellowMouseWolf)context.getBean("yellowMouseWolf");
getBean中的值,为bean中的id,id唯一。
调用方法直接用yellowMouseWolf1.behavior就可以了
spring中单例与多例
package cn.java.ioc1;

import org.springframework.context.ApplicationContext;
import org.springframework.context.support.ClassPathXmlApplicationContext;

/**
 * @Title:  Window.java
 * @Package cn.java.ioc1
 * @author: Matthew
 * @date: 2019年3月6日 下午6:01:58
 */

public class Window {

	public static void main(String[] args) {
//		YellowMouseWolf yellow = new YellowMouseWolf();
//		1.启动框架(context代表spring容器)
		ApplicationContext context = new ClassPathXmlApplicationContext("applicationContext.xml");

//		2.获取spring容器中创建的对象(通过id获取)
		YellowMouseWolf yellowMouseWolf1 = (YellowMouseWolf)context.getBean("yellowMouseWolf");
		YellowMouseWolf yellowMouseWolf2 = (YellowMouseWolf)context.getBean("yellowMouseWolf");
//		yellowMouseWolf1.behavior();
		System.out.println(yellowMouseWolf1 == yellowMouseWolf2);


	}
}
结果为true
也就是说spring默认为单例模式,那我们想要多例怎么办尼
有两种方法:
第一种方法
在applicationContext.xml中再加一个bean声明
 	<bean id="yellowMouseWolf" class="cn.java.ioc1.YellowMouseWolf">bean>
	<bean id="yellowMouseWolf222" class="cn.java.ioc1.YellowMouseWolf">bean>
Window.java改写为
	public static void main(String[] args) {
//		YellowMouseWolf yellow = new YellowMouseWolf();
//		1.启动框架(context代表spring容器)
		ApplicationContext context = new ClassPathXmlApplicationContext("applicationContext.xml");

//		2.获取spring容器中创建的对象(通过id获取)
		YellowMouseWolf yellowMouseWolf1 = (YellowMouseWolf)context.getBean("yellowMouseWolf");
		YellowMouseWolf yellowMouseWolf2 = (YellowMouseWolf)context.getBean("yellowMouseWolf222");
//		yellowMouseWolf1.behavior();
		System.out.println(yellowMouseWolf1 == yellowMouseWolf2);


	}
结果为
YellowMouseWolf…一只黄鼠狼出生了
YellowMouseWolf…一只黄鼠狼出生了
false
第二种方法
我们可以在bean中增加一个scope属性,改变scope中的值来改变。
我们新建一个类叫Dog
package cn.java.singleton2;
/**
 * @Title:  Dog.java
 * @Package cn.java.singleton2
 * @author: Matthew
 * @date: 2019年3月6日 下午6:17:13
 */

public class Dog {

	public Dog() {
		System.out.println("一只单身狗诞生了");
	}

	public void behavior(){
		System.out.println("狗会叫");
	}
}
然后在applicationContext中写
<bean id="dog" class="cn.java.singleton2.Dog" scope="prototype">bean>
新建一个Window
package cn.java.singleton2;

import org.springframework.context.ApplicationContext;
import org.springframework.context.support.ClassPathXmlApplicationContext;

/**
 * Description:单例与多例
 * @Title:  Window.java
 * @Package cn.java.ioc1
 * @author: Matthew
 * @date: 2019年3月6日 下午6:01:58
 */

public class Window {

	public static void main(String[] args) {

//		1.启动框架(context代表spring容器)
		ApplicationContext context = new ClassPathXmlApplicationContext("applicationContext.xml");
//		2.获取spring容器中创建的对象(通过id值获得)
		Dog dog1 = (Dog)context.getBean("dog");
		Dog dog2 = (Dog)context.getBean("dog");

		System.out.println(dog1 == dog2);

	}
}
运行结果为:
一只单身狗诞生了
一只单身狗诞生了
false


