Win10安装PyTorch-Geometric包
Win10安装PyTorch-Geometric包
- 太长不看版
- Visual Studio安装
- CUDA安装
- cuDNN组件安装
- *检查环境变量
- 安装Pytorch
- 安装PyG
- 我碰到的一些坑
太长不看版
依次安装以下组件(点击文字到官网)
Visual Studio
CUDA
cuDNN
Pytorch
安装Pytorch-geometric
 把下面命令中的${CUDA}替换为 cpu,cu92,cu100 或 cu101后在cmd中运行
pip install torch-scatter==latest+${CUDA} -f https://pytorch-geometric.com/whl/torch-1.4.0.html
pip install torch-sparse==latest+${CUDA} -f https://pytorch-geometric.com/whl/torch-1.4.0.html
pip install torch-cluster==latest+${CUDA} -f https://pytorch-geometric.com/whl/torch-1.4.0.html
pip install torch-spline-conv==latest+${CUDA} -f https://pytorch-geometric.com/whl/torch-1.4.0.html
pip install torch-geometric
Visual Studio安装
安装VS是为了安装CUDA Visual Studio Integration组件。
https://visualstudio.microsoft.com/zh-hans/vs/
访问微软官网,下载最新Visual Studio(Community版是免费的只要登录微软账号就好)。下载下来的安装包是Visual Studio Installer,安装Visual Studio Installer以后运行,勾选你需要的组件即可(Python开发里包含了Python本体,已经有Python的可以不选)

CUDA安装
https://developer.nvidia.com/rdp/cudnn-archive
访问英伟达官网,选择系统和需要的CUDA版本,Installer Type建议选exe(local)本地安装,然后点Download按钮下载。下载下来以后,按安装程序提示安装,下一步到底就行。

cuDNN组件安装
https://developer.nvidia.com/rdp/cudnn-archive
访问英伟达官网,如果已经加入开发者计划就先登录,再点下载。没有加入开发者计划的,下载前会提醒你加入,按照提示注册英伟达账号、加入开发者就行。

解压下载下来的压缩文件,把bin、include、lib复制到刚才安装的CUDA目录下,默认情况是
C:\Program Files\NVIDIA GPU Computing Toolkit\CUDA\v10.2
*检查环境变量
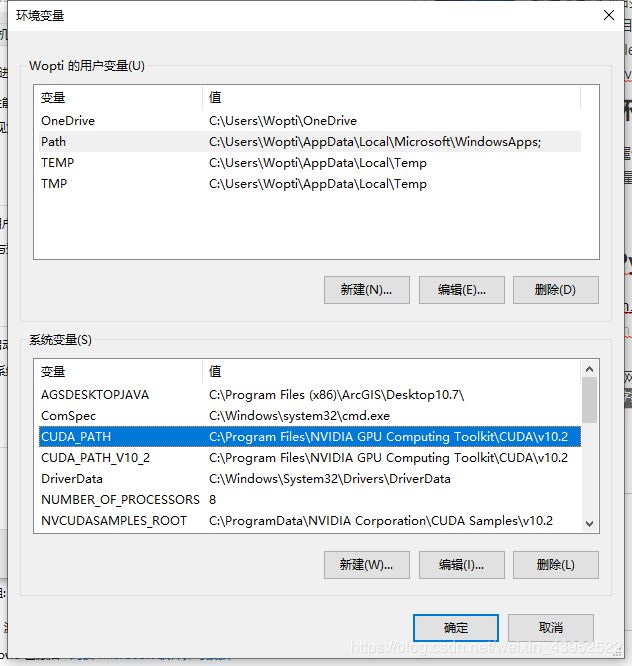
此电脑-右键-属性-高级系统设置-环境变量
看一下系统变量里有没有
CUDA_PATH、CUDA_PATH_V10_2

Path变量点编辑,看看有没有CUDA和python的路径。

没有的话,按照自己的安装来添加。
安装Pytorch
https://pytorch.org/get-started/locally/
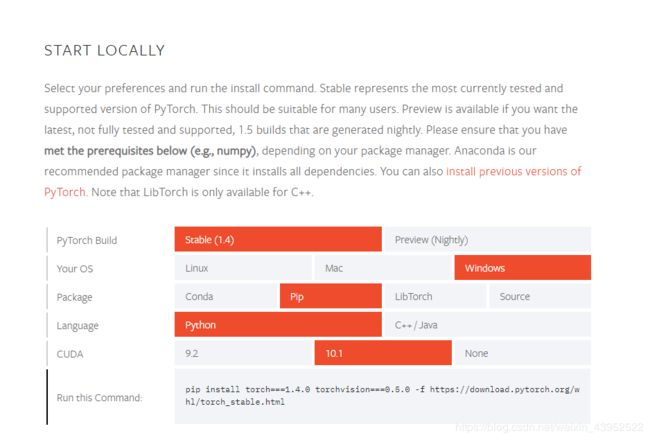
访问Pytoch官网,选择安装版本和方式,然后复制下面自动生成的安装命令。
我选的是最传统的pip安装,CUDA选10.1版本(若选None是CPU版本)。
我安装的时候,Pytorch还只支持CUDA 10.1,但英伟达官网只看到最新的CUDA 10.2下载,我现在使用下来的结果是它们能够兼容。

以管理员身份运行cmd,输入安装命令安装。
pip install torch===1.4.0 torchvision===0.5.0 -f https://download.pytorch.org/whl/torch_stable.html
安装PyG
以管理员身份运行cmd,输入安装命令安装,其中torch-spline-conv是选装的,但文件很小建议安装。
(按照新的官方文档,这里代码已经做了修改)
把下面命令中的${CUDA}替换为 cpu,cu92,cu100 或 cu101,官方还未支持CUDA 10.2,所以我安装cu101,目前用下来没有碰到问题。
pip install torch-scatter==latest+${CUDA} -f https://pytorch-geometric.com/whl/torch-1.4.0.html
pip install torch-sparse==latest+${CUDA} -f https://pytorch-geometric.com/whl/torch-1.4.0.html
pip install torch-cluster==latest+${CUDA} -f https://pytorch-geometric.com/whl/torch-1.4.0.html
pip install torch-spline-conv==latest+${CUDA} -f https://pytorch-geometric.com/whl/torch-1.4.0.html
pip install torch-geometric
我碰到的一些坑
如果按照以上流程安装的话,打开Python,运行以下命令,应该不会报错。
from torch_geometric.nn import GCNConv
ImportError:DLL load failed 是cuDNN没装。
如果CUDA环境有问题,会安装CPU版本,要重装组件。
No module named ‘torch_scatter.scatter_cuda’ 是环境变量没有添加,需要添加环境变量后卸载torch-scatter、torch-sparse重新安装。
如果遇到困难还可以到GitHub上找找,
https://github.com/rusty1s/pytorch_geometric