Linux进程间通信:pipe、fifo、mmap、信号
进程是程序运行资源分配的最小单位。每个进程各自有不同的用户地址空间,任何一个进程的全局变量在另一个进程中都看不到,所以进程之间要交换数据必须通过内核,在内核中开辟一块缓冲区,进程1把数据从用户空间拷到内核缓冲区,进程2再从内核缓冲区把数据读走,内核提供的这种机制称为进程间通信(IPC,Inter-Process Communication)。
1、匿名管道:pipe
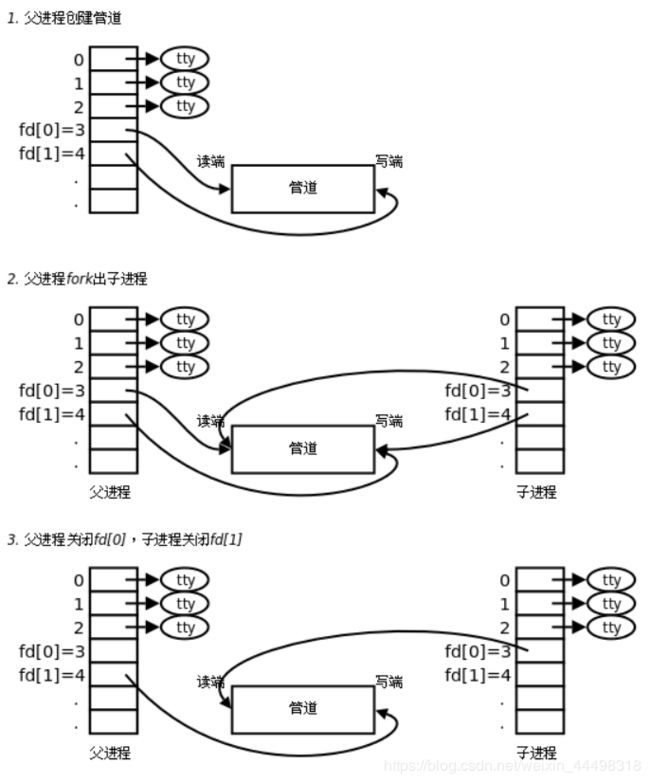
pipe只能用于有血缘关系的进程进行单向通信。调用 pipe 函数时在内核中开辟一块缓冲区(称为管道)用于通信,它有一个读端一个写端,然后通过 fd 参数传出给用户程序两个文件描述符, fd[0] 指向管道的读端, fd[1] 指向管道的写端。支持多端读或多端写,但不支持一端同时读写。看图会更加直观一点:
 看例子:
看例子:
#include 输出结果:
hello world
这是父进程把字符串“hello world”写入到管道,子进程再从管道里面读取出来并且打印到标准输出上面来。
2、命名管道:fifo
FIFO(First In First Out)文件在磁盘上没有数据块,仅仅是内核中一条通道,各进程可以读写从而实现的进程间通信。支持多端读或多端写。
管道创建方式:
命令:mkfifo 管道名
库函数:int mkfifo(const char *pathname, mode_t mode);
分别创建wr.c和rd.c,并且在当前目录下执行命令mkfifo myfifo生成一个fifo文件用于两个进程的通信:
// file: wr.c
#include // file: rd.c
#include 编译成功后打开两个终端进入该目录分别执行对应程序(一个读,一个写),查看运行结果。
3、内存映射:mmap
两个进程(不管有没有血缘关系)通过映射同一个文件到内存中,可以通过str、内存操作来通信。
void *mmap(void *addr, size_t length, int prot, int flags, int fd, off_t offset);
int munmap(void *addr, size_t length);
| 参数 | 作用 |
|---|---|
| addr | 指定位置,映射时通常为NULL, |
| length | 小于、等于文件大小 |
| port | 映射区读写属性:PROT_READ、PROT_WRITE、PROT_READ |
| flags | 为内存的共享属性:MAP_SHARED、MAP_PRIVATE |
| fd | 创建共享内存映射区文件的句柄 |
| offset | 偏移位置,默认0表示全部,必须是4K的整数倍 |
匿名映射:
只能用于血缘关系的进程间通信,例如:
p=(int *)mmap(NULL, 40, PROT_READ|PROT_WRITE, MAP_SHARED| MAP_ANNOYMOUS, -1, 0);
看下mmap的例子,创建mymmapwr.c和mymmaprd.c文件,内容如下:
// file: mymmapwr.c
#include // file: mymmaprd.c
#include 首先执行读端程序./mymmaprd,由于此时写段还没有创建文件,所以会打印出错误信息并退出:
open file: No such file or directory
这时执行./mymmapwr,把需要传递的数据映射到内存中,然后再次执行./mymmaprd可以看到以下输出代表通信成功:
Hello, I'm mmap write function!
4、信号
每个进程收到的所有信号,都是有内核负责发送的,内核处理。可以在控制台输入kill -l命令查看Linux支持的信号:
 1) SIGHUP         2) SIGINT         3) SIGQUIT        4) SIGILL
 5) SIGTRAP        6) SIGABRT        7) SIGBUS         8) SIGFPE
 9) SIGKILL       10) SIGUSR1       11) SIGSEGV       12) SIGUSR2
13) SIGPIPE       14) SIGALRM       15) SIGTERM       17) SIGCHLD
18) SIGCONT       19) SIGSTOP       20) SIGTSTP       21) SIGTTIN
22) SIGTTOU       23) SIGURG        24) SIGXCPU       25) SIGXFSZ
26) SIGVTALRM     27) SIGPROF       28) SIGWINCH      29) SIGIO
30) SIGPWR        31) SIGSYS        34) SIGRTMIN      35) SIGRTMIN+1
36) SIGRTMIN+2    37) SIGRTMIN+3    38) SIGRTMIN+4    39) SIGRTMIN+5
40) SIGRTMIN+6    41) SIGRTMIN+7    42) SIGRTMIN+8    43) SIGRTMIN+9
44) SIGRTMIN+10   45) SIGRTMIN+11   46) SIGRTMIN+12   47) SIGRTMIN+13
48) SIGRTMIN+14   49) SIGRTMIN+15   50) SIGRTMAX-14   51) SIGRTMAX-13
52) SIGRTMAX-12   53) SIGRTMAX-11   54) SIGRTMAX-10   55) SIGRTMAX-9
56) SIGRTMAX-8    57) SIGRTMAX-7    58) SIGRTMAX-6    59) SIGRTMAX-5
60) SIGRTMAX-4    61) SIGRTMAX-3    62) SIGRTMAX-2    63) SIGRTMAX-1
64) SIGRTMAX
发送信号函数
① 发送信号
int kill(pid_t pid, int sig);
| pid取值 | 作用 |
|---|---|
| pid > 0 | 指定进程 |
| pid = 0 | 与调用kill函数进程数与同组的所有进程 |
| pid < -1 | 取pid绝对值对应的进程组 |
| pid = -1 | 发送给进程有权限发送的系统中所有进程 |
② 定时器
unsigned int alarm(unsigned int seconds);
每个进程有唯一一个定时器,设置时间,返回的是上一次设置定时的剩余时间值,时间值被新值代替,到时内核发送SIGALRM给当前进程。SIGALRM的默认动作是终止进程,如果相捕捉该信号可以在alarm之前注册信号捕捉函数。
alarm(0);	//取消闹钟。
int getitimer(int which, struct itimerval *curr_value);
int setitimer(int which, const struct itimerval *new_value,
			  struct itimerval *old_value);	// 精度更高us
which设置定时模式:
	ITIMER_REAL:自然计时			->	SIGALRM
	ITIMER_VIRTUAL:用户空间计时	    ->	SIGVTALRM
	ITIMER_PROF:内核 + 用户空间计时	->	SIGPROF

struct itimerval {
	struct timeval it_interval; /* Interval for periodic timer */
	struct timeval it_value;    /* Time until next expiration */
};

struct timeval {
	time_t      tv_sec;         /* seconds */
	suseconds_t tv_usec;        /* microseconds */
};
③ 其他发送信号函数
int raise(int sig);
给自己发信号:raise(signo); 等价于 kill(getpid(), signo);
void abort(void);
调用raise(SIGABRT);使程序异常终止,可以在信号处理函数里面做清理工作,但是如果在信号处理函数里面不退出进程,调用结束后也会结束进程,并且向主机环境发送一个异常终止的通知。
int pause(void);
调用该函数会使该进程挂起直至捕捉到一个信号。执行完信号处理函数pause才返回-1并且设置error为EINTER。
④ 注册信号处理函数signal
typedef void (*sighandler_t)(int);
sighandler_t signal(int signum, sighandler_t handler);
例如以下程序,当程序运行时接收到SIGINT信号时执行sig_catch函数:
#include 程序执行时进入循环,我们在键盘上同时按下Ctrl+c向它发送信号(SIGINT),此时程序捕捉到该信号并且已经打印出来了。但是发现并不能像以前一样按下这两个键就可以把程序杀掉,这是因为这个信号的默认关闭程序行为已经被我们改变了,此时可以按下Ctrl+z关闭该进程。运行结果如下:
book@book:~$ ./sigal
^Ccatch you!! 2
^Ccatch you!! 2
^Ccatch you!! 2
^Z
[1]+  Stopped                 ./sigal
book@book:~$
⑤ 注册信号处理函数sigaction
int sigaction(int signum, const struct sigaction *act, struct sigaction *oldact);
其中sigaction定义如下:
struct sigaction {
	void (*sa_handler)(int);
	void (*sa_sigaction)(int, siginfo_t *, void *);
	sigset_t sa_mask;
	int sa_flags;
	void (*sa_restorer)(void);
};
例如:
#include 程序操作与sigal的方式一样,实现的是同一个功能,但是sigaction可以设置屏蔽信号与属性,比sigal信号接口更加健壮。
除了以上几种方式之外,进程通信还可以使用文件的方式,打开的文件是内核中的一块缓冲区,多个无血缘关系的进程可以同时访问。