Spring Boot--配置文件 yml/properties 详解
前言
个人博客: https://aaatao66.github.io/
掘金: https://juejin.im/user/5d187331f265da1bc5527953
我以前都是在前两个上面更新,第一是个人博客,第二是掘金,第三才用的 csdn
开发环境:
- win10
- jdk1.8
- idea2019
- maven 3.2.5
- Spring Boot v2.1.5.RELEASE (版本)
1. yml文件的语法概览:
person:
  lastNAME: carson
  age: 18
  boss: true
  birth: 1234/12/12
  #map写法: {k: v,k2: v2}
  maps: {k1: v1,k2: v2}
  #数组写法:  -值
  lists:
    - lisi
    - zhangsan
    - wangwu
    - zhaoliu
  dog:
    name: 小狗
    age: 3

spring:
   mvc:
     view:
       prefix: /WEB-INF/views/
       suffix: .jsp
   datasource:
     url: jdbc:mysql:///ssm
     username: root
     password: root
     driver-class-name: com.mysql.jdbc.Driver
   jpa:
     hibernate:
       ddl-auto: update

server:
  port: 9090
2. @Value获取值和 @ConfigurationProperties获取值比较
| @ConfigurationProperties | @Value | |
|---|---|---|
| 功能 | 批量注入配置文件中的属性 | 一个个指定 |
| 松散绑定(松散语法)大小写 | 支持 | 不支持 |
| SpEL表达式 | 不支持 | 支持 |
| JSR303数据校验 | 支持 | 不支持 |
| 复杂类型封装 | 支持 | 不支持 |
这两种方式都能获取值:
- 如果,我们只是在某个业务逻辑中需要获取一下配置文件中的某项值,使用@Value
- 如果,我们专门编写了一个javaBean来和配置文件进行映射;@ConfigurationProperties
@Validated
@Value
@Getter@Setter
@ToString
@Component
//@ConfigurationProperties (prefix = "person")
@Validated // 来校验数据,如果数据异常则会统一抛出异常,方便异常中心统一处理。
public class Person {

    // @Email
    @Value("${person.lastNAME}")
    private String lastNAME;
    @Value("#{3*3}")
    private Integer age;
    private Boolean boss;
    private Date birth;
    private Map<String,Object> maps;
    private List<Object> lists;

    private Dog dog;
}
3. @PropertySource&@ImportResource
因为 @ConfigurationProperties 是全局注解,如果想指定的话
- @PropertySource:可以指定某个文件 @PropertySource("classpath: xxx.properties)
@ImportResource: 导入Spring配置文件,让配置文件里面的内容生效
- 创建一个HelloService 类
- 如果没有注解情况下
<beans xmlns="http://www.springframework.org/schema/beans"
       xmlns:xsi="http://www.w3.org/2001/XMLSchema-instance"
       xsi:schemaLocation="http://www.springframework.org/schema/beans http://www.springframework.org/schema/beans/spring-beans.xsd">

    <bean id="helloService" class="com.carson.springboot.service.impl.HelloService">bean>
beans>
	 @Autowired
    ApplicationContext ioc;

    @Test
    public void testHelloService(){
        // 是否是包含 这个 bean
        boolean b = ioc.containsBean("helloService");
        System.out.println(b);//false
    }
false 说明Spring Boot 里面没有Spring的配置文件,我们自己编写的配置文件,也不能自动识别
如果想让Spring的配置文件生效,加载进来; 就 把@ImportResource标注在一个配置类上
- 主类
@ImportResource(locations = {"classpath:beans.xml"})
@SpringBootApplication
public class SpringbootApplication {

    public static void main(String[] args) {
        SpringApplication.run(SpringbootApplication.class, args);
    }

}
	 @Autowired
    ApplicationContext ioc;

    @Test
    public void testHelloService(){
        // 是否是包含 这个 bean
        boolean b = ioc.containsBean("helloService");
        System.out.println(b);//true
    }
SpringBoot推荐给容器中添加组件的方式:
使用 @Bean
- 1, 配置类======Spring配置文件
- 建一个包 config,专门放配置类:MyAppConfig
/**
* @Configuration: 指明当前类是一个配置类;就是来代替之前的Spring配置文件
*
* 以前配置文件总 用 记得把之前主类的@ImportResource注解 去掉!
输出结果:

  .   ____          _            __ _ _
 /\\ / ___'_ __ _ _(_)_ __  __ _ \ \ \ \
( ( )\___ | '_ | '_| | '_ \/ _` | \ \ \ \
 \\/  ___)| |_)| | | | | || (_| |  ) ) ) )
  '  |____| .__|_| |_|_| |_\__, | / / / /
 =========|_|==============|___/=/_/_/_/
 :: Spring Boot ::        (v2.1.5.RELEASE)

2019-06-29 16:53:48.081  INFO 11084 --- [           main] c.c.s.SpringbootApplicationTests         : Starting SpringbootApplicationTests on DESKTOP-JBSD6AK with PID 11084 (started by My in F:\code\springboot)
2019-06-29 16:53:48.083  INFO 11084 --- [           main] c.c.s.SpringbootApplicationTests         : No active profile set, falling back to default profiles: default
2019-06-29 16:53:52.689  INFO 11084 --- [           main] o.s.s.concurrent.ThreadPoolTaskExecutor  : Initializing ExecutorService 'applicationTaskExecutor'
2019-06-29 16:53:53.988  INFO 11084 --- [           main] c.c.s.SpringbootApplicationTests         : Started SpringbootApplicationTests in 7.259 seconds (JVM running for 10.759)
true
2019-06-29 16:53:54.433  INFO 11084 --- [       Thread-3] o.s.s.concurrent.ThreadPoolTaskExecutor  : Shutting down ExecutorService 'applicationTaskExecutor'
也是 true
4. 配置文件里的 ${}
random随机数
${random.value}
${random.int}
${random.long}
${random.int(10)}
${random.int[1024,65536]}
${} 获取 之前配置的值
person:
  lastNAME: bob${random.uuid}
  age: ${random.int}
  boss: true
  birth: 1234/12/12
  maps: {k1: v1,k2: v2}
  lists:
    - lisi
    - zhangsan
    - wangwu
    - zhaoliu
  dog:
    name: ${person.lastNAME}_dog
    age: 3
如果
  dog:
name: ${person.lastNAME}_dog
如果lastNAME没有的话, 那就
  dog:
name: ${person.lastNAME:hello}_dog
5. Profile
5.1 多个Profile 文件
Profile是Spring对不同环境提供不同配置功能的支持,可以通过指定参数等方式快速切换环境
比如我配置3个端口,一个默认的,一个dev(开发),一个prod(测试)
主配置文件名可以是 application.yml/application.properties
默认使用application.yml的配置;
5.2 yml的多文档块
以 — 分隔 文档快
spring:
  profiles:
    active: dev

server:
  port: 9090
---

server:
  port: 9091
spring:
  profiles: dev
---

server:
  port: 9092
spring:
  profiles: prod
- active:是指定哪个文档快
- profiles: 指定一个名称,让active识别的
5.3 激活指定profile
1, 在配置文件中指定 spring.profiles.active=dev
2, 命令行:
idea功能栏中的 run > edit > program arguments 添加上
–spring.profiles.active=prod
–spring.profiles.active=dev
3,cmd中 将 项目打成 jar包
java -jar (jar包名) --spring.profiles.active=prod
4, 虚拟机 参数:
idea功能栏中的 run > edit >VM options 添加上
-Dspring.profiles.active=prod/dev
6.Spring Boot配置文件的加载位置
Spring Boot 启动会扫描以下位置的application.yml或application.properties文件作为默认配置文件
- file: ./config/
- file: ./
- classpath: ./config/
- classpath: /
以上是按照优先级从高到低的顺序,所有的配置文件都会被加载,高优先级配置会覆盖 低优先级配置
file : 跟src平级的目录
classpath: resources目录下的
我们也可以通过配置spring.config.location来改变默认配置文件位置:
1.将项目打包
2.命令行格式: java -jar 包名 --spring.config.location= F:/app/application.properties(配置文件绝对路径)
项目打包之后可能后来会需要修改一些配置,就可以使用这种方式,并且旧配置还会存在,新配置也会应用上
7.外部配置加载顺序
SpringBoot也可以从以下位置加载配置,优先级从高到低,高优先级覆盖低优先级,如果有不同的配置,就会形成互补
-
命令行参数
java -jar xxx.jar --server.port=8081 --xxx
多个配置用空格分开: --xxx --xxx
-
来自java:comp/env的NDI属性
-
Java系统属性(System.getProperties())
-
操作系统环境变量
-
RandomValuePropertySource配置的random.*属性值
由jar包外向jar包内进行寻找:
优先加载带profile的
- jar包"外"部的application-{profile}.properties或application.yml(带spring.profile)的配置文件
- jar包’‘内’'部的application-{profile}.properties或application.yml(带spring.profile)的配置文件
再来加载不带profile的
- jar包’‘外’'部的application.properties或application.yml(不带spring.profile)的配置文件
- jar包’‘内’'部的application.properties或application.yml(不带spring.profile)的配置文件
还有其他的:
- @Configuration注解类上的@PropertySource
- 通过SrpingApplication.setDefaultProperties指定默认属性
详情参考官网文档的第 24章
8.自动配置原理(重点)
自动配置到底能些什么?怎么写?自动配置原理:
文档地址
这里面说明了都有哪些配置项
其实:
- 1.SpringBoot启动会加载大量的自动配置类
- 2.我们看我们需要的功能有没有SpringBoot默认写好的自动配置类
- 3.我们再来看这个自动配置类到底配置了哪些组件(只要我们要用的组件有,我们就不需要再来配置了)
- 4.给容器中自动配置类添加组建的时候,会从properties类中获取某些属性,我们就可以在配置文件中指定这些属性的值
xxxxAutoConfigurartion: 自动配置类;
给容器中添加组件
xxxxProperties:封装配置文件中相关属性;
技巧:
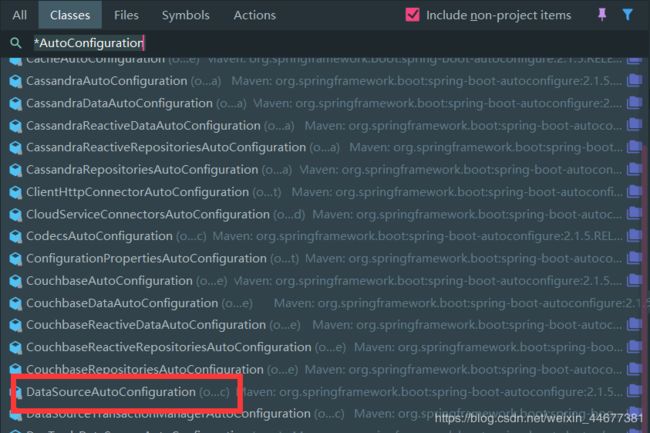
idea双击Shift,搜索 *AutoConfiguration
点开缓存相关的自动配置
我们将会看到以下源码:
@EnableConfigurationProperties({CacheProperties.class})
@AutoConfigureAfter({CouchbaseAutoConfiguration.class, HazelcastAutoConfiguration.class, HibernateJpaAutoConfiguration.class, RedisAutoConfiguration.class})
@Import({CacheAutoConfiguration.CacheConfigurationImportSelector.class})
public class CacheAutoConfiguration {
    public CacheAutoConfiguration() {
    }
ctrl+鼠标左键点击:
@EnableConfigurationProperties({CacheProperties.class})
//点击 CacheProperties
我们会看到在CacheProperties类上:
@ConfigurationProperties(
    prefix = "spring.cache"
)
public class CacheProperties {
prefix = “spring.cache” : 就是在yml/properties配置文件的语法前缀
至于能配置哪些具体东西?
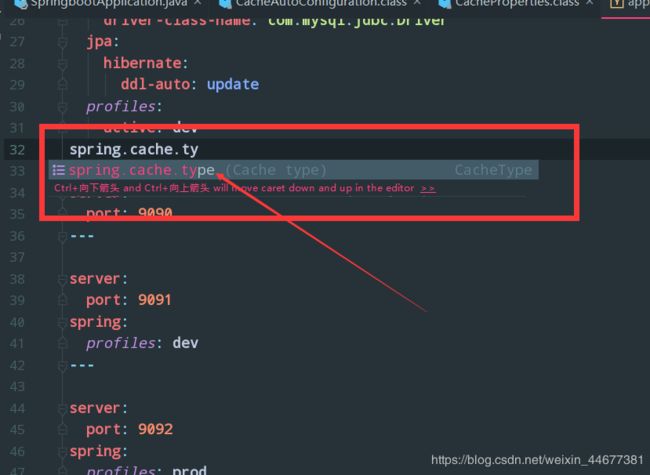
或者你可以利用idea的代码提示在配置文件里,比如我调用 第一个getType
这就是通过源码的方式,来了解到我们可以在配置文件里配置什么东西
我看到了我们的需要的字段,以及下面很多的方法(这里就不截图了)
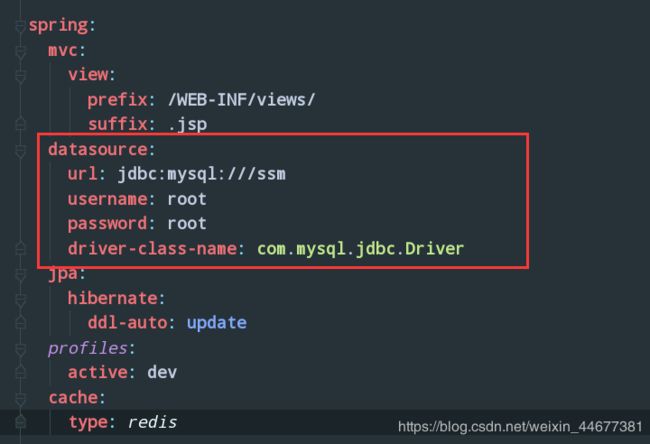
接下来就是到配置文件配置了:
9.细节
@Conditional派生注解
我发现源码中有很多的 @ConditionalOn***
它其实就是利用Spring底层的 @Conditional注解

作用: 必须是 @Conditional 指定的条件成立,才给容器中添加组件,配置类里面的内容才会生效,如果返回false那么,你配的东西都不会生效的
SpringBoot 扩展了 @Conditional注解 比如:
所以其实自动配置类必须在一定的条件下才能生效
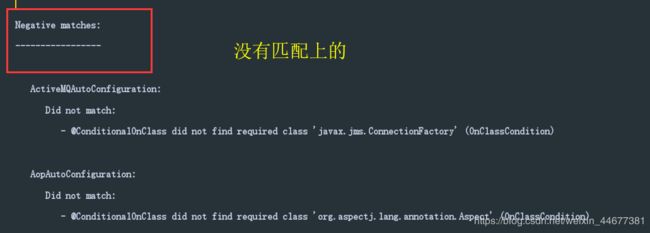
我们该怎么知道哪些类生效哪些没生效呢?很简单,在配置文件里添加:
debug: true
然后运行我们的朱类:
我们会看到:
还有:
我发现源码中有很多的 @ConditionalOn***
它其实就是利用Spring底层的 @Conditional注解
[外链图片转存中…(img-uEWKzajm-1564571450083)]
作用: 必须是 @Conditional 指定的条件成立,才给容器中添加组件,配置类里面的内容才会生效,如果返回false那么,你配的东西都不会生效的
SpringBoot 扩展了 @Conditional注解 比如:
[外链图片转存中…(img-VHIt07l3-1564571450084)]
所以其实自动配置类必须在一定的条件下才能生效
我们该怎么知道哪些类生效哪些没生效呢?很简单,在配置文件里添加:
debug: true
然后运行我们的朱类:
我们会看到:
[外链图片转存中…(img-w8OUh247-1564571450086)]
还有:
[外链图片转存中…(img-MXZNqwSo-1564571450087)]
都会在控制台打印输出


