基于K210的MNIST手写数字识别
基于K210的MNIST手写数字识别
硬件平台
采用Maixduino开发板
在sipeed官方有售
软件平台
使用MaixPy环境进行单片机的编程
官方资源可在这里下载 链接: link.
安装方法在这里先不进行赘述
开发平台
操作系统:macOS系统
模型训练:tensorflow2.1 CPU版
模型转换工具:NNCase v0.2.0 Beta2
nncase下载地址:链接: Github.
让我们开始吧~!
1、配置模型开发环境
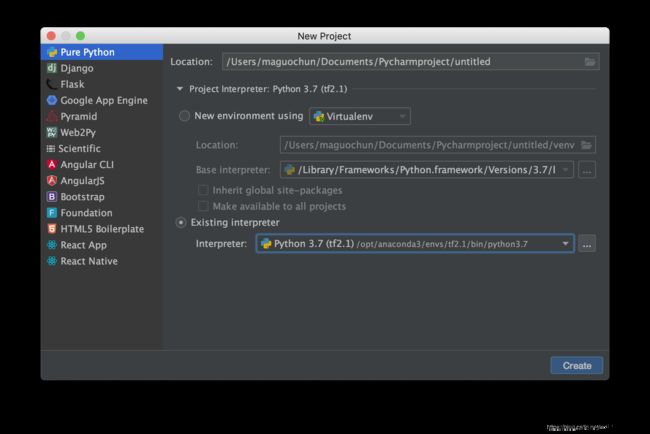
打开终端进入anoconda 使用conda create 命令新建虚拟环境
conda create -n tf2.1 python=3.7
激活虚拟环境
conda activate tf2.1
下载安装tensorflow
pip install tensorflow -i https://pypi.doubanio.com/simple/
测试一下吧~~
import tensorflow as tf
print(tf.__version__)
如果输出了正确的版本号就代表成功啦!!
2、模型的建立与训练
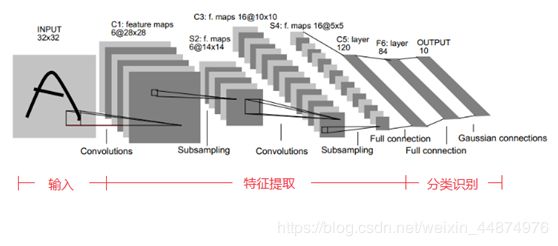
本次使用的深度学习的方法去识别手写的数字,这里采用LeNet5卷积神经网络进行模型的搭建。
首先什么是LeNet5呢,这张图很好的说明了网络的架构。简单来讲这个网络包含了两个卷积,池化层 和两个全连接层。

在模型的搭建时有一点需要注意,k210的kpu 最好使用1x1、3x3的卷积核,这样效率比较高。因此根据情况在代码中做调整即可。
具体代码如下:
import tensorflow as tf
import matplotlib.pyplot as plt
import numpy as np
import datetime
print(tf.__version__)

mnist = tf.keras.datasets.mnist
(x_train,y_train),(x_test,y_test) = mnist.load_data()
print(x_train.shape, y_train.shape)
print(x_test.shape, y_test.shape)

image_index = 1
print(y_train[image_index])
plt.imshow(x_train[image_index])
plt.show()

x_train = np.pad(x_train,((0,0),(2,2),(2,2)),'constant',constant_values=0)
x_test = np.pad(x_test,((0,0),(2,2),(2,2)),'constant',constant_values=0)
print(x_train.shape)
print(x_test.shape)

x_train = x_train.astype('float32')

x_train = x_train/255
x_test = x_test/255

x_train = x_train.reshape(x_train.shape[0],32,32,1)
x_test = x_test.reshape(x_test.shape[0],32,32,1)
print(x_train.shape)
print(x_test.shape)

model =  tf.keras.models.Sequential([
    tf.keras.layers.Conv2D(filters = 6, kernel_size = (3,3), padding = 'valid', activation = tf.nn.relu, input_shape = (32,32,1)),
    tf.keras.layers.AveragePooling2D(pool_size = (2,2), strides = (2,2), padding = 'same'),
    tf.keras.layers.Conv2D(filters = 16, kernel_size = (3,3), padding = 'valid', activation = tf.nn.relu),
    tf.keras.layers.AveragePooling2D(pool_size = (2,2), strides = (2,2), padding = 'same'),
    tf.keras.layers.Flatten(),
    tf.keras.layers.Dense(units = 120, activation = tf.nn.relu),
    tf.keras.layers.Dense(units = 84, activation = tf.nn.relu),
    tf.keras.layers.Dense(units = 10, activation = tf.nn.softmax)
])
model.summary()
#超参数设置
num_epochs = 2#这里规定训练的次数 请自行更改,为了演示设为很小2
batch_size = 64
learning_rate = 0.001

#优化器
adam_optimizer = tf.keras.optimizers.Adam(learning_rate)

model.compile(optimizer = adam_optimizer,
              loss = tf.keras.losses.sparse_categorical_crossentropy,
              metrics = ['accuracy'])

start_time = datetime.datetime.now()

model.fit(x = x_train,
          y = y_train,
          batch_size = batch_size,
          epochs = num_epochs)

end_time = datetime.datetime.now()
time_cost = end_time - start_time
print("time cost = ",time_cost)
#保存模型
model.save('mnist_lenet_model.h5')


#评估指标
print(model.evaluate(x_test,y_test))

#预测
image_index = 6666
print(x_test[image_index].shape)

plt.imshow(x_test[image_index].reshape(32,32))
plt.show()
pred = model.predict(x_test[image_index].reshape(1,32,32,1))


print(pred)
print(pred.argmax())
#to tflite
converter = tf.lite.TFLiteConverter.from_keras_model(model)
converter.experimental_new_converter = True

tflite_model = converter.convert()

open('model_tflite.tflite', 'wb').write(tflite_model)
代码中num_epochs 根据情况修改训练次数。
代码最后to tflite部分可以不要。
如果训练成功,会保存一个h5的模型文件。
3、模型的转换
因为k210单片机并不能识别tensorflow的模型,因此需要转换。
大致的流程是这样的。
h5–>pb–>tflite–>kmodel
首先需要下载工具Maix_Toolbox链链接: Github.
因为本次使用tf2版本 需要手动将ncc文件夹下的文件替换为最新的nncase(本次使用的是NNCase v0.2.0 Beta2)
生成pb文件
采用tensorflow2.0 直接转换为pb文件
import tensorflow as tf
import tensorflow.compat.v1 as tf1

tf1.reset_default_graph()
tf1.keras.backend.set_learning_phase(0)  # 调用模型前一定要执行该命令
tf1.disable_v2_behavior()  # 禁止tensorflow2.0的行为
# 加载hdf5模型
hdf5_pb_model = tf.keras.models.load_model("mnist_lenet_model.h5")


def freeze_session(session, keep_var_names=None, output_names=None, clear_devices=True):
    graph = session.graph
    with graph.as_default():
        #         freeze_var_names = list(set(v.op.name for v in tf1.global_variables()).difference(keep_var_names or []))
        output_names = output_names or []
        #         output_names += [v.op.name for v in tf1.global_variables()]
        print("output_names", output_names)
        input_graph_def = graph.as_graph_def()
        #         for node in input_graph_def.node:
        #             print('node:', node.name)
        print("len node1", len(input_graph_def.node))
        if clear_devices:
            for node in input_graph_def.node:
                node.device = ""
        frozen_graph = tf1.graph_util.convert_variables_to_constants(session, input_graph_def,
                                                                     output_names)

        outgraph = tf1.graph_util.remove_training_nodes(frozen_graph)  # 云掉与推理无关的内容
        print("##################################################################")
        for node in outgraph.node:
            print('node:', node.name)
        print("len node1", len(outgraph.node))
        return outgraph


frozen_graph = freeze_session(tf1.keras.backend.get_session(),
                              output_names=[out.op.name for out in hdf5_pb_model.outputs])
tf1.train.write_graph(frozen_graph, '', "hdf52pb.pb", as_text=False)
最终在目录中生成了名为hdf52pb的pb文件。将它拷贝到Maix_Toolbox/workspace下。
配置Maix_Toolbox的环境
Maix_Toolbox需要依靠tensorflow环境来实现一些功能,但是2.0版本对于它来说太新了,因此首先创建基于tensorflow1.15的虚拟环境,具体步骤和之前一样,注意下载时加上版本号(否则会默认下载最新版本)。
使用工具箱
进入tf1.15的虚拟环境,并cd到Maix_Toolbox路径下,输入如下指令查看计算图。
./gen_pb_graph.py workspace/hdf52pb.pb

注意找到计算图的输入与输出,这里输入是conv2d_input, 输出是dense_2/Softmax。
转换为tflite文件
./pb2tflite.sh
根据提示依次输入对应内容即可,最终会自动生成需要的指令,并自动生成tflite文件。
最后转换为kmodel模型
首先需要准备训练集并保存到toolbox的images目录下,由于训练时使用的mnist不是图片格式,可以使用如下代码生成图片。
import tensorflow as tf
import numpy as np
from PIL import Image
import matplotlib.pyplot as plt
import scipy.misc
import os
#from tensorflow.examples.tutorials.mnist import input_data
#mnist = input_data.read_data_sets("MNIST_data/", one_hot=True) #MNIST数据输入
mnist = tf.keras.datasets.mnist
(x_train,y_train),(x_test,y_test) = mnist.load_data()
print(x_train.shape)
x_train = np.pad(x_train,((0,0),(2,2),(2,2)),'constant',constant_values=0)
x_train = x_train/255
print(x_train.shape)
#plt.imshow(x_train[1])
#plt.show()
save_dir = './images/'
if os.path.exists(save_dir) is False:
    os.makedirs(save_dir)
for i in range(1000):
    #image = mnist.train.images[i,:]
    image = x_train[i]
    #image = image.reshape(32,32)
    file = save_dir+'mnist_train_%d.jpg' % i
    Image.fromarray((image*255).astype('uint8'), mode='L').convert('L').save(file)
    #scipy.misc.toimage(image,cmin=0.0,cmax=1.0).save(file)
复制所有图片到toolbox下的images文件夹下。运行以下指令
./ncc/ncc compile workspace/hdf52pb.tflite workspace/test1.kmodel -i tflite -o kmodel -t k210 --dataset images --dump-ir --max-allocator-solve-secs 60 --calibrate-method l2 -v
我们可以看到最终的转换结果 和模型的大小
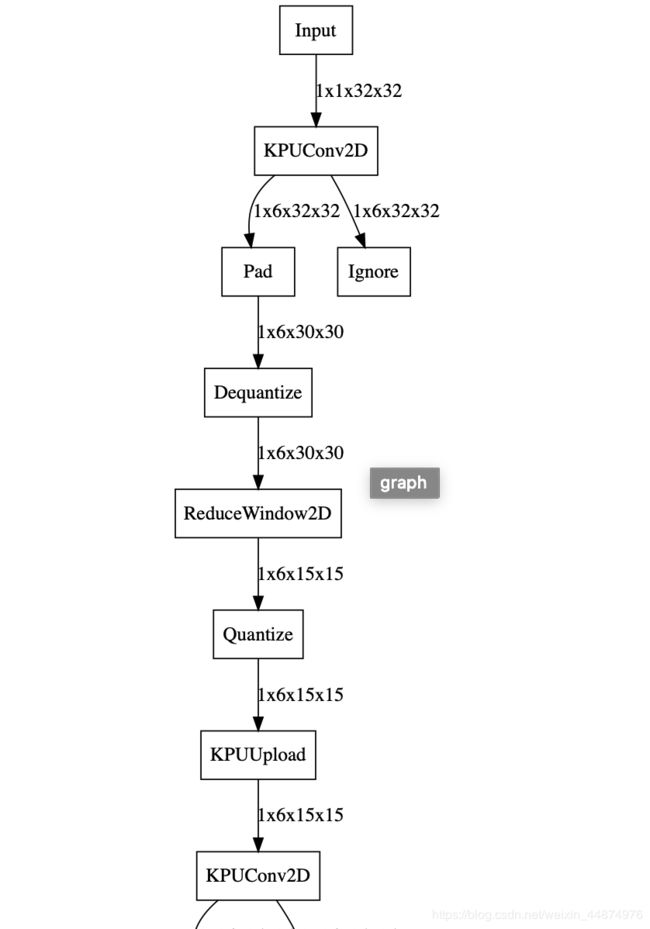
查看新的计算图可以使用链接: GraphvizOnline.

4、下载模型到k210
使用kflash_gui工具把kmodel模型下载到k210的flash中(注意选好地址本次使用0x300000)
如果maixpy的固件过大,调整地址,避免重叠。

5、编写单片机程序
打开maixpy IDE
import sensor,lcd,image
import KPU as kpu
lcd.init()
sensor.reset()
sensor.set_pixformat(sensor.RGB565)
sensor.set_framesize(sensor.QVGA)
sensor.set_windowing((224, 224))	#set to 224x224 input
sensor.set_hmirror(0)				#flip camera
task = kpu.load(0x300000)			#load model from flash address 0x200000
a=kpu.set_outputs(task, 0, 10,1,1)
sensor.run(1)
while True:
    img = sensor.snapshot()
    lcd.display(img,oft=(0,0))		#display large picture
    img1=img.to_grayscale(1)		#convert to gray
    img2=img1.resize(32,32)			#resize to mnist input 32x32
    a=img2.invert()					#invert picture as mnist need
    a=img2.strech_char(1)			#preprocessing pictures, eliminate dark corner
    lcd.display(img2,oft=(240,32))	#display small 32x32 picture
    a=img2.pix_to_ai();				#generate data for ai
    fmap=kpu.forward(task,img2)		#run neural network model
    plist=fmap[:]					#get result (10 digit's probability)
    pmax=max(plist)					#get max probability
    max_index=plist.index(pmax)		#get the digit
    lcd.draw_string(224,0,"%d: %.3f"%(max_index,pmax),lcd.WHITE,lcd.BLACK)
调试运行 最终下载到k210
实验结果!
成功!!可以修改训练方法增强准确率。


