python爬虫基础
欠下的帐,总有一天是要还的
在学python爬虫之前,先学习一下python的多线程
参考自
https://www.runoob.com/python/python-multithreading.html
首先调用线程,代码如下:
import thread
import time

def printf(threadname,delay):
    i=1
    while(i<10):
        print threadname
        print "this is the "+str(i)+"th"
        i+=1
    time.sleep(delay)

try:
    thread.start_new_thread(printf,("thread-1",2))
    thread.start_new_thread(printf,("thread-2",4))
except:
    print "error!"
关于线程有以下几个函数:
run(): 用以表示线程活动的方法。
start():启动线程活动。
join([time]): 等待至线程中止。这阻塞调用线程直至线程的join() 方法被调用中止-正常退出或者抛出未处理的异常-或者是可选的超时发生。
isAlive(): 返回线程是否活动的。
getName(): 返回线程名。
setName(): 设置线程名。
这里就看一下run和start的使用方法:
import threading
import time

Exit=0
class Thread(threading.Thread):#继承父类threading.Thread
    def _init_(self):
        threading.Thread._init_(self)

    def run(self):#run里写要执行的代码,线程开启后会自行调用
        print "thread start"
        thread_print()

def thread_print():
    i=0
    if  Exit:
        print "thread stop!"
        exit()
    else:
        while i<10:
            print "print something the "+str(i)+"th"
            i+=1


thread1=Thread()#创建新线程
thread2=Thread()

thread1.start()#开启线程
thread2.start()
好了,重头戏
线程同步
使用Thread对象的Lock和RLock可以实现简单的线程同步,这两个对象都有acquire方法和release方法,话不多说,看代码
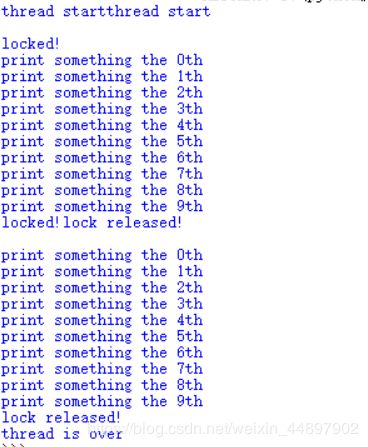
这是不加锁时的执行结果:

import threading
import time

Exit=0
class Thread(threading.Thread):#继承父类threading.Thread
    def _init_(self):
        threading.Thread._init_(self)

    def run(self):
        print "thread start"
        threadLock.acquire()#获得锁
        print "locked!"
        thread_print()
        threadLock.release()#释放锁
        print "lock released!"
def thread_print():
    i=0
    if  Exit:
        print "thread stop!"
        exit()
    else:
        while i<10:
            print "print something the "+str(i)+"th"
            i+=1


thread1=Thread()
thread2=Thread()

thread1.start()
thread2.start()

threadLock=threading.Lock()#在java里应该是实例化
threads=[]

threads.append(thread1)
threads.append(thread2)


for i in threads:
    i.join()
print "thread is over"
好,开始python爬虫
网上教爬虫的挺多的,也挺全的,我就记录一下自己写的吧
标题1.爬取京东电脑价格
import requests
from bs4 import BeautifulSoup
import re


for page_id in range(1,99):
    url="https://search.jd.com/Search?keyword=%E7%94%B5%E8%84%91&enc=utf-8&qrst=1&rt=1&stop=1&vt=1&wq=%E7%94%B5%E8%84%91&page="+str(page_id)+"&s=241&click=0"
    headers={
    'User-Agent' : 'Mozilla/5.0 (Windows NT 10.0; Win64; x64; rv:68.0) Gecko/20100101 Firefox/68.0'
    }
    r=requests.get(url,headers=headers)
    print r.status_code
    content=r.text
    #print content
    soup=BeautifulSoup(content,'lxml')
    all_1=soup.find_all('li',attrs={'class':'gl-item'})
    all_2=soup.find_all('li',attrs={'class':'gl-item gl-item-presell'})
    all_item=all_1+all_2
    for i in all_item:
        price=i.find('div', attrs={'class':'p-price'}).find('i').text
        print price
标题2.爬取百度图片:
在爬取图片之前,得先了解一下lxml包
lxml.etree.HTML(text) 解析HTML文档
其中xpath和cssselect 是重点,用于获取文字和属性,功能类似与正则匹配或者beautifulsoup的find函数
例如:有一段html代码如下:
<html>
<body>
<div>
<p>there are somrthingp>
<table>
<tr>
<td>something1td>
<td>something1td>
tr>
<tr>
<td>something2td>
<td>something2td>
tr>
table>
div>
body>
html>
提取table标签,可用xpath
from lxml.html import fromstring,tostring,etree#引用fromstring和tostring是为了之后输出转成字符串

html='''


there are somrthing


something1
something1


something2
something2


'''
html_text=etree.HTML(html)
content=html_text.xpath('//div/table')[0]
content=tostring(content)#为了输出,将结果转为字符串
print content
from lxml.html import etree,tostring,fromstring
import cssselect
html='''
- a
- b
'''
html_text=etree.HTML(html)
content=html_text.cssselect('.bb')[0]
print content.text
content=tostring(content)
print content
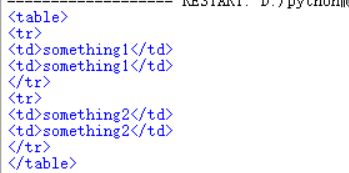
结果如下:
![]()
好,爬图片开始!(原本想爬百度图片,但是经过长时间的试探,发现百度好像有反爬机制(当然很大可能是因为我太菜),所以这里就随便找了一个网站,来爬图片)
注意,验证路径是否匹配很重要,验证的时候可以直接在控制台输入:
$x('//div/ul/li/a/img/@src')
代码如下:
(注意路径的写法,用\\代替\)
import requests
import os
from lxml.html import etree,tostring,fromstring
import threading

ThreadLock=threading.Lock()
threads=[]

class img(threading.Thread):
    def __init__(self,url,headers):
        threading.Thread.__init__(self)
        self.url=url
        self.headers=headers

    def run(self):
        try:
            text=self.get_pic()
            print "已经获取"
            self.save_pic(text)
        finally:
            ThreadLock.release()

    def get_pic(self):
        r=requests.get(self.url,headers=self.headers)
        html=r.text
        if r.status_code==200:
            print "开始下载!"
            content=etree.HTML(html)
            try:
                text=content.xpath('//div/ul/li/a/img/@src')
                for i in text:
                    print i
                return text
            except IndexError:
                print "something error"
                pass
    def save_pic(self,text):
        j=0
        for i in text:
            r1=requests.get(i,headers=self.headers)
            if r1.status_code==200:
                print "访问正常"
                print "D:\\python爬虫\\result\\%d.jpg" %j
                with open("D:\\python爬虫\\result\\%d.jpg" %j,'wb') as f:
                    f.write(r1.content)
                j+=1

        print "下载完毕"


def main():

    url='http://www.04832.com/6628/f390/mingrijilintianqiyubao.html'
    headers={
    'User-Agent':'Mozilla/5.0 (Windows NT 6.1; WOW64) AppleWebKit/537.36 (KHTML, like Gecko) Chrome/55.0.2883.87 Safari/537.36'
         }
    referer=url


    ThreadLock.acquire()
    t = img(url,headers)
    t.start()

if __name__=='__main__':
    main()
标题3.爬取某学校登录验证码(这个就不发代码了)
标题4.爬取小说章节(编码真的kill me)
import requests
import re
from lxml.html import etree,tostring,fromstring
import os
import io


next_url='https://www.hongxiu.com/chapter/16041863405758604/43062118761085702'
headers={
    "User-Agent":"Mozilla/5.0 (Windows NT 6.1; WOW64) AppleWebKit/537.36 (KHTML, like Gecko) Chrome/55.0.2883.87 Safari/537.36",
}
k=0
html=requests.get(next_url,headers=headers)
content=html.text
text=etree.HTML(content)
title=text.xpath('//h1')[1]
print title.text
path='./result/%s'%title.text
print path
if not os.path.exists(path):
    os.makedirs(path)
    print "文件创建成功"
    print "开始爬取"
else:
    print "开始爬取"


n=int(input("需要爬取几页:"))
while(k<n):
    print "第%d章"%(k+1)
    url=next_url
    html=requests.get(url,headers=headers)
    content=html.text
    if html.status_code==200:
        print "访问正常"
        text=etree.HTML(content)
        string=text.xpath('//div/p')
        next_url='https:'+text.xpath("//div[@class='chapter-control dib-wrap']/a/@href")[2]
        print next_url

        for i in string:
            with io.open((u'%s//%d.txt'%(path,(k+1))),'a',encoding='utf-8') as f:
                f.write(u'{}\n'.format(i.text))
                f.close()
        k+=1

print "爬取完毕"
爬取小说的时候,由于中文编码的问题,遇到以下几个报错;
1. UnicodeEncodeError: ‘ascii’ codec can’t encode characters in position 0-13: ordinal not in range(128)
最好的解决办法还是以下这种(但是这样让我原本的代码不能输出了)
              import sys
              reload(sys)
              sys.setdefaultencoding('utf8')
2. ‘encoding’ is an invalid keyword argument for this function
这是我在调用
with open('D:\\python爬虫\\result\\%d.txt'%j,'a',encoding='utf-8') as f:
的时候报的错,修改方式如下:
import io
........
 with io.open('D:\\python爬虫\\result\\%d.txt'%j,'a',encoding='utf-8') as f:
但是这样写之后又遇到这种报错
3. write() argument 1 must be unicode, not str
解决方案就是在之前加一个u,如下
f.write(u'{}\n'.format(i.text))
4.需要注意的是python用input输入之后会被当做字符串处理,所以如果输入整型,需要进行int的强转
标题5.自动提交flag(带session)
我也不知道我写的是个啥,因为没有awd环境,攻防世界的登录带验证码,不太好直接验证,就大概写个样子,反正都是带session提交
import requests
import re

headers = {
    'User-Agent': 'Mozilla/5.0 (X11; Linux x86_64) AppleWebKit/537.36 (KHTML, like Gecko) Chrome/66.0.3359.139 Safari/537.36'
    }
def get_flag():
    url='http://111.198.29.45:36460/'
    data={'username':'admin',
          'password':'123456'
          }
    session=requests.session()
    r1=session.post(url,headers=headers)
    r2=session.post('http://111.198.29.45:36460/check.php',headers=headers,data=data)
    if r2.status_code==200:
       # print r2.text
       content=r2.text
       pattern = re.compile(ur'.*}')
       flag=pattern.search(content).group(0)
       print flag
    return flag

def login():
    url='http://ctf.john30n.com/login'
    data={'name':'xxx',
          'password':'xxx'
            }
    session=requests.session()
    r=session.post(url,data=data,headers=headers)
    return session

def auto(session,flag,ip):
    url='http://xxx/submit.php'
    data={
        'ip':ip,
        'flag':flag
        }
    r=session.post(url,headers=headers,data=data)
    print r.text


ip=['123.123.123.123','111.111.111.111','xxxxx']
for i in ip:
    flag=get_flag()
    session=login()
    auto(session,flag,i)


