Bash 脚本学习
文章目录
-
- 1、脚本编程基础
- 2. 变量
-
- 2.1 参数变量的引用
- 2.2 环境变量
- 3 条件判断语句
-
- 3.1 if 语句
-
- 3.1.1 语法
- 3.1.2 案例
- 3.2 case 语句
-
- 3.2.1 语法
- 3.2.2 案例
- 3.3 判断参数说明
- 4 循环语句
-
- 4.1 for 循环
-
- 4.1.1 语法
- 4.1.2 案例
- 4.2 while循环
-
- 4.2.1 语法
- 4.2.2 案例
- 4. 3 循环总结
- 5. 函数
-
- 5.1 语法
- 5.2 案例
- 6. &,&&,|,||
- 7. 项目实战
-
- 项目1 :下载coco数据集
- 项目2:下载imagenet数据集
- 项目3:
- 项目4
- 参考
-
脚本(script)就是包含一系列命令的一个文本文件。Shell 读取这个文件,依次执行里面的所有命令,就好像这些命令直接输入到命令行一样。所有能够在命令行完成的任务,都能够用脚本完成。 -
脚本的好处是可以重复使用,也可以指定在特定场合自动调用,比如系统启动或关闭时自动执行脚本
1、脚本编程基础
(1)声明Bash Shell
声明使用的解析器,可避免系统采用默认解析器去运行脚本带来的可能的错误。
#!/bin/bash
脚本的第一行必须指定解释器, 以# + ! + 脚本解释器路径来指定解释器- 任意行的单独的
”#“都是注释作用,非第一行的“井号+感叹号“也是注释作用
(2) 脚本的执行权限
脚本需要有可执行权限才可以执行,可以通过 ls -l 来查看它是否是可执行文件, 可以使用下面命令赋予脚本可执行权限
# 给所有用户执行权限
chmod +x script.sh

# 给所有用户读权限和执行权限
chmod +rx script.sh
# 或者
chmod 755 script.sh

# 只给脚本拥有者读权限和执行权限
chmod u+rx script.sh
#为所以用户提供最高权限
chmod -R 777 script.sh
(3)变量的引用
${var}是变量引用的方式之一,可以写成 $var,建议使用${var}方式,方便阅读。
(4)printf命令介绍
echo命令是最常用的输出命令,但它无法进行格式化输出,而printf可以进行格式化输出。
printf "%-10s %-10s %-10s\n" 年级 班级 姓名;
(5) read命令介绍
read 命令用于接收标准输入或者其他文件描述符的输入。得到输入后,read命令将数据放入一个标准变量中。
| 参数 | 说明 |
|---|---|
| -a | 指定变量为数组 |
| -r | 反斜杠转义不会生效,意味着行末的’\’成为有效的字符,例如使 \n 成为有效字符而不是换行 |
| -p | 指定输出提示信息 |
| -d | 输入结束符,当输入的内容出现这个字符时,立即结束。一般情况下是以IFS为参数的间隔,但是通过-d自定义 |
| -n | 指定输入的字符长度 |
| -t | 指定读取值时等待的时间(秒),read命令会一直等待用户输入,时间到自动退出 |
| -s | 不显示输入的值,一般用于密码 |
# 不带参数,输入值都用空格隔开
[hadoop@hadoop01 ~]$ read ARG
arg1 arg2
[hadoop@hadoop01 ~]$ echo $ARG
arg1 arg2

# 定义多个变量,变量和输入值都用空格隔开。顺序赋值,超过自动退出,不足会等待输入
[hadoop@hadoop01 ~]$ read ARG1 ARG2
hello hi
[hadoop@hadoop01 ~]$ echo $ARG1
hello
[hadoop@hadoop01 ~]$ echo $ARG2
hi

# -r,反斜杠也会被输出
[hadoop@hadoop01 ~]$ read -r ARG
\arg
[hadoop@hadoop01 ~]$ echo $ARG
\arg

# -d,指定的字符作为命令的结束输入,未输入指定的结束符前输入窗口一直存,enter键也无效
[hadoop@hadoop01 ~]$ read -d "-" ARG
arg1
arg2
-[hadoop@hadoop01 ~]$ echo $ARG
arg1 arg2

# -a,定义数组
[hadoop@hadoop01 ~]$ read -a ARG
arg1 arg2
[hadoop@hadoop01 ~]$ echo ${ARG[0]} ${ARG[1]}
arg1 arg2

# -p,指定输出提示信息
[hadoop@hadoop01 ~]$ read -p "please enter arg:" ARG
please enter arg:arg1
[hadoop@hadoop01 ~]$ echo $ARG
arg1
read [选项] [变量名]
2. 变量
2.1 参数变量的引用
在编写 Linux bash shell 脚本时,经常会用到 $0、$1、$2、$#、$@、$*、$? 等参数,下面具体说明这些参数的含义。
调用脚本的时候,脚本文件名后面可以带有参数。
./work/test.sh parm1 parm2 param3
上面例子中,test.sh是一个脚本文件,parm1、parm2、parm3是三个参数。脚本文件内部,可以使用特殊变量,引用这些参数
$0:脚本文件名,即./work/test.sh;$1~$9:对应脚本的第1个参数到第9个参数;$1获取的是parm1 参数,$2获取的是parm2参数, 以此类推$#:参数的个数; 比如上面脚本总共3个参数parm1~parm2,则$#的值就为3$@:全部的参数,参数之间使用空格分隔。$*:全部的参数:$*与$@值是相同的,获得所有参数的数组;但加上双引号时, "$*" 和 "$@" 有所不同。"$*"把所有参数合并成一个字符串,而"$@"会得到一个字符串参数数组。
如果脚本的参数多于9个,那么第10个参数可以用${10}的形式引用,以此类推。
#! /bin/bash

echo '===========$n============' #注意:如果使用的是双引号,$n会被识别为变量
echo script name: $0
echo 1st parameter: $1
echo 2nd parameter: $2
echo '===========$#============'
echo parameter numbers: $#
echo '===========$*============'
echo $*
echo '===========for i in $*============'
for i in $*
do
   echo $i
done
echo '===========for i in "$*"============'
for i in "$*"
do
   echo $i
done
echo '===========$@============'
echo $@
echo '===========for i in $@============'
for i in $@
do
  echo $i
done
echo '===========for i in "$@"============'
for i in "$@"
do
 echo $i
done
运行脚本
./parameter.sh zhx yxy
输出
[root@VM-4-17-centos parameter]#
===========$n============
script name: ./parameter.sh
1st parameter: zhx
2nd parameter: yxy
===========$#============
parameter numbers: 2
===========$*============
zhx yxy
===========for i in $*============
zhx
yxy
===========for i in "$*"============
zhx yxy
===========$@============
zhx yxy
===========for i in $@============
zhx
yxy
===========for i in "$@"============
zhx
yxy
2.2 环境变量
生效范围为当前shell进程及其子进程
(1) 环境变量赋值
export name=value
declare -x name=value:声明环境变量。
declare -i name=value:声明整形数据。
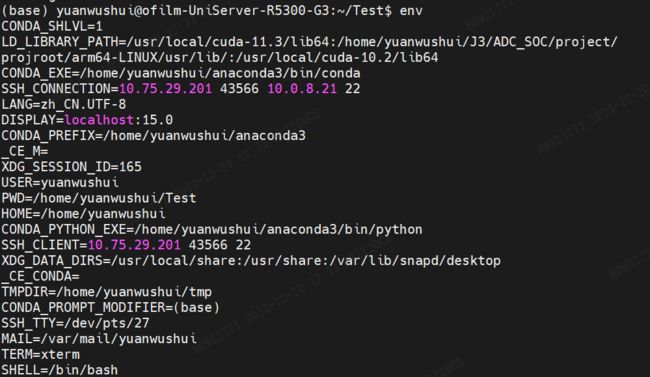
(2) 显示环境变量
env、printenv
env
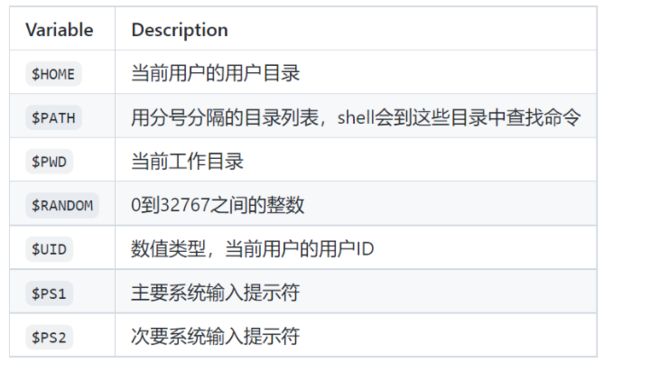
(3) 内建的环境变量:bash中有许多内建的环境变量,使用时需要避免覆盖
$PATH、$SHELL、$UID、$HISTSIZE、$HOME、$PWD、$OLD、$HISTFILE...

创建一个脚本文件:bash_sdvar.sh,并在Bash控制台上编写以下代码,如下所示
#! /bin/bash
# Bash System-defined Variables
echo $HOME # Home Directory
echo $PWD # current working directory
echo $BASH # Bash shell name
echo $BASH_VERSION # Bash shell Version
echo $LOGNAME # Name of the Login User
echo $OSTYPE # Type of OS
3 条件判断语句
3.1 if 语句
3.1.1 语法
if condition
then
    command
    command
    ...

elif condition
then
    command
    command
    ...

else
    command
    command
    ...
if then同写一行时,需要用;分隔
if condition; then
    command
    command
    ...

elif condition; then
    command
    command
    ...

else
    command
    command
    ...
3.1.2 案例
案例1:
#!/bin/bash
read -p "请输入一个数字: " num

if [ $num -gt 0 ]; then
    echo "$num大于零"
elif [ $num -lt 0 ]; then
    echo "$num小于零"
else
    echo "$num等于零"
fi
这段代码首先会要求用户输入一个数字,然后通过if-elif-else结构对该数字进行条件判断。根据不同情况打印相应的提示信息。
案例2
#判断本脚本名称的字符串
if [[ $0="study_006.sh" ]] || [[ -n $0 ]]
	then printf "本脚本名称与期望名称一致, 或脚本名称的长度不为0 \n"
else
        printf "本脚本名称与期望名称不一致,或长度为0 \n"
fi
if语句注意事项
-
如上脚本,可以知道语句的基本格式为 “if … ;then…;fi”,可选"else"、"elif…;then…"进行扩展,其中
”;“可以使用回车替代。 -
条件需要使用
[]或[[]]进行包裹,里面语句的两端需要有空格才能被识别为条件,二者用法是有区别的,建议使用[[]],因为可以在里面使用 || 等逻辑操作符,[]是不可以的。 -
[]或[[]]可以使用命令test来替代,test的使用例子为
if test 1 -eq 1 ;then echo "good"; fi
-
书写这些语句时,建议培养使用习惯,如使用分号或使用回车号来构造语句,建议统一使用分号来避免误操作。
-
if语句可以嵌套
3.2 case 语句
3.2.1 语法
bash case语句的语法如下:
case expression in
    pattern_1)
        statements
        ;;
    pattern_2)
        statements
        ;;
    pattern_3|pattern_4|pattern_5)
        statements
        ;;
    pattern-n)
        statements
        ;;
    *)
        statements
        ;;
esac
bash case语句的一些重要说明:
- bash中的每个case语句均以case关键字开头,后接case表达式和in关键字。使用
esac关键字关闭case语句。 - 可以应用以
|分隔的多个模式运算符,运算符指示模式列表的终止。 - 包含语句的模式称为子句,并且必须以双分号(
;;)终止。 - 星号(
*)用作定义默认情况的最终模式。当用作最后一种情况时,它用作默认情况
3.2.2 案例
案例1
#!/bin/bash

echo "Do you know Java Programming?"
read -p "Yes/No? :" Answer
case $Answer in
    Yes|yes|y|Y)
        echo "That's amazing."
        echo
        ;;
    No|no|N|n)
        echo "It's easy. Let's start learning from yiibai.com."
        ;;
esac
案例2
#!/bin/bash

echo "Which Operating System are you using?"
echo "Windows, Android, Chrome, Linux, Others?"
read -p "Type your OS Name:" OS

case $OS in
    Windows|windows|window|win)
        echo "That's common. You should try something new."
        echo
        ;;
    Android|android)
        echo "This is my favorite. It has lots of applications."
        echo
        ;;
    Chrome|chrome)
        echo "Cool!!! It's for pro users. Amazing Choice."
        echo
        ;;
    Linux|linux)
        echo "You might be serious about security!!"
        echo
        ;;
    *)
        echo "Sounds interesting. I will try that."
        echo
        ;;
esac
3.3 判断参数说明
(1)数字判断使用到的参数
| 参数 | 说明 |
|---|---|
| -eq | 等于则为真 |
| ne | 不等于则为真 |
| -gt | 大于则为真 |
| -ge | 大于等于则为真 |
| -lt | 小于则为真 |
| -le | 小于等于则为真 |
(2)字符串判断使用到的参数
| 参数 | 说明 |
|---|---|
| = | 等于则为真 |
| != | 不相等则为真 |
| -z 字符串 | 字符串的长度为零则为真 |
| -n 字符串 | 字符串的长度不为零则为真 |
(3)文件判断使用到的参数
| 参数 | 说明 |
|---|---|
| -e 文件名 | 如果文件存在则为真 |
| -f 文件名 | 如果文件存在且为普通文件则为真 |
| -d 文件名 | 如果文件存在且为目录则为真 |
| -r 文件名 | 如果文件存在且可读则为真 |
| -w 文件名 | 如果文件存在且可写则为真 |
| -x 文件名 | 如果文件存在且可执行则为真 |
| -s 文件名 | 如果文件存在且至少有一个字符则为真 |
| -c 文件名 | 如果文件存在且为字符型特殊文件则为真 |
| -b 文件名 | 如果文件存在且为块特殊文件则为真 |
(4)条件判断使用到的逻辑操作符
-
与的表示方法:&&、-a
要求所有条件为真,则条件为真 -
或的表示方法:||、-o
要求任意条件为真,则条件为真 -
非的表示方法:!
要求条件反转为真时,条件为真
4 循环语句
4.1 for 循环
bash shell脚本也支持for循环以执行重复性任务。它有助于在字符串中的一系列单词或数组中的元素上迭代一组特定的语句
4.1.1 语法
可以通过两种方式在bash脚本上应用for循环。一种方法是for-in,另一种方法是C语言语法。以下是bash shell脚本中for循环的语法:
for variable in list
do
commands
done
或者
for (( expression1; expression2; expression3 ))
do
commands
done
for循环语句有一些关键点需要记住:
- bash中for循环的每个块均以do关键字开头,后跟该块中的命令。for循环语句由done关键字关闭。
- 列表可以包含数字或字符串等,以空格分隔。
4.1.2 案例
案例1
可以使用for循环来迭代数组的值, 语法可以定义为:
arr=(  "element1" "element 2" .  .  "elementN" )

for i in "${arr[@]}"
do
echo $i
done
注:arr中元素以空格或者逗号隔开都可以
案例2
三表达式语法是for循环的最常见语法。第一个表达式指的是初始化过程,第二个表达式指的是终止,第三个表达式指的是增量或减量。
#!/bin/bash
#For Loop to Read Three-expression

for ((i=1; i<=10; i++))
do
echo "$i"
done
案例3
- For循环读取带增/减的范围,可以通过添加两个点(
..)并将值相加来增加或减少指定的值,例如{START..END..INCREMENT}。查看以下示例: - 可以在for循环中使用break语句来终止循环。
#!/bin/bash
#Table of 2

for table in {2..100..2}
do
echo $table
if [ $table == 20 ]; then
break
fi
done
案例4
可以在for循环中使用continue语句来跳过特定条件下的特定语句。它告诉Bash停止执行循环的特定迭代并处理下一个迭代。
#!/bin/bash
#Numbers from 1 to 20, ignoring from 6 to 15 using continue statement"

for ((i=1; i<=20; i++));
do
if [[ $i -gt 5 && $i -lt 16 ]];
then
continue
fi
echo $i
done
4.2 while循环
bash while循环可以定义为控制流语句,只要所应用的条件为真,该语句就允许重复执行给定的命令集。
4.2.1 语法
while [ expression ];
do
commands;
multiple commands;
done
while循环单行语法可以定义为:
while [ condition ]; do commands; done
while control-command; do Commands; done
4.2.2 案例
案例1:
#!/bin/bash
#Script to get specified numbers

read -p "Enter starting number: " snum
read -p "Enter ending number: " enum

while [[ $snum -lt $enum || $snum == $enum ]];
do
echo $snum
((snum++))
done

echo "This is the sequence that you wanted."
案例2: C语言样式while循环
还可以在bash脚本中编写像在C编程语言中编写while循环一样。
#!/bin/bash
#While loop example in C style

i=1
while((i <= 10))
do
echo $i
let i++
done
4. 3 循环总结
#!/bin/bash
# 无限循环与强制退出
while true # 可使用 : 代替true
do
        printf "条件true开始打印 \n"
        if [[ $0="study_007.sh" ]];then
                printf "条件true,强制打印结束 \n"
                break
        fi
done

# 有限循环与自动退出
int=0
while (( $int<10 )) # 可使用test、[[]]替代,<等价于-lt,建议数值对比时使用-lt
do
        printf "条件int,第 %s 次打印 \n" $int
        let "int++" # 等价于 (( int++ ))
        if [[ ${int} -eq 10 ]];then
                printf "条件int,打印结束 \n"
        fi
done

# 循环与命令
while pwd # 命令执行失败将不进入循环,如使用cp gogo bb
do
        printf "pwd指令执行为真,开始打印 \n"
        if [[ $0="study_007.sh" ]];then
                printf "pwd指令执行为真,打印结束 \n"
                break
        fi
done

# for无限循环替代while无限循环
for (( ; ; ))
do
        printf "条件true开始打印 \n"
        if [[ $0="study_007.sh" ]];then
                printf "条件true,强制打印结束 \n"
                break
        fi
done

# for有限循环替代while优先循环
for (( int_1=0 ; int_1<10 ; $(( int_1++ )) )) # 不能用 [[]] 替代 (())
do
        printf "条件int_1,第 %s 次打印 \n" $int_1
        # (( int_1++ ))
        # printf "int_1的数值为 ${int_1} \n"
        if [[ ${int_1} -eq 9 ]];then # 因为while的加1在前,而for的加1在后,因此判断条件为9
                printf "条件int_1,打印结束 \n"
        fi
done

# for与数组
arr=(0 1 2 3 4 5 6 7 8 9)
for i in ${arr[@]} # 可使用 arr[*] 替换 arr[@]
do
        printf "arr 为 ${i} \n"
done

# for与可迭代数列(数组的一种)
for i in 0 1 2 3 4 5 6 7 8 9
do
        printf "arr 为 ${i} \n"
done

# for与可迭代文本(数组的一种)
for i in my first book is " i can do it "
do
        printf "arr 为 ${i} \n"
done

# 循环中的continue与break
while :
do
        printf "continue 开始打印 \n"
        if [[ $0="study_007.sh" ]];then
                printf "continue 前一个语句 \n"
                continue
                printf "continue 后一个语句 \n"
        fi
done
(1)while语句注意事项
- 循环需要通过条件为真去循环,当然while false是没有意义的,而while true是无限循环的写法之一,可通过break语句强制退出整个循环,通过continue退出后续语句而继续循环。
- 用法见本脚本实例,把握关键字do…done
- until语句与 while 在处理逻辑上完全相反,但使用方式上完全相同,等价于while false执行,while true不执行。
(2)for语句注意事项
-
可以实现while的无限循环和有限循环,但不能像while一样直接判断命令的结果去执行循环,详见本脚本中的”循环与命令“;但是,for可以遍历数组,这个特性是while没有的。
-
用法见本脚本实例,把握关键字do…done
(3)数字判断可以使用符号替代选项
如实例中的 -lt 可以使用 < 替代,建议使用-lt,因为当 -eq 时,对应的是 ==,容易混用赋值语句或字符串判断的 = 。
(4)let命令与(())
let命令可以与(())互相替换,使用的时候哪个方便用哪个就好。
(5)(()) 与 [[]]
(())用于整数运算,[[]]用于条件判断,二者不是一回事。while (( $int<10 ))可以使用 [[]]替换(()),但for (( int_1=0 ; int_1<10 ; $(( int_1++ )) )) 不能用 [[]] 替代 (())。原因是(())既可以作为运算使用,也可以作为条件使用,而[[]]只能作为条件使用。当不涉及运算时,[[]]才有可能替换(())。
(6)数组
- 如脚本所示,数组的赋值方式采用()来包裹,里面元素采用空格划分
- 数组的取值方式采用索引方式,形式如 a r r [ 0 ] 、 {arr[0]}、 arr[0]、{arr[@]}、${arr[*]}等
- 关联数组(类字典)的实现是以关键字 declare 来实现,使其像字典那样取数据或写数据,例子如下
5. 函数
5.1 语法
bash声明函数的语法有两种格式定义:
第一种方法:以函数名称开头,后跟括号。这是最优选且最常用的方法,语法如下:
function_name () {
   commands
}
单行语法如下:
function_name () { commands; }
第二种方法:以函数保留字开头,后跟函数名称:
function function_name {
    commands
}
5.2 案例
案例1
#!/bin/bash
#Script to pass and access arguments

function_arguments(){
    echo $1
    echo $2
    echo $3
    echo $4
    echo $5
}
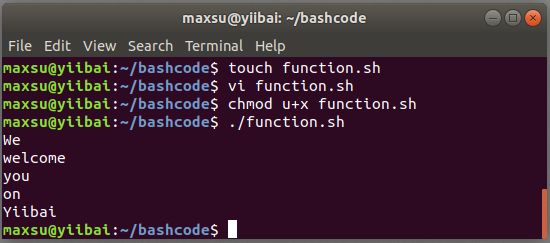
- 在终端输入:
#Calling function_arguments
function_arguments "We" "welcome" "you" "on" "Yiibai"

在此脚本中,在调用function_arguments函数之后添加了值:"We" "welcome" "you" "on" "Yiibai"。这些值将作为参数传递到function_arguments并存储在局部变量中。但是,与其他语言不同,解释器将传递的值存储到预定义的变量中,然后根据传递的参数顺序进行命名。
例如,
- "We"存储在变量
$1中。 - "welcome"存储在变量
$2中。 - "you"存储在变量
$3中。 - "on"存储到变量
$4中。 - "Yiibai"存储在变量
$5中
案例2: 函数带返回值
Bash函数不提供在调用时返回值的支持。但是,它们允许设置返回状态,这种状态类似于程序或命令如何以退出状态退出。
bash函数完成时,其返回值是函数中最后执行的语句的状态。对于成功状态,它将返回0,对于失败,将返回1-255范围内的非零十进制数。
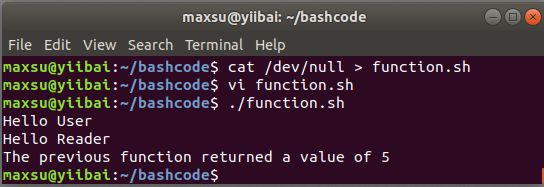
可以使用关键字return指示返回状态,并将它分配给变量$?。return语句终止函数并用作函数的退出状态。
#!/bin/bash
#Setting up a return status for a function

print_it () {
    echo Hello $1
    return 5
}

print_it User
print_it Reader
echo The previous function returned a value of $?
从函数返回值的另一个更好的选择是使用echo或printf命令将打印值发送到stdout,如下脚本代码所示:
#!/bin/bash

print_it () {
    local my_greet="Welcome to Yiibai."
    echo "$my_greet"
}

my_greet="$(print_it)"
echo $my_greet
案例3: 函数重写
可以通过创建与要覆盖的命令同名的函数来覆盖bash命令。例如,如果想覆盖echo命令,那么只需要创建一个名称为echo的函数即可。
#!/bin/bash
#Script to override command using function

echo () {
    builtin echo -n `date +"[%m-%d %H:%M:%S]"` ": "
    builtin echo $1
}

echo "Welcome to Yiibai."
在此示例中,我们将覆盖echo命令,并将时间戳以参数的形式添加到了echo命令中。
6. &,&&,|,||
(1) 操作符&&与||
&&表示当前一条命令执行成功时,执行后一条命令
curl -L $url$f -o $f -# && unzip -q $f -d $d && rm $f &
- ||表示当前一条命令执行失败时,才执行后一条命令
(2) 操作符&与|
&表示将任务置于后台运行
-|表示将前一条命令的输出,用作后一条命令的输入
wget -qO- https://raw.githubusercontent.com/soumith/imagenetloader.torch/master/valprep.sh | bash # move into subdirs
通过wget下载好valprep.sh脚本,然后对该脚本 执行bash操作
7. 项目实战
项目1 :下载coco数据集
脚本名为get_coco.sh
#!/bin/bash
# YOLOv5  by Ultralytics, GPL-3.0 license
# Download COCO 2017 dataset http://cocodataset.org
# Example usage: bash data/scripts/get_coco.sh
# parent
# ├── yolov5
# └── datasets
#     └── coco  ← downloads here

# Arguments (optional) Usage: bash data/scripts/get_coco.sh --train --val --test --segments
if [ "$#" -gt 0 ]; then
  for opt in "$@"; do
    case "${opt}" in
    --train) train=true ;;
    --val) val=true ;;
    --test) test=true ;;
    --segments) segments=true ;;
    esac
  done
else
  train=true
  val=true
  test=false
  segments=false
fi

# Download/unzip labels
d='../datasets' # unzip directory
url=https://github.com/ultralytics/yolov5/releases/download/v1.0/
if [ "$segments" == "true" ]; then
  f='coco2017labels-segments.zip' # 168 MB
else
  f='coco2017labels.zip' # 168 MB
fi
echo 'Downloading' $url$f ' ...'
curl -L $url$f -o $f -# && unzip -q $f -d $d && rm $f &

# Download/unzip images
d='../datasets/coco/images' # unzip directory
url=http://images.cocodataset.org/zips/
if [ "$train" == "true" ]; then
  f='train2017.zip' # 19G, 118k images
  echo 'Downloading' $url$f '...'
  curl -L $url$f -o $f -# && unzip -q $f -d $d && rm $f &
fi
if [ "$val" == "true" ]; then
  f='val2017.zip' # 1G, 5k images
  echo 'Downloading' $url$f '...'
  curl -L $url$f -o $f -# && unzip -q $f -d $d && rm $f &
fi
if [ "$test" == "true" ]; then
  f='test2017.zip' # 7G, 41k images (optional)
  echo 'Downloading' $url$f '...'
  curl -L $url$f -o $f -# && unzip -q $f -d $d && rm $f &
fi
wait # finish background tasks
终端执行
sh get_coco.sh --train --val --test --segments
则会 自动从coco2017官网:http://cocodataset.org,下载train,test,val、segments , 下载哪些数据重要根据脚本后面的参数(--train --val --test --segments)指定的
代码说明
if [ "$#" -gt 0 ]; then
  for opt in "$@"; do
    case "${opt}" in
    --train) train=true ;;
    --val) val=true ;;
    --test) test=true ;;
    --segments) segments=true ;;
    esac
  done
else
  train=true
  val=true
  test=false
  segments=false
fi
- 首先判断脚本运行时,指定的
参数个数是否>0,参数个数通过$#获取。如果参数个数等于0的话,则按else中语句执行,即默认设置train=true,val=true,test=false,segments=false。 - 如果满足
参数个数>0,则利用for循环遍历所有参数, 通过"$@"获取所有参数。如果遍历的参数存在--train,则设置train=true, 表示需要下载train数据,如果参数存在--val,则val=true将val设置为true,表示需要下载val数据, 同理test,segments是否下载也是通过该方式指定。
# Download/unzip labels
d='../datasets' # unzip directory
url=https://github.com/ultralytics/yolov5/releases/download/v1.0/
if [ "$segments" == "true" ]; then
  f='coco2017labels-segments.zip' # 168 MB
else
  f='coco2017labels.zip' # 168 MB
fi
echo 'Downloading' $url$f ' ...'
curl -L $url$f -o $f -# && unzip -q $f -d $d && rm $f &

# Download/unzip images
d='../datasets/coco/images' # unzip directory
url=http://images.cocodataset.org/zips/
if [ "$train" == "true" ]; then
  f='train2017.zip' # 19G, 118k images
  echo 'Downloading' $url$f '...'
  curl -L $url$f -o $f -# && unzip -q $f -d $d && rm $f &
fi
if [ "$val" == "true" ]; then
  f='val2017.zip' # 1G, 5k images
  echo 'Downloading' $url$f '...'
  curl -L $url$f -o $f -# && unzip -q $f -d $d && rm $f &
fi
if [ "$test" == "true" ]; then
  f='test2017.zip' # 7G, 41k images (optional)
  echo 'Downloading' $url$f '...'
  curl -L $url$f -o $f -# && unzip -q $f -d $d && rm $f &
fi
wait # finish background tasks
上述的代码,就是根据train,val,test,segments中如果为true的话,就执行具体的下载并解压命令。
下载解压蛀牙通过一下命令实现:
curl -L $url$f -o $f -# && unzip -q $f -d $d && rm $f &
- 利用
$url$f拼接下载的数据集地址, - 通过
-L跳转到指定要下载数据的网站; - 小写的
-o代表下载文件并重命名文件 -#显示下载的精度条
下载好文件,通过unzip 对文件解压 :
-q: 静默模式,不显示解压缩过程中的详细信息-d: 指定解压后文件存放的目录’- 最后一个
&,表示将任务置于后台执行
解压完后: 通过rm $f删除压缩包
参考:
https://blog.csdn.net/qq_26918437/article/details/129539444
https://blog.csdn.net/qq_21438461/article/details/131427162
项目2:下载imagenet数据集
#!/bin/bash
# YOLOv5  by Ultralytics, GPL-3.0 license
# Download ILSVRC2012 ImageNet dataset https://image-net.org
# Example usage: bash data/scripts/get_imagenet.sh
# parent
# ├── yolov5
# └── datasets
#     └── imagenet  ← downloads here

# Arguments (optional) Usage: bash data/scripts/get_imagenet.sh --train --val
if [ "$#" -gt 0 ]; then
  for opt in "$@"; do
    case "${opt}" in
    --train) train=true ;;
    --val) val=true ;;
    esac
  done
else
  train=true
  val=true
fi

# Make dir
d='../datasets/imagenet' # unzip directory
mkdir -p $d && cd $d

# Download/unzip train
if [ "$train" == "true" ]; then
  wget https://image-net.org/data/ILSVRC/2012/ILSVRC2012_img_train.tar # download 138G, 1281167 images
  mkdir train && mv ILSVRC2012_img_train.tar train/ && cd train
  tar -xf ILSVRC2012_img_train.tar && rm -f ILSVRC2012_img_train.tar
  find . -name "*.tar" | while read NAME; do
    mkdir -p "${NAME%.tar}"
    tar -xf "${NAME}" -C "${NAME%.tar}"
    rm -f "${NAME}"
  done
  cd ..
fi

# Download/unzip val
if [ "$val" == "true" ]; then
  wget https://image-net.org/data/ILSVRC/2012/ILSVRC2012_img_val.tar # download 6.3G, 50000 images
  mkdir val && mv ILSVRC2012_img_val.tar val/ && cd val && tar -xf ILSVRC2012_img_val.tar
  wget -qO- https://raw.githubusercontent.com/soumith/imagenetloader.torch/master/valprep.sh | bash # move into subdirs
fi

# Delete corrupted image (optional: PNG under JPEG name that may cause dataloaders to fail)
# rm train/n04266014/n04266014_10835.JPEG

# TFRecords (optional)
# wget https://raw.githubusercontent.com/tensorflow/models/master/research/slim/datasets/imagenet_lsvrc_2015_synsets.txt
weget 参考: https://blog.csdn.net/qq_32331073/article/details/79239323
项目3:
run_docker.sh
#!/bin/bash

dataset_path=$1
run_type=$2
version=v2.5.2

if [ -z "$dataset_path" ];then
  echo "Please specify the dataset path"
  exit
fi
dataset_path=$(readlink -f "$dataset_path")

echo "Docker version is ${version}"
echo "Dataset path is $(readlink -f "$dataset_path")"

open_explorer_path=$(readlink -f "$(dirname "$0")")
echo "OpenExplorer package path is $open_explorer_path"

if [ "$run_type" == "cpu" ];then
    docker run -it --rm \
      -v "$open_explorer_path":/open_explorer \
      -v "$dataset_path":/data/horizon_x3/data \
      openexplorer/ai_toolchain_ubuntu_20_xj3_cpu:"$version"
else
    echo "Run in GPU mode"
    docker run -it --rm \
      --runtime=nvidia \
      -e NVIDIA_DRIVER_CAPABILITIES=compute,utility \
      -e NVIDIA_VISIBLE_DEVICES=all \
      --shm-size="15g" \
      -v "$open_explorer_path":/open_explorer \
      -v "$dataset_path":/data/horizon_x3/data \
      openexplorer/ai_toolchain_ubuntu_20_xj3_gpu:"$version"
fi
执行:
./run_docker.sh ./data cpu
- 在Linux中
readlink命令的作用是:输出符号链接值或权威文件名(通常使用的是-f参数) $(readlink -f "$dataset_path")表示的就是当前dataset_path路径在系统中链接的完整名称(包含脚本名称)。
参考:https://blog.csdn.net/weixin_40026739/article/details/129424479
项目4
train.sh
MODEL_TYPE='teacher'
BASE_PATH='/media/hticimg/data1/Data/MRI'
MODEL='attention_imitation'
DATASET_TYPE='cardiac'
MASK='cartesian'
ACC_FACTOR='5x'


BATCH_SIZE=4
NUM_EPOCHS=150
DEVICE='cuda:0'

EXP_DIR='/home/hticimg/gayathri/reconstruction/exp/'${DATASET_TYPE}'/'${MASK}'/acc_'${ACC_FACTOR}'/'${MODEL}'_'${MODEL_TYPE}

TRAIN_PATH=${BASE_PATH}'/datasets/'
VALIDATION_PATH=${BASE_PATH}'/datasets/'
USMASK_PATH=${BASE_PATH}'/usmasks/'

echo python train_base_model.py --batch-size ${BATCH_SIZE} --num-epochs ${NUM_EPOCHS} --device ${DEVICE} --exp_dir ${EXP_DIR} --train-path ${TRAIN_PATH} --validation-path ${VALIDATION_PATH} --acceleration_factor ${ACC_FACTOR} --dataset_type ${DATASET_TYPE} --usmask_path ${USMASK_PATH} --model_type ${MODEL_TYPE}
python train_base_model.py --batch-size ${BATCH_SIZE} --num-epochs ${NUM_EPOCHS} --device ${DEVICE} --exp_dir ${EXP_DIR} --train-path ${TRAIN_PATH} --validation
https://github.com/GayathriMatcha/SFT-KD-Recon/blob/main/git_cardiac/train_teacher.sh
参考
https://www.yiibai.com/bash/bash-case-statement.html
https://blog.csdn.net/lingeio/article/details/96587362
https://blog.csdn.net/weixin_41968982/article/details/117386991
https://blog.csdn.net/weixin_43431593/article/details/127550041
https://www.learnfk.com/shell/bash-tutorial-script.html


