迟迟钟鼓初长夜,耿耿星河欲曙天
有任务问题欢迎私信提问
将代码封装成dll可以隐藏代码,当作黑盒使用
1.创建 dll 工程
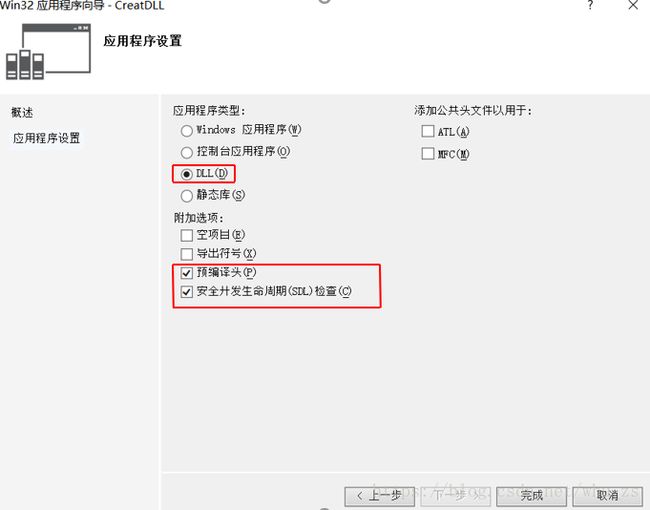
确定->选择DLL->完成
导出符号: 如果勾选了导出符号,就会生成一个demo样例,介绍怎样封装变量、函数和类,在这里我们自己编写,不勾选
空项目: 所有操作都自己写,包括dllmain.cpp
得到以下结果
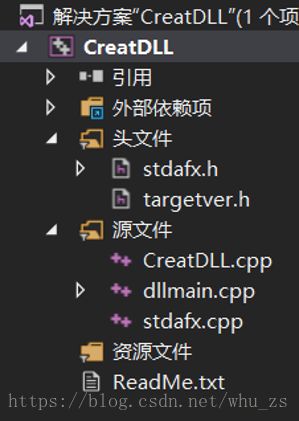
dllmain.cpp: DLL程序的入口函数文件,类似于main,在这里我们不用管它,存在就行
dllmain详解 dllmain介绍
CreatDLL.cpp: 是程序代码编写的地方
2.程序编写
2.1. 添加.h文件,声明函数
博主创建的是dll.h,代码如下所示:
#pragma once //避免重复编译
/*
生成dll的工程时,vs默认定义宏:DLL_EXPORTS,不是dll工程,没有该宏定义
可以在"属性->预处理器->预处理器定义"里面看见该宏
以下语句的含义:如果定义该宏,则DLL_API是导出.(dll生成工程定义了该宏,所以是导出)
如果未定义该宏,则DLL_API是导入.(调用dll的工程没有定义该宏,所以是导入dll)
*/
#ifdef CREATDLL_EXPORTS
#define DLL_API __declspec(dllexport)
#else
#define DLL_API __declspec(dllimport)
#endif
#include
namespace zsdll //定义命名空间,可要可不要,这里只是为了说明命名空间的用法
{
/*图像二值化,调用opencv库*/
//extern "C" 作用是编译时用C的编译方式,保证函数名不变
//C++存在函数重载,所以编译函数时会在函数名后面加上参数类型,如果C++调用C编写的dll库就需要extern "C"
extern "C" DLL_API void ThresholdImg(std::string SrcPath, std::string ResPath, double thresh);
/*插入排序*/
extern "C" DLL_API void InsertSort(int *data_array, int size_array);
};
#pragma once(或者采用 #ifndef…#define…#endif): 避免重复定义,两者区别\\或者
2.2. 函数实现: 博主编写了两个函数,一个是调用了opencv库的二值化函数,一个是插入排序函数,由于调用了opencv库,所以要配置opencv环境,opencv配置参考. 实现代码如下:
// CreatDLL.cpp : 定义 DLL 应用程序的导出函数。
//
#include "stdafx.h"
#include
#include
#include "dll.h"
void zsdll::ThresholdImg(std::string SrcPath, std::string ResPath, double thresh)
{
cv::Mat srcImg = cv::imread(SrcPath, 0);
cv::Mat resImg;
srcImg.copyTo(resImg); //深复制
cv::threshold(srcImg, resImg, thresh, 255, CV_THRESH_BINARY);
cv::imwrite(ResPath, resImg);
}
void zsdll::InsertSort(int *data_array, int size_array)
{
int *res_array = new int[size_array + 1]{ 0 };
for (int i = 1; i < size_array + 1; i++)
{
res_array[i] = data_array[i - 1];
}
//插入排序
int location{ 0 };
for (int i = 2; i < size_array + 1; i++)
{
res_array[0] = res_array[i];
for (int j = i - 1; j >= 0; j--) //遍历前面有序数据
{
location = j;
if (res_array[j] <= res_array[0])
break;
res_array[j + 1] = res_array[j];
}
res_array[location + 1] = res_array[0];
}
std::cout << "排序结果: ";
for (int i = 1; i < size_array + 1; i++)
{
std::cout << res_array[i] << "\t";
}
std::cout << std::endl;
delete[] res_array;
}
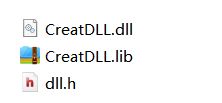
2.3. 生成解决方案: 生成->生成解决方案,博主生成的是x64版本的,在x64的Debug目录下生成了CreatDLL.dll和CreatDLL.lib 文件。将dll、lib和dll.h 拷贝出来,调用时需要用到
3. 调用封装好的dll
第一种方式:隐式调用:即在程序开始执行时就将DLL文件加载到应用程序中,需要dll、lib和.h文件
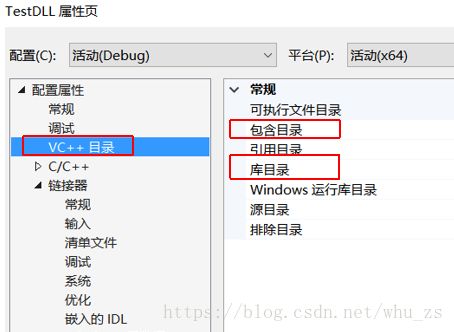
新建Win32控制台程序,名称为TestDLL–>添加属性表或者直接修改工程属性: 在VC++目录下的包含目录添加.h文件所在目录,库目录添加.lib文件所在目录(也可以在调用程序中采用#pragma comment ( lib,”CreatDLL.lib” ) 来连接lib),在链接器->输入->附加依赖项里添加.lib文件名称(CreatDLL.lib)
–>将.dll文件(CreatDLL.dll)放到TestDLL工程目录下(查看根目录如下图所示)或者放到System32文件夹下,opencv的dll文件(如Debug下的opencv330d.dll)也需要放到根目录下,由于博主电脑的System32文件夹下包含opencvdll文件,所以不需放入根目录下
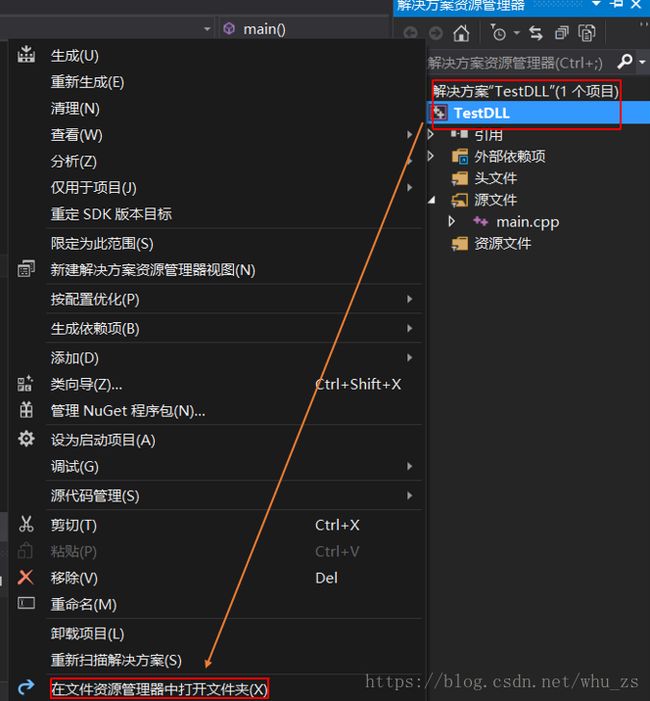
–>在TestDLL工程的cpp文件中编写如下代码调用DLL
#include
#include
#include
void main()
{
/*图像二值化*/
std::string InputPath = "src.jpg";
std::string OutPath = "res.jpg";
zsdll::ThresholdImg(InputPath, OutPath, 100);
std::cout << "图像二值化完成" << std::endl;
/*插入排序*/
int *data = new int[10]{ 5,3,2,7,8,1,0,4,6,9 };
std::cout << "原始数据:";
for (int i = 0; i < 10; i++)
{
std::cout << data[i] << "\t";
}
std::cout << std::endl;
zsdll::InsertSort(data, 10);
delete[] data;
}
第二种方式:显示调用:是应用程序在执行过程中可以随时加载DLL文件,也可以随时卸载DLL文件,更灵活,只需DLL文件即可
新建Win32控制台程序, 命名为TestDLL_–>将DLL文件(CreatDLL.dll)放到工程根目录下–>cpp文件中填写以下代码
#include
#include
#include
#include
void main()
{
typedef void(*FunDLL)(std::string Input, std::string Out, double T); //采用指针指向dll里面的函数
std::string InputPath = "src.jpg";
std::string OutPath = "res.jpg";
HMODULE hdll = LoadLibrary(_T("CreatDLL.dll"));
if (hdll != NULL)
{
FunDLL ThresholdImg = (FunDLL)GetProcAddress(hdll, "ThresholdImg");
if (ThresholdImg != NULL)
{
ThresholdImg(InputPath, OutPath, 100);
}
}
FreeLibrary(hdll);
}
有任何问题欢迎私信提问
落霞与孤鹜齐飞,秋水共长天一色