当SRS遇到K8S,快速高效运营直播流媒体集群
K8S
流媒体服务和流媒体服务器的关键差异是什么?高效的运维能力是其中极其关键的差异之一,云计算+Docker+K8S让开源项目也能拥有这种能力,让每个人都能具备互联网流媒体服务能力,正如:旧时王谢堂前燕,飞入寻常百姓家!
为何要用k8s部署SRS集群?
- Simple(简单有效): 这玩意儿真的非常简单、高效便捷、直击服务部署和维护的痛点。羽扇纶巾,谈笑间强撸灰飞湮灭,不信一起来看QuickStart.
- Declarative deployment(声明式部署):只需要根据业务量声明需要多少个SRS,自动配置和更新SLB,不用启动服务和看门狗,也不用机器故障时一顿操作猛如虎的迁移和更新。
- Expand easily(扩容很容易): K8S可以自动扩容底层基础设施,例如可通过ESS自动,而业务集群(如SRS Edge)通过修改Pod数量(或根据策略)实现扩容。
- Rolling Update(滚动式更新): K8S可以在不中断服务的前提下,实现服务的更新、回滚和灰度发布,这是提供稳定可靠高效服务的大杀器,总不能每次更新就被用户投诉吧?总不能每次都半夜三更提心吊胆吧?
本文介绍了,在不同的业务场景下,如何使用ACK(AlibabaCloud Container Service for Kubernetes)构建SRS集群。
- Quick Start: 快速入门,在ACK中部署单SRS源站服务。
- SRS Shares Volume with Nginx: SRS能分发简单的HTTP,也能和Nginx配合工作提供更强大的HTTP能力,比如:SRS分发RTMP/HTTP-FLV等流协议,Nginx分发HLS。
- SRS Edge Cluster for High Concurrency Streaming: SRS边缘集群,支持高并发流媒体播放,减轻源站压力,分离源站关键业务,在SLB下自动扩容和更新。
- SRS Origin Cluster for a Large Number of Streams: SRS源站集群,支持大规模的推流,流的自动发现,以及流的灾备。
- SRS Cluster Update, Rollback, Gray Release with Zero Downtime: 如何在不中断服务的前提下,实现SRS集群的更新、回滚和灰度发布。
- SRS Cluster Rolling Update: 在平滑退出基础上的滚动更新,集群更新的基础机制。
- SRS Cluster Rolling Back: 在平滑退出基础上的发布回滚,发布遇到问题首先考虑回滚。
- SRS Cluster Canary Release: 金丝雀升级,可精确控制的流量控制和回滚。
- Useful Tips: 补充的实用话题和场景
- Create K8S Cluster in ACK: 在阿里云ACK创建你的K8S集群。
- Publish Demo Streams to SRS: 推送SRS的演示流,可直接推源站,也可以推边缘集群。
- Cleanup For DVR/HLS Temporary Files: 定期,比如每天凌晨1点,清理临时文件。
- Use One SLB and EIP for All Streaming Service: 使用一个SLB(EIP)对外提供RTMP、HTTP-FLV、HLS等服务。
- Build SRS Origin Cluster as Deployment: 除了以StatefulSet有状态应用方式部署Origin Cluster,我们还可以选择Deployment无状态应用方式。
- Managing Compute Resources for Containers: 资源的申请和限制,以及如何调度和限制如何生效。
- Auto Reload by Inotify: SRS侦听ConfigMap的变更,并支持自动reload。
Quick Start
假设你有一个k8s集群(如果没有可以从Create K8S Cluster in ACK轻松创建),执行下面的命令应该是成功的:
kubectl cluster-info
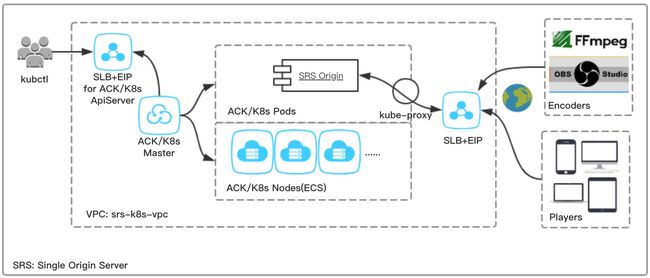
基于K8S,我们可以快速构建一个流媒体服务,尽管只有一个SRS源站。
在这个场景下,对比K8S和传统部署方式的差异:
| 对比项 | ECS | K8S | 说明 |
|---|---|---|---|
| 资源 | 手动 | 自动 | 部署时,传统方式需要手动购买相关资源, K8S自动购买需要的资源比如ECS、SLB和EIP等 |
| 部署 | 安装包 | 镜像 | Docker镜像可回滚,开发和生产环境一致,可Cache, 高效率和高密度,高可移植性,资源隔离可预测程序性能 |
| 看门狗 | 手动 | 自动 | SRS异常退出由看门狗重新拉起,非K8S需要手动安装, K8S自动管理和拉起服务 |
| 迁移 | 手动 | 自动 | ECS更换时,非K8S需要手动申请,修改SLB,安装服务, K8S自动迁移服务,更新SLB配置监听和保活等 |
实现该场景的架构图如下所示:
Step 1: 创建一个无状态应用k8s deployment,运行SRS源站服务器:
cat <<EOF | kubectl apply -f -
apiVersion: apps/v1
kind: Deployment
metadata:
  name: srs-deploy
  labels:
    app: srs
spec:
  replicas: 1
  selector:
    matchLabels:
      app: srs
  template:
    metadata:
      labels:
        app: srs
    spec:
      containers:
      - name: srs
        image: ossrs/srs:3
        imagePullPolicy: IfNotPresent
        ports:
        - containerPort: 1935
        - containerPort: 1985
        - containerPort: 8080
EOF
Step 2: 创建一个服务k8s service,自动创建SLB和EIP,对外提供流媒体服务:
cat <<EOF | kubectl apply -f -
apiVersion: v1
kind: Service
metadata:
  name: srs-origin-service
spec:
  type: LoadBalancer
  selector:
    app: srs
  ports:
  - name: srs-origin-service-1935-1935
    port: 1935
    protocol: TCP
    targetPort: 1935
  - name: srs-origin-service-1985-1985
    port: 1985
    protocol: TCP
    targetPort: 1985
  - name: srs-origin-service-8080-8080
    port: 8080
    protocol: TCP
    targetPort: 8080
EOF
Note: 如果是自动创建SLB和EIP,那么HLS和RTMP/HTTP-FLV的IP是不一样的,你可以选择手动指定SLB,这两个服务可以用同一个SLB,参考Use One SLB and EIP for All Streaming Service。
Step 3: 大功告成。查询服务的EIP地址,你就可以推拉流了。
执行命令kubectl get svc/srs-origin-service,可以查看服务的ExternalIP,也就是公网IP:
NAME          TYPE           CLUSTER-IP      EXTERNAL-IP
srs-origin-service   LoadBalancer   172.21.12.131   28.170.32.118
例子中的IP是28.170.32.118,就可以推流到这个公网IP地址,也可以从这个地址播放:
- Publish RTMP to
rtmp://28.170.32.118/live/livestreamor Publish Demo Streams to SRS. - Play RTMP from rtmp://28.170.32.118/live/livestream
- Play HTTP-FLV from http://28.170.32.118:8080/live/livestream.flv
- Play HLS from http://28.170.32.118:8080/live/livestream.m3u8
SRS Shares Volume with Nginx
本章描述了基于K8S,SRS如何和Nginx配合提供更丰富的HTTP服务。
我们可以用SRS分发RTMP和HTTP-FLV等流媒体,并生成HLS切片到共享Volume,然后Nginx读取Volume并分发HLS。当然SRS也可以直接分发HLS切片,之所以用Nginx,这个场景可以用在:
- 已经有Nginx和Web服务,SRS无法使用80端口,可以选择共享Volume方式给Nginx,当然也可以配置Nginx代理特定的URL。
- SRS不支持HTTPS。Nginx可以支持HTTPS,配置Nginx支持证书后,可以将SRS生成的HLS,通过HTTPS分发。
- SRS不支持HLS的鉴权。Nginx或其他Web框架,可以在用户访问HLS文件时,实现鉴权的逻辑。
- SRS只支持HTTP/1.1部分协议。Nginx有更完善的HTTP功能,比如HTTP/2,完整的HTTP协议支持。
在这个场景下,对比K8S和传统部署方式的差异:
| 对比项 | ECS | K8S | 说明 |
|---|---|---|---|
| 资源 | 手动 | 自动 | 部署时,传统方式需要手动购买相关资源, K8S自动购买需要的资源比如ECS、SLB和EIP等 |
| 部署 | 安装包 | 镜像 | Docker镜像可回滚,开发和生产环境一致,可Cache, 高效率和高密度,高可移植性,资源隔离可预测程序性能 |
| 看门狗 | 手动 | 自动 | SRS异常退出由看门狗重新拉起,非K8S需要手动安装, K8S自动管理和拉起服务 |
| 迁移 | 手动 | 自动 | ECS更换时,非K8S需要手动申请,修改SLB,安装服务, K8S自动迁移服务,更新SLB配置监听和保活等 |
实现该场景的架构图如下所示:
Step 1: 创建一个无状态应用k8s deployment,运行SRS和Nginx,HLS写入共享Volume:
cat <<EOF | kubectl apply -f -
apiVersion: apps/v1
kind: Deployment
metadata:
  name: srs-deploy
  labels:
    app: srs
spec:
  replicas: 1
  selector:
    matchLabels:
      app: srs
  template:
    metadata:
      labels:
        app: srs
    spec:
      volumes:
      - name: cache-volume
        emptyDir: {}
      containers:
      - name: srs
        image: ossrs/srs:3
        imagePullPolicy: IfNotPresent
        ports:
        - containerPort: 1935
        - containerPort: 1985
        - containerPort: 8080
        volumeMounts:
        - name: cache-volume
          mountPath: /usr/local/srs/objs/nginx/html
          readOnly: false
      - name: nginx
        image: nginx
        imagePullPolicy: IfNotPresent
        ports:
        - containerPort: 80
        volumeMounts:
        - name: cache-volume
          mountPath: /usr/share/nginx/html
          readOnly: true
      - name: srs-cp-files
        image: ossrs/srs:3
        imagePullPolicy: IfNotPresent
        volumeMounts:
        - name: cache-volume
          mountPath: /tmp/html
          readOnly: false
        command: ["/bin/sh"]
        args:
        - "-c"
        - >
          if [[ ! -f /tmp/html/index.html ]]; then
            cp -R ./objs/nginx/html/* /tmp/html
          fi &&
          sleep infinity
EOF
Note: Nginx的默认目录是
/usr/share/nginx/html,若不是请改成你自己的目录。
Note: SRS和Nginx挂载了emptyDir Volume共享HLS文件,默认是空目录,会随着Pod的销毁而清空。
Note: 由于共享目录是空目录,我们启动了一个
srs-cp-files的container,拷贝SRS默认的文件,参考#1603.
Step 2: 创建一个服务k8s service,使用SLB对外提供流媒体服务:
cat <<EOF | kubectl apply -f -
apiVersion: v1
kind: Service
metadata:
  name: srs-origin-service
spec:
  type: LoadBalancer
  selector:
    app: srs
  ports:
  - name: srs-origin-service-80-80
    port: 80
    protocol: TCP
    targetPort: 80
  - name: srs-origin-service-1935-1935
    port: 1935
    protocol: TCP
    targetPort: 1935
  - name: srs-origin-service-1985-1985
    port: 1985
    protocol: TCP
    targetPort: 1985
  - name: srs-origin-service-8080-8080
    port: 8080
    protocol: TCP
    targetPort: 8080
EOF
Note: 我们通过Service暴露端口,对外提供服务,其中RTMP(1935)/FLV(8080)/API(1985)由SRS提供服务,HLS(80)由Nginx提供服务。
Note: 这里我们选择ACK自动创建SLB和EIP,也可以手动指定SLB,参考Use One SLB and EIP for All Streaming Service。
Step 3: 大功告成。你可以推拉流了,其中HLS流可以从SRS(8080)播放,也可以从Nginx(80)播放:
- Publish RTMP to
rtmp://28.170.32.118/live/livestreamor Publish Demo Streams to SRS. - Play RTMP from rtmp://28.170.32.118/live/livestream
- Play HTTP-FLV from http://28.170.32.118:8080/live/livestream.flv
- Play HLS from http://28.170.32.118:8080/live/livestream.m3u8
- Play HLS from http://28.170.32.118/live/livestream.m3u8
Note: 请将上面的EIP换成你自己的,可用命令
kubectl get svc/srs-origin-service查看你的EIP。
SRS Edge Cluster for High Concurrency Streaming
本章描述了基于K8S,如何构建Edge Cluster实现高并发流媒体播放。
Edge Cluster实现了合并回源,对于某一路流,不管有多少客户端播放,Edge Server都只会从Origin Server取一路流,这样可以通过扩展Edge Cluster来增加支持的播放能力,也就是CDN网络具备的重要能力:高并发。
Note: Edge Cluster根据客户端播放的协议不同,可以分为RTMP Edge Cluster或HTTP-FLV Edge Cluster,详细请参考相关Wiki。
对于自建源站,没有那么多播放量,为何不建议使用SRS单源站直接提供服务,而要用Edge Cluster呢?主要场景分析如下:
- 防止Origin过载,即使推流非常少而且播放的流也不多,比如自建源站后使用CDN回源,在多家CDN回源时,也可能一个CDN一条流会有多个回源连接。使用Edge能保护Origin不因为回源造成Origin问题,最多就是某些Edge被回源打挂。
- 可以使用多个Edge Cluster(只需要再加srs-edge-service就可以),对外用不同的SLB暴露,可以针对每个SLB限流,防止CDN之间互相干扰。这样能保证某些CDN是可用的,而不是Origin挂了后所有CDN都不可用。
- 分离Origin关键业务,将下行流媒体分发业务交给Edge Cluster,Origin可以做切片、DVR、鉴权等关键业务,避免业务之间互相干扰。
在这个场景下,对比K8S和传统部署方式的差异:
| 对比项 | ECS | K8S | 说明 |
|---|---|---|---|
| 资源 | 手动 | 自动 | 部署时,传统方式需要手动购买相关资源, K8S自动购买需要的资源比如ECS、SLB和EIP等 |
| 部署 | 安装包 | 镜像 | Docker镜像可回滚,开发和生产环境一致,可Cache, 高效率和高密度,高可移植性,资源隔离可预测程序性能 |
| 看门狗 | 手动 | 自动 | SRS异常退出由看门狗重新拉起,非K8S需要手动安装, K8S自动管理和拉起服务 |
| 迁移 | 手动 | 自动 | ECS更换时,非K8S需要手动申请,修改SLB,安装服务, K8S自动迁移服务,更新SLB配置监听和保活等 |
| 配置 | 文件 | Volume | ECS需要手动管理配置;K8S配置在ConfigMap, 通过Volume挂载为配置文件,扩容时不用变更 |
| 扩容 | 手动 | 自动 | 需要新开进程时,ECS需要申请部署和配置, K8S只需要修改Replicas数目即可(也可自动扩容) |
| 发现 | 手动 | 自动 | Origin变更IP时,ECS需要手动修改配置, K8S自动通知边缘和自动发现 |
| SLB | 手动 | 自动 | 新增Edge时,ECS需要手动更新SLB配置, K8S自动更新SLB配置 |
实现该场景的架构图如下所示:
Step 1: 创建SRS和Nginx源站应用和服务。
srs-origin-deploy: 创建一个无状态应用k8s deployment,运行SRS Origin Server和Nginx,HLS写入共享Volume:srs-origin-service: 创建一个服务k8s service,基于ClusterIP提供Origin服务,供内部Edge Server调用。srs-http-service: 创建一个服务k8s service,基于SLB提供HTTP服务,Nginx对外提供HLS服务。
cat <<EOF | kubectl apply -f -
apiVersion: apps/v1
kind: Deployment
metadata:
  name: srs-origin-deploy
  labels:
    app: srs-origin
spec:
  replicas: 1
  selector:
    matchLabels:
      app: srs-origin
  template:
    metadata:
      labels:
        app: srs-origin
    spec:
      volumes:
      - name: cache-volume
        emptyDir: {}
      containers:
      - name: srs
        image: ossrs/srs:3
        imagePullPolicy: IfNotPresent
        ports:
        - containerPort: 1935
        - containerPort: 1985
        - containerPort: 8080
        volumeMounts:
        - name: cache-volume
          mountPath: /usr/local/srs/objs/nginx/html
          readOnly: false
      - name: nginx
        image: nginx
        imagePullPolicy: IfNotPresent
        ports:
        - containerPort: 80
        volumeMounts:
        - name: cache-volume
          mountPath: /usr/share/nginx/html
          readOnly: true
      - name: srs-cp-files
        image: ossrs/srs:3
        imagePullPolicy: IfNotPresent
        volumeMounts:
        - name: cache-volume
          mountPath: /tmp/html
          readOnly: false
        command: ["/bin/sh"]
        args:
        - "-c"
        - >
          if [[ ! -f /tmp/html/index.html ]]; then
            cp -R ./objs/nginx/html/* /tmp/html
          fi &&
          sleep infinity

---

apiVersion: v1
kind: Service
metadata:
  name: srs-origin-service
spec:
  type: ClusterIP
  selector:
    app: srs-origin
  ports:
  - name: srs-origin-service-1935-1935
    port: 1935
    protocol: TCP
    targetPort: 1935

---

apiVersion: v1
kind: Service
metadata:
  name: srs-http-service
spec:
  type: LoadBalancer
  selector:
    app: srs-origin
  ports:
  - name: srs-http-service-80-80
    port: 80
    protocol: TCP
    targetPort: 80
  - name: srs-http-service-1985-1985
    port: 1985
    protocol: TCP
    targetPort: 1985
EOF
Note: Origin Server在集群内部提供流媒体源站服务,他的服务类型为ClusterIP,内部域名为
srs-origin-service,Edge Server会通过该域名连接到Origin Server。
Note: SRS和Nginx挂载了emptyDir Volume共享HLS文件,默认是空目录,会随着Pod的销毁而清空。
Note: 由于共享目录是空目录,我们启动了一个
srs-cp-files的container,拷贝SRS默认的文件,参考#1603.
Note: 服务
srs-http-service暴露的是Nginx(80)端口,对外提供HLS服务;以及SRS(1985)端口,对外提供API服务。
Note: 这里我们选择ACK自动创建SLB和EIP,也可以手动指定SLB,参考Use One SLB and EIP for All Streaming Service。
Step 2: 创建SRS边缘配置、应用和服务。
srs-edge-config: 创建一个配置k8s ConfigMap,存储了SRS Edge Server使用的配置文件。srs-edge-deploy: 创建一个无状态应用k8s deployment,运行多个SRS Edge Server。srs-edge-service: 创建一个服务k8s service基于SLB对外提供流媒体服务。
cat <<EOF | kubectl apply -f -
apiVersion: v1
kind: ConfigMap
metadata:
  name: srs-edge-config
data:
  srs.conf: |-
    listen              1935;
    max_connections     1000;
    daemon              off;
    http_api {
        enabled         on;
        listen          1985;
    }
    http_server {
        enabled         on;
        listen          8080;
    }
    vhost __defaultVhost__ {
        cluster {
            mode            remote;
            origin          srs-origin-service;
        }
        http_remux {
            enabled     on;
        }
    }

---

apiVersion: apps/v1
kind: Deployment
metadata:
  name: srs-edge-deploy
  labels:
    app: srs-edge
spec:
  replicas: 3
  selector:
    matchLabels:
      app: srs-edge
  template:
    metadata:
      labels:
        app: srs-edge
    spec:
      volumes:
      - name: config-volume
        configMap:
          name: srs-edge-config
      containers:
      - name: srs
        image: ossrs/srs:3
        imagePullPolicy: IfNotPresent
        ports:
        - containerPort: 1935
        - containerPort: 1985
        - containerPort: 8080
        volumeMounts:
        - name: config-volume
          mountPath: /usr/local/srs/conf

---

apiVersion: v1
kind: Service
metadata:
  name: srs-edge-service
spec:
  type: LoadBalancer
  selector:
    app: srs-edge
  ports:
  - name: srs-edge-service-1935-1935
    port: 1935
    protocol: TCP
    targetPort: 1935
  - name: srs-edge-service-8080-8080
    port: 8080
    protocol: TCP
    targetPort: 8080
EOF
Note: 我们将Edge Server的配置存储在ConfigMap中,名称为
srs-edge-config,然后将ConfigMap挂载为配置文件/usr/local/srs/conf/srs.conf,其中srs.conf是在ConfigMap的配置项名称。
Note: Edge Server读取配置文件,通过Service注册的内部域名
srs-origin-service,连接到Origin Server。
Note: 服务
srs-edge-service暴露的是SRS的1935端口,对外提供RTMP服务;以及SRS的8080端口,对外提供HTTP-FLV服务。
Note: 这里我们选择ACK自动创建SLB和EIP,也可以手动指定SLB,参考Use One SLB and EIP for All Streaming Service。
Step 3: 大功告成。你可以推拉流了,其中HLS流可以从Nginx(80)播放,RTMP和HTTP-FLV从SRS播放:
- Publish RTMP to
rtmp://28.170.32.118/live/livestreamor Publish Demo Streams to SRS. - Play RTMP from rtmp://28.170.32.118/live/livestream
- Play HTTP-FLV from http://28.170.32.118:8080/live/livestream.flv
- Play HLS from http://28.170.32.118/live/livestream.m3u8
Note: 请将上面的EIP换成你自己的,可用命令
kubectl get svc/srs-http-service或kubectl get svc/srs-edge-service查看你的EIP。
Note: 如果是自动创建SLB和EIP,那么HLS和RTMP/HTTP-FLV的IP是不一样的,你可以选择手动指定SLB,这两个服务可以用同一个SLB,参考Use One SLB and EIP for All Streaming Service。
SRS Origin Cluster for a Large Number of Streams
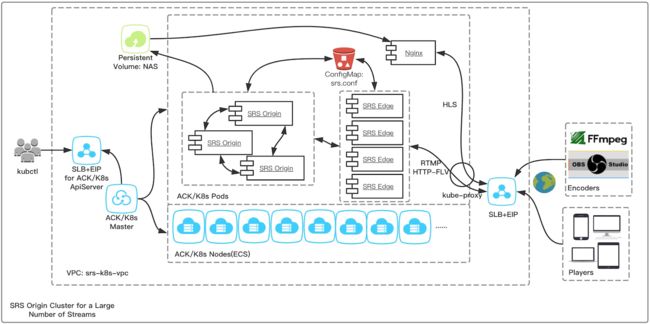
本章描述了基于K8S,如何构建Origin Cluster支持超多推流场景。
Origin Cluster通过配置其他源站的信息,在本源站没有流时查询到流的位置,通过RTMP 302定向到指定源站,具体原理可以参考#464。主要应用场景如下:
- 源站灾备:即使流比较少,也可以用两个源站,这样可以将流分散到不同的源站,避免源站出现问题时影响所有的流。
- 海量推流:单源站可以支持1000到3000路流,高码率的流支持的路数更少,有DVR和HLS时支持的路更少,源站集群有多个源站同时接收推流,可以支持10k~100k推流,参考规格。
- 复杂源站业务:源站除了支持推流和拉流,还有重要的功能是DVR、转码、转HLS,DVR和HLS涉及磁盘,转码涉及CPU,都是容易发生瓶颈的资源依赖,源站集群扩展能力更强。
在这个场景下,对比K8S和传统部署方式的差异:
| 对比项 | ECS | K8S | 说明 |
|---|---|---|---|
| 资源 | 手动 | 自动 | 部署时,传统方式需要手动购买相关资源, K8S自动购买需要的资源比如ECS、SLB和EIP等 |
| 部署 | 安装包 | 镜像 | Docker镜像可回滚,开发和生产环境一致,可Cache, 高效率和高密度,高可移植性,资源隔离可预测程序性能 |
| 看门狗 | 手动 | 自动 | SRS异常退出由看门狗重新拉起,非K8S需要手动安装, K8S自动管理和拉起服务 |
| 迁移 | 手动 | 自动 | ECS更换时,非K8S需要手动申请,修改SLB,安装服务, K8S自动迁移服务,更新SLB配置监听和保活等 |
| 配置 | 文件 | Volume | ECS需要手动管理配置;K8S配置在ConfigMap, 通过Volume挂载为配置文件,扩容时源站手动更新自动推送, 边缘扩容自动更新 |
| 扩容 | 手动 | 自动 | 需要新开进程时,ECS需要申请部署和配置, K8S只需要修改Replicas数目即可(也可自动扩容) |
| 发现 | 手动 | 自动 | Origin变更IP时,ECS需要手动修改配置, K8S在迁移源站Pod时会保持,或自动更新 |
| SLB | 手动 | 自动 | 新增Origin时,ECS需要手动安装和更新配置, K8S自动安装,手动更新但自动推送配置 |
| 存储 | 手动 | 自动 | 扩容存储时,ECS需要手动安装和更新, K8S会自动更新,不影响业务 |
实现该场景的架构图如下所示:
Step 1: 由于SRS和Nginx不在一个Pod可能也不在一个Node,需要创建依赖的PV(Persistent Volume)持久化卷,可购买NAS例如:
- 驱动类型(PV driver):
alicloud/nas - 挂载点(PV server),可在控制台创建、查看和复制:
1abb5492f7-ubq80.cn-beijing.nas.aliyuncs.com - NFS版本(PV vers):
3
在NAS基础上可以创建PV,以及PVC:
pv-nas,从NAS存储创建的PV,支持多写和多读,Pod不使用存储后会回收,也就是删除这些数据。pvc-nas,SRS和Nginx源站使用的PVC,具有读写权限。读取SRS的静态文件和HLS并分发。
cat <<EOF | kubectl apply -f -
apiVersion: v1
kind: PersistentVolume
metadata:
  name: pv-nas
  labels:
    pv: nfs-pv
spec:
  capacity:
    storage: 100Gi
  storageClassName: nas
  accessModes:
    - ReadWriteMany
    - ReadOnlyMany
  persistentVolumeReclaimPolicy: Retain
  flexVolume:
    driver: "alicloud/nas"
    options:
      server: "1abb5492f7-ubq80.cn-beijing.nas.aliyuncs.com"
      path: "/k8s"
      vers: "3"
      options: "nolock,tcp,noresvport"

---

apiVersion: v1
kind: PersistentVolumeClaim
metadata:
  name: pvc-nas
spec:
  accessModes:
    - ReadWriteMany
  storageClassName: nas
  resources:
    requests:
      storage: 100Gi
  selector:
    matchLabels:
      pv: nfs-pv
EOF
Note: 请将上面的挂载点(PV server)替换成你的。
Note: SRS和Nginx使用
pvc-nas描述自己的存储需求,K8S会绑定和分配存储pv-nas。
Step 2: 创建SRS源站集群和Nginx源站应用和服务。
srs-origin-config: 创建一个配置k8s ConfigMap,存储了SRS Origin Server使用的配置文件。socs: 创建一个Headless服务k8s service,基于Headless Service提供Origin服务,每个Origin都有自己的服务地址,例如srs-origin-0.socs,供内部Edge Server调用。srs-origin: 创建一个有状态应用k8s StatefulSet,运行SRS Origin Cluster,HLS写入共享存储PV。srs-api-service: 创建一个服务k8s service,基于SLB提供HTTP服务,SRS第一个源站提供API服务,标签为statefulset.kubernetes.io/pod-name: srs-origin-0。
cat <<EOF | kubectl apply -f -
apiVersion: v1
kind: ConfigMap
metadata:
  name: srs-origin-config
data:
  srs.conf: |-
    listen              1935;
    max_connections     1000;
    daemon              off;
    http_api {
        enabled         on;
        listen          1985;
    }
    http_server {
        enabled         on;
        listen          8080;
    }
    vhost __defaultVhost__ {
        cluster {
            origin_cluster  on;
            coworkers       srs-origin-0.socs srs-origin-1.socs srs-origin-2.socs;
        }
        http_remux {
            enabled     on;
        }
        hls {
            enabled         on;
        }
    }

---

apiVersion: v1
kind: Service
metadata:
  name: socs
spec:
  clusterIP: None
  selector:
    app: srs-origin
  ports:
  - name: socs-1935-1935
    port: 1935
    protocol: TCP
    targetPort: 1935

---

apiVersion: apps/v1
kind: StatefulSet
metadata:
  name: srs-origin
  labels:
    app: srs-origin
spec:
  serviceName: "socs"
  replicas: 3
  selector:
    matchLabels:
      app: srs-origin
  template:
    metadata:
      labels:
        app: srs-origin
    spec:
      volumes:
      - name: cache-volume
        persistentVolumeClaim:
          claimName: pvc-nas
      - name: config-volume
        configMap:
          name: srs-origin-config
      containers:
      - name: srs
        image: ossrs/srs:3
        imagePullPolicy: IfNotPresent
        ports:
        - containerPort: 1935
        - containerPort: 1985
        - containerPort: 8080
        volumeMounts:
        - name: cache-volume
          mountPath: /usr/local/srs/objs/nginx/html
          readOnly: false
        - name: config-volume
          mountPath: /usr/local/srs/conf

---

apiVersion: v1
kind: Service
metadata:
  name: srs-api-service
spec:
  type: LoadBalancer
  selector:
    statefulset.kubernetes.io/pod-name: srs-origin-0
  ports:
  - name: srs-api-service-1985-1985
    port: 1985
    protocol: TCP
    targetPort: 1985

EOF
Note: 配置存储在ConfigMap中
srs-origin-config,会被以Volume方式挂载成配置文件/usr/local/srs/conf/srs.conf。
Remark: 源站集群配置,需要配置各个源站的服务地址也就是域名。假设SRS源站有状态服务
srs-origin配置的Replicas为2,则会生成两个源站srs-origin-0.socs和srs-origin-1.socs,若新增了源站比如Replicas为3,则需要在配置中加上srs-origin-2.socs。
Note: Origin Server在集群内部提供流媒体源站服务,以有状态服务方式提供名字为
socs,每个源站会自动分配内部域名,内部域名为srs-origin-0.socs和srs-origin-1.socs,Edge Server会配置这些域名连接到Origin Server。
Note: 源站对外提供API服务
srs-api-service,我们选择第一个源站对外提供API服务,实际上源站集群需要改进这点,参考#1607。
Note: 这里我们选择ACK自动创建SLB和EIP,也可以手动指定SLB,参考Use One SLB and EIP for All Streaming Service。
nginx-origin-deploy: 创建一个无状态应用k8s deployment,运行Nginx,将SRS静态文件写入PV,从共享存储PV读取HLS和静态文件。srs-http-service: 创建一个服务k8s service,基于SLB提供HTTP服务,Nginx对外提供HLS服务。
cat <<EOF | kubectl apply -f -

apiVersion: apps/v1
kind: Deployment
metadata:
  name: nginx-origin-deploy
  labels:
    app: nginx-origin
spec:
  replicas: 1
  selector:
    matchLabels:
      app: nginx-origin
  template:
    metadata:
      labels:
        app: nginx-origin
    spec:
      volumes:
      - name: cache-volume
        persistentVolumeClaim:
          claimName: pvc-nas
      containers:
      - name: nginx
        image: nginx
        imagePullPolicy: IfNotPresent
        ports:
        - containerPort: 80
        volumeMounts:
        - name: cache-volume
          mountPath: /usr/share/nginx/html
          readOnly: true
      - name: srs-cp-files
        image: ossrs/srs:3
        imagePullPolicy: IfNotPresent
        volumeMounts:
        - name: cache-volume
          mountPath: /tmp/html
          readOnly: false
        command: ["/bin/sh"]
        args:
        - "-c"
        - >
          if [[ ! -f /tmp/html/index.html ]]; then
            cp -R ./objs/nginx/html/* /tmp/html
          fi &&
          sleep infinity

---

apiVersion: v1
kind: Service
metadata:
  name: srs-http-service
spec:
  type: LoadBalancer
  selector:
    app: nginx-origin
  ports:
  - name: nginx-origin-service-80-80
    port: 80
    protocol: TCP
    targetPort: 80
EOF
Note: 由于共享目录是空目录,我们启动了一个
srs-cp-files的container,拷贝SRS默认的文件,参考#1603.
Note: Nginx通过Shared Volume(PV)读取SRS Origin生成的切片,对外提供HLS服务。
Note: 这里我们选择ACK自动创建SLB和EIP,也可以手动指定SLB,参考Use One SLB and EIP for All Streaming Service。
Step 3: 创建SRS边缘配置、应用和服务。
srs-edge-config: 创建一个配置k8s ConfigMap,存储了SRS Edge Server使用的配置文件。srs-edge-deploy: 创建一个无状态应用k8s deployment,运行多个SRS Edge Server。srs-edge-service: 创建一个服务k8s service基于SLB对外提供流媒体服务。
cat <<EOF | kubectl apply -f -
apiVersion: v1
kind: ConfigMap
metadata:
  name: srs-edge-config
data:
  srs.conf: |-
    listen              1935;
    max_connections     1000;
    daemon              off;
    http_api {
        enabled         on;
        listen          1985;
    }
    http_server {
        enabled         on;
        listen          8080;
    }
    vhost __defaultVhost__ {
        cluster {
            mode            remote;
            origin          srs-origin-0.socs srs-origin-1.socs srs-origin2.socs;
        }
        http_remux {
            enabled     on;
        }
    }

---

apiVersion: apps/v1
kind: Deployment
metadata:
  name: srs-edge-deploy
  labels:
    app: srs-edge
spec:
  replicas: 4
  selector:
    matchLabels:
      app: srs-edge
  template:
    metadata:
      labels:
        app: srs-edge
    spec:
      volumes:
      - name: config-volume
        configMap:
          name: srs-edge-config
      containers:
      - name: srs
        image: ossrs/srs:3
        imagePullPolicy: IfNotPresent
        ports:
        - containerPort: 1935
        - containerPort: 1985
        - containerPort: 8080
        volumeMounts:
        - name: config-volume
          mountPath: /usr/local/srs/conf

---

apiVersion: v1
kind: Service
metadata:
  name: srs-edge-service
spec:
  type: LoadBalancer
  selector:
    app: srs-edge
  ports:
  - name: srs-edge-service-1935-1935
    port: 1935
    protocol: TCP
    targetPort: 1935
  - name: srs-edge-service-8080-8080
    port: 8080
    protocol: TCP
    targetPort: 8080
EOF
Remark: 假设SRS源站有状态服务
srs-origin配置的Replicas为2,则会生成两个源站srs-origin-0.socs和srs-origin-1.socs,若新增了源站比如Replicas为3,则需要在配置中加上srs-origin-2.socs。
Note: Edge Server的配置中,通过源站在Headless Service注册的内部域名
srs-origin-0.socs等等,连接到Origin Server。
Note: 这里我们选择ACK自动创建SLB和EIP,也可以手动指定SLB,参考Use One SLB and EIP for All Streaming Service。
Step 4: 大功告成。你可以推拉流了,其中HLS流可以从Nginx(80)播放,RTMP和HTTP-FLV从SRS播放:
- Publish RTMP to
rtmp://28.170.32.118/live/livestreamor Publish Demo Streams to SRS. - Play RTMP from rtmp://28.170.32.118/live/livestream
- Play HTTP-FLV from http://28.170.32.118:8080/live/livestream.flv
- Play HLS from http://28.170.32.118/live/livestream.m3u8
Note: 请将上面的EIP换成你自己的,可用命令
kubectl get svc/srs-http-service或kubectl get svc/srs-edge-service查看你的EIP。
Note: 如果是自动创建SLB和EIP,那么HLS和RTMP/HTTP-FLV的IP是不一样的,你可以选择手动指定SLB,这两个服务可以用同一个SLB,参考Use One SLB and EIP for All Streaming Service。
这里我们选择的是有状态集群方式,也可以选择以无状态应用(Deployment)方式部署源站,参考Build SRS Origin Cluster as Deployment。
SRS Cluster Update, Rollback, Gray Release with Zero Downtime
服务的更新、回滚和灰度,是个简单的问题,如果加上一个条件"不中断服务的前提下",那么就是一个难题,如果再加上"大规模",那么就是K8S要解决的核心问题之一。
坏消息是这个难搞的问题还真是流媒体服务的核心的、关键的、不可忽视的关键能力之一,好消息是K8S和云计算让这个难题稍微好一点点了。
我们在什么场景下会遇到更新、回滚和灰度的问题:
- SRS需要升级新版本,如何知道升级后对现有业务没有影响?如果选择业务量小升级,那一般常态会是半夜三更、凌晨三四点,还要不要头发了呢?
- 改进了新的功能或优化,根据业务定制了新的东西(完全直接使用SRS也得有自己的业务服务器),如何只在一部分机器发布,看看效果有没有达到预期?
- 更新新版本后,如果发现有问题,影响了用户服务,如何在最短时间内回滚到之前的版本?问题出现时首先是要确认问题后(若由升级引起则)回滚,而不是很费时间的找Bug。
在这个场景下,对比K8S和传统部署方式的差异:
| 对比项 | ECS | K8S | 说明 |
|---|---|---|---|
| 部署 | 安装包 | 镜像 | Docker镜像可回滚,开发和生产环境一致,可Cache, 高效率和高密度,高可移植性,资源隔离可预测程序性能 |
| 看门狗 | 手动 | 自动 | SRS异常退出由看门狗重新拉起,非K8S需要手动安装, K8S自动管理和拉起服务 |
| 更新 | 手动 | 自动 | 传统方式用脚本下载和更新二进制,人工分批更新, K8S自动Rolling Update,自动下载镜像和分批更新 |
| 灰度 | 手动 | 自动 | 传统方式手动操作SLB决定切量比例,K8S通过Replicas控制比例,自动切量 |
| 回滚 | 手动 | 自动 | 传统方式手动回滚,K8S有版本管理和回滚机制 |
Note: 平滑更新的关键是平滑退出,重点是边缘集群的更新,对于源站集群我们可以选择直接重启,因为一般会有边缘集群作为代理,源站断开后边缘会重试,不影响用户,参考#1579
我们重点关注边缘集群的平滑退出,SRS边缘属于长连接无状态服务。和Nginx一样,SRS使用SIGQUIT作为信号,
同时配置force_grace_quit认为SIGTERM也是平滑退出,收到SIGQUIT信号后,会等待grace_start_wait指定的时间,然后关闭Listeners新的连接不会分配到这个服务器,
然后开始清理并等待现有连接退出,所有连接退出后还会等待grace_final_wait指定的时间,才会退出。
以之前部署的SRS源站和边缘集群为例,参考SRS Origin Cluster for a Large Number of Streams,SRS边缘的Pod的配置,需要指定平滑退出的参数,例如:
cat <<EOF | kubectl apply -f -
apiVersion: v1
kind: ConfigMap
metadata:
  name: srs-edge-config
data:
  srs.conf: |-
    listen              1935;
    max_connections     1000;
    daemon              off;
    grace_start_wait    700;
    grace_final_wait    800;
    force_grace_quit    on;
    http_api {
        enabled         on;
        listen          1985;
    }
    http_server {
        enabled         on;
        listen          8080;
    }
    vhost __defaultVhost__ {
        cluster {
            mode            remote;
            origin          srs-origin-0.socs srs-origin-1.socs srs-origin2.socs;
        }
        http_remux {
            enabled     on;
        }
    }
EOF
Remark: 一定要开启
force_grace_quit,不开启(默认)将使用暴力更新,直接断开现有的连接,参考#1579
Note: 在K8S中开始删除Pod时,会快速从Service删除Pod,所以我们将
grace_start_wait和grace_final_wait设置时间短一些,只需要几百毫秒就足够了。
SRS边缘的配置,也需要在lifecycle.preStop事件时启动平滑退出,并设置terminationGracePeriodSeconds等待时间,例如:
cat <<EOF | kubectl apply --record -f -
apiVersion: apps/v1
kind: Deployment
metadata:
  name: srs-edge-deploy
  labels:
    app: srs-edge
spec:
  replicas: 2
  revisionHistoryLimit: 10
  selector:
    matchLabels:
      app: srs-edge
  template:
    metadata:
      labels:
        app: srs-edge
    spec:
      volumes:
      - name: config-volume
        configMap:
          name: srs-edge-config
      containers:
      - name: srs
        image: ossrs/srs:v4.0.5
        imagePullPolicy: IfNotPresent
        ports:
        - containerPort: 1935
        - containerPort: 1985
        - containerPort: 8080
        volumeMounts:
        - name: config-volume
          mountPath: /usr/local/srs/conf
        lifecycle:
          preStop:
            exec:
              command: ["/usr/local/srs/etc/init.d/srs", "grace"]
      terminationGracePeriodSeconds: 120
EOF
Note:
kubectl apply增加了一个参数--record,后面回滚会用到。
Note:
terminationGracePeriodSeconds等待退出时间我们设置2分钟,线上服务可以设置更长,比如12小时。
Remark: 为了更好体现平滑更新的逻辑,我们设置
Replicas=2可以更容易演示。
Remark: 我们使用SRS4演示,例如
v4.0.5,实际上SRS3也可以的比如v3.0-b1等。
我们停掉了之前srs-demo-deploy推的两个DEMO流,采用手动推流到Edge,方便演示升级时有长连接需要服务的情况:
ffmpeg -re -i ./doc/source.200kbps.768x320.flv -c copy \
    -f flv rtmp://28.170.32.118/live/livestream
Note: 请将上面的EIP换成你自己的,可用命令
kubectl get svc/srs-edge-service查看你的EIP。
咱们可以看到目前启动了2个Edge,可以看下它的版本,是通过Pod(z9gbm)推流:
kubectl get po|grep edge
srs-edge-deploy-58d9999b7c-pnr2f       1/1     Running   0          16s
srs-edge-deploy-58d9999b7c-z9gbm       1/1     Running   0          16s

kubectl exec srs-edge-deploy-58d9999b7c-pnr2f -- ./objs/srs -v
4.0.5
kubectl exec srs-edge-deploy-58d9999b7c-pnr2f -- yum install -y net-tools
kubectl exec srs-edge-deploy-58d9999b7c-pnr2f -- netstat -anp|grep 1935
tcp        0      0 0.0.0.0:1935            0.0.0.0:*               LISTEN      1/./objs/srs

kubectl exec srs-edge-deploy-58d9999b7c-z9gbm -- ./objs/srs -v
4.0.5
kubectl exec srs-edge-deploy-58d9999b7c-z9gbm -- yum install -y net-tools
kubectl exec srs-edge-deploy-58d9999b7c-z9gbm -- netstat -anp|grep 1935
tcp        0      0 0.0.0.0:1935            0.0.0.0:*               LISTEN      1/./objs/srs
tcp        0      0 172.20.0.62:46482       172.20.0.41:1935        ESTABLISHED 1/./objs/srs
tcp        0      0 172.20.0.62:1935        172.20.0.1:12066        ESTABLISHED 1/./objs/srs
Note: 我们只推流一个流,会有两个连接,一个是客户端到Edge的连接,一个是Edge回源到Origin的连接。
下面我们会分几个部分,看发布中遇到的问题:
- SRS Cluster Rolling Update: 在平滑退出基础上的滚动更新,集群更新的基础机制。
- SRS Cluster Rolling Back: 在平滑退出基础上的发布回滚,发布遇到问题首先考虑回滚。
- SRS Cluster Canary Release: 金丝雀升级,可精确控制的流量控制和回滚。
SRS Cluster Rolling Update
K8S的更新是Rolling Update,也就是修改和更新Pods时,会分批次执行。
比如,上面的例子中SRS边缘的版本是v4.0.5,若我们现在需要更新到4.0.6,镜像已经打好了ossrs/srs:v4.0.6,那么我们可以用命令更新:
kubectl set image deploy/srs-edge-deploy srs=ossrs/srs:v4.0.6 --record
可以看这两个Pod的日志,没有连接的Pod很快就退出了,而有连接的Pod经过了一定的时间才退出(若客户端连接主动断开会更快退出):
kubectl exec srs-edge-deploy-58d9999b7c-pnr2f -- tail -f objs/srs.log
[2020-02-19 11:07:20.818][Trace][1][937] sig=3, user start gracefully quit
[2020-02-19 11:07:20.960][Trace][1][937] force gracefully quit, signo=15
[2020-02-19 11:07:21.772][Trace][1][932] cleanup for quit signal fast=0, grace=1
[2020-02-19 11:07:21.772][Warn][1][932][11] main cycle terminated, system quit normally.
command terminated with exit code 137

kubectl exec srs-edge-deploy-58d9999b7c-z9gbm -- tail -f objs/srs.log
[2020-02-19 11:07:23.095][Trace][1][1009] sig=3, user start gracefully quit
[2020-02-19 11:07:23.316][Trace][1][1009] force gracefully quit, signo=15
[2020-02-19 11:07:23.784][Trace][1][1004] cleanup for quit signal fast=0, grace=1
[2020-02-19 11:07:23.784][Warn][1][1004][11] main cycle terminated, system quit normally.
[2020-02-19 11:07:24.784][Trace][1][1004] wait for 1 conns to quit
[2020-02-19 11:07:26.968][Trace][1][1010] <- CPB time=120041497, okbps=0,0,0, ikbps=252,277,0, mr=0/350, p1stpt=20000, pnt=5000
[2020-02-19 11:08:26.791][Trace][1][1004] wait for 1 conns to quit
[2020-02-19 11:08:52.602][Trace][1][1010] edge change from 200 to state 0 (init).
[2020-02-19 11:08:52.792][Trace][1][1004] wait for 0 conns to quit
command terminated with exit code 137

kubectl get po |grep edge
NAME                                   READY   STATUS        RESTARTS   AGE
srs-edge-deploy-58d9999b7c-z9gbm       0/1     Terminating   0          3m52s
srs-edge-deploy-76fcbfb848-z5rmn       1/1     Running       0          104s
srs-edge-deploy-76fcbfb848-zt4wv       1/1     Running       0          106s
Remark: 注意我们现在是有一个Pod有客户端在推流的。同样,我们指定了参数
--record,会在后面回滚时用得着。
若Rolling Update期间,我们需要暂停更新,可以用kubectl rollout暂停和恢复:
kubectl rollout pause deploy/srs-edge-deploy
kubectl rollout resume deploy/srs-edge-deploy
Remark: 注意并不是滚动过程中停止,而是暂停的下一次Rollout,参考理解rollout pause和resume。
SRS Cluster Rolling Back
每次发布K8S都会记录一个Revision,若我们传递了--record参数(正如前面我们做的),则会记录更详细的CHANGE-CAUSE,比如:
kubectl rollout history deploy/srs-edge-deploy
REVISION  CHANGE-CAUSE
1         kubectl apply --record=true --filename=-
2         kubectl set image deploy/srs-edge-deploy srs=ossrs/srs:v4.0.6 --record=true
Note: 默认ACK只保留10个Revision,可以通过设置
revisionHistoryLimit增加可回滚的版本。
若出现异常,可以回滚到之前的版本,例如:
kubectl rollout undo deploy/srs-edge-deploy --to-revision=1
实际上回滚的过程也是Rolling Update的过程,只是不用指定修改什么配置,而是指定的哪个历史版本的配置。回滚后,新增了一个版本3,和1是一样的:
REVISION  CHANGE-CAUSE
1         kubectl apply --record=true --filename=-
2         kubectl set image deploy/srs-edge-deploy srs=ossrs/srs:v4.0.6 --record=true
3         kubectl apply --record=true --filename=-
Note: 可以在阿里云控制台来选择回滚到哪个版本。
SRS Cluster Canary Release
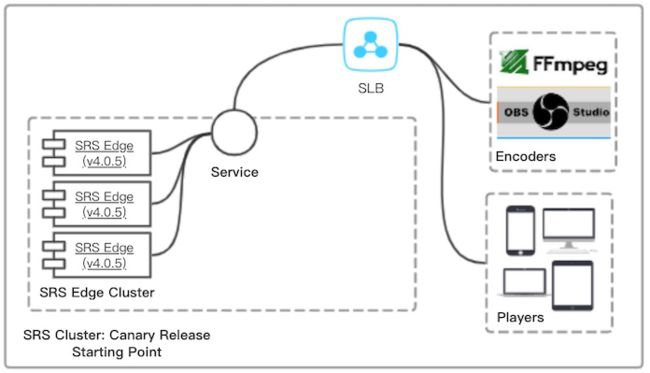
Canary是金丝雀发布,指试探性的发布一些版本,没有问题就继续扩大比例。由于涉及到具体的发布比例,所以我们要在Rolling Update基础上,
能控制新老Pods的数目,这就需要使用SLB了,参考Kubernetes集群中使用阿里云 SLB 实现四层金丝雀发布。
Note: 关于金丝雀发布,最初发布的版本就好比金丝雀,在以前煤矿中会把金丝雀先送下去,如果缺氧雀儿就挂了。
以上面的Edge集群为例,假设目前版本是v4.0.5,有三个Edge Pod在运行,通过SLB对外提供服务:
cat <<EOF | kubectl apply --record -f -
apiVersion: apps/v1
kind: Deployment
metadata:
  name: srs-edge-r5-deploy
  labels:
    run: srs-edge-r5
spec:
  replicas: 3
  selector:
    matchLabels:
      run: srs-edge-r5
  template:
    metadata:
      labels:
        run: srs-edge-r5
        app: srs-edge
    spec:
      volumes:
      - name: config-volume
        configMap:
          name: srs-edge-config
      containers:
      - name: srs
        image: ossrs/srs:v4.0.5
        imagePullPolicy: IfNotPresent
        ports:
        - containerPort: 1935
        - containerPort: 1985
        - containerPort: 8080
        volumeMounts:
        - name: config-volume
          mountPath: /usr/local/srs/conf
        lifecycle:
          preStop:
            exec:
              command: ["/usr/local/srs/etc/init.d/srs", "grace"]
      terminationGracePeriodSeconds: 120
EOF
Remark: 注意Pod的labels有两个,一个是
run: srs-edge-r5是这个应用所使用的,另外一个是app: srs-edge是Service用的,新老的SRS都有这个标签这样Service就可以都转发了。
执行命令后,可以看到三个Pod在运行:
kubectl get po
NAME                                   READY   STATUS    RESTARTS   AGE
srs-edge-r5-deploy-6c84cdc77b-q2j97    1/1     Running   0          3m15s
srs-edge-r5-deploy-6c84cdc77b-s6pzh    1/1     Running   0          3m15s
srs-edge-r5-deploy-6c84cdc77b-wjdtl    1/1     Running   0          3m15s
如果我们要升级到v4.0.6,但是只想先升级一台,这台就是金丝雀了。我们可以创建另外一个Deployment,他们的name不一样,但使用同样的Service:
cat <<EOF | kubectl apply --record -f -
apiVersion: apps/v1
kind: Deployment
metadata:
  name: srs-edge-r6-deploy
  labels:
    run: srs-edge-r6
spec:
  replicas: 1
  selector:
    matchLabels:
      run: srs-edge-r6
  template:
    metadata:
      labels:
        run: srs-edge-r6
        app: srs-edge
    spec:
      volumes:
      - name: config-volume
        configMap:
          name: srs-edge-config
      containers:
      - name: srs
        image: ossrs/srs:v4.0.6
        imagePullPolicy: IfNotPresent
        ports:
        - containerPort: 1935
        - containerPort: 1985
        - containerPort: 8080
        volumeMounts:
        - name: config-volume
          mountPath: /usr/local/srs/conf
        lifecycle:
          preStop:
            exec:
              command: ["/usr/local/srs/etc/init.d/srs", "grace"]
      terminationGracePeriodSeconds: 120
EOF
Remark: 注意Pod的labels有两个,一个是
run: srs-edge-r6是这个应用所使用的,另外一个是app: srs-edge是Service用的,和之前的老版本是一样的,这样Service就可以都转发了。
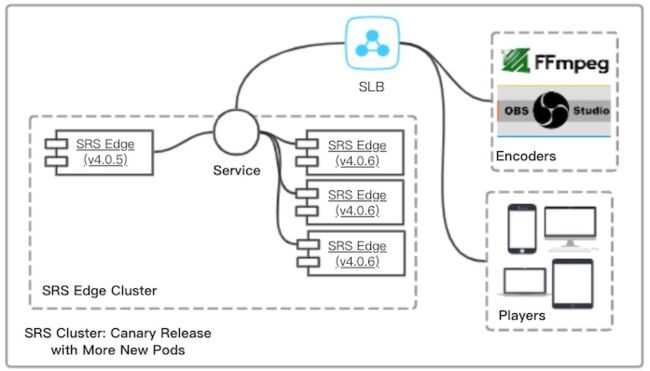
执行命令后,可以看到四个Pod在运行,三个老的,一个新的,这样就灰度了25%的流量到了新版本:
kubectl get po
NAME                                   READY   STATUS    RESTARTS   AGE
srs-edge-r5-deploy-6c84cdc77b-q2j97    1/1     Running   0          3m30s
srs-edge-r5-deploy-6c84cdc77b-s6pzh    1/1     Running   0          3m30s
srs-edge-r5-deploy-6c84cdc77b-wjdtl    1/1     Running   0          3m30s
srs-edge-r6-deploy-598f4698d-kkfnb     1/1     Running   0          6s

while true; do ffmpeg -f flv -i rtmp://r.ossrs.net/live/livestream 2>&1|grep server_version; sleep 1; done
    server_version  : 4.0.5
    server_version  : 4.0.5
    server_version  : 4.0.5
    server_version  : 4.0.5
    server_version  : 4.0.5
    server_version  : 4.0.5
    server_version  : 4.0.6 # 这是新版本
    server_version  : 4.0.5
    server_version  : 4.0.5
    server_version  : 4.0.6 # 这是新版本
那么接下来,只需要调整新老的Deployment的Replicas,就能调整流量的比例了,比如我们增加新版本比重,只流一台老的:
kubectl scale --replicas=3 deploy/srs-edge-r6-deploy
kubectl scale --replicas=1 deploy/srs-edge-r5-deploy
可以看到经过Gracefully Quit平滑升级和退出,最终变成了我们声明的那个样子,对业务不影响:
kubectl get po
NAME                                   READY   STATUS    RESTARTS   AGE
nginx-origin-deploy-85f4695685-gn2df   3/3     Running   0          5h31m
srs-edge-r5-deploy-6c84cdc77b-s6pzh    1/1     Running   0          25m
srs-edge-r6-deploy-f6b59c6c6-ddgxw     1/1     Running   0          2m59s
srs-edge-r6-deploy-f6b59c6c6-gvnd8     1/1     Running   0          2m54s
srs-edge-r6-deploy-f6b59c6c6-j46b5     1/1     Running   0          2m58s

while true; do ffmpeg -f flv -i rtmp://r.ossrs.net/live/livestream 2>&1|grep server_version; sleep 1; done
    server_version  : 4.0.6
    server_version  : 4.0.6
    server_version  : 4.0.6
    server_version  : 4.0.6
    server_version  : 4.0.6
    server_version  : 4.0.6
    server_version  : 4.0.5 # 这是老版本
    server_version  : 4.0.6
    server_version  : 4.0.6
    server_version  : 4.0.6
    server_version  : 4.0.6
    server_version  : 4.0.6
    server_version  : 4.0.5 # 这是老版本
    server_version  : 4.0.6
    server_version  : 4.0.6
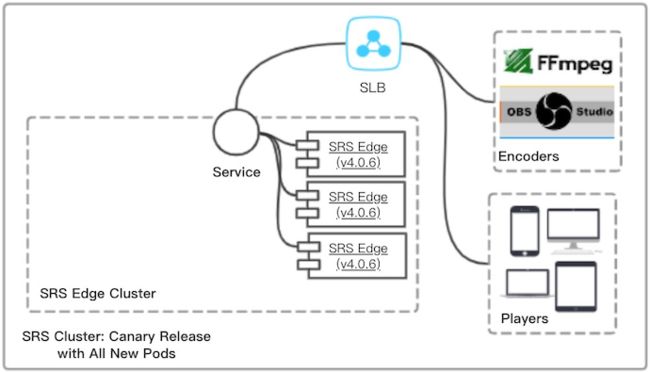
最终我们只要把老的Replicas设为0,然后就可以删除老的应用srs-edge-r5-deploy了,系统全部变成新的版本了,如下图所示:
亲,爽吗?干净利落,谈笑间,强撸灰飞湮灭啦。
Useful Tips
本章补充了一些比较实用的话题,以及前面章节用到的一些工具和场景。
- Create K8S Cluster in ACK: 在阿里云ACK创建你的K8S集群,我们基于ACK构建流媒体服务。
- Publish Demo Streams to SRS: 推送SRS的演示流,可直接推源站,也可以推边缘集群。
- Cleanup For DVR/HLS Temporary Files: 定期清理临时文件,比如每天凌晨1点,删除3天前的临时文件。
- Use One SLB and EIP for All Streaming Service: 使用一个SLB(EIP)对外提供RTMP、HTTP-FLV、HLS等服务。
- Build SRS Origin Cluster as Deployment: 除了以StatefulSet有状态应用方式部署Origin Cluster,我们还可以选择Deployment无状态应用方式。
- Managing Compute Resources for Containers: 资源的申请和限制,以及如何调度和限制如何生效。
- Auto Reload by Inotify: SRS侦听ConfigMap的变更,并支持自动reload。
Create K8S Cluster in ACK
Step 1: [可选] 创建k8s集群用的专有网络VPC和交换机。
- 专有网络,名称:
srs-k8s-vpc,会在这个VPC创建网络资源。 - 交换机,名称:
srs-k8s-node,创建的Node(ECS)会在这个交换机的网段中。
Step 2: [可选] 创建管理机器的密钥对KeyPair。
- 密钥对名称:
srs-k8s-key,可以设置ssh配置免密码登陆。
Step 3: [可选] 购买NAS,创建源站集群使用的PV(Persistent Volume)持久化卷,可在NAS控制台创建文件系统。
- 文件系统类型:可选择
通用型,或者要求更快的速度可选择极速型。 - 区域:请选择
华北3(张家口),千万注意别选错了,要和ACK集群在同一VPC中。 - 协议类型:选择
NFS。 - VPC网络:请选择
srs-k8s-vpc。 - 交换机:请选择
srs-k8s-node。
Step 4: 进入ACK控制台,新建K8S托管集群。
- 集群名称:
srs - 地域:
华北3(张家口)
选择专有网络和Node(ECS)的交换机,也可以点新建创建。
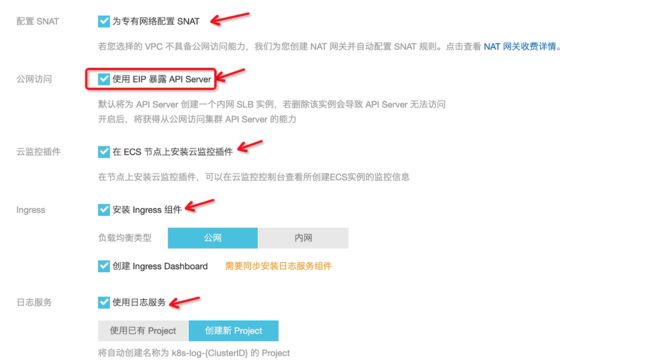
选择Worker实例的类型和规格、创建的台数(默认3台)、镜像、密钥对。把相关组件都选择上,尤其是ApiServer公网访问。
Remark: Worker推荐3台及以上,至少4CPU+8GB内存的ECS配置,太低的配置可能会造成负载太高。
点创建集群,就可以成功创建K8S集群了。
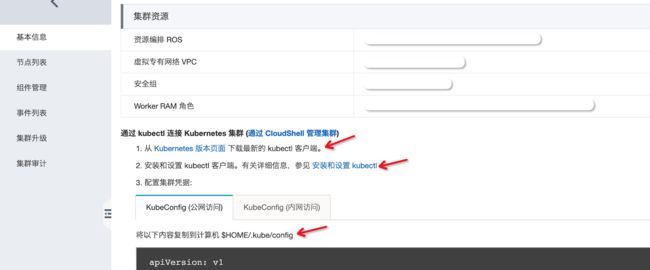
Step 5: 使用kubectl管理集群,进入ACK,点击集群查看基本信息。
配置好kubectl后,执行下面的命令应该是成功的:
kubectl cluster-info
接下来,就可以创建SRS集群了,参考QuickStart.
Publish Demo Streams to SRS
为了演示用,若存在源站服务srs-origin-service,也可以创建一个无状态应用k8s deployment,推流到SRS源站:
cat <<EOF | kubectl apply -f -
apiVersion: apps/v1
kind: Deployment
metadata:
  name: srs-demo-deploy
  labels:
    app: srs-demo
spec:
  replicas: 1
  selector:
    matchLabels:
      app: srs-demo
  template:
    metadata:
      labels:
        app: srs-demo
    spec:
      containers:
      - name: encoder
        image: ossrs/srs:encoder
        imagePullPolicy: IfNotPresent
        command: ["/bin/sh"]
        args:
        - "-c"
        - >
          while true; do
            ffmpeg -re -i ./doc/source.200kbps.768x320.flv \
              -c copy -f flv rtmp://srs-origin-service/live/livestream;
            sleep 3;
          done
EOF
Note: 可以创建多个应用推多个流,记得将推流域名改成你的嗯源站服务的名称。
集群中若已经有Edge(边缘)服务srs-edge-service,也可以创建无状态应用k8s deployment,推流到SRS边缘:
cat <<EOF | kubectl apply -f -
apiVersion: apps/v1
kind: Deployment
metadata:
  name: srs-demo-deploy
  labels:
    app: srs-demo
spec:
  replicas: 1
  selector:
    matchLabels:
      app: srs-demo
  template:
    metadata:
      labels:
        app: srs-demo
    spec:
      containers:
      - name: livestream
        image: ossrs/srs:encoder
        imagePullPolicy: IfNotPresent
        command: ["/bin/sh"]
        args:
        - "-c"
        - >
          while true; do
            ffmpeg -re -i ./doc/source.200kbps.768x320.flv -c copy \
              -f flv rtmp://srs-edge-service/live/livestream && continue;
            sleep 3;
          done
      - name: avatar
        image: ossrs/srs:encoder
        imagePullPolicy: IfNotPresent
        command: ["/bin/sh"]
        args:
        - "-c"
        - >
          while true; do
            ffmpeg -re -i ./doc/source.200kbps.768x320.flv -c copy \
              -f flv rtmp://srs-edge-service/live/avatar && continue;
            sleep 3;
          done
EOF
Note: 若存在源站服务,可以直接推源站,参考Publish Demo Streams to SRS。
Cleanup For DVR/HLS Temporary Files
可以开启一个K8S CronJob定期清理存储的临时文件:
- 若开启了HLS,推流结束后最后几个切片还会继续存在,当然也可以开启
hls_dispose清理。 - SRS重启或Crash后,可能有临时文件不会被清理,会不断累积。
- 清理时注意不要删除有用的文件,比如DVR正式文件,或console等静态文件。
建议将清理的目标设置为:
- 只清理3天前的,3天之内的文件可以暂时不用管。
- 扩展名为
*.ts*或*.m3u8*或*.flv.tmp或*.mp4.tmp文件。 - 清理空目录,空目录一般不影响正常功能,清理不会出现问题。
- 每天凌晨1点运行清理任务,时间是按K8S集群时间,一般国内是北京时间。
cat <<EOF | kubectl apply -f -
apiVersion: batch/v1beta1
kind: CronJob
metadata:
  name: cleanup
spec:
  schedule: "15 1 * * *"
  jobTemplate:
    spec:
      template:
        spec:
          volumes:
          - name: cache-volume
            persistentVolumeClaim:
              claimName: pvc-nas
          containers:
          - name: cleanup
            image: centos:7
            imagePullPolicy: IfNotPresent
            volumeMounts:
            - name: cache-volume
              mountPath: /tmp/html
              readOnly: false
            args:
            - /bin/sh
            - -c
            - >
              find /tmp/html -mtime +3 -name *.ts* -print -delete &&
              find /tmp/html -mtime +3 -name *.m3u8* -print -delete &&
              find /tmp/html -mtime +3 -name *.flv.tmp -print -delete &&
              find /tmp/html -mtime +3 -name *.mp4.tmp -print -delete &&
              find /tmp/html -type d -empty -print -delete &&
              echo "Done"
          restartPolicy: Never
EOF
Remark: K8S的Cron表达式没有秒,格式是
分 时 日 月 星期,比如15 1 * * *表示每天01:15执行。另外,一般
Remark: 注意find命令的
-nmin和-mtime时间限制,是和-name绑定在一起的,所以每种文件用一个命令删除。
目前ACK还不支持Job完成后自动清理,ttlSecondsAfterFinished,完成后的Pod还会留在系统。
一个可选的办法,是启动一个Deployment后,用脚本循环执行,执行一次后等待1天:
cat <<EOF | kubectl apply -f -
apiVersion: apps/v1
kind: Deployment
metadata:
  name: cleanup
  labels:
    app: cleanup
spec:
  replicas: 1
  selector:
    matchLabels:
      app: cleanup
  template:
    metadata:
      labels:
        app: cleanup
    spec:
      volumes:
      - name: cache-volume
        persistentVolumeClaim:
          claimName: pvc-nas
      containers:
      - name: cleanup
        image: centos:7
        imagePullPolicy: IfNotPresent
        volumeMounts:
        - name: cache-volume
          mountPath: /tmp/html
          readOnly: false
        args:
        - /bin/sh
        - -c
        - >
          while true; do
            find /tmp/html -mtime +3 -name *.ts* -print -delete &&
            find /tmp/html -mtime +3 -name *.m3u8* -print -delete &&
            find /tmp/html -mtime +3 -name *.flv.tmp -print -delete &&
            find /tmp/html -mtime +3 -name *.mp4.tmp -print -delete &&
            find /tmp/html -type d -empty -print -delete &&
            echo "[`date`] Cleanup done";
            sleep 86400;
          done
EOF
Note: 一天就是86400秒,注意避开业务高峰期执行。
Use One SLB and EIP for All Streaming Service
在例子中,我们默认配置的是自动创建SLB和EIP,这会导致对外提供的EIP是不一样的,比如RTMP/HTTP-FLV是一个EIP,HLS是另外一个IP。
为了使用一个EIP对外提供服务,我们必须在创建Service时指定SLB,这需要一个已经存在的内网SLB(绑定了EIP),你可以从Aliyun组合购买,比如:
- SLB ID:
lb-2zetmjpao868s9yzvr5ld - EIP:
28.170.32.118
然后可以在创建服务时,通过指定Service的metadata.annotations,指定你自己购买的内网SLB:
metadata:
  annotations:
    service.beta.kubernetes.io/alicloud-loadbalancer-address-type: intranet
    service.beta.kubernetes.io/alicloud-loadbalancer-force-override-listeners: "true"
    service.beta.kubernetes.io/alicloud-loadbalancer-id: lb-2zetmjpao868s9yzvr5ld
Remark: 如果购买的是内网SLB,需要在单独买EIP,将EIP绑定到SLB对外提供服务。
Remark: 也可以简单点,购买SLB时就带外网IP了,就可以直接对外提供服务,这时候去掉上面
alicloud-loadbalancer-address-type: intranet这个条,不是内网了。
Remark: 如果是专有版K8S,而不是托管版K8S,需要安装CCM(Cloud Controller Manager)才能使用SLB,否则会发现指定了SLB的ID无法使用,Service无ExternalIP等。
例如,我们以Quick Start为例,可以修改Service如下:
cat <<EOF | kubectl apply -f -
apiVersion: v1
kind: Service
metadata:
  annotations:
    service.beta.kubernetes.io/alicloud-loadbalancer-address-type: intranet
    service.beta.kubernetes.io/alicloud-loadbalancer-force-override-listeners: "true"
    service.beta.kubernetes.io/alicloud-loadbalancer-id: lb-2zetmjpao868s9yzvr5ld
  name: srs-origin-service
spec:
  type: LoadBalancer
  selector:
    app: srs
  ports:
  - name: srs-origin-service-1935-1935
    port: 1935
    protocol: TCP
    targetPort: 1935
  - name: srs-origin-service-1985-1985
    port: 1985
    protocol: TCP
    targetPort: 1985
  - name: srs-origin-service-8080-8080
    port: 8080
    protocol: TCP
    targetPort: 8080
EOF
Note:购买时注意选择SLB的VPC,要和K8S集群在一个VPC下面。
Note:关于SLB的更多配置,比如保活、计费、证书等等,可以参考SLB for K8S Service。
Build SRS Origin Cluster as Deployment
在源站集群部署中,可以选择StatefulSet(有状态应用)方式部署,参考:SRS Origin Cluster for a Large Number of Streams。
当然也可以选择Deployment(无状态应用)方式部署,这两种方式的差异参考#464。
| 对比项 | 无状态源站集群 | 有状态源站集群 |
|---|---|---|
| 部署 | 容易,源站只需要创建一个StatefulSet和Service | 复杂,需要几个源站就需要创建几个应用 |
| 规模 | <30节点,需要将节点写入源站和边缘配置 | <10节点,需要将节点写入源站和边缘配置 |
| 更新 | 简单,直接修改镜像更新Pod | 复杂,需要再创建源站同等数量的应用,几个源站就几个应用 |
| 灰度 | 不支持,更新时断流有重推 | 支持灰度,可手动灰度指定的机器, 更新时断流有重推 |
- 新增源站时,都需要修改源站和边缘的配置,修改ConfigMap。
- 灰度时,可以手动更改某些源站的镜像版本,出现问题手动回滚,不适合较多机器的情况。
- 更新和回滚时,都会造成源站重启,由于有边缘作为代理,所以用户不会中断,但边缘会有重试,用户可能会有感知。
Note: 关于Rolling Update,参考SRS Cluster Update, Rollback, Gray Release with Zero Downtime。
我们以部署三个源站为例,全部以无状态应用(Deployment)方式部署:
| 源站 | Deployment | Service | 域名 |
|---|---|---|---|
| Origin Server 0 | srs-origin-0-deploy | srs-origin-0-socs | srs-origin-0-socs |
| Origin Server 1 | srs-origin-1-deploy | srs-origin-1-socs | srs-origin-1-socs |
| Origin Server 2 | srs-origin-2-deploy | srs-origin-2-socs | srs-origin-2-socs |
- 配置
srs-origin-config,三个源站的配置都是一样的,都是Service的地址例如srs-origin-0-socs。新增源站时需要更新。 - 配置
srs-edge-config,边缘集群的配置项也是一样的,都是Service的地址例如srs-origin-0-socs。新增源站时需要更新。
cat <<EOF | kubectl apply -f -
apiVersion: v1
kind: ConfigMap
metadata:
  name: srs-origin-config
data:
  srs.conf: |-
    listen              1935;
    max_connections     1000;
    daemon              off;
    http_api {
        enabled         on;
        listen          1985;
    }
    http_server {
        enabled         on;
        listen          8080;
    }
    vhost __defaultVhost__ {
        cluster {
            origin_cluster  on;
            coworkers       srs-origin-0-socs srs-origin-1-socs srs-origin-2-socs;
        }
        http_remux {
            enabled     on;
        }
        hls {
            enabled         on;
        }
    }

---

apiVersion: v1
kind: ConfigMap
metadata:
  name: srs-edge-config
data:
  srs.conf: |-
    listen              1935;
    max_connections     1000;
    daemon              off;
    http_api {
        enabled         on;
        listen          1985;
    }
    http_server {
        enabled         on;
        listen          8080;
    }
    vhost __defaultVhost__ {
        cluster {
            mode            remote;
            origin          srs-origin-0-socs srs-origin-1-socs srs-origin-2-socs;
        }
        http_remux {
            enabled     on;
        }
    }

EOF
第一个源站,服务地址为srs-origin-0-socs:
- Deployment应用为
srs-origin-0-deploy,注意Replicas应该为1。 - Service服务为
srs-origin-0-socs,只挂了一个应用srs-origin-0-deploy。
cat <<EOF | kubectl apply -f -

apiVersion: apps/v1
kind: Deployment
metadata:
  name: srs-origin-0-deploy
  labels:
    app: srs-origin-0
spec:
  replicas: 1
  selector:
    matchLabels:
      app: srs-origin-0
  template:
    metadata:
      labels:
        app: srs-origin-0
    spec:
      volumes:
      - name: config-volume
        configMap:
          name: srs-origin-config
      containers:
      - name: srs
        image: ossrs/srs:3
        imagePullPolicy: IfNotPresent
        ports:
        - containerPort: 1935
        - containerPort: 1985
        - containerPort: 8080
        volumeMounts:
        - name: config-volume
          mountPath: /usr/local/srs/conf

---

apiVersion: v1
kind: Service
metadata:
  name: srs-origin-0-socs
spec:
  type: ClusterIP
  selector:
    app: srs-origin-0
  ports:
  - name: srs-origin-0-socs-service-1935-1935
    port: 1935
    protocol: TCP
    targetPort: 1935

EOF
Remark: 按照上面的例子,建立第二个源站,服务地址为
srs-origin-1-socs,Deployment应用为srs-origin-1-deploy,Service服务为srs-origin-1-socs。
Remark: 按照上面的例子,建立第三个源站,服务地址为
srs-origin-2-socs,Deployment应用为srs-origin-2-deploy,Service服务为srs-origin-2-socs。
srs-api-service: 创建一个服务k8s service,基于SLB提供HTTP服务,SRS第一个源站提供API服务,标签为srs-origin-0。
cat <<EOF | kubectl apply -f -
apiVersion: v1
kind: Service
metadata:
  name: srs-api-service
spec:
  type: LoadBalancer
  selector:
    app: srs-origin-0
  ports:
  - name: srs-origin-service-1985-1985
    port: 1985
    protocol: TCP
    targetPort: 1985
EOF
Note: 源站对外提供API服务
srs-api-service,我们选择第一个源站对外提供API服务,实际上源站集群需要改进这点,参考#1607。
Note: 这里我们选择ACK自动创建SLB和EIP,也可以手动指定SLB,参考Use One SLB and EIP for All Streaming Service。
Managing Compute Resources for Containers
计算资源有CPU、内存、磁盘、网络等,K8S内置的资源是指CPU和内存,
K8S也支持声明和消费扩展资源。
可以指定Pod对于资源的Requests和Limits,比如:
spec.containers[].resources.limits.cpu
spec.containers[].resources.limits.memory
spec.containers[].resources.requests.cpu
spec.containers[].resources.requests.memory
Note: CPU单位是m(millicores或millicpu)千分之一核心的意思,0.1或100m就是10%的CPU。
Note: Memory单位是字节,可以是
Ei, Pi, Ti, Gi, Mi, Ki,比如100Mi意思就是100MB内存。
调度时,会根据Requests请求的资源大小,分配到合适的Pod。而Limits,对于CPU和内存的策略是不同的:
- CPU是可以被压缩的资源,可能允许(也可能不允许)超过容器的Limits,这个会传递到容器的cpu-quota,会根据CPU已经容器的状态动态调整。
- Memory是不可以被压缩的资源,如果内存被耗光就OOM了,会杀掉容器重启或迁移走一些容器,K8S Resource QoS会根据Requests和Limits的定义,优先保障Guranteed,然后是Burstable,最低优先级是Best-Effort。
对于SRS源站,我们可以指定更大的内存和CPU:
cat <<EOF | kubectl apply -f -
apiVersion: apps/v1
kind: StatefulSet
metadata:
  name: srs-origin
  labels:
    app: srs-origin
spec:
  serviceName: "socs"
  replicas: 3
  selector:
    matchLabels:
      app: srs-origin
  template:
    metadata:
      labels:
        app: srs-origin
    spec:
      volumes:
      - name: cache-volume
        persistentVolumeClaim:
          claimName: pvc-nas
      - name: config-volume
        configMap:
          name: srs-origin-config
      containers:
      - name: srs
        image: ossrs/srs:3
        imagePullPolicy: IfNotPresent
        resources:
          limits:
            cpu: 200m
            memory: 2Gi
        ports:
        - containerPort: 1935
        - containerPort: 1985
        - containerPort: 8080
        volumeMounts:
        - name: cache-volume
          mountPath: /usr/local/srs/objs/nginx/html
          readOnly: false
        - name: config-volume
          mountPath: /usr/local/srs/conf
EOF
对于SRS边缘,一般CPU可以少一些,内存可以多一些:
cat <<EOF | kubectl apply -f -
apiVersion: apps/v1
kind: Deployment
metadata:
  name: srs-edge-deploy
  labels:
    app: srs-edge
spec:
  replicas: 3
  selector:
    matchLabels:
      app: srs-edge
  template:
    metadata:
      labels:
        app: srs-edge
    spec:
      volumes:
      - name: config-volume
        configMap:
          name: srs-edge-config
      containers:
      - name: srs
        image: ossrs/srs:3
        imagePullPolicy: IfNotPresent
        resources:
          limits:
            cpu: 100m
            memory: 3Gi
        ports:
        - containerPort: 1935
        - containerPort: 1985
        - containerPort: 8080
        volumeMounts:
        - name: config-volume
          mountPath: /usr/local/srs/conf
EOF
Auto Reload by Inotify
SRS会在ConfigMap变更后自动触发Reload,详细参考#1635。
K8S使用ConfigMap存储配置文件,比如:
cat <<EOF | kubectl apply -f -
apiVersion: v1
kind: ConfigMap
metadata:
  name: srs-config
data:
  srs.conf: |-
    listen              1935;
    max_connections     1000;
    daemon              off;
    http_api {
        enabled         on;
        listen          1985;
    }
    http_server {
        enabled         on;
        listen          8080;
    }
    vhost __defaultVhost__ {
        http_remux {
            enabled     on;
        }
        hls {
            enabled         on;
        }
    }
EOF
ConfigMap会以volume挂载成配置文件:
cat <<EOF | kubectl apply -f -
apiVersion: apps/v1
kind: Deployment
metadata:
  name: srs-deploy
  labels:
    app: srs
spec:
  replicas: 1
  selector:
    matchLabels:
      app: srs
  template:
    metadata:
      labels:
        app: srs
    spec:
      volumes:
      - name: config-volume
        configMap:
          name: srs-config
      containers:
      - name: srs
        image: ossrs/srs:3
        imagePullPolicy: IfNotPresent
        ports:
        - containerPort: 1935
        - containerPort: 1985
        - containerPort: 8080
        volumeMounts:
        - name: config-volume
          mountPath: /usr/local/srs/conf
EOF
当ConfigMap变更时,会更新SRS的配置文件,SRS会通过inotify收到通知,从而触发SRS的reload。比如我们禁用HTTP和HLS服务:
cat <可以看pod的日志,成功reload,关闭了HTTP服务:
kubectl exec `kubectl get po|grep srs-deploy|awk '{print $1}'` -- tail -f objs/srs.log

[2020-03-12 14:32:59.049][Warn][1][348][16] enable auto reload for docker
[2020-03-12 14:32:59.049][Trace][1][348] auto reload watching fd=11, watch=1, file=conf

[2020-03-12 14:34:17.601][Trace][1][354] inotify event wd=1, mask=0x40000100, len=32, name=..2020_03_12_14_34_17.976827533, reload=0
[2020-03-12 14:34:17.601][Trace][1][354] inotify event wd=1, mask=0x100, len=16, name=..data_tmp, reload=0
[2020-03-12 14:34:17.601][Trace][1][354] inotify event wd=1, mask=0x80, len=16, name=..data, reload=1

[2020-03-12 14:34:17.601][Trace][1][354] reload config, signo=1
[2020-03-12 14:34:18.114][Trace][1][348] config parse complete
[2020-03-12 14:34:18.114][Trace][1][348] srs checking config...
[2020-03-12 14:34:18.114][Warn][1][348][11] stats network use index=0, ip=172.20.2.169
[2020-03-12 14:34:18.114][Warn][1][348][11] stats disk not configed, disk iops disabled.
[2020-03-12 14:34:18.114][Trace][1][348] write log to file ./objs/srs.log
[2020-03-12 14:34:18.114][Trace][1][348] you can: tailf ./objs/srs.log
[2020-03-12 14:34:18.114][Trace][1][348] @see: https://github.com/ossrs/srs/wiki/v1_CN_SrsLog
[2020-03-12 14:34:18.115][Trace][1][348] reload http_api on=>off success.
[2020-03-12 14:34:18.115][Trace][1][348] reload http stream on=>off success.
[2020-03-12 14:34:18.115][Trace][1][348] vhost __defaultVhost__ maybe modified, reload its detail.
[2020-03-12 14:34:18.115][Trace][1][348] vhost __defaultVhost__ reload hls success.
[2020-03-12 14:34:18.115][Trace][1][348] vhost __defaultVhost__ http_remux reload success
[2020-03-12 14:34:18.115][Trace][1][348] vhost __defaultVhost__ reload http_remux success.
[2020-03-12 14:34:18.115][Trace][1][348] ingest nothing changed for vhost=__defaultVhost__
[2020-03-12 14:34:18.115][Trace][1][348] reload config success.
Note: 从ConfigMap的修改,到Pod的配置文件生效,一共花了118秒钟,时间比较久。
Winlin 2020.02
