Arduino UNO与ESP8266串口连接
Arduino UNO与ESP8266串口连接
- 1. ESP8266烧录AT固件
- 1.1 烧录软件下载
- 1.2 烧录AT固件
- 2. ESP8266 AT指令
- 3. Arduino UNO 串口连接方式
- 4. Arduino UNO与ESP8266-12f串口连接
- 5. 串口调试
1. ESP8266烧录AT固件
1.1 烧录软件下载
登录乐鑫官网下载地址,下载Flash 下载工具。
1.2 烧录AT固件
首先,点击安信可AT固件下载地址,下载出厂默认 AT 固件。
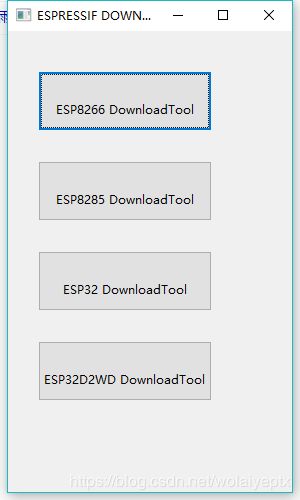
然后打开Flash Download Tools,点击Download ESP8266,如图所示:

在COM处选择端口号,点击START连接。此时,DETECTED INFO会显示连接的ESP8266硬件信息,包括晶振频率和Flash Size。选择DoNotChgBin,并选择下载的AT固件文件,设置地址为0x00000,设置其余参数和ESP8266信号一致。点击ERASE清空FLASH,点击START开始写入直到完成。
2. ESP8266 AT指令
| AT指令 | 第二列 |
|---|---|
| AT+CWMODE=2 | 开启 AP 模式 |
| AT+CWSAP=“ESP8266”,“0123456789”,11,0 | 设置模块的 wifi 和密码 |
| AT+CIPSERVER=1,8899 | 设置模块服务器端口 |
| AT+CIPSEND=0,11 | 进入数据发送模式为11个字节 |
| AT+CWMODE=1 | 设置模组为STA模式 |
| AT+CWLAP | 查询附近 WIFI |
| AT+CWJAP=“123123”,“12345678” | 连接 WIFI |
| AT+CIFSR | 查看路由器分配给模组的IP地址 |
| AT+CIPMUX=0 | 打开单连接 |
| AT+CIPMUX=1 | 打开多连接 |
| AT+CIPMODE=1 | 设置透传模式 |
| AT+CIPSTART=“TCP”,“192.168.43.104”,8899 | 连接手机端建立的TCP服务器 |
| AT+CIPSEND | 开始发送数据 |
| +++ | 注意退出透传,直接发送。取消发送新行 |
| AT+CIPSTART=0,“UDP”,“255.255.255.255”,50000,1000, 0 | 是建立 UDP 连接,其中手机 UDP server 设置 50000,UDP client 设置的端口 1000 |
| AT+CIPSTART=“UDP”,“192.168.43.104”,5000,2000,0 | 连接网络调试助手UDP的IP和端口 |
- 注意透传只能在单连接模式下进行,所以在建立连接之前一定要用(AT+CIPMUX=0设置单连接),但是模块处于服务器模式下时,必须要多链接,由于冲突,所以模块开启服务器模式不能做 TCP透传!
//模块通过数据外网透传
AT+CWMODE=3                        设置 AP 和 STA 共存模式
AT+CWLAP                            查询附近 WIFI
AT+CWJAP="HUAWEI-C4VTTJ","1234567890"           连接 wifi
AT+CIPMUX=0                          设置单连接
AT+CIPMODE=1                        设置透传模式
AT+CIPSTART="TCP","115.29.109.104",6602    连接外网服务器,请参考下面网址
AT+CIPSEND
3. Arduino UNO 串口连接方式
Arduino UNO ESP8266 D2-TX D3-RX 5V-Vin 3.3V-3.3V GND-GND Arduino UNO ESP8266
- D2、D3为arduino设置的软串口RX和TX。
4. Arduino UNO与ESP8266-12f串口连接
Arduino IDE官网下载连接,Arduino UNO端程序如下:
#include

#define DEBUG true

SoftwareSerial esp8266(2,3); // make RX Arduino line is pin 2, make TX Arduino line is pin 3.
                             // This means that you need to connect the TX line from the esp to the Arduino's pin 2
                             // and the RX line from the esp to the Arduino's pin 3
void setup()
{
  Serial.begin(9600);
  esp8266.begin(9600); // your esp's baud rate might be different

  pinMode(11,OUTPUT);
  digitalWrite(11,LOW);

  pinMode(12,OUTPUT);
  digitalWrite(12,LOW);

  pinMode(13,OUTPUT);
  digitalWrite(13,LOW);

  sendCommand("AT+RST\r\n",2000,DEBUG); // reset module
  setAP("ESP8266","w12345678");
  Serial.println("Server Ready");
}

void loop()
{
  if(esp8266.available()) // check if the esp is sending a message
  {
    if(esp8266.find("+IPD,"))
    {
     delay(1000); // wait for the serial buffer to fill up (read all the serial data)
     // get the connection id so that we can then disconnect
     int connectionId = esp8266.read()-48; // subtract 48 because the read() function returns
                                           // the ASCII decimal value and 0 (the first decimal number) starts at 48

     esp8266.find("pin="); // advance cursor to "pin="

     int pinNumber = (esp8266.read()-48); // get first number i.e. if the pin 13 then the 1st number is 1
     int secondNumber = (esp8266.read()-48);
     if(secondNumber>=0 && secondNumber<=9)
     {
      pinNumber*=10;
      pinNumber +=secondNumber; // get second number, i.e. if the pin number is 13 then the 2nd number is 3, then add to the first number
     }

     digitalWrite(pinNumber, !digitalRead(pinNumber)); // toggle pin

     // build string that is send back to device that is requesting pin toggle
     String content;
     content = "Pin ";
     content += pinNumber;
     content += " is ";

     if(digitalRead(pinNumber))
     {
       content += "ON";
     }
     else
     {
       content += "OFF";
     }

     sendHTTPResponse(connectionId,content);

     // make close command
     String closeCommand = "AT+CIPCLOSE=";
     closeCommand+=connectionId; // append connection id
     closeCommand+="\r\n";

     sendCommand(closeCommand,1000,DEBUG); // close connection
    }
  }
}

void setAP(String wifi,String passwd)
{
    sendCommand("AT+CWMODE=2\r\n",1000,DEBUG); // 开启 AP 模式
    sendCommand("AT+CWSAP=\""+wifi+"\",\""+passwd+"\",11,0\r\n",3000,DEBUG);
}

void setSTA(String wifi,String passwd)
{
    sendCommand("AT+CWMODE=1\r\n",1000,DEBUG); // 开启 STA 模式
    sendCommand("AT+CWJAP=\""+wifi+"\",\""+passwd+"\"\r\n",3000,DEBUG);
    delay(10000);
    sendCommand("AT+CIFSR\r\n",1000,DEBUG); // get ip address
    sendCommand("AT+CIPMUX=1\r\n",1000,DEBUG); // configure for multiple connections
    sendCommand("AT+CIPSERVER=1,80\r\n",1000,DEBUG); // turn on server on port 80
}

/*
* Name: sendData
* Description: Function used to send data to ESP8266.
* Params: command - the data/command to send; timeout - the time to wait for a response; debug - print to Serial window?(true = yes, false = no)
* Returns: The response from the esp8266 (if there is a reponse)
*/
String sendData(String command, const int timeout, boolean debug)
{
    String response = "";

    int dataSize = command.length();
    char data[dataSize];
    command.toCharArray(data,dataSize);

    esp8266.write(data,dataSize); // send the read character to the esp8266
    if(debug)
    {
      Serial.println("\r\n====== HTTP Response From Arduino ======");
      Serial.write(data,dataSize);
      Serial.println("\r\n========================================");
    }

    long int time = millis();

    while( (time+timeout) > millis())
    {
      while(esp8266.available())
      {

        // The esp has data so display its output to the serial window
        char c = esp8266.read(); // read the next character.
        response+=c;
      }
    }

    if(debug)
    {
      Serial.print(response);
    }

    return response;
}

/*
* Name: sendHTTPResponse
* Description: Function that sends HTTP 200, HTML UTF-8 response
*/
void sendHTTPResponse(int connectionId, String content)
{

     // build HTTP response
     String httpResponse;
     String httpHeader;
     // HTTP Header
     httpHeader = "HTTP/1.1 200 OK\r\nContent-Type: text/html; charset=UTF-8\r\n";
     httpHeader += "Content-Length: ";
     httpHeader += content.length();
     httpHeader += "\r\n";
     httpHeader +="Connection: close\r\n\r\n";
     httpResponse = httpHeader + content + " "; // There is a bug in this code: the last character of "content" is not sent, I cheated by adding this extra space
     sendCIPData(connectionId,httpResponse);
}

/*
* Name: sendCIPDATA
* Description: sends a CIPSEND=, command
*
*/
void sendCIPData(int connectionId, String data)
{
   String cipSend = "AT+CIPSEND=";
   cipSend += connectionId;
   cipSend += ",";
   cipSend +=data.length();
   cipSend +="\r\n";
   sendCommand(cipSend,1000,DEBUG);
   sendData(data,1000,DEBUG);
}

/*
* Name: sendCommand
* Description: Function used to send data to ESP8266.
* Params: command - the data/command to send; timeout - the time to wait for a response; debug - print to Serial window?(true = yes, false = no)
* Returns: The response from the esp8266 (if there is a reponse)
*/
String sendCommand(String command, const int timeout, boolean debug)
{
    String response = "";

    esp8266.print(command); // send the read character to the esp8266

    long int time = millis();

    while( (time+timeout) > millis())
    {
      while(esp8266.available())
      {

        // The esp has data so display its output to the serial window
        char c = esp8266.read(); // read the next character.
        response+=c;
      }
    }

    if(debug)
    {
      Serial.print(response);
    }

    return response;
}
