Elastalert安装及使用
安装elastalert参考其他文章,结合自己实践经验稍作修改。
简介
Elastalert是用python2写的一个报警框架(目前支持python2.6和2.7,不支持3.x),github地址为 https://github.com/Yelp/elastalert。他提供不同场景的规则配置,若觉得规则、告警不满足需求时,可以用python编写插件Adding a New Rule Type、Adding a New Alerter。
Elastalert内置的告警方式:
- JIRA
- OpsGenie
- Commands
- HipChat
- MS Teams
- Slack
- Telegram
- AWS SNS
- VictorOps
- PagerDuty
- Exotel
- Twilio
- Gitter
前置条件
- Elasticsearch
- Python 2.7
- pip
- python-pip python-dev libffi-dev libssl-dev
安装
直接使用pip安装:
$ pip install elastalert
注:windows环境下安装会失败,建议使用源码安装
或者克隆源码安装:
$ git clone https://github.com/Yelp/elastalert.git
安装模块:
$ pip install "setuptools>=11.3"
# cd到项目根目录 执行安装程序
$ python setup.py install
根据不同的Elasticsearch版本安装elasticsearch-py。
Elasticsearch 5.0+:(我现在用的版本是6.5.1,下面参数可以改为 elasticsearch>=6.0.0,会安装6.0以上版本)
$ pip install "elasticsearch>=5.0.0"
Elasticsearch 2.X:
$ pip install "elasticsearch<3.0.0"
补充:
若出现如下问题:
error: six 1.9.0 is installed but six>=1.10.0 is required by set(['jira'])
解决办法:
$ pip install --upgrade six
然后继续安装即可。安装过程中还会出现其他类似的错误提示,基本都是版本的问题,继续pip install --upgrade 'pagkage>version'
重命名配置文件:
$ cp config.yaml.example config.yaml
打开配置文件config.yaml:
$ vim config.yaml
设置es_host、es_host指向你的Elasticsearch,然后保存退出。
配置文件解析
此处的配置文件是指config.yaml文件。
rules_folder:ElastAlert将加载规则配置文件的地方,它将尝试加载文件夹中的每个.yaml文件。
run_every:ElastAlert查询Elasticsearch的频率。
buffer_time:是查询窗口的大小,从每个查询运行的时间向后延伸。对于其中use_count_query或use_terms_query设置为true的规则,此值将被忽略。
es_host:是Elasticsearch集群的地址,ElastAlert将存储有关其状态、查询运行、警报和错误的数据。每个规则也可以设置不同的elasticsearch主机进行查询。
es_port:Elasticsearch对应的端口。
use_ssl: (可选的)是否使用TLS;连接到es_host;设置为True或False。
verify_certs: (可选的)是否验证TLS证书; 设置为True或False,默认是True。
client_cert: (可选的)PEM证书的路径。
client_key: (可选的) 作为客户端密钥使用的私钥文件的路径。
ca_certs: (可选的) 用于验证SSL连接的CA证书的路径。
es_username: (可选的) 用于连接Elasticsearch的basic-auth用户名。
es_password: (可选的) 用于连接Elasticsearch的密码。
es_url_prefix: (可选的) Elasticsearch端点的URL前缀。
es_send_get_body_as: (可选的) 查询Elasticsearch方法- GET,POST或source,默认是GET。
writeback_index:是ElastAlert将存储数据的索引名称。
alert_time_limit: 是失败警报的重试窗口。
创建Elasticsearch索引
elastalert-create-index这个命令会在elasticsearch创建索引,便于ElastAlert将有关其查询及其警报的信息和元数据保存回Elasticsearch。这不是必须的步骤,但是强烈建议创建。因为对于审计,测试很有用,并且重启elastalert不影响计数和发送alert。默认情况下,创建的索引叫 elastalert_status。
$ elastalert-create-index
New index name (Default elastalert_status)
Name of existing index to copy (Default None)
New index elastalert_status created
Done!
创建成功之后,我们可以在Elasticsearch中看到所创建的索引elastalert_status:
$ curl 'localhost:9200/_cat/indices?v'
health status index             uuid                   pri rep docs.count docs.deleted store.size pri.store.size
yellow open   .kibana           _4Op-xRCSzyC5nI2wZSPvw   1   1          2            0      8.4kb          8.4kb
yellow open   elastalert_status ZTetmp8mTS6F28aIBJmJOg   5   1          0            0       810b           810b
elastalert_status
ElastAlert 根据elastalert_status去确定首次启动的时候在什么时间范围内去查询,以避免重复查询。对于每个规则,它将从最近的结束时间开始查询。包括:
- @timestamp:文件上传到Elasticsearch的时间。这是在运行查询并且已经处理结果之后。
- rule_name:相应规则的名称。
- starttime:查询的开始时间戳。
- endtime:查询结束时间戳。
- hits:查询结果的数量。
- matches:处理命中后规则返回的匹配数。请注意,这并不一定意味着警报被触发。
- time_taken:此查询运行所需的秒数。
测试Demo
本次elastalert安装目录为:/opt/elastalert。
配置SMTP
在/opt/elastalert目录下创建文件smtp_auth_file.yaml,内容如下:
#邮箱用户名
user: [email protected]
#不是邮箱密码,是设置的SMTP密码
password: XXXXX
配置规则
在example_rules目录下修改配置文件,如下:
$ cd /opt/elastalert/example_rules
$ vim example_frequency.yaml
修改后的配置文件:
# Alert when the rate of events exceeds a threshold

# (Optional)
# Elasticsearch host
# es_host: elasticsearch.example.com

# (Optional)
# Elasticsearch port
# es_port: 9200

# (OptionaL) Connect with SSL to Elasticsearch
#use_ssl: True

# (Optional) basic-auth username and password for Elasticsearch
#es_username: someusername
#es_password: somepassword

# (Required)
# Rule name, must be unique
 name: Example rule

# (Required)
# Type of alert.
# the frequency rule type alerts when num_events events occur with timeframe time
 type: frequency

# (Required)
# Index to search, wildcard supported
 index: logstash-2017.08.28

# (Required, frequency specific)
# Alert when this many documents matching the query occur within a timeframe
 num_events: 1

# (Required, frequency specific)
# num_events must occur within this amount of time to trigger an alert
 timeframe:
   minutes: 1

# (Required)
# A list of Elasticsearch filters used for find events
# These filters are joined with AND and nested in a filtered query
# For more info: http://www.elasticsearch.org/guide/en/elasticsearch/reference/current/query-dsl.html

#匹配日志中field字段值为value的日志数据,若不想进行过滤可以写成“filter: []”(这种方式可以用在日志数量的告警中)
 filter:
 - query:
     query_string:
       query: "field: value"

#SMTP configration
 smtp_host: smtp.163.com
 smtp_port: 25

#SMTP auth
 smtp_auth_file: /opt/elastalert/smtp_auth_file.yaml
 email_reply_to: [email protected]
 from_addr: [email protected]

# (Required)
# The alert is use when a match is found
 alert:
 - "email"

# (required, email specific)
# a list of email addresses to send alerts to
 email:
 - "[email protected]"
保存修改并退出。
补充:
上述规则表示:在elastalert执行的一分钟内,出现一条有field值为value日志,则触发告警,并且告警通知将以email的形式从[email protected]邮箱发送给[email protected]。
规则配置解析:
-
es_host、es_port:应该指向我们要查询的Elasticsearch集群。
-
name:是这个规则的唯一名称。如果两个规则共享相同的名称,ElastAlert将不会启动。
-
type:每个规则都有不同的类型,可能会采用不同的参数。该frequency类型表示“在timeframe时间内匹配成功次数超过num_events发出警报”。有关其他类型的信息,请参阅规则类型。
-
index:要查询的索引的名称。
-
num_events:此参数特定于frequency类型,是触发警报时的阈值。
-
timeframe:timeframe是num_events必须发生的时间段。
-
filter:是用于过滤结果的Elasticsearch过滤器列表。有关
详细信息,请参阅编写过滤规则。 -
alert:警报。有关警报类型的更多信息,请参阅警报。电子邮件警报需要SMTP服务器才能发送邮件。默认情况下,它将尝试使用localhost。这可以通过smtp_host选项更改。
-
email:是要发送警报的地址列表。
还有许多其他可选配置选项,请参阅常见配置选项。
测试规则
命令如下:
$ elastalert-test-rule ./example_rules/example_frequency.yaml
能够检查规则是否正确,有关详细信息测试部分。
运行
运行elastalert:
$ cd /opt/elastalert
$ python -m elastalert.elastalert --verbose --rule example_frequency.yaml
给Elasticsearch添加测试数据:
$ curl -X POST "http://127.0.0.1:9200/logstash-2017.08.28/test"  -d '{
"@timestamp": "2017-08-28T10:54:41.000Z",
"field": "value"
}'
注意:上述的@timestamp是UTC时间,也就是说这条数据是在2017-08-28 18:54:41产生的。
Alert
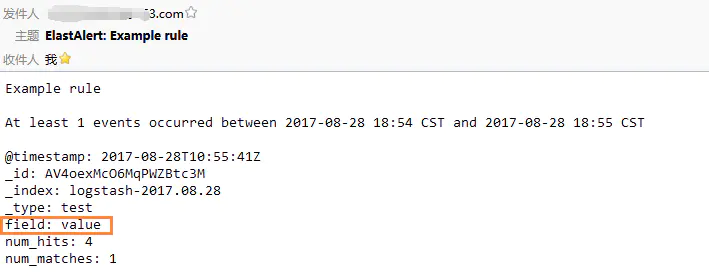
可在邮箱中看到如下图所示的邮件:
收到邮件中会包含当前符合告警规则的日志数据。
参考资料
- ElastAlert - Easy & Flexible Alerting With Elasticsearch
- Rule Types and Configuration Options
- Writing Filters For Rules
原文链接
