ELK 系列一、Centos 7 安装ELK6.2.3
ELK 不是一款软件,而是 Elasticsearch、Logstash 和 Kibana 三种软件产品的首字母缩写。这三者都是开源软件,通常配合使用,而且又先后归于 Elastic.co 公司名下,所以被简称为 ELK Stack。根据 Google Trend 的信息显示,ELK Stack 已经成为目前最流行的集中式日志解决方案。
Elasticsearch:分布式搜索和分析引擎,具有高可伸缩、高可靠和易管理等特点。基于 Apache Lucene 构建,能对大容量的数据进行接近实时的存储、搜索和分析操作。通常被用作某些应用的基础搜索引擎,使其具有复杂的搜索功能;
Logstash:数据收集引擎。它支持动态的从各种数据源搜集数据,并对数据进行过滤、分析、丰富、统一格式等操作,然后存储到用户指定的位置;
Kibana:数据分析和可视化平台。通常与 Elasticsearch 配合使用,对其中数据进行搜索、分析和以统计图表的方式展示;
Filebeat:ELK 协议栈的新成员,一个轻量级开源日志文件数据搜集器,基于 Logstash-Forwarder 源代码开发,是对它的替代。在需要采集日志数据的 server 上安装 Filebeat,并指定日志目录或日志文件后,Filebeat 就能读取数据,迅速发送到 Logstash 进行解析,亦或直接发送到 Elasticsearch 进行集中式存储和分析。
本次安装的版本为:elasticsearch-6.2.3,logstash-6.2.3,kibana-6.2.3,filebeat-6.2.3
业务请求到达nginx-server机器上的Nginx;
Nginx响应请求,并在access.log文件中增加访问记录;
FileBeat搜集新增的日志,通过LogStash的5044端口上传日志;
LogStash将日志信息通过本机的9200端口传入到ElasticSerach;
搜索日志的用户通过浏览器访问Kibana,服务器端口是5601;
Kibana通过9200端口访问ElasticSerach;
接下来安装ELK吧;
安装JDK
首先请在elk-server机器上JDK8;
在ELK官方文档中(https://www.elastic.co/guide/en/elasticsearch/hadoop/6.2/requirements.html),推荐的JDK版本为8,如下图所示: ![]()
在CentOS7安装JDK8的步骤请参考《CentOS7安装JDK8》;
安装jdk
下载jdk-8u181-linux-x64.tar.gz,官网地址:http://www.oracle.com/technetwork/java/javase/downloads/jdk8-downloads-2133151.html
[root@host-172-22-14-75 ~]# cd /data/soft/
[root@host-172-22-14-75 soft]# ls
jdk-8u181-linux-x64.tar.gz
[root@host-172-22-14-75 soft]# tar -zxvf jdk-8u181-linux-x64.tar.gz
[root@host-172-22-14-75 soft]# mv jdk1.8.0_181/ /usr/local/
[root@host-172-22-14-77 ~]# vim /etc/profile
export JAVA_HOME=/usr/local/jdk1.8.0_181
export JRE_HOME=${JAVA_HOME}/jre
export CLASSPATH=.:${JAVA_HOME}/lib/dt.JAVA_HOME/lib/tools.jar:${JRE_HOME}/lib
export PATH=${JAVA_HOME}/bin:${PATH}
[root@host-172-22-14-75 soft]# source /etc/profile
[root@host-172-22-14-75 soft]# java -version
java version "1.8.0_181"
Java(TM) SE Runtime Environment (build 1.8.0_181-b13)
Java HotSpot(TM) 64-Bit Server VM (build 25.181-b13, mixed mode)
系统设置
- 设置hostname,打开文件/etc/hostname,将内容改为elk-server (不是必须的,可跳过)
- 关闭防火墙(如果因为其他原因不能关闭防火墙,也请不要禁止80端口):systemctl stop firewalld.service
- 禁止防火墙自动启动:systemctl disable firewalld.service
- 打开文件/etc/security/limits.conf,添加下面四行内容:
* soft nofile 65536
* hard nofile 131072
* soft nproc 2048
* hard nproc 4096
soft nproc: 可打开的文件描述符的最大数(软限制)
hard nproc: 可打开的文件描述符的最大数(硬限制)
soft nofile:单个用户可用的最大进程数量(软限制)
hard nofile:单个用户可用的最大进程数量(硬限制)
5. 打开文件/etc/sysctl.conf,添加下面一行内容:
vm.max_map_count=655360
max_map_count定义了一个进程拥有的最多内存区域,默认为65536
6. 加载sysctl配置,执行命令:sysctl -p
7. 重启电脑;
elk-server:安装文件准备
请在ELK官网https://www.elastic.co/downloads下载以下文件:
1. elasticsearch-6.2.3.tar.gz;
2. logstash-6.2.3.tar.gz;
3. kibana-6.2.3-linux-x86_64.tar.gz;
上述三个文件,推荐在CentOS7的命令行输入以下四个命令下载:
wget https://artifacts.elastic.co/downloads/elasticsearch/elasticsearch-6.2.3.tar.gz
wget https://artifacts.elastic.co/downloads/logstash/logstash-6.2.3.tar.gz
wget https://artifacts.elastic.co/downloads/kibana/kibana-6.2.3-linux-x86_64.tar.gz
解压:
[root@elk-server ELK]# tar -zxvf elasticsearch-6.2.3.tar.gz
[root@elk-server ELK]# tar -zxvf logstash-6.2.3.tar.gz
[root@elk-server ELK]# tar -zxvf kibana-6.2.3-linux-x86_64.tar.gz
创建用户
ElasticSerach要求以非root身份启动,所以我们要创建一个用户:
1. 创建用户组:groupadd elasticsearch;
2. 创建用户加入用户组:useradd elasticsearch -g elasticsearch;
3. 设置ElasticSerach文件夹为用户elasticsearch所有:
[root@elk-server soft]# chown -R elasticsearch.elasticsearch /data/soft/ELK/elasticsearch-6.2.3
查看用户权限
启动ElasticSerach
切换用户:
[root@elk-server ELK]# su elasticsearch
启动:
[elasticsearch@elk-server elasticsearch-6.2.3]$ /data/soft/ELK/elasticsearch-6.2.3/bin/elasticsearch -d
查看日志:大概10秒启动完成,
[root@elk-server ~]# tail -f /data/soft/ELK/elasticsearch-6.2.3/logs/elasticsearch.log
[2018-09-21T13:50:06,074][INFO ][o.e.p.PluginsService     ] [i_BHGCC] no plugins loaded
[2018-09-21T13:50:09,565][INFO ][o.e.d.DiscoveryModule    ] [i_BHGCC] using discovery type [zen]
[2018-09-21T13:50:10,260][INFO ][o.e.n.Node               ] initialized
[2018-09-21T13:50:10,261][INFO ][o.e.n.Node               ] [i_BHGCC] starting ...
[2018-09-21T13:50:11,370][INFO ][o.e.t.TransportService   ] [i_BHGCC] publish_address {127.0.0.1:9300}, bound_addresses {[::1]:9300}, {127.0.0.1:9300}
[2018-09-21T13:50:14,469][INFO ][o.e.c.s.MasterService    ] [i_BHGCC] zen-disco-elected-as-master ([0] nodes joined), reason: new_master {i_BHGCC}{i_BHGCCLSjK6a_z2Fryljg}{3sJux4uuRaWFAle6mvRIWg}{127.0.0.1}{127.0.0.1:9300}
[2018-09-21T13:50:14,476][INFO ][o.e.c.s.ClusterApplierService] [i_BHGCC] new_master {i_BHGCC}{i_BHGCCLSjK6a_z2Fryljg}{3sJux4uuRaWFAle6mvRIWg}{127.0.0.1}{127.0.0.1:9300}, reason: apply cluster state (from master [master {i_BHGCC}{i_BHGCCLSjK6a_z2Fryljg}{3sJux4uuRaWFAle6mvRIWg}{127.0.0.1}{127.0.0.1:9300} committed version [1] source [zen-disco-elected-as-master ([0] nodes joined)]])
[2018-09-21T13:50:14,511][INFO ][o.e.h.n.Netty4HttpServerTransport] [i_BHGCC] publish_address {127.0.0.1:9200}, bound_addresses {[::1]:9200}, {127.0.0.1:9200}
[2018-09-21T13:50:14,511][INFO ][o.e.n.Node               ] [i_BHGCC] started
[2018-09-21T13:50:14,519][INFO ][o.e.g.GatewayService     ] [i_BHGCC] recovered [0] indices into cluster_state
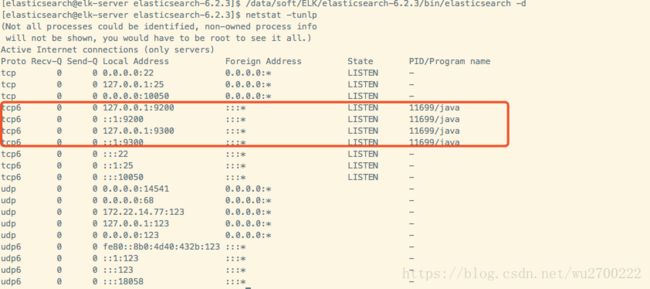
[elasticsearch@elk-server elasticsearch-6.2.3]$ netstat -tunlp
执行curl命令检查服务是否正常响应:curl 127.0.0.1:9200,收到响应如下:
[elasticsearch@elk-server elasticsearch-6.2.3]$ curl 127.0.0.1:9200
{
"name" : "i_BHGCC",
"cluster_name" : "elasticsearch",
"cluster_uuid" : "TW1WQPPxTnSd3GtGOQ8EiA",
"version" : {
"number" : "6.2.3",
"build_hash" : "c59ff00",
"build_date" : "2018-03-13T10:06:29.741383Z",
"build_snapshot" : false,
"lucene_version" : "7.2.1",
"minimum_wire_compatibility_version" : "5.6.0",
"minimum_index_compatibility_version" : "5.0.0"
},
"tagline" : "You Know, for Search"
}
至此,ElasticSerach服务启动成功,接下来是Logstash
配置和启动Logstash
1.在目录logstash-6.2.3下创建文件default.conf,内容如下:
cd /data/soft/ELK/logstash-6.2.3
[root@ host-172-22-14-77 logstash-6.2.3]# vim default.conf
# 监听5044端口作为输入
input {
    beats {
        port => "5044"
    }
}
# 数据过滤
filter {
    grok {
        match => { "message" => "%{COMBINEDAPACHELOG}" }
    }
    geoip {
        source => "clientip"
    }
}
# 输出配置为本机的9200端口,这是ElasticSerach服务的监听端口
output {
    elasticsearch {
        hosts => ["127.0.0.1:9200"]
    }
}
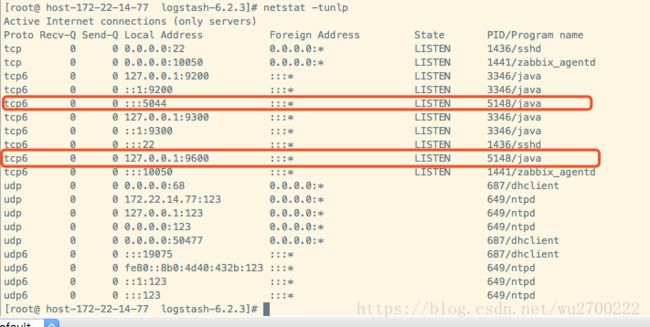
监听5044端口的数据打印至9200端口
2. 后台启动Logstash服务:
[root@ host-172-22-14-77 logstash-6.2.3]# nohup /data/soft/ELK/logstash-6.2.3/bin/logstash -f /data/soft/ELK/logstash-6.2.3/default.conf &
3. 查看启动日志:tail -f logs/logstash-plain.log,启动成功的信息如下
[root@ host-172-22-14-77 logstash-6.2.3]# tail -f logs/logstash-plain.log
[root@ host-172-22-14-77 logstash-6.2.3]# netstat -tunlp
配置和启动Kibana
1.编辑Kibana的配置文件
[root@ host-172-22-14-77 config]# vim /data/soft/ELK/kibana-6.2.3-linux-x86_64/config/kibana.yml
修改字段:
server.host: "0.0.0.0"
pid.file: /var/run/kibana.pid
2.启动服务
[root@ host-172-22-14-77 kibana-6.2.3-linux-x86_64]# nohup /data/soft/ELK/kibana-6.2.3-linux-x86_64/bin/kibana &
3.查看端口和日志确认是否正常启动
[root@ host-172-22-14-77 kibana-6.2.3-linux-x86_64]# netstat -tunlp|grep 5601
tcp 0 0 0.0.0.0:5601 0.0.0.0:* LISTEN 6227/node
[root@ host-172-22-14-77 kibana-6.2.3-linux-x86_64]# cat nohup.out
在浏览器访问http://172.22.14.77:5601,看到如下页面:
因为我这本的外网是其它服务器,所以做了映射
222.217.61.44:50005 对应到172.22.14.77:5601
至此,ELK服务启动成功,接下来我们将业务日志上报上来,需要操作另一台电脑:nginx-server;
安装Nginx
yum install -y nginx
systemctl start nginx.service
 systemctl enable nginx.service
在使用nginx转发的时候,要进行一次用户身份的确认
1)通过htpasswd命令生成用户名及对应密码数据库文件。
[root@host-172-22-14-89 ~]# yum install httpd -y
[root@host-172-22-14-89 ~]# htpasswd -c /etc/nginx/passwd.db admin
New password: blm123
Re-type new password: blm123
Adding password for user admin
#可以看到通过htpasswd生成的密码为加密格式
[root@host-172-22-14-89 ~]# cat /etc/nginx/passwd.db
admin:$apr1$Ijv3PMQF$1BTSrxkBxweTyi5OxSYxJ.
2)编辑虚拟主机配置文件。
[root@host-172-22-14-89 ~]# vim /etc/nginx/nginx.conf
server {
listen 50006;
#server_name boss.test.otosaas.com;
location ^~ / {
proxy_pass http://172.22.14.77:5601/;
auth_basic "s1";
auth_basic_user_file /etc/nginx/passwd.db;
proxy_redirect off;
location ^~ / {
proxy_pass http://172.22.14.77:5601/;
auth_basic "s1";
auth_basic_user_file /etc/nginx/passwd.db;
proxy_redirect off;
proxy_set_header Host $host;
proxy_set_header X-Real-Ip $remote_addr;
proxy_set_header X-Forwarded-for $remote_addr;
proxy_connect_timeout 30;
proxy_send_timeout 30;
proxy_read_timeout 60;
proxy_buffer_size 256k;
proxy_buffers 4 256k;
}
}
[root@host-172-22-14-89 ~]# service nginx restart
完成,登录网页测试一下
安装Filebeat
在被监控日志的服务器上安装filebeat服务,比如nginx服务器
[root@host-172-22-14-89 ~]# cd /data/soft/
[root@host-172-22-14-89 ~]# wget https://artifacts.elastic.co/downloads/beats/filebeat/filebeat-6.2.3-linux-x86_64.tar.gz
[root@host-172-22-14-89 soft]# tar -zxvf filebeat-6.2.3-linux-x86_64.tar.gz
[root@host-172-22-14-89 soft]# cd filebeat-6.2.3-linux-x86_64
查看nginx的日志文件
[root@host-172-22-14-89 ~]# ls /var/log/nginx/
access.log access.log-20180923.gz error.log error.log-20180923.gz
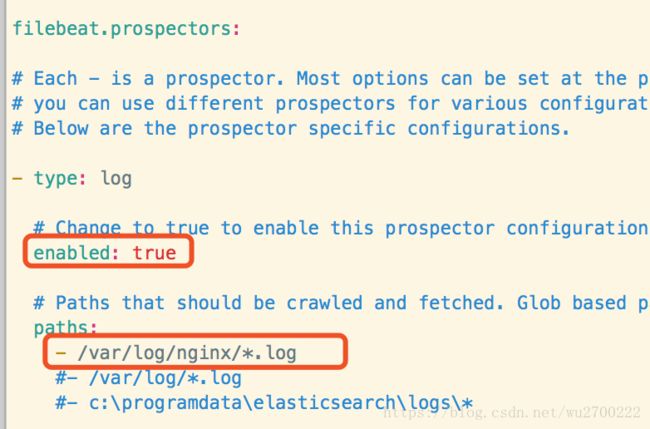
[root@host-172-22-14-89 filebeat-6.2.3-linux-x86_64]# vim filebeat.yml
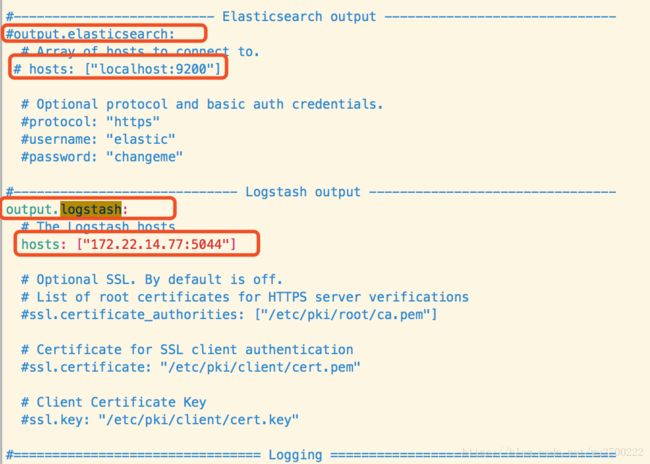
编辑后的结果如下;
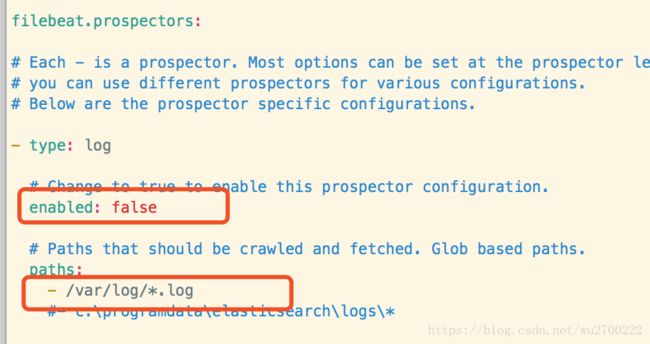
enabled: false改为enabled: true;
- /var/log/*.log改为- /var/log/nginx/*.log
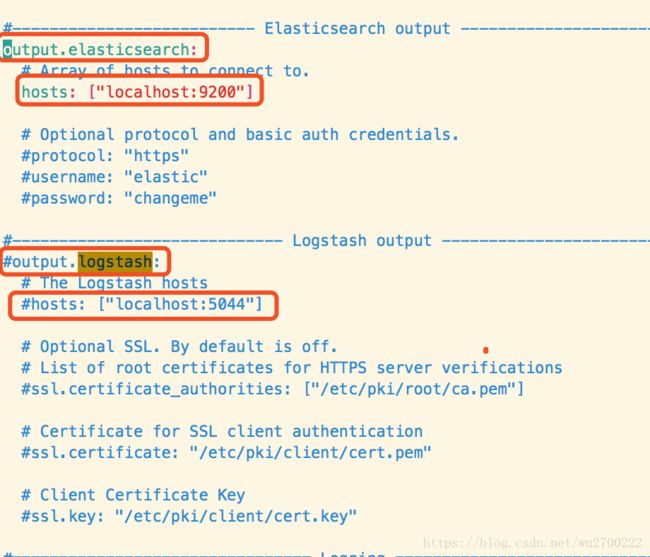
output.elasticsearch:改为#output.elasticsearch:
hosts: ["localhost:9200"]改为 # hosts: ["localhost:9200"]
#output.logstash:改为 output.logstash:
#hosts: ["localhost:5044"]改为 hosts: ["172.22.14.77:5044"]
启动FileBeat:./filebeat -e -c filebeat.yml -d “publish”
[root@host-172-22-14-89 filebeat-6.2.3-linux-x86_64]# nohup /data/soft/filebeat-6.2.3-linux-x86_64/filebeat -e -c /data/soft/filebeat-6.2.3-linux-x86_64/filebeat.yml -d "publish" &
至此,FileBeat也启动成功了,接下来验证服务;
如果要停止服务
[root@host-172-22-14-89 log]# ps -ef|grep filebeat
root 67218 65638 0 13:48 pts/1 00:00:00 /data/soft/filebeat-6.2.3-linux-x86_64/filebeat -e -c /data/soft/filebeat-6.2.3-linux-x86_64/filebeat.yml -d publish
root 68838 65638 0 13:58 pts/1 00:00:00 grep --color=auto filebeat
[root@host-172-22-14-89 log]# kill 67218
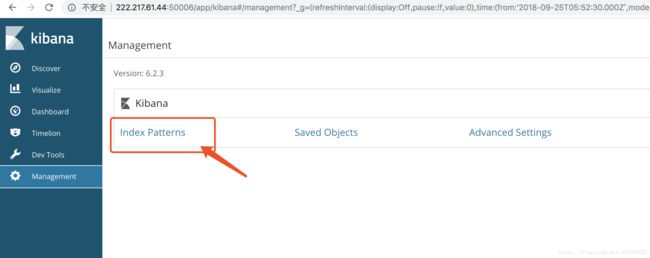
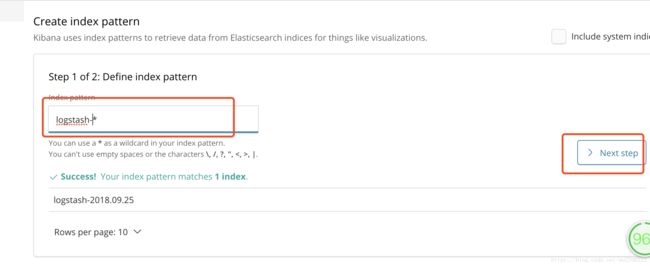
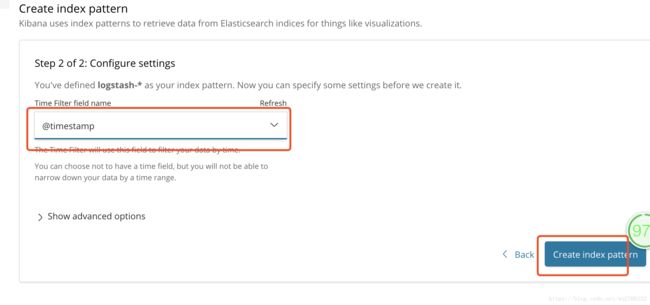
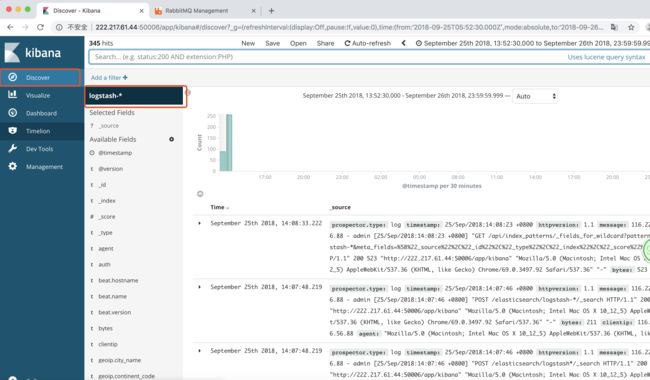
配置kibana
至此,ELK-6.2.3版本的服务和日志上报的搭建已经完成,后续如果还有业务服务器要上报日志,只需按照上述步骤安装和配置FileBeat即可


