Intellij IDEA 搭建Spring Boot项目(二)spring-dao的相关配置
Intellij IDEA 搭建Spring Boot项目 –>spring-dao的相关配置
标签(空格分隔): SpringBoot JAVA后台
前言
spring boo默认已经配置了很多环境变量,例如,tomcat的默认端口是8080,项目的contextpath是“/”等等,可以在这里看spring boot默认的配置信息
配置数据库连接和数据源
第一步
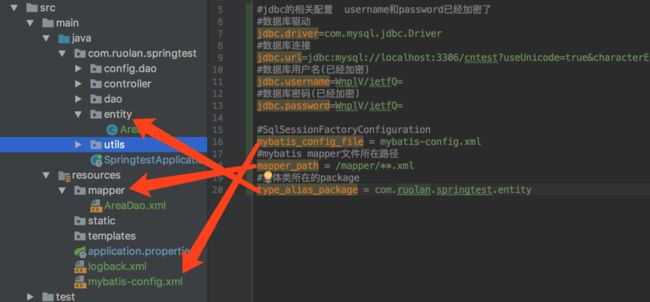
在application.properties文件里面加入
#jdbc的相关配置  username和password已经加密了
#数据库驱动
jdbc.driver=com.mysql.jdbc.Driver
#数据库连接
jdbc.url=jdbc:mysql://localhost:3306/cntest?useUnicode=true&characterEncoding=utf8
#数据库用户名(已经加密)
jdbc.username=WnplV/ietfQ=
#数据库密码(已经加密)
jdbc.password=WnplV/ietfQ=

#SqlSessionFactoryConfiguration
mybatis_config_file = mybatis-config.xml
#mybatis mapper文件所在路径
mapper_path = /mapper/**.xml
#实体类所在的package
type_alias_package = com.ruolan.springtest.entity
上面涉及到的mybatis-config.xml文件和mapper_path对应包结构和目录如下图(还是图比较方便哈)
第二步配置DataSource连接池
springboot允许我们通过代码的方式配置我们需要的数据源,比如我们经常使用的c3p0 JDBC连接池,怎么配置呢?如下图所示
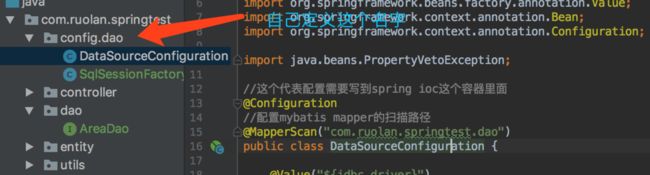
我们需要创建DataSourceConfiguration.class这个类
//这个代表配置需要写到spring ioc这个容器里面
@Configuration
//配置mybatis mapper的扫描路径  这个扫描位置配置好就行 不需要进行其他配置  会自动扫描mapper的
@MapperScan("com.ruolan.springtest.dao")
public class DataSourceConfiguration {
    //这里通过这种方式获取到application.properties里面定义的相关配置
    @Value("${jdbc.driver}")
    private String jdbcDriver;
    @Value("${jdbc.url}")
    private String jdbcUrl;

    @Value("${jdbc.username}")
    private String jdbcUsername;

    @Value("${jdbc.password}")
    private String jdbcPassword;

    /**
     * 生成与spring-dao.xml对应的bean  dataSource
     * @return
     */
    @Bean(name = "dataSource")
    public ComboPooledDataSource createDataSource() throws PropertyVetoException {
        //创建DataSource实例
        ComboPooledDataSource dataSource = new ComboPooledDataSource();
        dataSource.setDriverClass(jdbcDriver);
        dataSource.setJdbcUrl(jdbcUrl);
        dataSource.setUser(DESUtils.getDecryptString(jdbcUsername));
        dataSource.setPassword(DESUtils.getDecryptString(jdbcPassword));
        //配置c3p0连接池的私有属性
        //连接池的最大线程数量
        dataSource.setMaxPoolSize(30);
        //连接池的最小线程数量
        dataSource.setMinPoolSize(30);
        //连接池不自动commit
        dataSource.setAutoCommitOnClose(false);
        //连接超时时间
        dataSource.setCheckoutTimeout(10000);
        //连接失败自动重试次数
        dataSource.setAcquireRetryAttempts(2);

        return dataSource;
    }
}
其实上面的类的相关作用就类似我们之前ssm的时候配置的spring-dao.xml里面的dataSource一样(如下)
    <bean id="dataSource" class="com.mchange.v2.c3p0.ComboPooledDataSource">

        <property name="driverClass" value="${jdbc.driver}" />
        <property name="jdbcUrl" value="${jdbc.url}" />
        <property name="user" value="${jdbc.username}" />
        <property name="password" value="${jdbc.password}" />


        <property name="maxPoolSize" value="30" />
        <property name="minPoolSize" value="10" />

        <property name="autoCommitOnClose" value="false" />

        <property name="checkoutTimeout" value="10000" />

        <property name="acquireRetryAttempts" value="2" />
    bean>
第三步配置sqlSessionFactory
和配置DataSource类似,我们创建一个SqlSessionFactoryConfiguration.class
//加上这个注解
@Configuration
public class SqlSessionFactoryConfiguration {

    @Autowired
    public DataSource dataSource;

    private static String mybatisConfigFile;
    //mybatis-config.xml配置文件的路径
    @Value("${mybatis_config_file}")
    public void setMybatisConfigFile(String mybatisConfigFile) {
        SqlSessionFactoryConfiguration.mybatisConfigFile = mybatisConfigFile;
    }

    private static String mapperPath;
    //mybatis mapper文件所在路径
    @Value("${mapper_path}")
    public void setMapperPath(String mapperPath) {
        SqlSessionFactoryConfiguration.mapperPath = mapperPath;
    }

    //实体类所在的package
    @Value("${type_alias_package}")
    private String typeAliasPackage;

    /**
     * 创建sqlSessionFactoryBean 实例  并且设置configtion  设置mapper映射路径
     *
     * 设置dataSource数据源
     */
    @Bean(name = "sqlSessionFactory")
    public SqlSessionFactoryBean createSqlSessionFactoryBean() throws IOException {
        SqlSessionFactoryBean sqlSessionFactoryBean = new SqlSessionFactoryBean();
        //设置mybatis configuration扫描路径
        sqlSessionFactoryBean.setConfigLocation(new ClassPathResource(mybatisConfigFile));
        //添加mapper扫描路径
        PathMatchingResourcePatternResolver pathMatchingResourcePatternResolver = new PathMatchingResourcePatternResolver();
        String packageSearchPath = ResourcePatternResolver.CLASSPATH_ALL_URL_PREFIX + mapperPath;
        sqlSessionFactoryBean.setMapperLocations(pathMatchingResourcePatternResolver.getResources(packageSearchPath));
        //设置DataSource
        sqlSessionFactoryBean.setDataSource(dataSource);
        //设置typeAlias包扫描路径
        sqlSessionFactoryBean.setTypeAliasesPackage(typeAliasPackage);

        return sqlSessionFactoryBean;
    }
其实上述的相关配置就类似spring-dao.xml里面的
    <bean id="sqlSessionFactory" class="org.mybatis.spring.SqlSessionFactoryBean">

        <property name="dataSource" ref="dataSource" />

        <property name="configLocation" value="classpath:mybatis-config.xml" />

        <property name="typeAliasesPackage" value="com.imooc.myo2o.entity" />

        <property name="mapperLocations" value="classpath:mapper/*.xml" />
    bean>
测试Dao
第一步
我们需要创建一个数据库cetest.并且创建一个数据表tb_area
建表语句(自行加入几条数据即可)
DROP TABLE IF EXISTS `tb_area`;

CREATE TABLE `tb_area` (
  `area_id` int(5) NOT NULL AUTO_INCREMENT,
  `area_name` varchar(200) NOT NULL,
  `area_desc` varchar(1000) DEFAULT NULL,
  `priority` int(2) NOT NULL DEFAULT '0',
  `create_time` datetime DEFAULT NULL,
  `last_edit_time` datetime DEFAULT NULL,
  PRIMARY KEY (`area_id`),
  UNIQUE KEY `UK_AREA` (`area_name`)
) ENGINE=InnoDB AUTO_INCREMENT=7 DEFAULT CHARSET=utf8;
创建Area实体类:
public class Area {
    private Long areaId;
    private String areaName;
    private String areaDesc;
    private Integer priority;
    private Date createTime;
    private Date lastEditTime;

    //自行添加getter/setter方法
}
创建AreaDao(包名是com.ruolan.springtest.dao)
public interface AreaDao {
 /**
     * 列出地域列表
     *
     * @return
     */
    List queryArea();

}
创建AreaDao
<mapper namespace="com.ruolan.springtest.dao.AreaDao">
<select id="queryArea" resultType="com.ruolan.springtest.entity.Area">
SELECT
area_id,
area_name,
area_desc,
priority,
create_time,
last_edit_time
FROM
tb_area
ORDER BY
priority DESC
select>
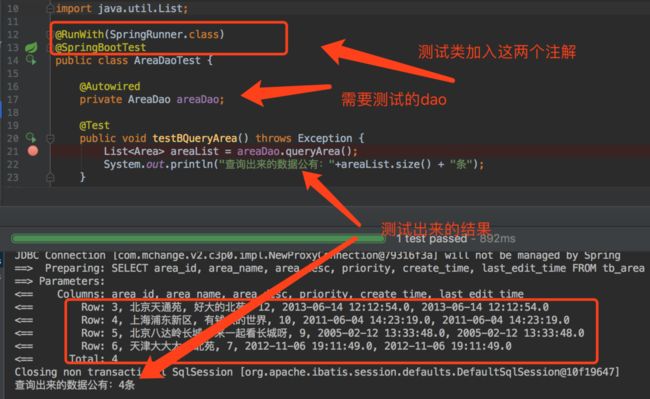
mapper>创建测试类
//测试类加入如下的两个注解
@RunWith(SpringRunner.class)
@SpringBootTest
public class AreaDaoTest {

    @Autowired
    private AreaDao areaDao;

    @Test
    public void testQueryArea() throws Exception {
        List areaList = areaDao.queryArea();
        System.out.println("查询出来的数据公有:"+areaList.size() + "条");
    }

}
运行testQueryArea()方法,如果配置成功则会显示如下的截图结果。
写在结尾
至此,类似spring-dao的相关配置已经完事,接下来就需要配置service的相关了,那就期待下一篇吧。
参考文章
- spring boot 使用application.properties 进行外部配置