【登录】刷脸登录(java语言-百度云ai)
刷脸登录(java语言-百度云ai)
pdf文件
一. 浅谈人工智能
人工智能(Artificial Intelligence),英文缩写为AI。它是研究、开发用于模拟、延伸和扩展人的智能的理论、方法、技术及应用系统的一门新的技术科学,总之很牛逼就是了;
作为中小型企业,可以采取世面上流行的人工智能产品快速的实现刷脸登录需求。目前比较流行人脸检测产品如下
- Face++
- 腾讯优图
- 科大讯飞
- 百度云AI
二. 百度云AI概述
01-概述
百度人脸识别基于深度学习的人脸识别方案,准确识别图片中的人脸信息,提供如下功能:
- 人脸检测:精准定位图中人脸,获得眼、口、鼻等72个关键点位置,分析性别、年龄、表情等多种人脸属性
- 人脸对比:对比两张人脸的相似度,并给出相似度评分,从而判断是否同一个人
- 人脸搜索:针对一张人脸照片,在指定人脸集合中搜索,找出最相似的一张脸或多张人脸,并给出相似度分 值
- 活体检测:提供离线/在线方式的活体检测能力,判断操作用户是否为真人,有效抵御照片、视频、模具等作 弊攻击
- 视频流人脸采集:设备端离线实时监测视频流中的人脸,同时支持处理静态图片或者视频流,输出人脸图片 并进行图片质量控制
02-百度云AI的开发步骤
- 注册账号创建应用
- 搭建工程导入依赖
- 人脸注册
- 人脸识别
03-百度云AI的注册于认证
(1)注册百度云帐号
打开百度云平台:https://login.bce.baidu.com/reg.html?tpl=bceplat&from=portal进行账号注册
(2)激活人脸识别,并创建应用
找到产品-人工智能-人脸识别激活应用,并注册应用应用创建完成之后,进入刚刚创建的应用获取开发所需的AppID,API Key,Secret Key。
三. 百度云API的入门
01-搭建环境
    com.baidu.aip
    java-sdk
    4.8.0
02-人脸注册
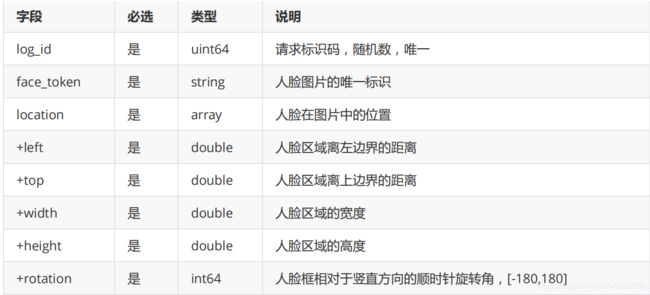
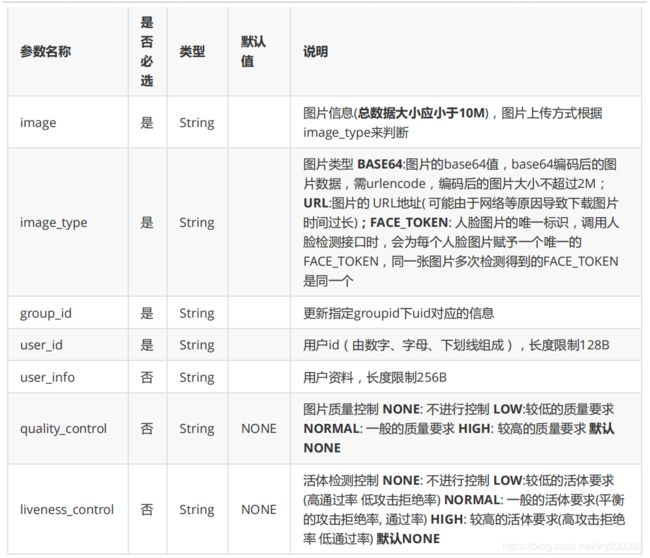
用于从人脸库中新增用户,可以设定多个用户所在组,及组内用户的人脸图片
典型应用场景:构建您的人脸库,如会员人脸注册,已有用户补全人脸信息等。
//人脸注册
@Test
public void testFaceRegister() throws Exception {
    //传入可选参数调用接口
    HashMap<String, String> options = new HashMap<String, String>();
    options.put("quality_control", "NORMAL");
    options.put("liveness_control", "LOW");
    String imageType = "BASE64";
    String groupId = "itcast";
    String userId = "1000";
    //构造base64图片字符串
    String path = "C:\\Users\\ThinkPad\\Desktop\\ihrm\\day11\\资源\\照片\\001.png";
    byte[] bytes = Files.readAllBytes(Paths.get(path));
    String image = Base64Util.encode(bytes);
    // 人脸注册
    JSONObject res = client.addUser(image, imageType, groupId, userId, options);
    System.out.println(res.toString(2));
}
03-人脸更新
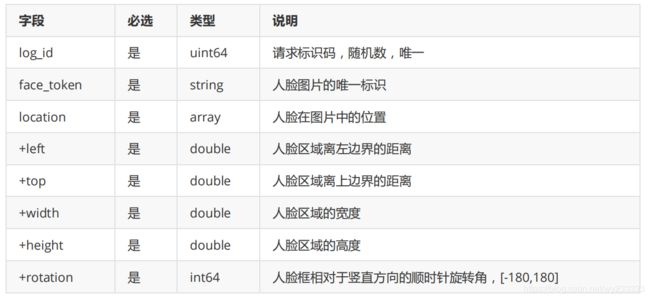
用于对人脸库中指定用户,更新其下的人脸图像。
//人脸更新
@Test
public void testFaceUpdate() throws Exception {
    //传入可选参数调用接口
    HashMap<String, String> options = new HashMap<String, String>();
    options.put("quality_control", "NORMAL");
    options.put("liveness_control", "LOW");
    String imageType = "BASE64";
    String groupId = "itcast";
    String userId = "1000";
    //构造base64图片字符串
    String path = "C:\\Users\\ThinkPad\\Desktop\\ihrm\\day11\\资源\\照片\\001.png";
    byte[] bytes = Files.readAllBytes(Paths.get(path));
    String image = Base64Util.encode(bytes);
    //人脸注册
    JSONObject res = client.updateUser(image, imageType, groupId, userId, options);
    System.out.println(res.toString(2));
}
04-人脸检测
//人脸检测
@Test
public void testFaceDetect() throws IOException {
    String path = "C:\\Users\\ThinkPad\\Desktop\\ihrm\\day11\\资源\\照片\\002.png";
    byte[] bytes = Files.readAllBytes(Paths.get(path));
    String image = Base64Util.encode(bytes);
    String imageType = "BASE64";
    HashMap<String, String> subOptions = new HashMap<String, String>();
    subOptions.put("max_face_num", "10");
    //人脸检测
    JSONObject res = client.detect(image, imageType, subOptions);
    System.out.println(res.toString(2));
}
05-人脸查找
在指定人脸集合中,找到最相似的人脸
//人脸搜索
@Test
public void testFaceSearch() throws IOException {
    String path = "D:\\223.png";
    byte[] bytes = Files.readAllBytes(Paths.get(path));
    String image = Base64Util.encode(bytes);
    String imageType = "BASE64";
    HashMap<String, String> options = new HashMap<String, String>();
    options.put("user_top_num", "1");
    //人脸搜索
    JSONObject res = client.search(image, imageType, "itcast", options);
    System.out.println(res.toString(2));
}
四. 刷脸登录实现
01-需求分析
为了用户登录的便捷,我们在系统中增加刷脸登录的功能,大致流程如下图:

用户在登录页面触发刷脸登录功能
在该页面中弹出一个二维码,此二维码是后台即时生成,包含特殊标志(但本质上是一个URL链接),后续登录流程将会使用此标志。用户对该二维码进行扫描,并在扫描端(手机或PC,注:此处不建议使用微信扫描)浏览器打开落地页。
打开落地页时,授权使用摄像头,并进行人脸识别,识别成功后,关闭落地页。
识别成功后,登录页面自动检测到成功标识,并获取相关信息,进入系统主页。
技术点
- 二维码生成
- 百度云AI
- Redis
- 前端摄像头调用
02-搭建环境
(1) 引入坐标
<dependency>
    <groupId>com.baidu.aipgroupId>
    <artifactId>java-sdkartifactId>
    <version>4.8.0version>
dependency>

<dependency>
    <groupId>com.google.zxinggroupId>
    <artifactId>coreartifactId>
    <version>3.2.1version>
dependency>
<dependency>
    <groupId>com.google.zxinggroupId>
    <artifactId>javaseartifactId>
    <version>3.2.1version>
dependency>
(2)添加配置
ai:
 appId: 15191935
 apiKey: cyWSHgas93Vtdt42OwbW8pu
 secretKey: yf1GusMvvLBdOnyubfLbNyod9iEDEZW
 imageType: BASE64
 groupId: itcast
qr:
 url: https://localhost:8080/#/facelogin
(3)创建二维码工具类
配置二维码创建的工具类
@Component
public class QRCodeUtil {
    /**
     * 生成Base64 二维码
     */
    public String crateQRCode(String content) throws IOException {
        ByteArrayOutputStream os = new ByteArrayOutputStream();
        try {
            QRCodeWriter writer = new QRCodeWriter();
            BitMatrix bitMatrix = writer.encode(content, BarcodeFormat.QR_CODE, 200, 200);
            BufferedImage bufferedImage =MatrixToImageWriter.toBufferedImage(bitMatrix);
            ImageIO.write(bufferedImage, "png", os);
            //添加图片标识
            return new String("data:image/png;base64," +Base64.encode(os.toByteArray()));
       } catch (Exception e) {
            e.printStackTrace();
       } finally {
            os.close();
       }
        return null;
   }
}
在QRCodeUtil类头添加 @Component 注解,使用时可通过@Autowired 来自动装配。
(4) 创建基本的工程结构
在系统微服务中构建基本的Controller代码
@RestController
@RequestMapping("/sys/faceLogin")
public class FaceLoginController {
    /**
     * 获取刷脸登录二维码
     *     返回值:QRCode对象(code,image)
     *
     */
    @RequestMapping(value = "/qrcode", method = RequestMethod.GET)
    public Result qrcode() throws Exception {
       return null;
   }
    /**
     * 检查二维码:登录页面轮询调用此方法,根据唯一标识code判断用户登录情况
     *     查询二维码扫描状态
     *         返回值:FaceLoginResult
     *             state :-1,0,1 (userId和token)
     */
    @RequestMapping(value = "/qrcode/{code}", method = RequestMethod.GET)
    public Result qrcodeCeck(@PathVariable(name = "code") String code) throws Exception
{
return null;
   }
    /**
     * 人脸登录:根据落地页随机拍摄的面部头像进行登录
     *         根据拍摄的图片调用百度云AI进行检索查找
     */
    @RequestMapping(value = "/{code}", method = RequestMethod.POST)
    public Result loginByFace(@PathVariable(name = "code") String code,
@RequestParam(name = "file") MultipartFile attachment) throws Exception {
return null;
   }
    /**
     * 图像检测,判断图片中是否存在面部头像
     */
    @RequestMapping(value = "/checkFace", method = RequestMethod.POST)
    public Result checkFace(@RequestParam(name = "file") MultipartFile attachment)
throws Exception {
return null;
   }
}
在系统微服务中构建基本的Service代码
@Service
public class FaceLoginService {
    @Value("${qr.url}")
    private String url;
//创建二维码
    public QRCode getQRCode() throws Exception {
return null;
   }
//根据唯一标识,查询用户是否登录成功
    public FaceLoginResult checkQRCode(String code) {
return null;
   }
//扫描二维码之后,使用拍摄照片进行登录
    public String loginByFace(String code, MultipartFile attachment) throws Exception {
return null;
   }
//构造缓存key
    private String getCacheKey(String code) {
        return "qrcode_" + code;
   }
}
三. 二维码生成
@Component
public class QRCodeUtil {
    /**
     * 生成Base64 二维码
     */
    public String crateQRCode(String content) throws IOException {
        System.out.println(content);
        ByteArrayOutputStream os = new ByteArrayOutputStream();
        try {
            QRCodeWriter writer = new QRCodeWriter();
            BitMatrix bitMatrix = writer.encode(content, BarcodeFormat.QR_CODE, 200, 200);
            BufferedImage bufferedImage =MatrixToImageWriter.toBufferedImage(bitMatrix);
            ImageIO.write(bufferedImage, "png", os);
            //添加图片标识
            return new String("data:image/png;base64," +Base64.encode(os.toByteArray()));
       } catch (Exception e) {
            e.printStackTrace();
       } finally {
            os.close();
              }
        return null;
   }
}
在QRCodeUtil类头添加 @Component 注解,使用时可通过 @Autowired 来自动装配。
四. 封装API
对于百度云AI SDK我们进行一些简单的封装,便于使用时,减少代码冗余。
package com.ihrm.system.utils;
import com.baidu.aip.face.AipFace;
import org.json.JSONArray;
import org.json.JSONObject;
import org.springframework.beans.factory.annotation.Value;
import org.springframework.stereotype.Component;
import javax.annotation.PostConstruct;
import java.util.HashMap;
@Component
public class BaiduAiUtil {
    @Value("${ai.appId}")
    private String APP_ID;
    @Value("${ai.apiKey}")
    private String API_KEY;
    @Value("${ai.secretKey}")
    private String SECRET_KEY;
    @Value("${ai.imageType}")
    private String IMAGE_TYPE;
    @Value("${ai.groupId}")
    private String groupId;
    private AipFace client;
    private HashMap<String, String> options = new HashMap<String, String>();
    public BaiduAiUtil() {
        options.put("quality_control", "NORMAL");
        options.put("liveness_control", "LOW");
   }
    @PostConstruct
    public void init() {
        client = new AipFace(APP_ID, API_KEY, SECRET_KEY);
   }
    /**
     * 人脸注册 :将用户照片存入人脸库中
     */
    public Boolean faceRegister(String userId, String image) {
        // 人脸注册
        JSONObject res = client.addUser(image, IMAGE_TYPE, groupId, userId, options);
        Integer errorCode = res.getInt("error_code");
        return errorCode == 0 ? true : false;
   }
    /**
     * 人脸更新 :更新人脸库中的用户照片
     */
    public Boolean faceUpdate(String userId, String image) {
        // 人脸更新
        JSONObject res = client.updateUser(image, IMAGE_TYPE, groupId, userId,
options);
        Integer errorCode = res.getInt("error_code");
        return errorCode == 0 ? true : false;
   }
    /**
     * 人脸检测:判断上传图片中是否具有面部头像
     */
    public Boolean faceCheck(String image) {
        JSONObject res = client.detect(image, IMAGE_TYPE, options);
        if (res.has("error_code") && res.getInt("error_code") == 0) {
            JSONObject resultObject = res.getJSONObject("result");
            Integer faceNum = resultObject.getInt("face_num");
            return faceNum == 1?true:false;
       }else{
            return false;
       }
   }
    /**
     * 人脸查找:查找人脸库中最相似的人脸并返回数据
     *         处理:用户的匹配得分(score)大于80分,即可认为是同一个用户
     */
    public String faceSearch(String image) {
        JSONObject res = client.search(image, IMAGE_TYPE, groupId, options);
        if (res.has("error_code") && res.getInt("error_code") == 0) {
            JSONObject result = res.getJSONObject("result");
            JSONArray userList = result.getJSONArray("user_list");
            if (userList.length() > 0) {
                JSONObject user = userList.getJSONObject(0);
                double score = user.getDouble("score");
                if(score > 80) {
                    return user.getString("user_id");
               }
           }
       }
        return null;
   }
}
在构造方法中,实例化client。通过client,可以调用SDK中包含的各种API。
APP_ID, API_KEY, SECRET_KEY在文中第一段中所述位置获取,如没有正确配置,会直接导致API调用失败。
根据官方文档所示,我们大致创建了faceRegister()、faceUpdate()、faceCheck()、faceSearch()四个方法。
人脸注册 faceRegister(groupId, userId, image)
groupId:用于人脸库区分人群标识,自定义即可,人脸库会根据提交的groupId,将用户分组
userId:人脸库中的用户标识,同组不可重复,自定义即可(通常为系统中用户的唯一标识)
image:Base64 用户图片
人脸更新 faceUpdate(groupId, userId, image)
参数解释同人脸注册
该方法用于发生变化时,更新人脸信息
人脸检测 faceCheck(image)
image:Base64 用户图片
该方法用于人脸注册、人脸更新和人脸登录前使用
目前采用的方案是检测出人脸数大于0即可,如需深化需求,可按需扩展
人脸登录 faceSearch(image)
image:Base64 用户图片
该方法使用的是百度云AI 人脸搜索方法,目前采用的方式是匹配度最高的结果,即要登录的用户
同样的,在BaiduAiUtil类头添加 @Component 注解,使用时可通过 @Autowired 来自动装配。在API调用后返回值处理上,进行了简单的解析,如需深化解析,可按需扩展。
五. 功能实现
完成刷脸登录一共需要我们解决如下5个问题: 人脸注册/人脸更新
在刷脸登录之前,我们首先需要对系统中的用户进行人脸注册,将相关信息提交至人脸库,才可通过人脸识
别的相关接口进行刷脸登录操作。当用户相貌变更较大时,可通过人脸更新进行人脸信息更换。 二维码生成
获取验证码。通过工具生成相关信息后,如特殊标志,将特殊标志写入Redis缓存,并将标记值设为”-1“,我
们认定值为”-1“,即为当前标记尚未使用。调用QRCodeUtil.crateQRCode()生成二维码。 二维码检测
前端获取二维码后,对二维码进行展现,并且前台启动定时器,定时检测特殊标记状态值。当状态值 为“1”时,表明登录成功。 人脸检测
当用户扫码进入落地页,通过落地页打开摄像头,并且定时成像。将成像图片,通过接口提交给后端进行人 脸检测。 人脸登录
检测成功后,即进行人脸登录,人脸登录后,改变特殊标记状态值,成功为“1”,失败为“0”。当登录成功时,
进行自动登录操作,将token和userId存入到redis中。
1. 后端实现
(1)人脸注册/人脸更新:在刷脸登录之前,我们首先需要对系统中的用户进行人脸注册,将相关信息提交至人脸库,才可通过人脸识别的相关接口进行刷脸登录操作。当用户相貌变更较大时,可通过人脸更新进行人脸信息更换。
    //人脸注册
@RequestMapping(value = "/register/face", method = RequestMethod.POST)
    public Boolean registerFace(@RequestParam(name = "fid") String fid) throws
Exception {
        SysFile sysFile = fileService.findById(fid);
        String path = uploadPath + "/" + sysFile.getPath() + "/" +
sysFile.getUuidName();
        byte[] bytes = Files.readAllBytes(Paths.get(path));
        Boolean isSuc;
        String image = Base64Utils.encodeToString(bytes);
        isSuc = userService.checkFace(image);
        if (isSuc) {
            isSuc = baiduAiUtil.faceRegister("1", userId, image);
       }
        return isSuc;
   }
//人脸更新
    @RequestMapping(value = "/update/face", method = RequestMethod.POST)
    public boolean updateFace(@RequestParam(name = "fid") String fid) throws Exception
{
        SysFile sysFile = fileService.findById(fid);
        String path = uploadPath + "/" + sysFile.getPath() + "/" +
sysFile.getUuidName();
        byte[] bytes = Files.readAllBytes(Paths.get(path));
        Boolean isSuc;
        String image = Base64Utils.encodeToString(bytes);
        isSuc = userService.checkFace(image);
        if (isSuc) {
            isSuc = baiduAiUtil.faceUpdate("1", userId, image);
       }
        return isSuc;
   }
(2)二维码生成:获取验证码。通过工具生成相关信息后,如特殊标志,将特殊标志写入Redis缓存,并将标记值设为”-1“,我们认定值为”-1“,即为当前标记尚未使用。调用QRCodeUtil.crateQRCode()生成二维码。
Controller:
/**
 * 获取刷脸登录二维码
 */
@RequestMapping(value = "/qrcode", method = RequestMethod.GET)
public Result qrcode() throws Exception {
    return new Result(ResultCode.SUCCESS, faceLoginService.getQRCode());
}
Service:
public QRCode getQRCode() throws Exception {
    String code = idWorker.nextId() + "";
    FaceLoginResult result = new FaceLoginResult("-1");
    redisTemplate.boundValueOps(getCacheKey(code)).set(result, 30,
TimeUnit.MINUTES);
    String strFile = qrCodeUtil.crateQRCode(url + "?code=" + code);
    return new QRCode(code, strFile);
}
(3)二维码检测:前端获取二维码后,对二维码进行展现,并且前台启动定时器,定时检测特殊标记状态值。当状态值为“1”时,表明登录成功。
Controller:
/**
 * 检查二维码:登录页面轮询调用此方法,根据唯一标识code判断用户登录情况
 */
@RequestMapping(value = "/qrcode/{code}", method = RequestMethod.GET)
public Result qrcodeCeck(@PathVariable(name = "code") String code) throws Exception
{
    FaceLoginResult codeCheck = faceLoginService.checkQRCode(code);
    return new Result(ResultCode.SUCCESS, codeCheck);
}
Service:
public FaceLoginResult checkQRCode(String code) {
    String cacheKey = getCacheKey(code);
    FaceLoginResult result = (FaceLoginResult)
redisTemplate.opsForValue().get(cacheKey);
    return result;
}
4)人脸检测/人脸登录:当用户扫码进入落地页,通过落地页打开摄像头,并且定时成像。将成像图片,通过接口提交给后端进行人脸检测。
/**
 * 图像检测,判断图片中是否存在面部头像
 */
@RequestMapping(value = "/checkFace", method = RequestMethod.POST)
public Result checkFace(@RequestParam(name = "file") MultipartFile attachment) throws Exception {
    if (attachment == null || attachment.isEmpty()) {
        throw new CommonException();
   }
    Boolean aBoolean =
baiduAiUtil.faceCheck(Base64Utils.encodeToString(attachment.getBytes()));
    if(aBoolean) {
        return new Result(ResultCode.SUCCESS);
   }else{
        return new Result(ResultCode.FAIL);
   }
}
(5)检测成功后,即进行人脸登录,人脸登录后,改变特殊标记状态值,成功为“1”,失败为“0”。当登录成功时,进行自动登录操作,将token和userId存入到redis中。
Controller:
@RequestMapping(value = "/{code}", method = RequestMethod.POST)
public Result loginByFace(@PathVariable(name = "code") String code,
	@RequestParam(name = "file") MultipartFile attachment) throws Exception {
    String userId = faceLoginService.loginByFace(code, attachment);
    if(userId == null) {
        return new Result(ResultCode.FAIL);
   }else{
        //构造返回数据
        return new Result(ResultCode.SUCCESS);
   }
}
Service:
public String loginByFace(String code, MultipartFile attachment) throws Exception {
    String userId =
baiduAiUtil.faceSearch(Base64Utils.encodeToString(attachment.getBytes()));
    FaceLoginResult result = new FaceLoginResult("1");
    if(userId != null) {
        User user = userDao.findById(userId).get();
        if(user != null) {
            Subject subject = SecurityUtils.getSubject();
            subject.login(new UsernamePasswordToken(user.getMobile(),
user.getPassword()));
            String token = subject.getSession().getId() + "";
            result = new FaceLoginResult("0",token,userId);
       }
   }
    redisTemplate.boundValueOps(getCacheKey(code)).set(result, 30,
TimeUnit.MINUTES);
    return userId;
}
2. 前端实现
前端主要实现的功能是,获取二维码并展示,然后后台轮询检测刷脸登录状态,并且实现落地页相关功能(摄像头 调用、定时成像、发送人脸检测和发送人脸登录请求)
(1)二维码展现
// 二维码
handlecode() {
  qrcode().then(res => {
    this.param.qrcode = res.data.file
    this.centerDialogVisible = true
    this.codeCheckInfo = res.data.code
    setInterval(() => {
      if (this.states === '-1') {
      codeCheck({ code: res.data.code }).then(res => {
        this.states = res.data.state
        this.token = res.data.token
        if (this.states === '0') {
        // 登录
        this.$store
         .dispatch('LoginByCode', res.data.token)
         .then(() => {
            this.$router.push({ path: '/' })
         })
         .catch(() => {
         })
       }
        if (this.states === '1') {
          // 关闭
          this.centerDialogVisible = false
       }
     })
   }
   }, 1000 * 10)
 })
}
(2)落地页调用摄像头
handleClick() {
      let _this = this
      if (!this.vdstate) {
        return false
     }
      if (!_this.states) {
        // 注册拍照按钮的单击事件
      let video = this.$refs['vd']
      let canvas = this.$refs['cav']
      // let form = this.$refs["myForm"];
      let context = canvas.getContext('2d')
      // 绘制画面
      context.drawImage(video, 0, 0, 200, 200)
      let base64Data = canvas.toDataURL('image/jpg')
      // 封装blob对象
      let blob = this.dataURItoBlob(base64Data, 'camera.jpg') // base64 转图片file
      let formData = new FormData()
      formData.append('file', blob)
      this.imgUrl = base64Data
      checkFace(formData).then(res => {
        if (res.data.isSuc) {
          axios({
            method: 'post',
            url: '/api/frame/facelogin/' + this.$route.query.code,
            data: formData
         })
           .then(function(response) {
              console.log(response)
              _this.states = true
              _this.canvasShow = false
              _this.tipShow = true
              // _this.$message.success('验证通过' + '!')
           })
           .catch(function(error) {
              console.log(error)
           })
       } else {
          return false
       }
     })
     }
   },
    dataURItoBlob(base64Data) {
      var byteString
      if (base64Data.split(',')[0].indexOf('base64') >= 0)
        byteString = atob(base64Data.split(',')[1])
      else byteString = unescape(base64Data.split(',')[1])
      var mimeString = base64Data
       .split(',')[0]
       .split(':')[1]
       .split(';')[0]
      var ia = new Uint8Array(byteString.length)
      for (var i = 0; i < byteString.length; i++) {
        ia[i] = byteString.charCodeAt(i)
     }
      return new Blob([ia], { type: mimeString })
   }
 }
六. 总结
通过上述的步骤,可以实现一个刷脸登录的功能,其核心在于百度云AI的使用。通过合理的使用百度云AI SDK提供的相关API,我们可以很轻松的实现刷脸登录功能。刷脸登录的业务流程有很多种,我们只是实现了一种借助二维码的方式,作为抛砖引玉。更多的流程和实现方式,在此不进行赘述。
这是将以前的笔记搬了出来,
以前好像是黑马视频里的


