Windows下编译Android所需的FFmpeg库(小白)
目录
- 安装VMware虚拟机
- 安装 Ubuntu系统
- ndk配置
- FFmpeg源码
- Android studio 引入FFmpeg
- 更新:
最近开始学习FFmpeg,从小白到了解再到成功编译,踩了很多坑,不得不感叹网络上的信息真是天花乱坠,碰壁两天,终于走出了一条自己的路,以此记录下。
安装VMware虚拟机
安装 Ubuntu系统
1、下载ubuntu镜像,我安装的是18.04.3。
2、百度安装教程。。。我参考的是安装Ubuntu18.04虚拟机
3、安装好,注意是否能上网,能否和window交互粘贴复制(为了以后方便),是否开启共享文件夹
ndk配置
将提前下载好的ndk压缩包,(注意是linux平台的!不要把window下的ndk就直接拷进去了,愚蠢的我弄了一上午,最后发现了差点没喷血!)拷贝进虚拟机,最好是主目录下,右键-提取到此处。目前我使用android-ndk-r15c.和android-ndk-r13b.是可以编译成功的,
也可以直接在虚拟机里面的终端上 输入 wget 跟上下载链接如
wget https://dl.google.com/android/repository/android-ndk-r15c-linux-x86_64.zip?hl=zh_cn
然后改下名字,因为解压出来的会有两层目录,将最外层的android-ndk-r15c-linux-x86_64改名为ndk,也可以不改,只是等会配置的时候会显得路径名字太长了。
进入root 模式
直接右键打开终端,输入sudo su,输入密码,进入root模式(后面的命令行会以root字样开头),建议所有命令都在root模式下输入,因为有些指令只有在root下才起作用的

打开bashrc文件添加内容
输入 gedit ~/.bashrc ,可能会稍等十来秒,会打开一个文本,在文本最后添加上
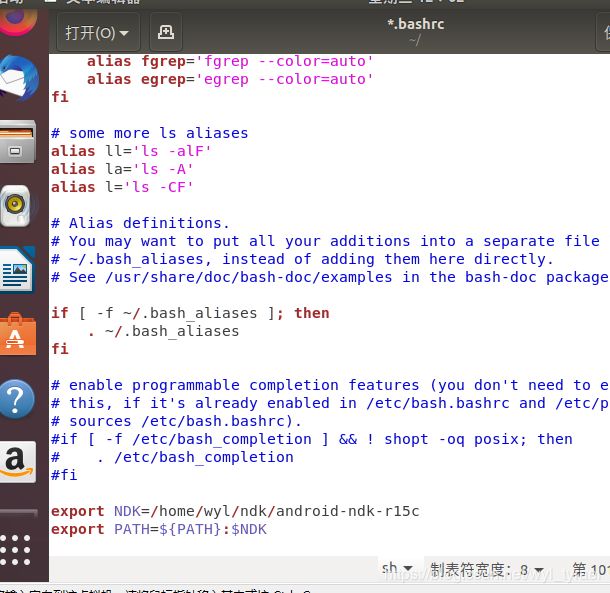
export NDK=/home/wyl/ndk/android-ndk-r15c
export PATH=${PATH}:$NDK
保存 !保存 ! 保存!
/home是固定的,/wyl表示的是系统名称,用户安装ubuntu系统的时候自定义的、/ndk/android-ndk-r15c就是上面解压后的ndk的相对路径
注意第一张图片顶部,有显示 /home/wyl。
然后 输入 source ~/.bashrc 通知系统 环境变量已经更改
输入 echo $NDK 会打印出刚刚配置的路径,
再输入 ndk-build 提示如下,说明ndk配置是OK的了,输入 ndk-build -v 会打印出ndk版本
FFmpeg源码
ffmpeg源码下载
我编译使用的是 3.2.12,使用最新版没成功,不知道是哪里出了问题
打开源码目录,找到configure文件,可以直接打开,然后将里面的
SLIBNAME_WITH_MAJOR='$(SLIBNAME).$(LIBMAJOR)'
LIB_INSTALL_EXTRA_CMD='$$(RANLIB) "$(LIBDIR)/$(LIBNAME)"'
SLIB_INSTALL_NAME='$(SLIBNAME_WITH_VERSION)'
SLIB_INSTALL_LINKS='$(SLIBNAME_WITH_MAJOR) $(SLIBNAME)'
替换为:
SLIBNAME_WITH_MAJOR='$(SLIBPREF)$(FULLNAME)-$(LIBMAJOR)$(SLIBSUF)'
LIB_INSTALL_EXTRA_CMD='$$(RANLIB)"$(LIBDIR)/$(LIBNAME)"'
SLIB_INSTALL_NAME='$(SLIBNAME_WITH_MAJOR)'
SLIB_INSTALL_LINKS='$(SLIBNAME)'
为什么呢?我们小白不需要知道为什么

同目录下,创建一个脚本文件,build.sh,名字自己起,该目录随便复制粘贴一个文件,改下名字即可,因为右键发现没有创文件的选项…里面的内容为:
#清除上次编译的东西
make clean
#配置NDK路径
export NDK=/home/wyl/ndk/android-ndk-r15c
#配置工具链  注意这里的目录,要确保在你的ndk目录里存在,没有就重新下  或是换个ndk版本
export PREBUILT=$NDK/toolchains/arm-linux-androideabi-4.9/prebuilt
#配置平台  注意这里的目录,要确保在你的ndk目录里存在,没有就重新下  或是换个ndk版本
export PLATFORM=$NDK/platforms/android-21/arch-arm
#配置编译好了之后的文件输出目录,$(pwd)当前目录下
export PREFIX=$(pwd)/android/
build_one(){
  ./configure --target-os=linux --prefix=$PREFIX \
--enable-cross-compile \
--enable-runtime-cpudetect \
--disable-asm \
--arch=arm \
--cc=$PREBUILT/linux-x86_64/bin/arm-linux-androideabi-gcc \
--cross-prefix=$PREBUILT/linux-x86_64/bin/arm-linux-androideabi- \
--disable-stripping \
--nm=$PREBUILT/linux-x86_64/bin/arm-linux-androideabi-nm \
--sysroot=$PLATFORM \
--enable-gpl --enable-shared --disable-static --enable-nonfree --enable-version3 --enable-small \
--enable-zlib --disable-ffprobe --disable-ffplay --disable-ffmpeg --disable-ffserver --disable-debug \
--extra-cflags="-fPIC -DANDROID -D__thumb__ -mthumb -Wfatal-errors -Wno-deprecated -mfloat-abi=softfp -marm -march=armv7-a"
}
build_one

#4线程编译
make -j4
make install
里面的内容,是我看了很多博主的脚本之后,唯一一个能编译成功的。。。
注意里面的注释,尤其是上面几行,确保相应的目录在ndk里面是存在的
这两个 arm-linux-androideabi-4.9 , android-21根据ndk里面作相应更改即可,有的会是4.8
保存文件,然后执行脚本
先赋予权限 chmod +x ./build.sh
执行 ./build.sh
就等待它执行完成吧。
编译过程中遇到的问题记录.
成功之后,会在当前目录生成android文件夹,里面就是需要的头文件和.so文件了
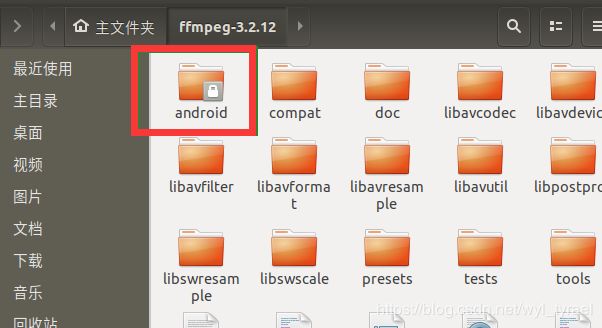
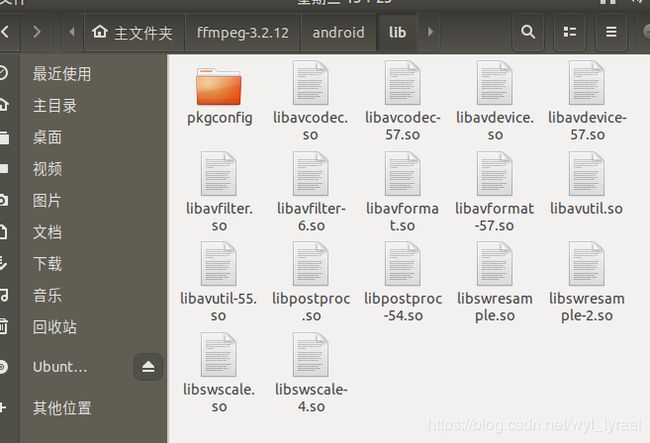
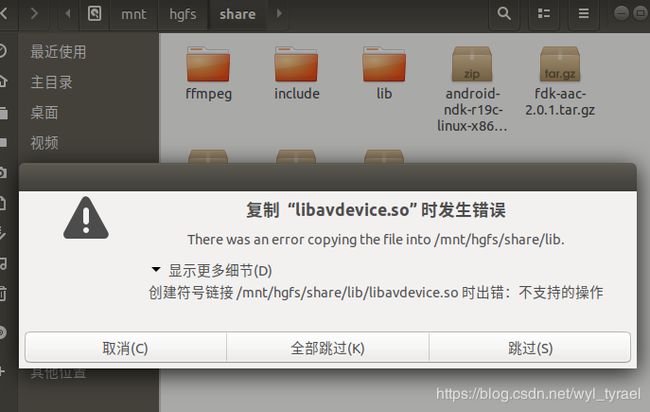
打开lib目录,里面的so文件,不带数字的都是没用的,将android目录直接复制到共享目录里,它会有提示,直接全部跳过,就是里面生成的链接文件,不带数字的那些,是不能复制到windows的,最后到window下面,找到共享目录,里面的include目录,和so文件就可以直接在Android studio上使用了。
Android studio 引入FFmpeg
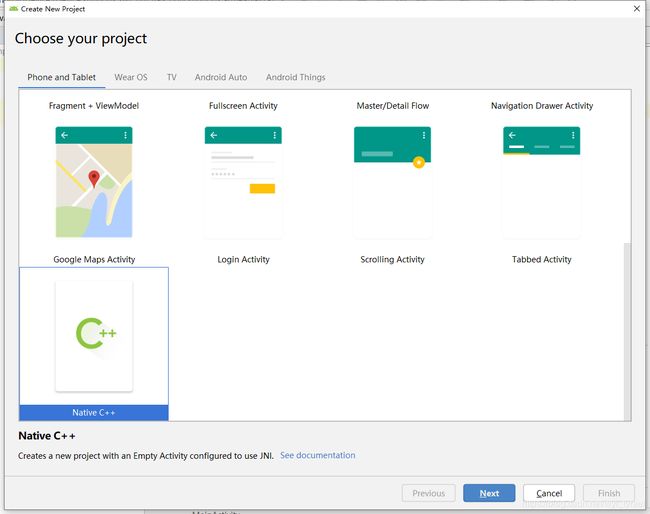
1、新建项目,选择 Native C++,我的AS版本是 3.5的,其他版本也类似
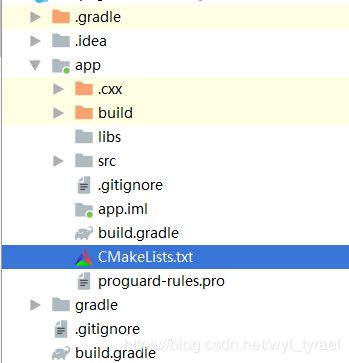
2、将cpp目录下的CMakeLists.txt文件移动到与src目录平级

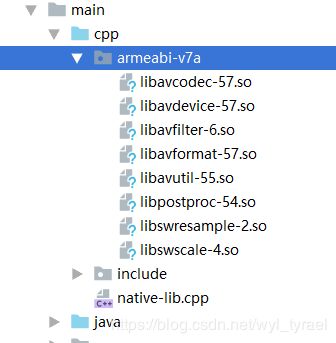
3、在cpp目录下创建 armeabi-v7a目录,将编译好的so文件复制进去,并将include目录也复制到cpp目录下,注意 include与armeabi-v7a是平级
4、修改build.gradle文件
android {
    compileSdkVersion 28
    buildToolsVersion "29.0.2"
    defaultConfig {
        applicationId "com.wyl.ffmpegdemo"
        minSdkVersion 19
        targetSdkVersion 28
        versionCode 1
        versionName "1.0"
        testInstrumentationRunner "android.support.test.runner.AndroidJUnitRunner"
        externalNativeBuild {
            cmake {
                cppFlags ""
            }
        }
        //添加目标平台
         ndk {
            abiFilters 'armeabi-v7a'
        }
    }
    //配置jniLibs
    sourceSets {
        main {
            jniLibs.srcDirs = ['src/main/cpp']
        }
    }
    buildTypes {
        release {
            minifyEnabled false
            proguardFiles getDefaultProguardFile('proguard-android-optimize.txt'), 'proguard-rules.pro'
        }
    }
    externalNativeBuild {
        cmake {
           // path "src/main/cpp/CMakeLists.txt" 这里是系统生成的
            path "CMakeLists.txt" //因为该文件移动到了外面,与src平级
            version "3.10.2"
        }
    }
}
5、修改CMakeLists.txt文件
# For more information about using CMake with Android Studio, read the
# documentation: https://d.android.com/studio/projects/add-native-code.html

# Sets the minimum version of CMake required to build the native library.

cmake_minimum_required(VERSION 3.4.1)

#important 需要注意目录
#设置头文件目录
include_directories(src/main/cpp/include)

# Creates and names a library, sets it as either STATIC
# or SHARED, and provides the relative paths to its source code.
# You can define multiple libraries, and CMake builds them for you.
# Gradle automatically packages shared libraries with your APK.

add_library( # Sets the name of the library.
        native-lib

        # Sets the library as a shared library.
        SHARED

        # Provides a relative path to your source file(s).
        src/main/cpp/native-lib.cpp )

add_library(
        avcodec
        SHARED
        IMPORTED
)

#指定库的位置
set_target_properties(
        avcodec
        PROPERTIES IMPORTED_LOCATION
        ${CMAKE_SOURCE_DIR}/src/main/cpp/armeabi-v7a/libavcodec-57.so
)

add_library(
        avutil
        SHARED
        IMPORTED
)

set_target_properties(
        avutil
        PROPERTIES IMPORTED_LOCATION
        ${CMAKE_SOURCE_DIR}/src/main/cpp/armeabi-v7a/libavutil-55.so
)

add_library(
        avdevice
        SHARED
        IMPORTED
)

set_target_properties(
        avdevice
        PROPERTIES IMPORTED_LOCATION
        ${CMAKE_SOURCE_DIR}/src/main/cpp/armeabi-v7a/libavdevice-57.so
)

add_library(
        avfilter
        SHARED
        IMPORTED
)

set_target_properties(
        avfilter
        PROPERTIES IMPORTED_LOCATION
        ${CMAKE_SOURCE_DIR}/src/main/cpp/armeabi-v7a/libavfilter-6.so
)

add_library(
        avformat
        SHARED
        IMPORTED
)

set_target_properties(
        avformat
        PROPERTIES IMPORTED_LOCATION
        ${CMAKE_SOURCE_DIR}/src/main/cpp/armeabi-v7a/libavformat-57.so
)

add_library(
        postproc
        SHARED
        IMPORTED
)
set_target_properties(
        postproc
        PROPERTIES IMPORTED_LOCATION
        ${CMAKE_SOURCE_DIR}/src/main/cpp/armeabi-v7a/libpostproc-54.so
)


add_library(
        swresample
        SHARED
        IMPORTED
)

set_target_properties(
        swresample
        PROPERTIES IMPORTED_LOCATION
        ${CMAKE_SOURCE_DIR}/src/main/cpp/armeabi-v7a/libswresample-2.so
)

add_library(
        swscale
        SHARED
        IMPORTED
)

set_target_properties(
        swscale
        PROPERTIES IMPORTED_LOCATION
        ${CMAKE_SOURCE_DIR}/src/main/cpp/armeabi-v7a/libswscale-4.so
)

# Searches for a specified prebuilt library and stores the path as a
# variable. Because CMake includes system libraries in the search path by
# default, you only need to specify the name of the public NDK library
# you want to add. CMake verifies that the library exists before
# completing its build.

find_library( # Sets the name of the path variable.
        log-lib
        # Specifies the name of the NDK library that
        # you want CMake to locate.
        log )


# Specifies libraries CMake should link to your target library. You
# can link multiple libraries, such as libraries you define in this
# build script, prebuilt third-party libraries, or system libraries.

target_link_libraries(

        # Specifies the target library.
        native-lib

        avcodec
        avutil
        avdevice
        avfilter
        avformat
        postproc
        swscale
        swresample

        # Links the target library to the log library
        # included in the NDK.
        ${log-lib} )
6、修改native-lib.cpp
#include 注意命名 将com_wyl_ffmpegdemo换成自己项目的包名
7、测试FFmpeg是否接入成功
在MainActivity中
 public class MainActivity extends AppCompatActivity {

    // Used to load the 'native-lib' library on application startup.
    static {
        System.loadLibrary("native-lib");
        //注意不要把so的前缀lib给复制上来了

        System.loadLibrary("avutil-55");
        System.loadLibrary("avcodec-57");
        System.loadLibrary("avformat-57");
        System.loadLibrary("avdevice-57");
        System.loadLibrary("swresample-2");
        System.loadLibrary("swscale-4");
        System.loadLibrary("postproc-54");
        System.loadLibrary("avfilter-6");
    }

    @Override
    protected void onCreate(Bundle savedInstanceState) {
        super.onCreate(savedInstanceState);
        setContentView(R.layout.activity_main);

        // Example of a call to a native method
        TextView tv = findViewById(R.id.sample_text);
        tv.setText(stringFromJNI());
    }

    /**
     * A native method that is implemented by the 'native-lib' native library,
     * which is packaged with this application.
     */
    public native String stringFromJNI();
}
编译通过,并运行安装成功后会提示:

至此,Android Studio 接入FFmpeg就告一段落了。
FFmpeg的大门已经打开啦…总结一下接下来的路需要什么装备吧:
1、了解Linux下的一些命令
2、了解.sh脚本语言
3、编译出主流架构下的so库:armeabi-v7a,x86和armeabi
4、了解CMakeLists.txt
5、了解学习C,C++
更新:
为何要将configure文件里的代码
# 将 configure 文件中的:
SLIBNAME_WITH_MAJOR='$(SLIBNAME).$(LIBMAJOR)'
LIB_INSTALL_EXTRA_CMD='$$(RANLIB) "$(LIBDIR)/$(LIBNAME)"'
SLIB_INSTALL_NAME='$(SLIBNAME_WITH_VERSION)'
SLIB_INSTALL_LINKS='$(SLIBNAME_WITH_MAJOR) $(SLIBNAME)'

#替换为:
SLIBNAME_WITH_MAJOR='$(SLIBPREF)$(FULLNAME)-$(LIBMAJOR)$(SLIBSUF)'
LIB_INSTALL_EXTRA_CMD='$$(RANLIB) "$(LIBDIR)/$(LIBNAME)"'
SLIB_INSTALL_NAME='$(SLIBNAME_WITH_MAJOR)'
SLIB_INSTALL_LINKS='$(SLIBNAME)'
原来是因为:
Android 工程中只支持导入 .so 结尾的动态库,形如:libavcodec-57.so 。但是FFmpeg 编译生成的动态库默认格式为 xx.so.版本号 ,形如:libavcodec.so.57 , 所以需要修改 FFmpeg 根目录下的 configure 文件,使其生成以 .so 结尾格式的动态库:
————————————————
版权声明:本文为CSDN博主「王英豪」的原创文章,遵循 CC 4.0 BY-SA 版权协议,转载请附上原文出处链接及本声明。
原文链接:https://blog.csdn.net/yhaolpz/article/details/76408829
