python实战(一)Python爬取猫眼评分排行前100电影及简单数据分析可视化
python实战(一)Python爬取猫眼排行前一百电影及简单数据分析可视化
一、抓取数据
需要的库
- request库 响应http请求
- json库 将文本保存成json形式
- pyquery 类似JQuery,主要用于解析网页源代码
import requests
import json
from pyquery import PyQuery as pq # 从pyquery导入PyQuery并重命名为pq
# import time

# 获取页面源代码
def GetOnePage(n):
    # 爬取目标的URL
    url = f'https://maoyan.com/board/4?offset={n*10}'
    # 反爬虫机制 添加表头信息
    header = {'User-Agent': 'Mozilla/5.0 (Windows NT 6.1; WOW64) AppleWebKit/537.36 (KHTML, like Gecko) '
                            'Chrome/56.0.2924.90 Safari/537.36 2345Explorer/9.7.0.18838'}
    r = requests.get(url, headers=header)
    return r.text

# 使用pyquery解析源代码
def parse(new_url):
    # 获取new_url的网页源代码
    r = requests.get(new_url)
    # 将网页源代码解析为文本格式
    html = r.text
    # 使用pyquery对文本进行解析
    t = pq(html)
    # 定位
    names = t('body > div.banner > div > div.celeInfo-right.clearfix > div.movie-brief-container > h3').text()
    film_type = t('body > div.banner > div > div.celeInfo-right.clearfix > div.movie-brief-container > ul > li:nth-child(1)').text()
    releasetimes = t('body > div.banner > div > div.celeInfo-right.clearfix > div.movie-brief-container > ul > li:nth-child(3)').text()[-4:-2]
#     print(names, film_type, releasetimes)
    # time.sleep(1)
    return releasetimes

# 把获取的信息写入到本地
# movie.json
# tyoe.json
# year.json
# nature.json
def saveFile(data):
    with open('nature.json', 'a', encoding='utf-8') as f:
        # 把字典 列表 转化成字符串 \n 换行
        data = json.dumps(data, ensure_ascii=False) + ',\n'
        f.write(data)

# 主函数
def run():
    for n in range(0, 10):
        # 获取每一页的电影
        html_text = GetOnePage(n)
        doc = pq(html_text)
        for n in range(1,11):
            # (pyquery解析的是字符串)
            link = doc("#app > div > div > div.main > dl > dd:nth-child(" + str(n) + ") > div > div > div.movie-item-info > p.name > a").attr("href")
            # 进行字符串拼接
            really_link = 'https://maoyan.com' + str(link)
            # 使用pyquery解析源代码
            items = parse(really_link)
            saveFile(items)
        #     print(items)

# 运行程序入口
if __name__ == "__main__":
    run()
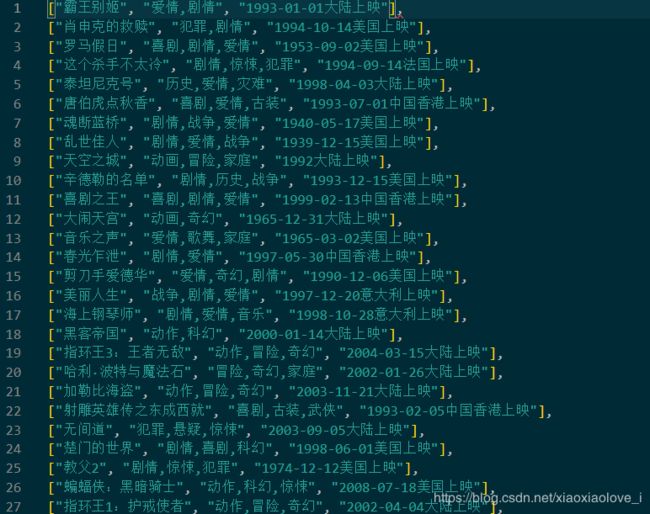
下面是部分保存到本地的数据信息
_movie.json
二、使用jieba库对爬取的数据进行统计
jieba库介绍
jieba库,优良的中文分词工具
# jieba中文分词函数库
import jieba

# type.json 类型---》词云图
# year.json 年份---》柱状图
# nature.json 国家---》饼状图

# 打开文件year.json 只读
json = open("猫眼/year.json", "r", encoding="utf-8").read()
# jieba.lcut精确模式,饭后json文件中分词后的列表变量
words = jieba.lcut(json)
# 定义一个字典
counts = {}
# 遍历words列表的分词 并计数
for word in words:
    if len(word) == 1:
        continue
    else:
        counts[word] = counts.get(word, 0) + 1
# items()返回可遍历的元组数组
items = list(counts.items())
# sort()排序函数
# lambda匿名函数
items.sort(key=lambda x:x[1], reverse=True)
for i in range(15):
    word, count = items[i]
    # format函数字符串格式化
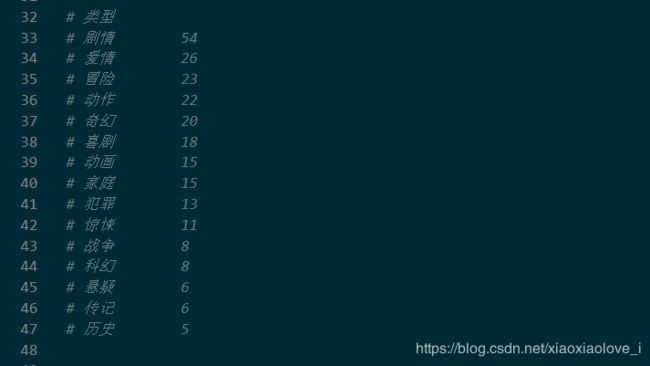
    print("{0:<10}{1:<5}".format(word, count))
三、数据可视化
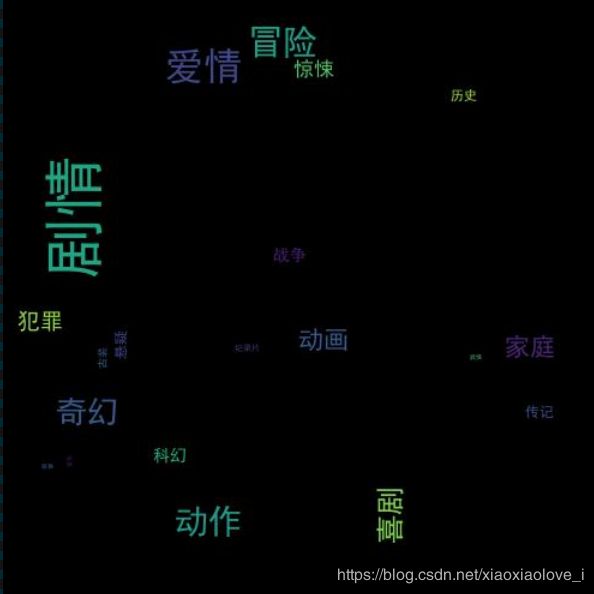
- 对电影类型进行词云图展示
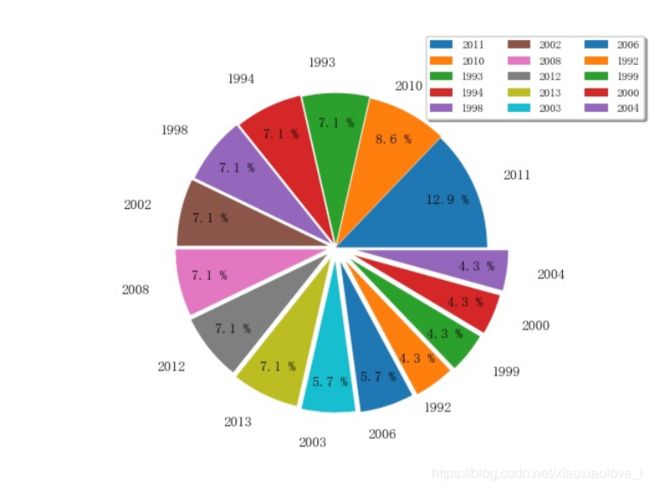
- 对电影年份进行饼状图展示
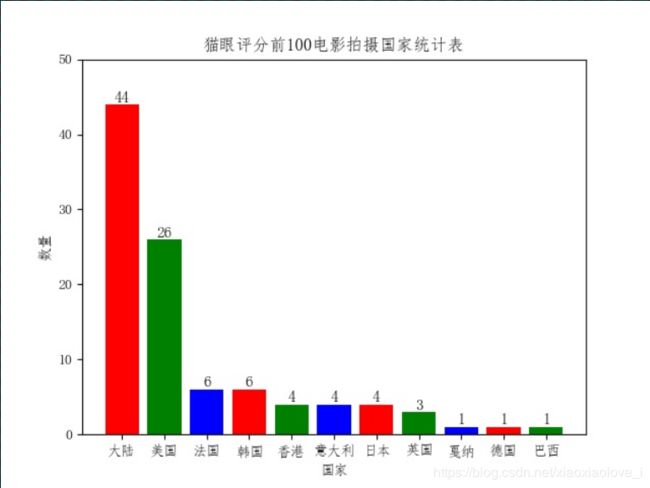
- 对电影国家进行柱状图展示
from wordcloud import WordCloud as wc #词云展示库
import jieba
from scipy.misc import imread  # 这是一个处理图像的函数
import numpy as np
import matplotlib.pyplot as plt #类似matlab的画图工具库
from pylab import mpl
import time # 时间库


mpl.rcParams['font.sans-serif'] = ['FangSong']  # 指定默认字体,解决中文显示乱码的问题
mpl.rcParams['axes.unicode_minus'] = False  # 解决保存图像是负号'-'显示为方块的问题

# 词云统计完整步骤
# 1.先使用jieba中文分词库对文不能进行分词;
# 2.添加自己的词库分词,比如添加'金三胖'到jieba词库后,当你处理的文本中含有金三胖这个词,
#   就会直接将'金三胖'当作一个词,而不会得到'金三'或'三胖'这样的词
# 3.去掉屏蔽词
# 电影类型 词云图


def WordCloud():
    with open("猫眼/_type.json", encoding="utf-8")as file:

        # 读取文本内容
        Type = file.read()
        # 解析该图片
        back_color = imread('猫眼/LYU.jpg')
        # 设置词云的参数
        wc_config = wc(
            font_path="C:/Windows/Fonts/SimHei.ttf",  # 字体的路径
            background_color="black",  # 背景颜色
            mask=back_color,  # 以该参数值作图绘制词云,这个参数不为空时,width和height会被忽略
            # width=600,
            # height=300,
            max_words=50,  # 最大词数
            # max_font_size=100, # 最大号字体,如果不指定则为图像高度
            random_state=42,  # 为每个词返回一个PIL颜色
            prefer_horizontal=0.8,  # 词语水平摆放的频率,默认为0.9.即竖直摆放的频率为0.1
            relative_scaling=.7  # 词频和字体大小的关联性
        ).generate(Type)
        # 生成图片
        image = wc_config.to_image()
        # 显示图片
        image.show()
        # 保存图片到本地
        wc_config.to_file("猫眼/maoyan_type.jpg")

# 电影年份 柱状图


def Histogram():
    # 设置原始数据
    source_data = {'大陆': 44,
                   '美国': 26,
                   '法国': 6,
                   '韩国': 6,
                   '香港': 4,
                   '意大利': 4,
                   '日本': 4,
                   '英国': 3,
                   '戛纳': 1,
                   '德国': 1,
                   '巴西': 1}

    for a, b in source_data.items():
        # ha 文字指定在柱体中间, va指定文字位置 fontsize指定文字体大小
        plt.text(a, b + 0.05, '%.0f' %
                 b, ha='center', va='bottom', fontsize=11)

    # 设置X轴Y轴数据,两者都可以是list或者tuple
    x_axis = tuple(source_data.keys())
    y_axis = tuple(source_data.values())
    # 如果不指定color,所有的柱体都会是一个颜色
    plt.bar(x_axis, y_axis, color='rgb')

    plt.xlabel(u"国家")  # 指定x轴描述信息
    plt.ylabel(u"数量")  # 指定y轴描述信息
    plt.title("猫眼评分前100电影拍摄国家统计表")  # 指定图表描述信息
    plt.ylim(0, 50)  # 指定Y轴的高度
    # plt.savefig('{}.png'.format(time.strftime('%Y%m%d%H%M%S')))  # 保存为图片
    plt.savefig('猫眼/maoyan_nature.jpg')  # 保存为图片
    plt.show()


# 电影国家 饼状图
def Piehart():
    data = {'1992': 3,
            '1993': 5,
            '1994': 5,
            '1998': 5,
            '1999': 3,
            '2000': 3,
            '2002': 5,
            '2003': 4,
            '2004': 3,
            '2006': 4,
            '2008': 5,
            '2010': 6,
            '2011': 9,
            '2012': 5,
            '2013': 5}

    # 对数据进行排序
    source_data = sorted(data.items(), key=lambda x: x[1], reverse=True)
    print(source_data)
    labels = [source_data[i][0][:4] for i in range(len(source_data))]  # 设置标签
    fracs = [source_data[i][1] for i in range(len(source_data))]
    # 与labels一一对应,数值越大离中心区越远
    explode = [x * 0.01 for x in range(len(source_data))]
    # 设置 X轴 Y轴比例
    plt.axes(aspect=1)
    plt.pie(x=fracs,  # 每一块的比例
            labels=labels,  # 饼图外侧显示的说明文字
            explode=explode,  # 离开中心的距离
            autopct='%3.1f %%',  # 百分比的格式 可以使用format字符串或者format function
            shadow=False,  # 是否阴影
            labeldistance=1.2,  # 标签离中心距离 相对于半径的比例, 如<1则绘制在饼图内侧 1.1比较不错
            startangle=0,  # 起始绘图角度,默认图是从x轴正方向逆时针画起,如设定=90则从y轴正方向画起
            pctdistance=0.8,  # 百分百数据离中心区距离
            # radius 控制饼图半径
            # counterclock True 为逆时针 False为顺时针
            center=(-1, 0))
    plt.legend(loc=7,  # 字体参数
               bbox_to_anchor=(1.33, 0.95),  # 指定图例在轴的位置,前者控制左右移动,后者控制上下
               ncol=3,  # 控制 图例所列的列数,默认值为1
               fancybox=True,  # 圆边
               shadow=True,  # 是否显示阴影
               fontsize=8)  # 字体大小
    plt.savefig('猫眼/maoyan_year.jpg')  # 保存为图片到本地
    plt.show()


# WordCloud()
# Histogram()
Piehart()
