WebPack4接入TypeScript开发
接入TypeScript
1、添加开发依赖
npm install --save-dev typescript awesome-typescript-loader source-map-loader
2、创建 tsconfig.json 文件:
./node_modules/.bin/tsc --init
3、安装@types/react,@types/react-dom
npm install @types/react @types/react-dom --save
4、添加webpack的loader
npm install awesome-typescript-loader -D
npm install source-map-loader -D
5、编辑tsconfig.json
{
  "compilerOptions": {
    /* Basic Options */
    "target": "es5",                          /* Specify ECMAScript target version: 'ES3' (default), 'ES5', 'ES2015', 'ES2016', 'ES2017', 'ES2018', 'ES2019' or 'ESNEXT'. */
    "module": "commonjs",                     /* Specify module code generation: 'none', 'commonjs', 'amd', 'system', 'umd', 'es2015', or 'ESNext'. */
    "jsx": "react",                           /* Specify JSX code generation: 'preserve', 'react-native', or 'react'. */
    "sourceMap": true,                        /* Generates corresponding '.map' file. */
    "outDir": "./dist/",                      /* Redirect output structure to the directory. */
    "strict": true,                           /* Enable all strict type-checking options. */
    "esModuleInterop": true                   /* Enables emit interoperability between CommonJS and ES Modules via creation of namespace objects for all imports. Implies 'allowSyntheticDefaultImports'. */
  },
  "include": [
    "./src/**/*"
  ]
}
6、 编辑 webpack.typescript.js
6.1 添加tsloader , source-map-loader
6.2 添加reslove,设置文件后缀补全顺序
const path = require('path');
const HtmlWebpackPlugin = require('html-webpack-plugin');
const CleanWebpackPlugin = require('clean-webpack-plugin');


module.exports = {
  mode: 'development',
  entry: './src/index.tsx',
  output: {
    path: path.resolve(__dirname, 'dist'),
    filename: 'index.js'
  },
  devtool: "source-map",
  devServer: {
    contentBase: path.resolve(__dirname, 'build'),
    compress: true,
    port: 8080
  },
  optimization: {
    splitChunks: {
      // include all types of chunks
      chunks: 'all'
    }
  },
  plugins: [
    new CleanWebpackPlugin(),
    new HtmlWebpackPlugin({
      title: 'Output manager',
      template: './src/index.html'
    })
  ],
  module: {
    rules: [
      {
        test: /\.ts[x]?$/,
        loader: "awesome-typescript-loader"
      },
      {
        enforce: "pre",
        test: /\.ts[x]$/,
        loader: "source-map-loader"
      },
      {
        test: /\.(js|jsx)$/,
        exclude: /(node_modules|bower_components)/,
        use: {
          loader: 'babel-loader',
          options: {
            presets: ['@babel/preset-env']
          }
        }
      },
    ]
  },
  resolve: {
    extensions: [".ts", ".tsx", ".js", ".json", ".png"],
  },
}
7、 创建一个TypeScript组件
import * as React from "react";
export interface HelloProps {
compiler: string;
framework: string;
}
export const Hello = (props: HelloProps) => Hello from {props.compiler} and {props.framework}!
;
8、 创建一个TypeScript入口文件
import * as React from "react";
import * as ReactDOM from "react-dom";
import { Hello } from "./components/Hello";
ReactDOM.render(
9、 在package.json的script中添加一条命令buildTS
  "scripts": {
    "buildTS": "./node_modules/.bin/webpack-cli --config webpack.typescript.js",
  },
10、编译输出页面
npm run buildTS
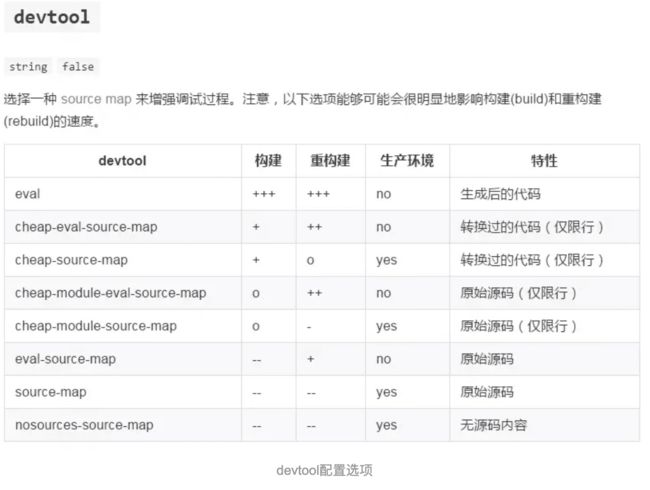
11、使用sourceMap调试
devtool: "source-map",
然而vue-cli脚手架搭建的工程,开发环境使用的是eval-source-map,生产环境用的是source-map。不管怎么说的,其实用起来感觉都差不多。但是,直接将sourceMap放入打包后的文件,会明显增大文件的大小,不利于静态文件的快速加载;而外联.map时,.map文件只会在F12开启时进行下载(sourceMap主要服务于调试),故推荐使用外联.map的形式。
参考文档: sourceMap文档
12、使用devServer开发
安装webpack-dev-server,?代码可以自动更新。
npm install --save-dev webpack-dev-server
webpack-dev-server有很多的配置项,其中之一是--config,这个可以让我们启动多个server,因为每一个-dev-server相关的配置都在--config配置的webpack.config.js中指定。
"scripts": {
    "startTS": "webpack-dev-server --open --color --hot --config webpack.config.js",
  },
13、安装antd-mobile
antd-mobile
$ npm install antd-mobile --save
这里刚开始的时候,总是在提示babel相关的错误,找不到babel-core或者找不到babel-loader,一开始按照常规思路,缺什么装什么,后来发现,这似乎是永无止境。那么及时的调整思路,
- 先去google上看看,发现好多人说是babel升级到7导致的。但是按照上面的建议处理后,发现没有效果。
- 把babel的错误,复制出来,百度看看, 发现有一个哥们遇到了这个问题,他的解决方法如下:
npm install -D babel-loader @babel/core @babel/preset-env webpack
不过我第一次装了之后发现没用,后来干脆把package.json中的babel-loader、@babel/core都删掉,然后执行这条命令,发现可以了。
这个步骤,其实可以换种思路,当我们发现这些问题的时候,应该有如下几种思路:
1. 去搜索引擎搜索
2. 去插件的官网查看,最近有没有版本升级,以及这个插件的原理是什么
3. 是在没办法,就去查看插件的源码,当然这是很花费时间的
14、使用typeScript开发项目
15、接入F2图表
1)、 安装F2图表
npm install @antv/f2 --save
2)、 使用F2图表
const F2 = require('@antv/f2');
3)、实现第一个组件
import React from 'react';
const F2 = require('@antv/f2');

class SimpleChart extends React.Component{
    constructor(props){
        super(props);
        // F2 对数据源格式的要求,仅仅是 JSON 数组,数组的每个元素是一个标准 JSON 对象。
        this.state = {
            data : [
                { genre: 'Sports', sold: 275 },
                { genre: 'Strategy', sold: 115 },
                { genre: 'Action', sold: 120 },
                { genre: 'Shooter', sold: 350 },
                { genre: 'Other', sold: 150 },
            ]
        };
    }

    componentDidMount() {
        // Step 1: 创建 Chart 对象
        this.chart = new F2.Chart({
            id: 'myChart',
            pixelRatio: window.devicePixelRatio // 指定分辨率
        });
        // Step 2: 载入数据源
        this.chart.source(this.state.data);
        // Step 3:创建图形语法,绘制柱状图,由 genre 和 sold 两个属性决定图形位置,genre 映射至 x 轴,sold 映射至 y 轴
        this.chart.interval().position('genre*sold').color('genre');
        // Step 4: 渲染图表
        this.chart.render();
    }

    render(){
        return (

        );
    }
}


export default SimpleChart;
4)、使用React Hooks实现
import React, { useState, useEffect } from 'react';
// import { useState, useEffect } from 'react';
const F2 = require('@antv/f2');

function SimpleChartHooks(){
    const myRef = React.createRef();
     // F2 对数据源格式的要求,仅仅是 JSON 数组,数组的每个元素是一个标准 JSON 对象。
    const [data, setdata] = useState(
      [
            { genre: 'Sports', sold: 275 },
            { genre: 'Strategy', sold: 115 },
            { genre: 'Action', sold: 120 },
            { genre: 'Shooter', sold: 350 },
            { genre: 'Other', sold: 150 },
        ]
    );

    useEffect(() => {
        console.log(myRef,myRef.current.id, data);
        // Step 1: 创建 Chart 对象
        const chart = new F2.Chart({
            id: 'myChart2',
            pixelRatio: window.devicePixelRatio // 指定分辨率
        });
        // Step 2: 载入数据源
        chart.source(data);
        // Step 3:创建图形语法,绘制柱状图,由 genre 和 sold 两个属性决定图形位置,genre 映射至 x 轴,sold 映射至 y 轴
        chart.interval().position('genre*sold').color('red');
        // Step 4: 渲染图表
        chart.render();
    });

    return (

    );

}

export default SimpleChartHooks;
16、ReactHooks使用
16.1、使用RectHooks开发一个组件
16.2、使用ReactHooks更新数据状态
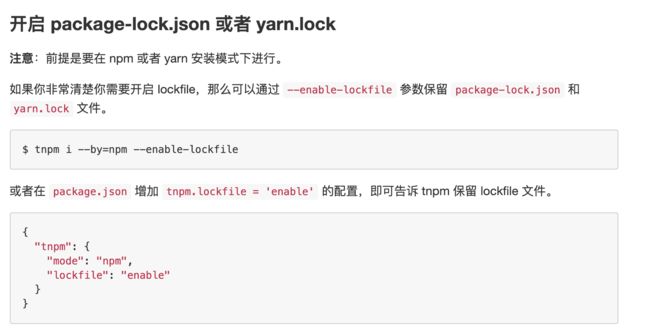
17、开启package-lock.json
之前一直以为是npm的问题,然后一直按照这个思路走,结果总是不对。其实这种思考方式太线性了。首先我们要清楚整个业务有多少个步长,然后一步一步去排查问题。否则很难快速定位到问题的所在。
18、在webpack项目中使用Loader要注意的点
在rules中的配置
  {
    test: /\.tsx?$/,
    use: [
      {
        loader: 'babel-loader',
        options: babelrc
      },
      {
        loader: 'ts-loader'
      },
    ]
  },
注意TypeScript导出的类型,可能是const。
19、处理scss文件
使用样式文件
import * as React from "react";
import styles from './index.scss'

export interface HelloProps {
    compiler: string;
    framework: string;
}

export const Hello = (props: HelloProps) => {
    return (

            Hello from {props.compiler} and {props.framework}!

    );
};
加载规则
const typingsForCssModulesLoaderConf = {
  loader: 'typings-for-css-modules-loader',
  options: {
    modules: true,
    namedExport: true,
    camelCase: true,
    sass: true
  },
};
多个loader综合配置
 {
    test: /\.[s]*css/,
    use: ExtractTextPlugin.extract({
      fallback: 'style-loader',
      use: [typingsForCssModulesLoaderConf,'sass-loader'],
    }),
  },
20、如何处理结构化的scss文件
本地安装sass-loader ,然后再loader中使用就可以了。
TypeScript使用scss


