大部分的App都会用的推送,看到这篇文章的人应该都明白什么是推送和推送的原理了,我就抛砖引玉讲讲极光推送使用的步骤吧。见笑了!
首先你要去极光的官网去申请自己的应用,然后他会给你自己应用的AppKey,这个是我们所需要的,然后去推送按照步骤将开发者证书上传上去,如图:
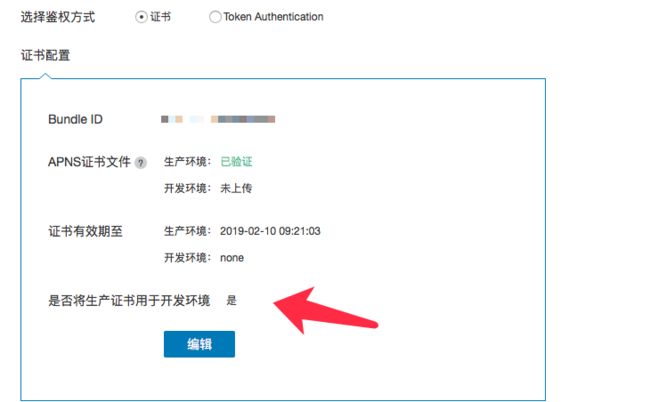
B1891C53-7F93-47E8-B958-D99B772D4529.png
现在生产环境的证书也可用于开发环境了。后台可以控制的。
好,一切准备就绪,开始敲代码!
在AppDelegate.h
static NSString *appKey = @"";// 极光给你返回的apKey
static NSString *channel = @"";//APP销售路径( 自己的理解) 一般都填APP Store
#ifdef DEBUG
// 开发 极光FALSE为开发环境
static BOOL const  isProduction = FALSE;
#else
// 生产 极光TRUE为生产环境
static BOOL const  isProduction = TRUE;
.m
// iOS10注册APNs所需头文件
#ifdef NSFoundationVersionNumber_iOS_9_x_Max
#import
#endif  //写在实现的上面
- (BOOL)application:(UIApplication *)application didFinishLaunchingWithOptions:(NSDictionary *)launchOptions {
if ([[UIDevice currentDevice].systemVersion floatValue] >= 10.0) // iOS10
    {
#ifdef NSFoundationVersionNumber_iOS_9_x_Max
        JPUSHRegisterEntity *entity = [[JPUSHRegisterEntity alloc] init];
        entity.types = (UNAuthorizationOptionAlert | UNAuthorizationOptionBadge | UNAuthorizationOptionSound);
        [JPUSHService registerForRemoteNotificationConfig:entity delegate:self];
#endif
    }
    else if ([[UIDevice currentDevice].systemVersion floatValue] >= 8.0)
    {
        // categories
        [JPUSHService registerForRemoteNotificationTypes:(UIUserNotificationTypeBadge | UIUserNotificationTypeSound | UIUserNotificationTypeAlert)
                                              categories:nil];
    }
    else
    {
        // categories nil
        [JPUSHService registerForRemoteNotificationTypes:(UIRemoteNotificationTypeBadge | UIRemoteNotificationTypeSound | UIRemoteNotificationTypeAlert)
                                              categories:nil];
    }
    [JPUSHService setupWithOption:launchOptions appKey:appKey channel:channel apsForProduction:isProduction];
    [JPUSHService registrationIDCompletionHandler:^(int resCode, NSString *registrationID) {
        if (resCode == 0) {
            NSLog(@"registrationID获取成功:%@",registrationID);
            [[NSUserDefaults standardUserDefaults] setObject:registrationID forKey:@"registrationID"];
            [[NSUserDefaults standardUserDefaults] synchronize];
        }else {
            NSLog(@"registrationID获取失败:%d",resCode);
        }
    }];
 NSDictionary *resultDic = [launchOptions objectForKey: UIApplicationLaunchOptionsRemoteNotificationKey];

    if (resultDic) {//推送进入APP

        NSLog(@"app未启动,推送进入,直接显示预警界面");

        //相应界面跳转方法

    }else{//正常进入APP

    }
}
- (void)applicationDidEnterBackground:(UIApplication *)application {
    // Use this method to release shared resources, save user data, invalidate timers, and store enough application state information to restore your application to its current state in case it is terminated later.
    // If your application supports background execution, this method is called instead of applicationWillTerminate: when the user quits.
    [self cleanBadge];
}


- (void)applicationWillEnterForeground:(UIApplication *)application {
    // Called as part of the transition from the background to the active state; here you can undo many of the changes made on entering the background.
    [self cleanBadge];
    [application cancelAllLocalNotifications];


}

- (void)application:(UIApplication *)application didRegisterForRemoteNotificationsWithDeviceToken:(nonnull NSData *)deviceToken {
    NSLog(@"%@",[NSString stringWithFormat:@"Device Token:%@",deviceToken]);
    [JPUSHService registerDeviceToken:deviceToken];
}
- (void)application:(UIApplication *)application
didFailToRegisterForRemoteNotificationsWithError:(NSError *)error {
    NSLog(@"did Fail To Register For Remote Notifications With Error: %@", error);
}

//程序无论在前后台都会执行这个方法
- (void)application:(UIApplication *)application
didReceiveRemoteNotification:(NSDictionary *)userInfo
fetchCompletionHandler:(void (^)(UIBackgroundFetchResult))completionHandler {
    [JPUSHService handleRemoteNotification:userInfo];
    NSLog(@"iOS7及以上系统,收到通知:%@", userInfo);


        //[rootViewController addNotificationCount];
        if ([UIApplication sharedApplication].applicationState == UIApplicationStateActive) {
            //处于前台
            NSLog(@"前台");
        }else if ([UIApplication sharedApplication].applicationState == UIApplicationStateBackground) {
            //处于后台
               NSLog(@"后台");
            [self goToMessageViewControllerWithDic:userInfo];
        }


    completionHandler(UIBackgroundFetchResultNewData);
}

#ifdef NSFoundationVersionNumber_iOS_9_x_Max
#pragma mark- JPUSHRegisterDelegate
- (void)jpushNotificationCenter:(UNUserNotificationCenter *)center willPresentNotification:(UNNotification *)notification withCompletionHandler:(void (^)(NSInteger))completionHandler {
    NSDictionary * userInfo = notification.request.content.userInfo;

    UNNotificationRequest *request = notification.request; // 收到推送的请求
    UNNotificationContent *content = request.content; // 收到推送的消息内容

    NSNumber *badge = content.badge;  // 推送消息的角标
    NSString *body = content.body;    // 推送消息体
    UNNotificationSound *sound = content.sound;  // 推送消息的声音
    NSString *subtitle = content.subtitle;  // 推送消息的副标题
    NSString *title = content.title;  // 推送消息的标题

    if([notification.request.trigger isKindOfClass:[UNPushNotificationTrigger class]]) {
        [JPUSHService handleRemoteNotification:userInfo];
        NSLog(@"iOS10 前台收到远程通知:%@", userInfo);
        if ([UIApplication sharedApplication].applicationState == UIApplicationStateActive) {
            //程序运行时收到通知,先弹出消息框
            NSLog(@"程序在前台");


        }

        else{
            //跳转到指定页面
            [self goToMessageViewControllerWithDic:userInfo];
            //这里也可以发送个通知,跳转到指定页面
            // [self readNotificationVcWithUserInfo:userInfo];
        }

    }
    else {
        // 判断为本地通知
        NSLog(@"iOS10 前台收到本地通知:{\nbody:%@,\ntitle:%@,\nsubtitle:%@,\nbadge:%@,\nsound:%@,\nuserInfo:%@\n}",body,title,subtitle,badge,sound,userInfo);
    }
    completionHandler(UNNotificationPresentationOptionBadge|UNNotificationPresentationOptionSound|UNNotificationPresentationOptionAlert); // 需要执行这个方法,选择是否提醒用户,有Badge、Sound、Alert三种类型可以设置
}
//只有点击消息推送之后才会进来,获取推送内容,跳转页面,都在这个回调里边
- (void)jpushNotificationCenter:(UNUserNotificationCenter *)center didReceiveNotificationResponse:(UNNotificationResponse *)response withCompletionHandler:(void (^)())completionHandler {

    NSDictionary * userInfo = response.notification.request.content.userInfo;
    UNNotificationRequest *request = response.notification.request; // 收到推送的请求
    UNNotificationContent *content = request.content; // 收到推送的消息内容

    NSNumber *badge = content.badge;  // 推送消息的角标
    NSString *body = content.body;    // 推送消息体
    UNNotificationSound *sound = content.sound;  // 推送消息的声音
    NSString *subtitle = content.subtitle;  // 推送消息的副标题
    NSString *title = content.title;  // 推送消息的标题

    if([response.notification.request.trigger isKindOfClass:[UNPushNotificationTrigger class]]) {
        [JPUSHService handleRemoteNotification:userInfo];
        NSLog(@"iOS10 收到远程通知:%@", userInfo);
        //[rootViewController addNotificationCount];
        //跳到指定页面
        if ([UIApplication sharedApplication].applicationState == UIApplicationStateActive) {
            //程序运行时收到通知,先弹出消息框
            NSLog(@"程序在前台");
              [self goToMessageViewControllerWithDic:userInfo];
        }

        else{
            //跳转到指定页面
            [self goToMessageViewControllerWithDic:userInfo];

        }

    }
    else {
        // 判断为本地通知
        NSLog(@"iOS10 收到本地通知:{\nbody:%@,\ntitle:%@,\nsubtitle:%@,\nbadge:%@,\nsound:%@,\nuserInfo:%@\n}",body,title,subtitle,badge,sound,userInfo);
    }

    completionHandler();  // 系统要求执行这个方法
}
#endif
- (void)application:(UIApplication *)application didReceiveRemoteNotification:(NSDictionary *)userInfo {

    // Required,For systems with less than or equal to iOS6
    [JPUSHService handleRemoteNotification:userInfo];

}
- (void)applicationWillTerminate:(UIApplication *)application {
    // Called when the application is about to terminate. Save data if appropriate. See also applicationDidEnterBackground:.
}
// 清空通知标志
- (void)cleanBadge{

    [[UIApplication sharedApplication]setApplicationIconBadgeNumber:0];

    [JPUSHService setBadge:0];
     [[UIApplication sharedApplication]cancelAllLocalNotifications];//取消任何通知标志

}
- (void)goToMessageViewControllerWithDic:(NSDictionary *)userInfo {
    //将字段存入本地,因为要在你要跳转的页面用它来判断,这里我只介绍跳转一个页面,
    NSUserDefaults *pushJudge = [NSUserDefaults standardUserDefaults];
    [pushJudge setObject:@"push"forKey:@"push"];
    [pushJudge synchronize];
// 这个是我要跳到的聊天页面 (你的目标页面)
    JYJ_ChatViewController *chatVC = [[JYJ_ChatViewController alloc]init];
    chatVC.tag = 4;
    chatVC.notify_id = [[NSString stringWithFormat:@"%@",userInfo[@"notify_id"]] intValue];
    BaseNavigationController * Nav = [[BaseNavigationController alloc]initWithRootViewController:chatVC];//这里加导航栏是因为我跳转的页面带导航栏,如果跳转的页面不带导航,那这句话请省去。
    [self.window.rootViewController presentViewController:Nav animated:YES completion:nil];

}
好代码完成了,很简单吧,毕竟用的三方SDK,人家逻辑基本给你写好了,只是调用他们的方法。
别忘了这个步骤:

8DEE8286-763E-4165-8326-EBEABEC34905.png
这两个一定要打开。然后你的项目中会出现这样的文件
B1D5873F-6482-4E59-A698-F97559D56865.png
如果以上步骤你都成功了,OK全部完事了,切记一定要用真机去测试,因为苹果那边需要你的设备号,根据你的设备号去推送消息。
好了 这是这些,希望对大家有所帮助!菜鸡一枚,学习ing!
对了把我遇到坑说一下:
安卓那边能收到推送,但是我这边就是收不到,后台也没管,后来我看了一下极光推送的文档,问了一下后台设置的推送环境,。。。我在DEBUG环境测试的推送也就是开发环境,后台用的是生产环境,后台改完就好了,上线了再让后台改过来就好了!