Android自定义Dialog,炫酷主流的加载对话框
前言
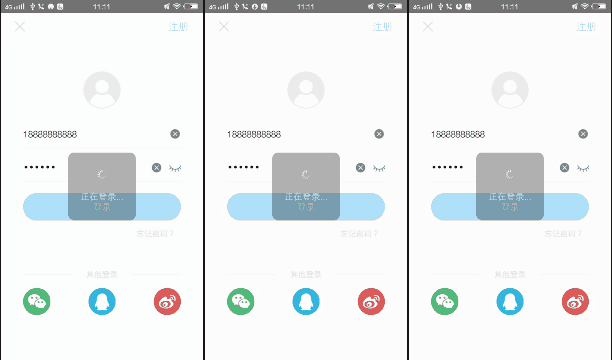
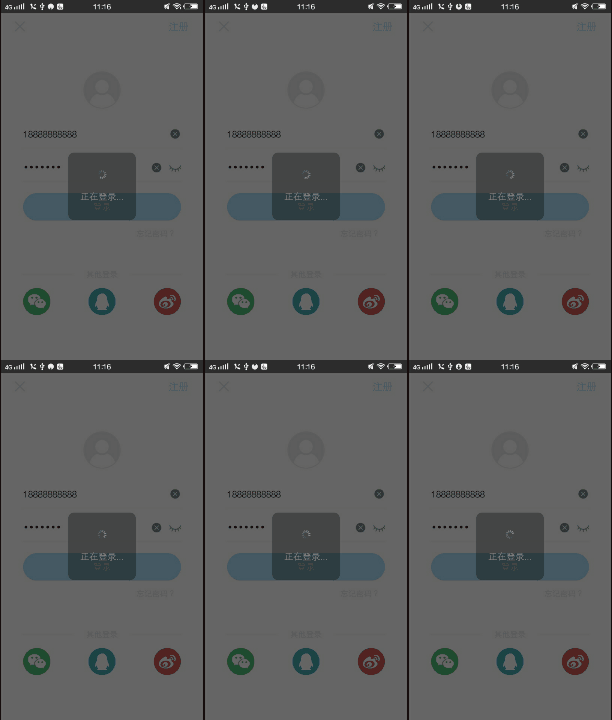
最近开发中用到许多对话框,之前都是在外面的代码中创建AlertDialog并设置自定义布局实现常见的对话框,诸如更新提示等含有取消和删除两个按钮的对话框我们可以通过代码创建一个AlertDialog并通过它暴露的一系列方法设置我们自定义的布局和style,但有时候系统的AlertDialog并不能实现更好的定制,这时,我们就想到了自定义Dialog。通过查看AlertDialog的类结构发现它也是继承于Dialog,于是我们也可以通过继承Dialog实现我们自定义的Dialog。这篇文章将介绍如何定制当今主流的对话框,先上效果图,给大家养养眼。
代码实现
1、编写自定义布局,dialog_loading.xml
<LinearLayout xmlns:android="http://schemas.android.com/apk/res/android"
             android:orientation="vertical"
             android:layout_width="match_parent"
             android:gravity="center"
             android:background="@drawable/bg_loading_dialog"
             android:layout_height="match_parent">

   <ImageView
       android:id="@+id/iv_loading"
       android:layout_width="wrap_content"
       android:src="@mipmap/ic_dialog_loading"
       android:layout_height="wrap_content"/>

   <TextView
       android:id="@+id/tv_loading"
       android:layout_width="wrap_content"
       android:layout_marginTop="20dp"
       android:text="@string/loading"
       android:textSize="16sp"
       android:textColor="@android:color/white"
       android:layout_height="wrap_content"/>

LinearLayout>
2、继承Dialog,覆盖构造方法
public class LoadingDialog extends Dialog {

    private static final String TAG = "LoadingDialog";

    private String mMessage; // 加载中文字
    private int mImageId; // 旋转图片id
    private boolean mCancelable;
    private RotateAnimation mRotateAnimation;

    public LoadingDialog(@NonNull Context context,String message,int imageId) {
        this(context,R.style.LoadingDialog,message,imageId,false);
    }

    public LoadingDialog(@NonNull Context context, int themeResId,String message,int imageId,boolean cancelable) {
        super(context, themeResId);
        mMessage = message;
        mImageId = imageId;
        mCancelable = cancelable;
    }
}
3、覆盖onCreate(),初始化控件
@Override
protected void onCreate(Bundle savedInstanceState) {
    super.onCreate(savedInstanceState);
    initView();
}

private void initView() {
    setContentView(R.layout.dialog_loading);
    // 设置窗口大小
    WindowManager windowManager = getWindow().getWindowManager();
    int screenWidth = windowManager.getDefaultDisplay().getWidth();
    WindowManager.LayoutParams attributes = getWindow().getAttributes();
    // 设置窗口背景透明度
    attributes.alpha = 0.3f;
    // 设置窗口宽高为屏幕的三分之一(为了更好地适配,请别直接写死)
    attributes.width = screenWidth/3;
    attributes.height = attributes.width;
    getWindow().setAttributes(attributes);
    setCancelable(mCancelable);

    TextView tv_loading = findViewById(R.id.tv_loading);
    ImageView iv_loading = findViewById(R.id.iv_loading);
    tv_loading.setText(mMessage);
    iv_loading.setImageResource(mImageId);
    // 先对imageView进行测量,以便拿到它的宽高(否则getMeasuredWidth为0)
    iv_loading.measure(0,0);
    // 设置选择动画
    mRotateAnimation = new RotateAnimation(0,360,iv_loading.getMeasuredWidth()/2,iv_loading.getMeasuredHeight()/2);
    mRotateAnimation.setInterpolator(new LinearInterpolator());
    mRotateAnimation.setDuration(1000);
    mRotateAnimation.setRepeatCount(-1);
    iv_loading.startAnimation(mRotateAnimation);
}
以上代码需要注意设置动画旋转中心坐标为我们imageView的中心点,需要先对imageView进行测量,同时初始化布局的操作请放在onCreate()方法中(别直接在构造方法中初始化布局,这样可以在Dialog要显示的时候才初始化,即调用show方法)。
4、其他
@Override
public void dismiss() {
    mRotateAnimation.cancel();
    super.dismiss();
}

@Override
public boolean onKeyDown(int keyCode, @NonNull KeyEvent event) {
    if(keyCode == KeyEvent.KEYCODE_BACK){
        // 屏蔽返回键
        return mCancelable;
    }
    return super.onKeyDown(keyCode, event);
}
这一步需要注意的是我们Dialog在显示的时候就会无限重复(setRepeatCount(-1))执行旋转动画,因此在Dialog消失的时候我们要取消动画,而屏蔽返回键则是为了更好地让窗口的关闭被我们的mCancelable控制。
看到这里你或许想知道我们设置的布局背景drawable,如下:
<shape xmlns:android="http://schemas.android.com/apk/res/android">
    <corners android:radius="10dp">corners>
    <solid android:color="@android:color/black"/>
shape>
你可以自己设置你想要的圆角大小,也可以设置背景颜色(会被透明处理,根据我们为窗口设置的透明度)。
当然,仔细的你会发现我们还少了一些必要的配置,那就是窗口的style,如下:
<style name="LoadingDialog" parent="@android:style/Theme.Holo.Dialog.NoActionBar">
<item name="android:windowBackground">@android:color/transparent
- "android:backgroundDimEnabled"
>false
style>- android:windowBackground:设置窗口的背景,这里设为透明;
- android:backgroundDimEnabled:设置窗口是否变暗(true变暗,false不变暗,见效果图1和2)。
最后奉上这篇文章的github:https://github.com/ydxlt/LoadingDialog

