Win10快速搭建TensorFlow, Keras与PyTorch深度学习环境
目录
版本信息
安装步骤
Step#1 安装Anaconda3 5.3.0(64bit)
Step#2 将Anaconda添加至环境变量
Step#3 打开Anaconda Prompt
Step#4 修改Anaconda的软件源为清华镜像
Step#5 修改Python版本为3.6.7
Step#6 创建虚拟环境tf1
Step#7 激活tf1环境&安装TensorFlow
Step#8 检查TensorFlow是否正确安装【代码】
Step#9 安装Keras2.2.4
Step#10 检查Keras是否正确安装【代码】
Step#11 创建PyTorch环境pt & 安装PyTorch与TorchVision
Step#12 检查PyTorch是否正确安装【代码】
版本信息
软件版本建议使用笔者的,这是笔者摸索许久得出的经验。
| 软件 | 版本 |
| Anaconda3 | 5.3.0(64bit) |
| Python | 3.6.7 |
| TensorFlow | 1.12 |
| Keras | 2.2.4 |
| PyTorch | 1.0 |
| TorchVision | 0.2.1 |
Anaconda搭建完如上环境,在PyCharm中如何使用,请参考另外一篇文章《如何在PyCharm中选择并使用Anaconda建立的TensorFlow、Keras和PyTorch Python环境》。
安装步骤
Step#1 安装Anaconda3 5.3.0(64bit)
Anaconda是基于Python的科学计算与数据处理的软件包,自带Python运行环境,所以不需要再额外安装Python3.
默认安装pip, python, readline, setuptools, sqlite, tk, wheel, xz, zlib, matplotlib,scikit-learn等模块。
Anaconda好处:模块不会重复安装,只会链接过去,不用重新下载
32位与64位的问题依据个人电脑配置来,笔者的是64位的电脑。
Step#2 将Anaconda添加至环境变量
笔者电脑C盘空间有限,就将Anaconda安装在D盘了
D:\anaconda3
D:\anaconda3\Scripts
D:\anaconda3\Library\bin
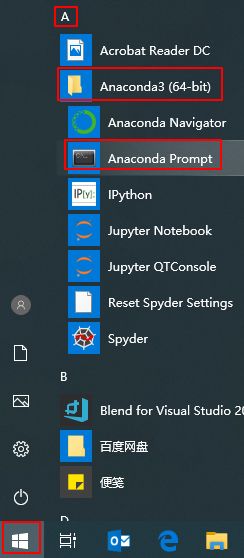
Step#3 打开Anaconda Prompt
后续所有命令行操作都是在此环境下执行
Step#4 修改Anaconda的软件源为清华镜像
访问Anaconda官网下载速度会比较慢,或者有问题,修改软件源为国内的映像网站。
前一段时间清华镜像用不了,中科大的可以用。现在(2019/10/08)清华镜像已经可以使用。
# 添加清华镜像源
conda config --add channels https://mirrors.tuna.tsinghua.edu.cn/anaconda/pkgs/free/
conda config --set show_channel_urls yes        #生成.condarc配置文件
在这里修改镜像源C:\Users\user_name\.condarc
下面是我收集的网址:
修改为清华镜像
- https://mirrors.tuna.tsinghua.edu.cn/anaconda/pkgs/free/
- https://mirrors.tuna.tsinghua.edu.cn/anaconda/pkgs/main/
- https://mirrors.tuna.tsinghua.edu.cn/anaconda/pkgs/free/win-64
- https://mirrors.tuna.tsinghua.edu.cn/anaconda/pkgs/free/noarch
- https://mirrors.tuna.tsinghua.edu.cn/anaconda/pkgs/main/win-64
- https://mirrors.tuna.tsinghua.edu.cn/anaconda/pkgs/main/noarch
修改为中科大的镜像
- https://mirrors.ustc.edu.cn/anaconda/pkgs/free/
- https://mirrors.ustc.edu.cn/anaconda/pkgs/main/
- https://mirrors.ustc.edu.cn/anaconda/pkgs/free/
- https://mirrors.ustc.edu.cn/anaconda/cloud/conda-forge/
- https://mirrors.ustc.edu.cn/anaconda/cloud/msys2/
- https://mirrors.ustc.edu.cn/anaconda/cloud/bioconda/
新版ubuntu要求使用https源,要注意。
清华:https://pypi.tuna.tsinghua.edu.cn/simple
中国科技大学 https://pypi.mirrors.ustc.edu.cn/simple/
阿里云:http://mirrors.aliyun.com/pypi/simple/
华中科技大学:http://pypi.hustunique.com/
山东理工大学:http://pypi.sdutlinux.org/
豆瓣:http://pypi.douban.com/simple/
网易:http://mirrors.163.com/
阿里云:http://mirrors.aliyun.com/ 同步频率为每天一次,每天凌晨2:00-4:00为镜像的同步时间
搜狐:http://mirrors.sohu.com/
原文:https://blog.csdn.net/leviopku/article/details/80113021
Step#5 修改Python版本为3.6.7
Anaconda3 5.3.0(64bit)自带的是3.7版Python,需要降版本至3.6.7
conda install python=3.6.7 # 安装python,指定版本为3.6.7Step#6 创建虚拟环境tf1
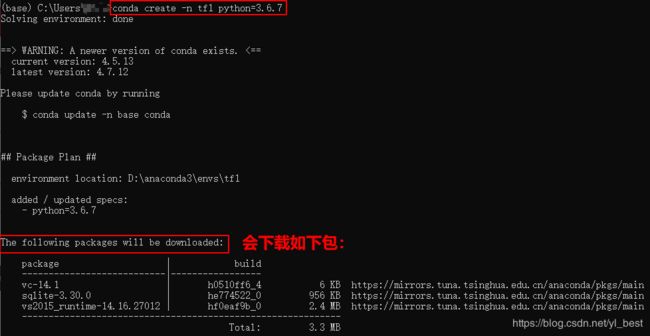
创建一个叫“tf1”的虚拟环境,基于Python3.6.7,之后会安装的是tensorflow1.12
名字不要起得太长,自己可以记住就行,后面还会使用到这个名字。
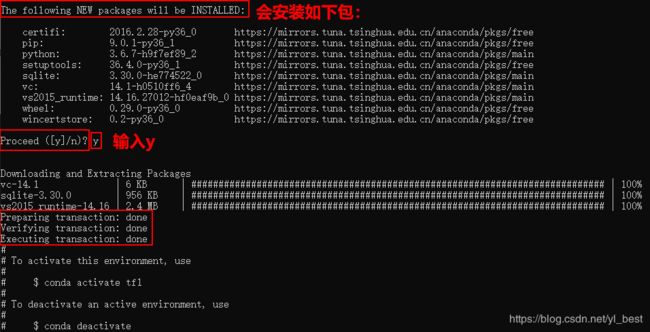
conda create -n tf1 python=3.6.7然后输入y,等待一段时间,虚拟环境tf1创建完成。
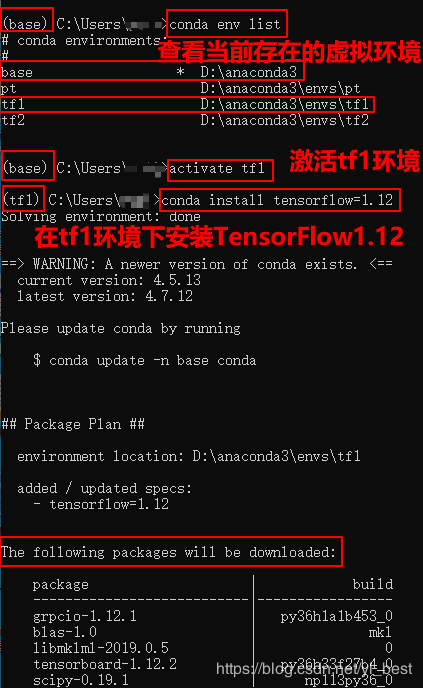
Step#7 激活tf1环境&安装TensorFlow
会下载&安装如下包:
Step#8 检查TensorFlow是否正确安装【代码】
import tensorflow as tf
se = tf.Session()
ar1 = tf.ones([2,3])
se.run(ar1)
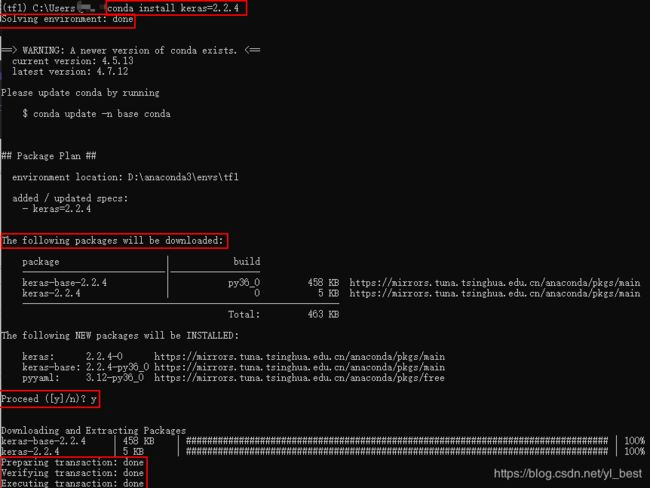
Step#9 安装Keras2.2.4
conda install keras=2.2.4Step#10 检查Keras是否正确安装【代码】
步骤和检查TensorFlow一样,如下图
from keras.models import Sequential记得最后输入deactivate退出tf1环境,为下面安装PyTorch做准备
Step#11 创建PyTorch环境pt & 安装PyTorch与TorchVision
torchvision 作用
1. 提供主流的model,和常用数据集
2. 对 torch.utils.data.Dataset进行扩充,针对不同类别图像放入不同文件夹的数据进行读取, torchvision.datasets.ImageFolder是torch.utils.data.Dataset 的子类。
3.提供transforms
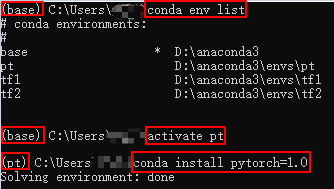
在命令行输入的指令如下:
conda create -n pt python=3.6.7  # 创建一个pt环境,基于Python3.6.7,后续会安装PyTorch1.0
conda env list                   # 查看当前存在的环境
activate pt                      # 激活pt环境
conda install pytorch=1.0        # 安装PyTorch 1.0版
pip install torchvision==0.2.1   # Anaconda不支持TorchVision,所以使用pip指令安装
如果直接使用指令pip install torchvision安装,会报错误
Could not find a version that satisfies the requirement torch>=1.1.0 (from torchvision) (from versions: 0.1.2, 0.1.2.post1, 0.1.2.post2)
No matching distribution found for torch>=1.1.0 (from torchvision)
笔者说明:我们之前已经安装了PyTorch1.0,而torchvision要求PyTorch>=1.1.0
解决办法:安装TorchVision 0.2.1版,pip install torchvision==0.2.1
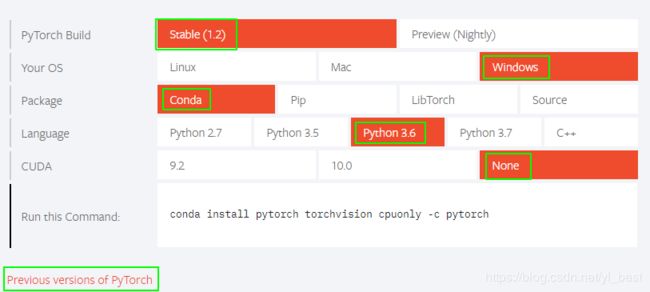
不想安装PyTorch1.0版本的可以去官网安装最新版(1.2)
在这个网址查看PyTorch安装指令
https://pytorch.org/
Step#12 检查PyTorch是否正确安装【代码】

import torch as t     # 导入Torch
a = t.zeros([2,3])    # 创建一个2x3的矩阵,其值全部为零
print(a)              # 输出矩阵
